2016 SUBARU WRX oil
[x] Cancel search: oilPage 379 of 594

Interior equipment/Accessory power outlets
trim can be used to hold a beverage bottle
and other items.
Accessory power outlets
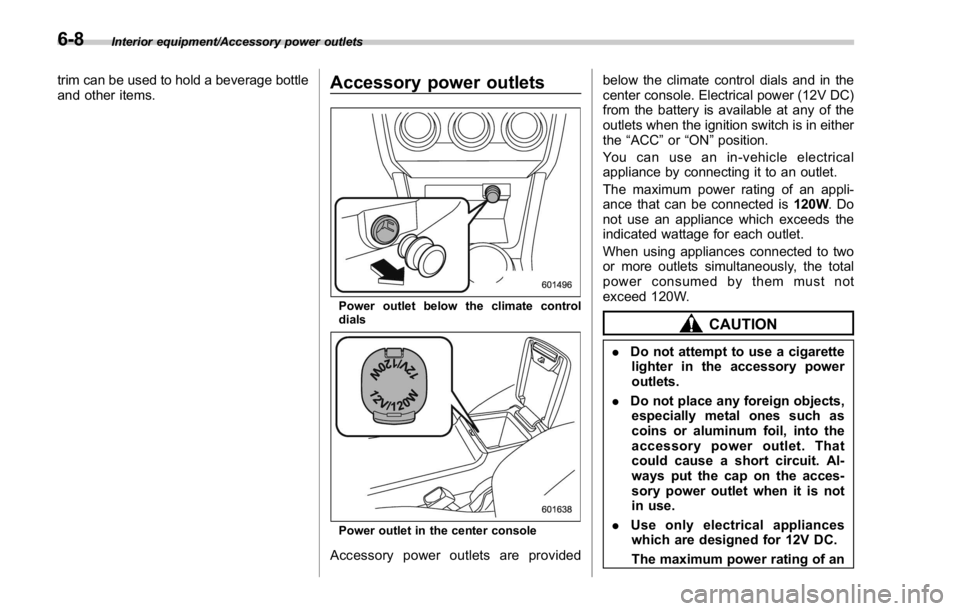
Power outlet below the climate control
dials
Power outlet in the center console
Accessory power outlets are provided below the climate control dials and in the
center console. Electrical power (12V DC)
from the battery is available at any of the
outlets when the ignition switch is in either
the “ ACC ” or “ ON ” position.
You can use an in-vehicle electrical
appliance by connecting it to an outlet.
The maximum power rating of an appli-
ance that can be connected is 120W .Do
not use an appliance which exceeds the
indicated wattage for each outlet.
When using appliances connected to two
or more outlets simultaneously, the total
power consumed by them must not
exceed 120W.
CAUTION. Do not attempt to use a cigarette
lighter in the accessory power
outlets.
. Do not place any foreign objects,
especially metal ones such as
coins or aluminum foil, into the
accessory power outlet. That
could cause a short circuit. Al-
ways put the cap on the acces-
sory power outlet when it is not
in use.
. Use only electrical appliances
which are designed for 12V DC.
The maximum power rating of an6-8
Page 398 of 594

CAUTIONTrapping small animals in the cool-
ing fan and belts of the engine may
result in a malfunction. Check that
no small animal enters the engine
compartment and under the vehicle
before starting the engine.
NOTE Engine oil, engine coolant, brake fluid,
washer fluid and other fluid levels
should be checked daily, weekly or at
fuel stops. Starting and stopping the
engine (models without
push-button start system) & Starting engine CAUTIONDo not operate the starter motor
continuously for more than 10 sec-
onds. If the engine fails to start after
operating the starter for 5 to 10
seconds, wait for 10 seconds or
more before trying again.
NOTE It may be difficult to start the engine
when the battery has been discon-
nected and reconnected (for mainte-
nance or other purposes). This diffi-
culty is caused by the electronically
controlled throttle ’ s self-diagnosis
function. To overcome it, keep the
ignition switch in the “ ON ” position
for approximately 10 seconds before
starting the engine. ! General precautions when starting
engine
WARNING. Never start the engine from out-
side the vehicle. It may result in
an accident.
. Do not leave the engine running
in locations with poor ventilation,
such as a garage and indoors.
The exhaust gas may enter the
vehicle or indoors, and it may
result in carbon monoxide poi-
soning.
. Do not start the engine near dry
foliage, paper, or other flam-
mable substances. The exhaust
pipe and exhaust emissions can
create a fire hazard at high
temperatures.
CAUTION
. If the engine is stopped during
driving, the catalyst may over-
heat and burn.Starting and operating/Starting and stopping the engine (models without push – button start system)
– CONTINUED –7-9
Page 408 of 594

as necessary; this helps to maintain a safe
speed and to extend brake pad life.
In this way, the engine provides a braking
effect. Remember, if you “ ride ” (over use)
the brakes while descending a hill, they
may overheat and not work properly.
The engine may, on rare occasions, knock
when the vehicle rapidly accelerates or
rapidly pulls away from a standstill. This
phenomenon is not an indication of a
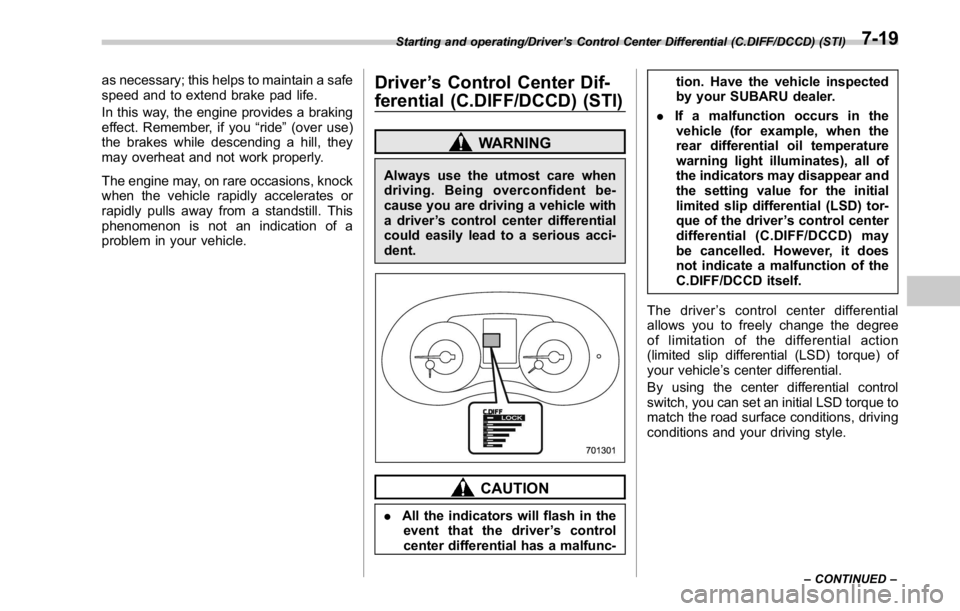
problem in your vehicle. Driver ’ s Control Center Dif-
ferential (C.DIFF/DCCD) (STI) WARNINGAlways use the utmost care when
driving. Being overconfident be-
cause you are driving a vehicle with
a driver ’ s control center differential
could easily lead to a serious acci-
dent.
CAUTION
. All the indicators will flash in the
event that the driver ’ s control
center differential has a malfunc- tion. Have the vehicle inspected
by your SUBARU dealer.
. If a malfunction occurs in the
vehicle (for example, when the
rear differential oil temperature
warning light illuminates), all of
the indicators may disappear and
the setting value for the initial
limited slip differential (LSD) tor-
que of the driver ’ s control center
differential (C.DIFF/DCCD) may
be cancelled. However, it does
not indicate a malfunction of the
C.DIFF/DCCD itself.
The driver ’ s control center differential
allows you to freely change the degree
of limitation of the differential action
(limited slip differential (LSD) torque) of
your vehicle ’ s center differential.
By using the center differential control
switch, you can set an initial LSD torque to
match the road surface conditions, driving
conditions and your driving style.Starting and operating/Driver ’ s Control Center Differential (C.DIFF/DCCD) (STI)
– CONTINUED –7-19
Page 416 of 594

“ ” appears, downshifting is possible.
When both indicators appear, upshifting
and downshifting are both possible. When
the vehicle stops (for example, at traffic
signals), the downshift indicator turns off.
Gearshifts can be performed using the
shift paddle behind the steering wheel.
To upshift to the next higher gear position,
pull the shift paddle that has “ + ” indicated
on it. To downshift to the next lower gear
position, pull the shift paddle that has “ – ”
indicated on it.
To deselect the manual mode, return the
select lever to the “ D ” position from the “ M ”
position. CAUTIONDo not place or hang anything on
the shift paddles. Doing so may
result in accidental gear shifting.
NOTE Please read the following points care-
fully and bear them in mind when using
the manual mode.
. If you attempt to shift down when
the engine speed is too high, i.e., when
a downshift would push the tachometer
needle beyond the red zone, beeps will
be emitted to warn you that the down-
shift is not possible.
. If you attempt to shift up when the
vehicle speed is too low, the transmis-
sion will not respond.
. You can perform a skip-shift (for
example, from 4th to 2nd) by operating
the shift paddle twice in rapid succes-
sion.
. The transmission automatically se-
lects 1st gear when the vehicle stops
moving.
. If the temperature of the transmis-
sion fluid becomes too high, the “ AT
OIL TEMP ” warning light on the combi-
nation meter will illuminate. Immedi-
ately stop the vehicle in a safe location and let the engine idle until the warning
light turns off.
. By selecting the Sport Sharp (S#)
mode, upshifting will not occur auto-
matically. According to the road condi-
tions, shift change manually so that the
tachometer needle does not enter the
red zone. Also, if the engine revolu-
tions reach the specified number, the
fuel supply will be cut. In this case,
perform shift up operation.
& Shift lock function The shift lock function helps prevent the
improper operation of the select lever.
. The select lever cannot be operated
unless the ignition switch is turned to the
“ ON ” position and the brake pedal is
depressed.
. The select lever cannot be moved from
the “ P ” position to any other position
before the brake pedal is depressed.
Depress the brake pedal first, and then
operate the select lever.
. Only the “ P ” position allows you to turn
the ignition switch from the “ ACC ” position
to the “ LOCK ” / “ OFF ” position and remove
the key from the ignition switch.
. If the ignition switch is turned to the
“ LOCK ” / “ OFF ” position while the select
lever is in the “ N ” position, the select leverStarting and operating/Continuously variable transmission
– CONTINUED –7-27
Page 438 of 594

headed up the hill, the front wheels should
be turned away from the curb.
When facing downhill, the front wheels
should be turned into the curb.
WARNING
. Never leave unattended children
or pets in the vehicle. They could
accidentally injure themselves or
others through inadvertent op-
eration of the vehicle. Also, on
hot or sunny days, the tempera-
ture in a closed vehicle could
quickly become high enough to
cause severe or possibly fatal
injuries to people.
. Do not park the vehicle over
flammable materials such as dry grass, waste paper or rags, as
they may burn easily if they come
near hot engine or exhaust sys-
tem parts.
. Be sure to stop the engine if you
take a nap in the vehicle. If
engine exhaust gas enters the
passenger compartment, occu-
pants in the vehicle could die
from carbon monoxide (CO) con-
tained in the exhaust gas.
CAUTIONIf your vehicle has a front under-
spoiler and rear underspoiler (both
optional), pay attention to blocks
and other obstructions on the
ground when parking. The under-
spoilers could be damaged by con-
tact with them. Hill start assist system
(models without electronic
parking brake system) WARNING. The Hill start assist system is a
device only for helping the driver
to START the vehicle on an uphill
grade. To prevent accidents
when the vehicle is parked on a
slope, be sure to firmly set the
parking brake. When setting the
parking brake, make sure that the
vehicle remains stationary when
the clutch pedal (MT models) and
brake pedal (both MT and CVT
models) are released.
. Do not turn the ignition switch to
the “ LOCK ” / “ OFF ” position while
the Hill start assist system is
operating. The Hill start assist
system will be deactivated, caus-
ing an accident.
The Hill start assist system is a device to
make the following vehicle operations
easier.Starting and operating/Hill start assist system (models without electronic parking brake system)
– CONTINUED –7-49
Page 459 of 594

Driving tips/Driving precaution
conditions than a two wheel drive vehicle.
There is little difference in handling,
however, during extremely sharp turns or
sudden braking. Therefore, when driving
down a slope or turning corners, be sure
to reduce your speed and maintain an
ample distance from other vehicles.
. Always check the cold tire pressure
before starting to drive. The recom-
mended tire pressure is provided on the
tire placard, which is located under the
door latch on the driver ’ s side.
. Frequent driving of an AWD vehicle
under hard-driving conditions such as
steep hills or dusty roads will necessitate
more frequent replacement of the follow-
ing items than that specified in the
“ Warranty and Maintenance Booklet ” .
– Engine oil
– Brake fluid
– Rear differential gear oil
– Manual transmission oil (MT mod-
els)
– Continuously variable transmission
fluid (CVT models)
– Front differential gear oil (CVT
models)
. There are some precautions that you
must observe when towing your vehicle.
For detailed information, refer to “ Towing ”
F 9-12. Driving precaution Water entering the engine air intake or the
exhaust pipe or water splashing onto
electrical parts may damage your vehicle
and may cause it to stall. Never attempt to
drive through rushing water; regardless of
its depth, it can wash away the ground
from under your tires, resulting in possible
loss of traction and even vehicle rollover. Winter driving & Operation during cold
weather Carry some emergency equipment, such
as a window scraper, a bag of sand,
flares, a small shovel and jumper cables.
Check the battery and cables. Cold
temperatures reduce battery capacity.
The battery must be in good condition to
provide enough power for cold winter
starts.
It normally takes longer to start the engine
in very cold weather conditions. Use an
engine oil of a proper grade and viscosity
for cold weather. Using heavy summer oil
will make it harder to start the engine.
Keep the door locks from freezing by
squirting them with deicer or glycerin.
Forcing a frozen door open may damage
or separate the rubber weather strips
around the door. If the door is frozen,
use hot water to melt the ice, and after-
wards thoroughly wipe the water away.
Use a windshield washer fluid that con-
tains an antifreeze solution. Do not use
engine antifreeze or other substitutes
because they may damage the paint of
the vehicle.8-6
Page 471 of 594

In case of emergency/Flat tires
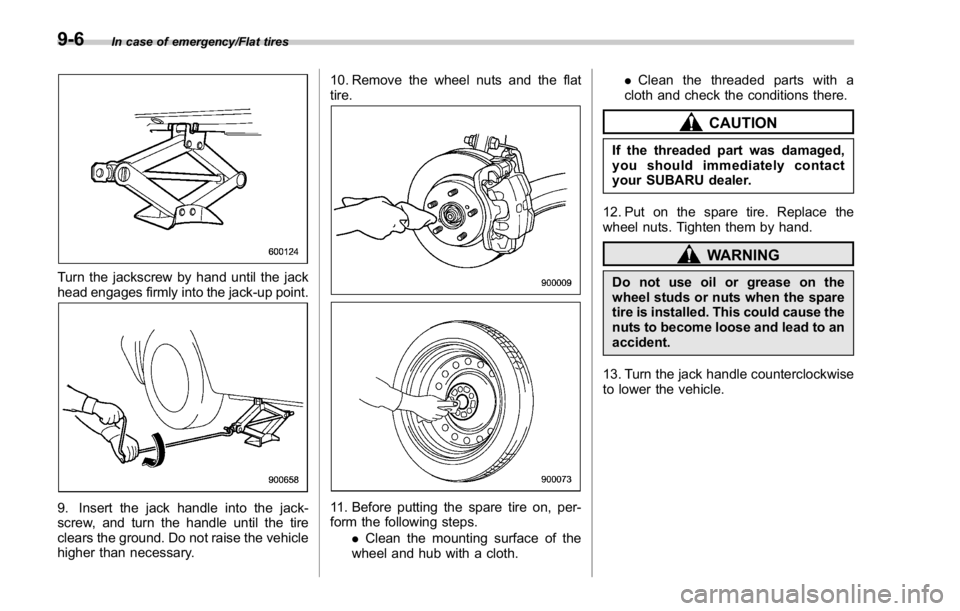
Turn the jackscrew by hand until the jack
head engages firmly into the jack-up point.
9. Insert the jack handle into the jack-
screw, and turn the handle until the tire
clears the ground. Do not raise the vehicle
higher than necessary. 10. Remove the wheel nuts and the flat
tire.
11. Before putting the spare tire on, per-
form the following steps.
. Clean the mounting surface of the
wheel and hub with a cloth. . Clean the threaded parts with a
cloth and check the conditions there.
CAUTIONIf the threaded part was damaged,
you should immediately contact
your SUBARU dealer.
12. Put on the spare tire. Replace the
wheel nuts. Tighten them by hand.
WARNINGDo not use oil or grease on the
wheel studs or nuts when the spare
tire is installed. This could cause the
nuts to become loose and lead to an
accident.
13. Turn the jack handle counterclockwise
to lower the vehicle.9-6
Page 476 of 594

Engine overheating WARNINGNever attempt to remove the radia-
tor cap until the engine has been
shut off and has fully cooled down.
When the engine is hot, the coolant
is under pressure. Removing the
cap while the engine is still hot
could release a spray of boiling hot
coolant, which could burn you very
seriously.
If the engine overheats, safely pull off the
road and stop the vehicle in a safe
location.
& If steam is coming from the
engine compartment . Turn off the engine and get everyone
away from the vehicle until it cools down.
. Contact an authorized SUBARU deal-
er.
& If no steam is coming from
the engine compartment
1. Keep the engine running at idling
speed.
2. Open the engine hood to ventilate the engine compartment. Refer to “ Engine
hood ” F 11-9.
Confirm that the cooling fan is turning. If
the fan is not turning, immediately turn off
the engine and contact an authorized
SUBARU dealer for repair.
3. After the engine coolant temperature
has dropped, turn off the engine.
If temperature gauge stays in the over-
heated zone, turn off the engine. Refer to
“ Temperature gauge ” F 3-11.
4. After the engine has fully cooled down,
check the coolant level in the reserve
tank. If the coolant level is below the
“ LOW ” mark, add coolant up to the “ FULL ”
mark.
NOTE For details about how to check the
coolant level or how to add coolant,
refer to “ Engine coolant ” F 11-18.
5. If there is no coolant in the reserve
tank, add coolant to the reserve tank.
Then remove the radiator cap and fill the
radiator with coolant.
If you remove the radiator cap from a hot
radiator, first wrap a thick cloth around the
radiator cap, then turn the cap counter-
clockwise slowly without pressing down
until it stops. Release the pressure from
the radiator. After the pressure has been fully released, remove the cap by pressing
down and turning it. In case of emergency/Engine overheating
9-11