2016 SUBARU OUTBACK tail lights
[x] Cancel search: tail lightsPage 209 of 572

!Photosensors
The mirror has a photosensor attached on
both the front and back sides. During
nighttime driving, these sensors detect
distracting glare from vehicle headlights
behind you and automatically dim the
mirror to eliminate glare and preserve
your vision. For this reason, use care not
to cover the sensors with stickers, or other
similar items. Periodically wipe the sen-
sors clean using a piece of dry soft cotton
cloth or an applicator.!Compass zone adjustmentCompass calibration zones
1. Refer to the“Compass calibration
zones”map shown above to verify that
the compass zone setting is correct for
your geographical location.
2. Press and hold the compass display
button for 3 seconds until the zone
selection comes up (a number will be
displayed in the mirror compass window).
3. Press the compass display button
repeatedly until the correct zone setting
for your location is displayed.
4. Releasing the button for 5 seconds will
exit the zone setting mode.!Compass calibration
1. If a“C”is displayed in the compass
window, the compass needs to be cali-
brated.
2. Drive the vehicle in a circle at 5 mph (8
km/h) or less until the display reads a
direction.
3. You can also calibrate the compass by
driving your vehicle on your everyday
routine. The compass will be calibrated
once it has tracked a complete circle.
4. To recalibrate your compass, push and
hold the compass display button for 9
seconds until a“C”appears in the
compass window.
5. Calibrate the compass according to
step 2 or step 3.
!HomeLink
®Wireless Control Sys-
tem
The HomeLink
®Wireless Control System
can be used to activate remote control
devices such as gate operators, garage
door openers, door locks, home lighting
and security systems.
There are three HomeLink
®buttons on the
mirror, each of which can be programmed
for operation of one desired device. For
details on the device types which can be
operated by this system, consult the
HomeLink
®website at:
Instruments and controls/Mirrors
–CONTINUED–3-57
Page 324 of 572
Interior equipment/Interior light
Interior light
CAUTION
When leaving your vehicle, make
sure the lights are turned off to
avoid battery discharge.
&Dome light
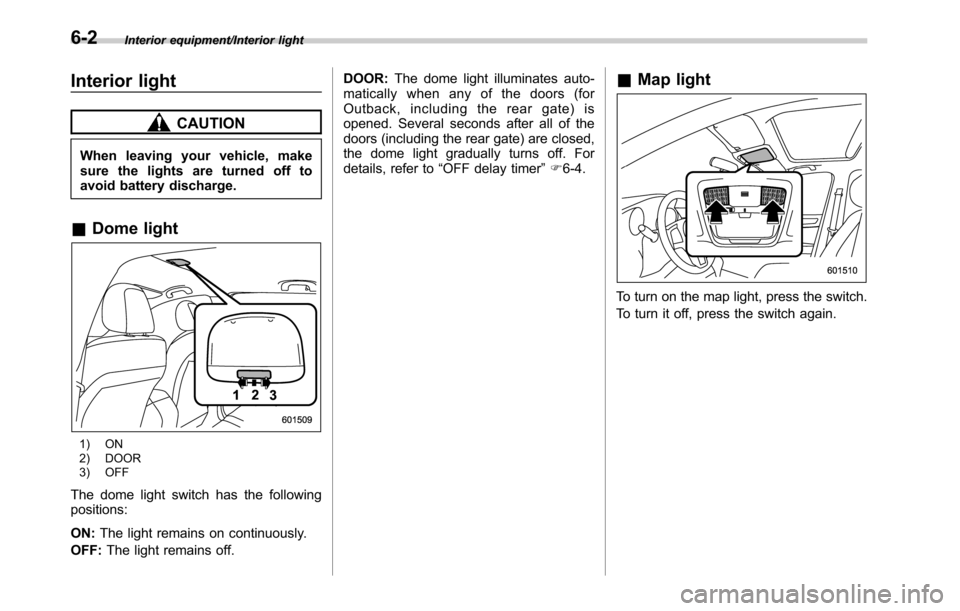
1) ON
2) DOOR
3) OFF
The dome light switch has the following
positions:
ON:The light remains on continuously.
OFF:The light remains off.DOOR:The dome light illuminates auto-
matically when any of the doors (for
Outback, including the rear gate) is
opened. Several seconds after all of the
doors (including the rear gate) are closed,
the dome light gradually turns off. For
details, refer to“OFF delay timer”F6-4.
&Map light
To turn on the map light, press the switch.
To turn it off, press the switch again.
6-2
Page 325 of 572
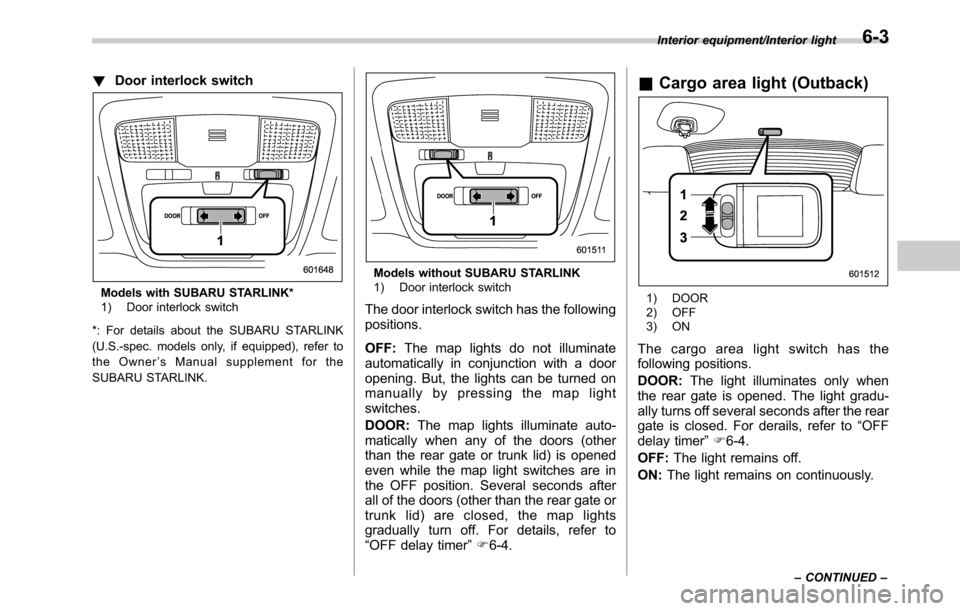
!Door interlock switch
Models with SUBARU STARLINK*
1) Door interlock switch
*: For details about the SUBARU STARLINK
(U.S.-spec. models only, if equipped), refer to
the Owner’s Manual supplement for the
SUBARU STARLINK.
Models without SUBARU STARLINK
1) Door interlock switch
The door interlock switch has the following
positions.
OFF:The map lights do not illuminate
automatically in conjunction with a door
opening. But, the lights can be turned on
manually by pressing the map light
switches.
DOOR:The map lights illuminate auto-
matically when any of the doors (other
than the rear gate or trunk lid) is opened
even while the map light switches are in
the OFF position. Several seconds after
all of the doors (other than the rear gate or
trunk lid) are closed, the map lights
gradually turn off. For details, refer to
“OFF delay timer”F6-4.
&Cargo area light (Outback)
1) DOOR
2) OFF
3) ON
The cargo area light switch has the
following positions.
DOOR:The light illuminates only when
the rear gate is opened. The light gradu-
ally turns off several seconds after the rear
gate is closed. For derails, refer to“OFF
delay timer”F6-4.
OFF:The light remains off.
ON:The light remains on continuously.
Interior equipment/Interior light
–CONTINUED–6-3
Page 326 of 572
Interior equipment/Sun visors
&OFF delay timer
The following lights have an automatic
illumination function.
.dome light
.map light
.cargo area light (Outback)
After being illuminated automatically,
these lights remain on for several seconds
and then gradually turn off under the
following conditions.
.after the ignition switch is turned to the
“LOCK”/“OFF”position
.after any doors or the rear gate
(Outback) is closed (dome light)
.after all doors are closed (map light)
.after the rear gate is closed (cargo area
light)
.after the doors are unlocked using the
keyless access function (if equipped)
(dome light and map light)
.after the doors are unlocked using the
remote keyless entry system (dome light
and map light)
.when approaching with the access key
(if equipped) (dome light and map light)
While the lights are illuminated, if any of
the following operations is performed, the
lights turn off immediately.
.The ignition switch is turned from the“LOCK”/“OFF”position to the“ACC”or
“ON”position.
.All doors and the rear gate (Outback)
are locked using the keyless access
function (if equipped).
.All doors and the rear gate (Outback)
are locked using the remote keyless entry
system.
The setting for the period of time in which
the lights remain on (OFF delay timer) can
be changed by a SUBARU dealer. Con-
tact your SUBARU dealer for details. Also,
the setting can be changed by operating
the multi information display. For details,
refer to“Interior Light”F3-42.
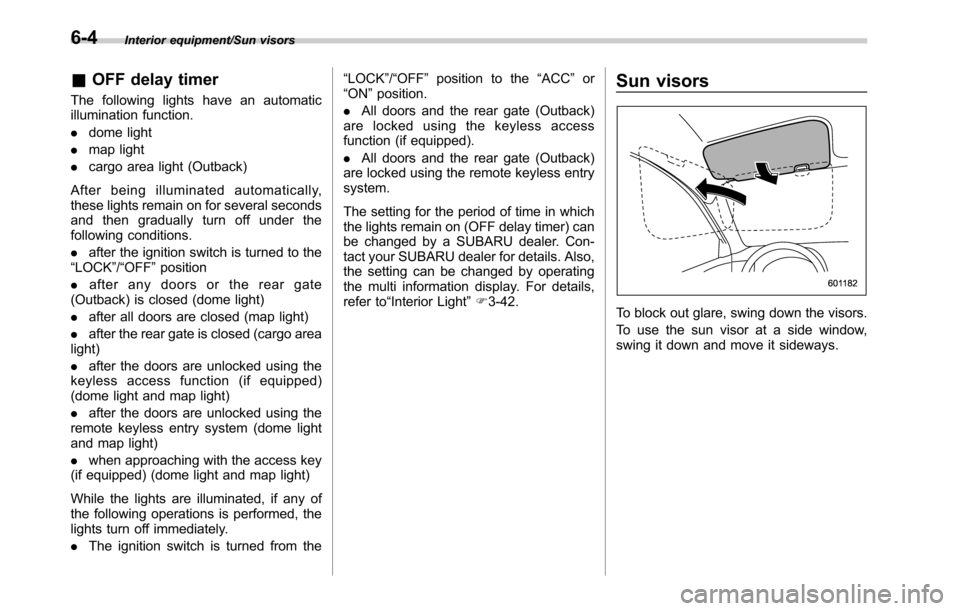
Sun visors
To block out glare, swing down the visors.
To use the sun visor at a side window,
swing it down and move it sideways.
6-4
Page 365 of 572
!Automatic engine shutdown
The remote engine start system will
automatically shut down or will not start
the engine under the following conditions.
.The total run-time has exceeded 20
minutes.
.Any door or the rear gate is opened.
.The select lever is moved to any
position other than“P”.
.The engine hood is opened.
.Thepush-buttonignitionswitchis
pressed.
.The brake pedal is depressed.
.The engine speed is 3,000 rpm or
more.
The time until the engine automatically
stops differs according to the setting.
To change the time until the engine
automatically stops, contact your
SUBARU dealer. However, local laws
and regulations may prohibit changing
this time.&Models without“keyless ac-
cess with push-button start
system”
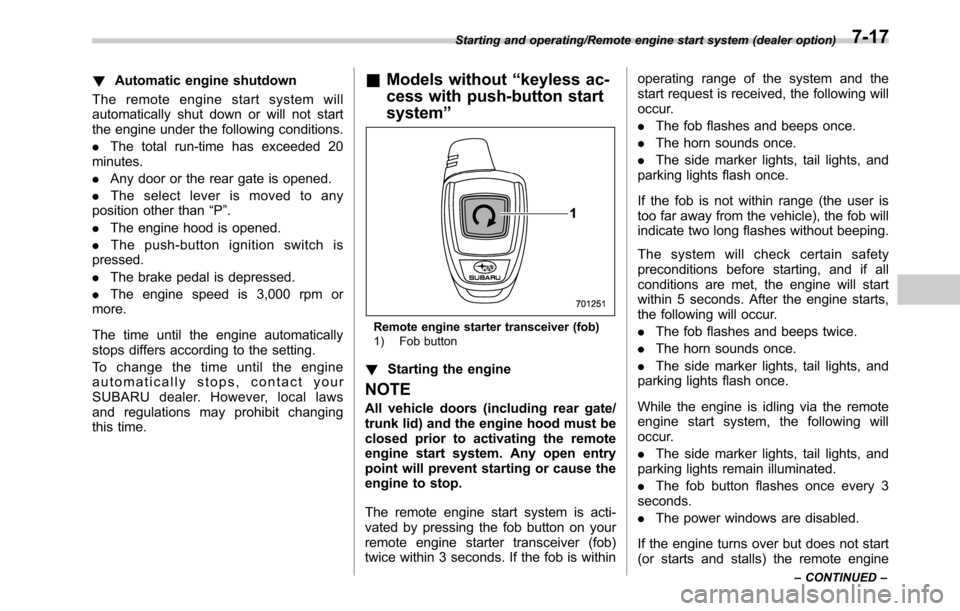
Remote engine starter transceiver (fob)
1) Fob button
!Starting the engine
NOTE
All vehicle doors (including rear gate/
trunk lid) and the engine hood must be
closed prior to activating the remote
engine start system. Any open entry
point will prevent starting or cause the
engine to stop.
The remote engine start system is acti-
vated by pressing the fob button on your
remote engine starter transceiver (fob)
twice within 3 seconds. If the fob is withinoperating range of the system and the
start request is received, the following will
occur.
.The fob flashes and beeps once.
.The horn sounds once.
.The side marker lights, tail lights, and
parking lights flash once.
If the fob is not within range (the user is
too far away from the vehicle), the fob will
indicate two long flashes without beeping.
The system will check certain safety
preconditions before starting, and if all
conditions are met, the engine will start
within 5 seconds. After the engine starts,
the following will occur.
.The fob flashes and beeps twice.
.The horn sounds once.
.The side marker lights, tail lights, and
parking lights flash once.
While the engine is idling via the remote
engine start system, the following will
occur.
.The side marker lights, tail lights, and
parking lights remain illuminated.
.The fob button flashes once every 3
seconds.
.The power windows are disabled.
If the engine turns over but does not start
(or starts and stalls) the remote engine
Starting and operating/Remote engine start system (dealer option)
–CONTINUED–7-17
Page 366 of 572
Starting and operating/Remote engine start system (dealer option)
start system will power off and then
attempt to start the engine 3 additional
times. The system will not attempt to
restart the engine if it determines a vehicle
malfunction is preventing starting. If the
engine does not start after 3 additional
attempts, the remote engine start request
will be aborted.
!Stopping the engine
Press and hold the fob button for at least 2
seconds to stop the engine. The fob will
flash and beep three times, indicating the
engine has stopped. If the stop request is
not received (for example, if the user is too
far away from the vehicle), the fob will
continue to flash once every 3 seconds.
The system will automatically stop the
engine after 15 minutes.
!Remote start safety features
For safety and security reasons, the
remote engine start system will prevent
starting (or stop the engine if running) and
sound the horn twice if any of the following
conditions is detected. In addition, the fob
will flash and beep 3 times.
.The brake pedal is depressed
.A key is in the ignition switch
.The engine hood is open
.The remote start system“Service
mode”is engaged
.The engine idle speed exceeds 3,500RPM
.The security alarm is triggered
.The select lever is not in the“P”
position
If the system detects any door (including
the rear gate/trunk lid) open during opera-
tion, it will prevent starting or stop the
engine, and sound the horn and flash side
marker lights, tail lights, and parking lights
6 times.
In addition to the items above, if the
vehicle’s engine management system
determines there is a safety risk due to a
vehicle-related problem, the vehicle will
power down and the horn will sound 3
times.
NOTE
.If the alarm system is armed at the
time of remote engine starter activation
(the security indicator light on the
combination meter is flashing), the
alarm system will remain armed
throughout the remote start run cycle.
.If the alarm system is disarmed at
the time of remote engine starter
activation (the security indicator light
on the combination meter is not flash-
ing), the alarm system will remain
disarmed throughout the remote start
run cycle.!Remote start operation - fob con-
firmation
Your remote engine starter fob is a
bidirectional transceiver that can confirm
system operation with several different
visual and audible indications. The fob’s
LED-backlit button and internal piezo
buzzer will indicate status of the system
using the following flash and beep se-
quences, provided the fob is within opera-
tional range of the system.
7-18
Page 369 of 572
event that a transmitter is lost, stolen,
damaged or additional transmitters are
desired (the system will accept up to eight
transmitters). New remote engine start
transmitters can be programmed accord-
ing to the following procedure.
1. Open the driver’s door (the driver’s
door must remain opened throughout the
entire process).
2. Depress and hold the brake pedal.
3. Turn the ignition switch to“ON”then
“LOCK”, back to“ON”then“LOCK”, back
to“ON”then“LOCK”, then back to“ON”
again and leave the ignition“ON”through-
out the programming process.
4. The system will flash the side marker
lights, tail lights and parking lights and
honk the horn three times, indicating that
the system has entered the transmitter
learn mode.
5. Press and release the“
”button on
the transmitter that you want to program.
6. The system will flash the side marker
lights, tail lights and parking lights and
honk the horn one time, indicating that the
system has learned the transmitter. Upon
successful programming, the remote start
confirmation transmitter button will flash
one time.
7. Repeat step 5 for any additional
transmitters (the system will accept up toeight transmitters).
8. The system will exit the transmitter
learn mode if the key is turned to the
“LOCK”position, the door is closed or
after 2 minutes.
&System maintenance
NOTE
For models without“keyless access
with push-button start system”:
In the event that the vehicle’s battery is
replaced, discharged or disconnected,
it will be necessary to start the vehicle
a minimum of one time using the key
prior to activating the remote engine
start system. This is required to allow
the vehicle electronic systems to re-
synchronize.
!Changing the batteries
CAUTION
.Do not let dust, oil or water get on
or in the remote engine start
transmitter when replacing the
battery.
.Be careful not to damage the
printed circuit board in the re-
mote engine start transmitter
when replacing the battery..Be careful not to allow children to
touch the battery and any re-
moved parts; children could
swallow them.
.There is a danger of explosion if
an incorrect replacement battery
is used. Replace only with the
same or equivalent type of bat-
tery.
.Batteries should not be exposed
to excessive heat such as sun-
shine, fire or the like.
For models with“keyless access with
push-button start system:
Perform the procedure described in“Re-
placing battery of access key”F11-50.
For models without“keyless access
with push-button start system”:
The 3-volt lithium battery (model CR-
2032) supplied in your remote engine start
transmitter should last approximately one
year, depending on usage. When the
battery begins to weaken, you will notice
a decrease in range (distance from the
vehicle that your remote control operates).
Follow the instructions below to change
the remote engine start transmitter battery.
Starting and operating/Remote engine start system (dealer option)
–CONTINUED–7-21
Page 382 of 572
Starting and operating/Electronic Brake Force Distribution (EBD) system
Electronic Brake Force Dis-
tribution (EBD) system
The EBD system maximizes the effective-
ness of the brakes by allowing the rear
brakes to supply a greater proportion of
the braking force. It functions by adjusting
the distribution of braking force to the rear
wheels in accordance with the vehicle’s
loading condition and speed.
The EBD system is an integral part of the
ABS and uses some of the ABS compo-
nents to perform its function of optimizing
the distribution of braking force. If any of
the ABS components used by the EBD
function fails, the EBD system also stops
working.
When the EBD system is operating, you
may hear a chattering noise or feel a slight
vibration in the brake pedal. This is normal
and does not indicate a malfunction.
&Steps to take if EBD system
malfunctions
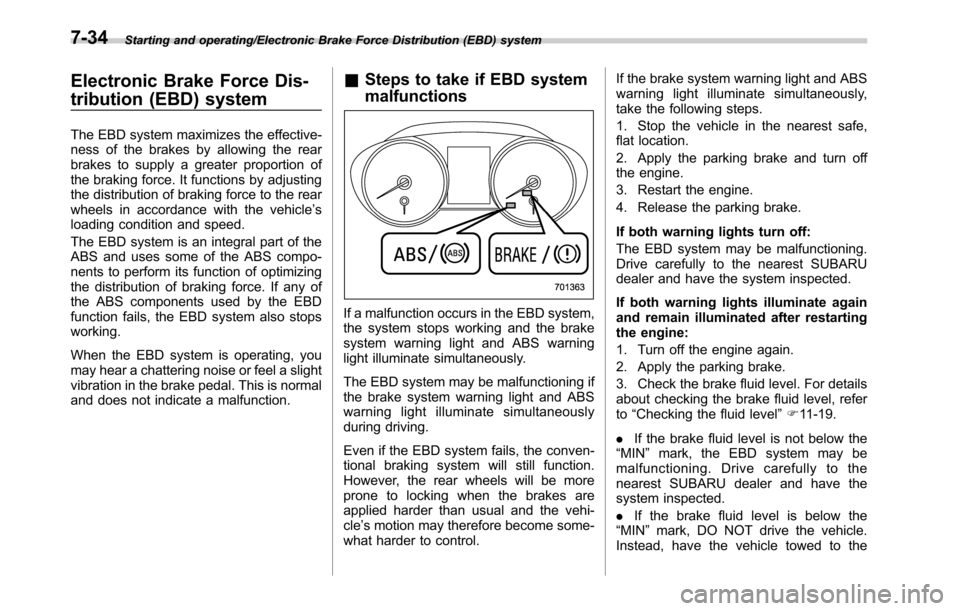
If a malfunction occurs in the EBD system,
the system stops working and the brake
system warning light and ABS warning
light illuminate simultaneously.
The EBD system may be malfunctioning if
the brake system warning light and ABS
warning light illuminate simultaneously
during driving.
Even if the EBD system fails, the conven-
tional braking system will still function.
However, the rear wheels will be more
prone to locking when the brakes are
applied harder than usual and the vehi-
cle’s motion may therefore become some-
what harder to control.If the brake system warning light and ABS
warning light illuminate simultaneously,
take the following steps.
1. Stop the vehicle in the nearest safe,
flat location.
2. Apply the parking brake and turn off
the engine.
3. Restart the engine.
4. Release the parking brake.
If both warning lights turn off:
The EBD system may be malfunctioning.
Drive carefully to the nearest SUBARU
dealer and have the system inspected.
If both warning lights illuminate again
and remain illuminated after restarting
the engine:
1. Turn off the engine again.
2. Apply the parking brake.
3. Check the brake fluid level. For details
about checking the brake fluid level, refer
to“Checking the fluid level”F11-19.
.If the brake fluid level is not below the
“MIN”mark, the EBD system may be
malfunctioning. Drive carefully to the
nearest SUBARU dealer and have the
system inspected.
.If the brake fluid level is below the
“MIN”mark, DO NOT drive the vehicle.
Instead, have the vehicle towed to the
7-34