Page 193 of 308

OTHER SETTINGS
191
SETTINGS
7
CUSTOMIZING THE SCREEN OFF IMAGES
When the screen is turned off, the desired set image
can be displayed as the screen off image. Images
can be copied from a USB memory or SD card*.
A USB memory or SD card* must be connected when
�H�G�L�W�L�Q�J���V�F�U�H�H�Q���R�I�I���L�P�D�J�H�V�������:�3����������������
*: With navigation function
NOTE
�OWhen saving the images to a USB or SD card* name the folder
that the screen off image is saved to “Image”. If this folder name
is not used, the system cannot download the images. (The folder
name is case sensitive.)
*: With navigation function �O<002c00500044004a0048000300bf004f0048005600030056004400590048004700030057005200030057004b0048000300500044005300030036002700030046004400550047000300460044005100510052005700030045004800030053004f0044005c00
48004700110003>
�QTRANSFERRING IMAGES
1. Select .
2. Select SETTINGS (SETTINGS).
3. Select General (General).
4. Select Customize Screen Off Image (Customize
Screen Off Image).
5. Select the device that the image is stored on.
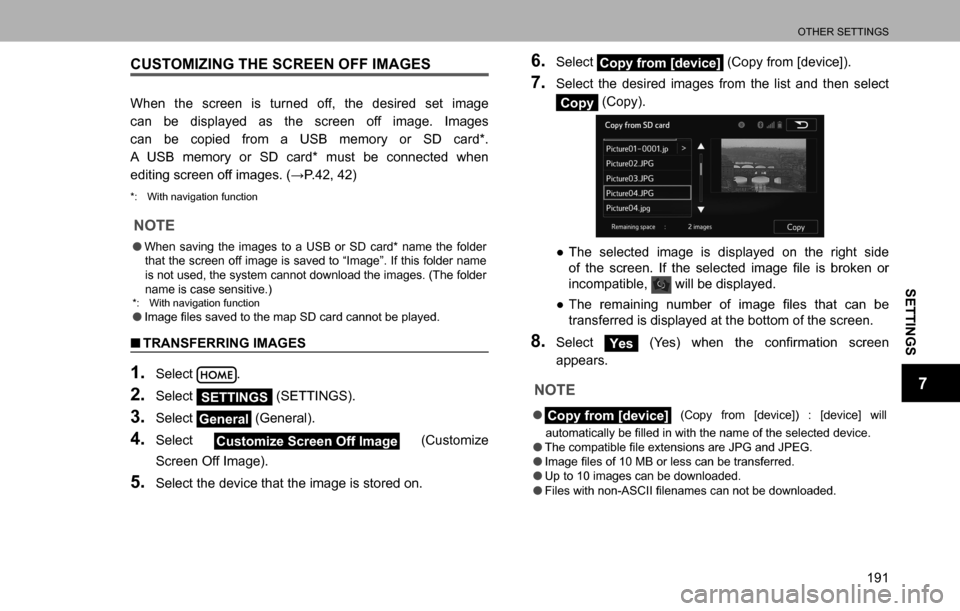
6. Select Copy from [device] (Copy from [device]).
7. Select the desired images from the list and then select
Copy (Copy).
�”The selected image is displayed on the right side
�R�I�� �W�K�H�� �V�F�U�H�H�Q���� �,�I�� �W�K�H�� �V�H�O�H�F�W�H�G�� �L�P�D�J�H�� �
Page 199 of 308

OTHER SETTINGS
197
SETTINGS
7
No. Function
When set to on, the indicator will illuminate. The
system is set to give maintenance information with the
“Maintenance Reminder (Maintenance Reminder)”
�V�F�U�H�H�Q�������:�3��������
NOTE
�OWhen the vehicle needs to be serviced, the screen button color
will change to orange.
MAINTENANCE INFORMATION SETTING
1. Select the desired part or component screen button.
�”When the vehicle needs to be serviced, the screen
button color will change to orange.
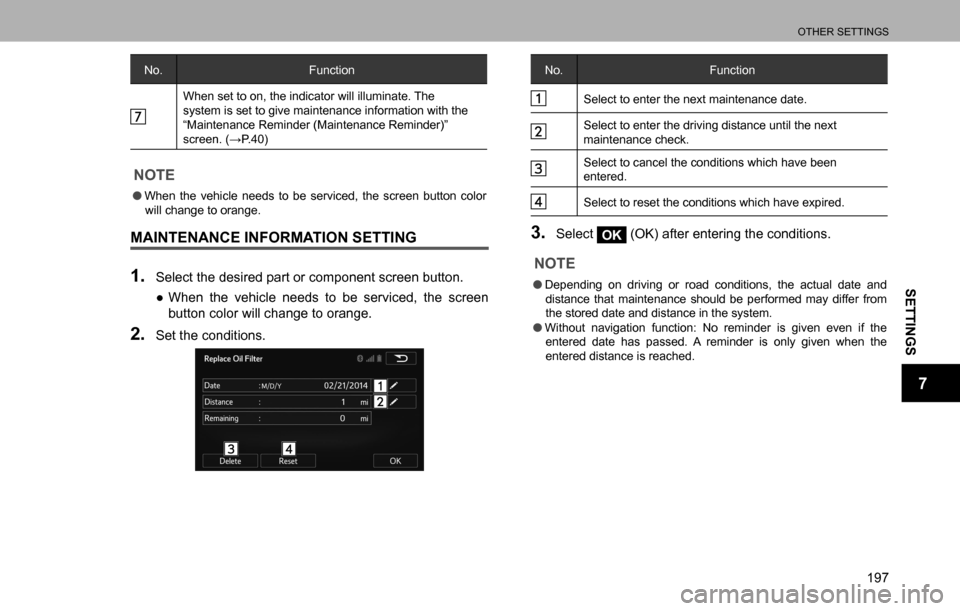
2. Set the conditions.
No. Function
Select to enter the next maintenance date.
Select to enter the driving distance until the next
maintenance check.
Select to cancel the conditions which have been
entered.
Select to reset the conditions which have expired.
3. Select OK (OK) after entering the conditions.
NOTE
�ODepending on driving or road conditions, the actual date and
distance that maintenance should be performed may differ from
the stored date and distance in the system.
�OWithout navigation function: No reminder is given even if the
entered date has passed. A reminder is only given when the
entered distance is reached.
Page 201 of 308
199
NAVIGATION SYSTEM
(WITH NAVIGATION
FUNCTION)
8
8
Page 203 of 308
BASIC OPERATION
201
NAVIGATION SYSTEM
8
No. Name Information/Function Page
*Highway
informationSelect to display the
highway information.227
Speed Limit
indicatorDisplays the speed limit for
the road being driven on.-
*: The default setting is not displayed, and can be displayed from “Display
<0052005100030030004400530003000b0027004c00560053004f0044005c0003005200510003003000440053000c00b40003004c0051000300b300300044005300030036004800570057004c0051004a00560003000b003000440053000300360048005700
57004c0051004a0056000c00b400110003000b013a0033>����������
NOTE
�OAn “Unable to read the map SD data. Check the map SD. If
necessary, consult your dealer.” message appears if the map SD
card is not inserted, or if an SD card containing no map data is
inserted.
MAP OPERATIONS
You can touch a position on the map, and then check that
position during navigation. The map’s current position
tracking function stops (the car marker (a blue arrow by
�G�H�I�D�X�O�W���� �L�V�� �Q�R�W�� �
Page 204 of 308

BASIC OPERATION
202
No. Operation Function
Point
informationSelect to open another screen
displaying information on the
selected map position (cursor). When
Bluetooth is enabled on your cellular
phone, a call can be placed if the
displayed information screen contains
phone number information.
Return to
normal
navigationSelect to return the map to the current
GPS position. Auto map rotation is
also enabled. The map operation
buttons are not displayed, and
navigation restarts.
Tilt up/downSelect to change the vertical display
angle of the map in 3D mode. Select
and hold to continue changing the
motion of the map screen.
No. Operation Function
Selecting a
destinationSelect to select the cursor as a new
destination. The route is researched
automatically.
Additional
functionsSelect to display the additional
functions list. For example, saving
the cursor to the destination list, and
searching the area around the cursor.
Zoom in/outSelect to change the area of the map
displayed on the screen. Select and
hold to continue changing the scale of
the map screen.
NOTE
�OThe map screen scale can be changed by double-touching or
�S�L�Q�F�K�L�Q�J���W�K�H���V�F�U�H�H�Q�������:�3��������
�OThe map direction can be changed by rotating the screen.
���:�3��������
Page 205 of 308

BASIC OPERATION
203
NAVIGATION SYSTEM
8
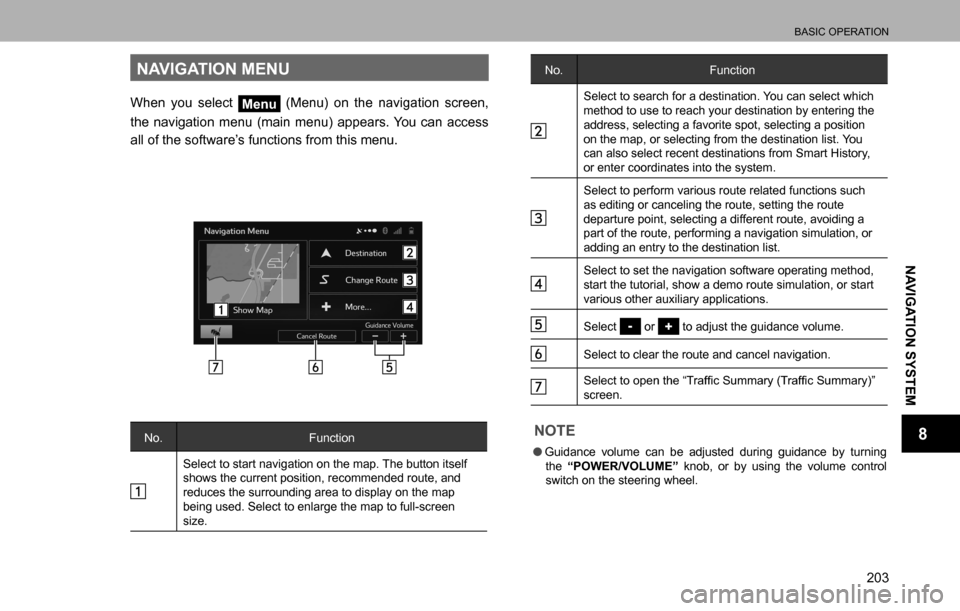
NAVIGATION MENU
When you select Menu (Menu) on the navigation screen,
the navigation menu (main menu) appears. You can access
all of the software’s functions from this menu.
No. Function
Select to start navigation on the map. The button itself
shows the current position, recommended route, and
reduces the surrounding area to display on the map
being used. Select to enlarge the map to full-screen
size.
No. Function
Select to search for a destination. You can select which
method to use to reach your destination by entering the
address, selecting a favorite spot, selecting a position
on the map, or selecting from the destination list. You
can also select recent destinations from Smart History,
or enter coordinates into the system.
Select to perform various route related functions such
as editing or canceling the route, setting the route
departure point, selecting a different route, avoiding a
part of the route, performing a navigation simulation, or
adding an entry to the destination list.
Select to set the navigation software operating method,
start the tutorial, show a demo route simulation, or start
various other auxiliary applications.
Select or to adjust the guidance volume.
Select to clear the route and cancel navigation.
�6�H�O�H�F�W���W�R���R�S�H�Q���W�K�H���³�7�U�D�I�¿�F���6�X�P�P�D�U�\�����7�U�D�I�¿�F���6�X�P�P�D�U�\���´��
screen.
NOTE
�OGuidance volume can be adjusted during guidance by turning
the “POWER/VOLUME” knob, or by using the volume control
switch on the steering wheel.
Page 207 of 308
BASIC OPERATION
205
NAVIGATION SYSTEM
8
MAP SCREEN OPERATION
CURRENT POSITION DISPLAY
1. Select , or select and then select MAP
(MAP).
2. Check that the current position map is displayed.
NOTE
�O�:�K�L�O�H�� �G�U�L�Y�L�Q�J���� �W�K�H�� �F�X�U�U�H�Q�W�� �S�R�V�L�W�L�R�Q�� �P�D�U�N�� �L�V�� �
Page 209 of 308
BASIC OPERATION
207
NAVIGATION SYSTEM
8
ORIENTATION OF THE MAP
The orientation of the map can be changed between 2D
north-up, 2D heading-up and 3D.
1. Select or .
�XNorth-up screen
�XHeading-up screen
�X3D screen
�”: 2D north-up symbol
Regardless of the direction of vehicle travel, north is
always up.
�”
: 2D heading-up and 3D symbol
The direction of vehicle travel is always up.
�”The letter(s) indicate the vehicle’s heading direction
(e.g. N for north).