2016 SUBARU IMPREZA stop start
[x] Cancel search: stop startPage 457 of 594
Driving tips/Loading your vehicle
assembly) plus the vehicle capacity
weight.
In addition, the total weight applied to
each axle (GAW) must never exceed the
GAWR. The front and rear GAWs can be
adjusted by relocating luggage inside the
vehicle.
Even if the total weight of your luggage is
lower than the vehicle capacity weight,
either front or rear GAW may exceed the
GAWR, depending on the distribution of
the luggage.
When possible, the load should be evenly
distributed throughout the vehicle.
If you carry heavy loads in the vehicle, you
should confirm that GVW and front and
rear GAWs are within the GVWR and
GAWR by putting your vehicle on a
vehicle scale, found at a commercial
weighing station.
Do not use replacement tires with a lower
load range than the originals because they
may lower the GVWR and GAWR limita-
tions. Replacement tires with a higher load
range than the originals do not increase
the GVWR and GAWR limitations.&Roof rail (if equipped)
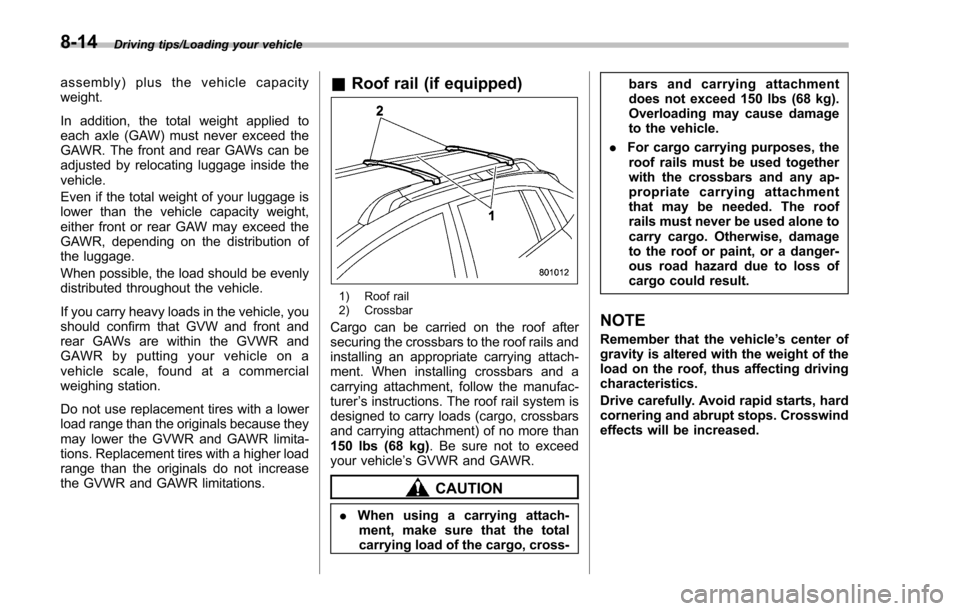
1) Roof rail
2) Crossbar
Cargo can be carried on the roof after
securing the crossbars to the roof rails and
installing an appropriate carrying attach-
ment. When installing crossbars and a
carrying attachment, follow the manufac-
turer ’s instructions. The roof rail system is
designed to carry loads (cargo, crossbars
and carrying attachment) of no more than
150 lbs (68 kg) . Be sure not to exceed
your vehicle’ s GVWR and GAWR.
CAUTION
.When using a carrying attach-
ment, make sure that the total
carrying load of the cargo, cross- bars and carrying attachment
does not exceed 150 lbs (68 kg).
Overloading may cause damage
to the vehicle.
. For cargo carrying purposes, the
roof rails must be used together
with the crossbars and any ap-
propriate carrying attachment
that may be needed. The roof
rails must never be used alone to
carry cargo. Otherwise, damage
to the roof or paint, or a danger-
ous road hazard due to loss of
cargo could result.
NOTE
Remember that the vehicle ’s center of
gravity is altered with the weight of the
load on the roof, thus affecting driving
characteristics.
Drive carefully. Avoid rapid starts, hard
cornering and abrupt stops. Crosswind
effects will be increased.
8-14
Page 458 of 594

&Roof molding and crossbar
(5-door models —if
equipped)
CAUTION
. For cargo carrying purposes, the
roof molding must be used to-
gether with a roof crossbar kit
and the appropriate carrying at-
tachment. Otherwise, damage to
the roof or paint or a dangerous
road hazard due to loss of cargo
could result.
. When using the roof crossbar kit,
make sure that the total weight of
the crossbars, carrying attach-
ment and cargo does not exceed
the maximum load limit. Over- loading may cause damage to
the vehicle and create a safety
hazard.
Cargo can be carried after securing the
roof crossbar kit to the roof molding and
installing the appropriate carrying attach-
ment. When installing the roof crossbar
kit, follow the manufacturer ’s instructions.
When you carry cargo on the roof using
the roof crossbar kit and a carrying
attachment, never exceed the maximum
load limit as explained below. You should
also be careful that your vehicle does not
exceed the Gross Vehicle Weight Rating
(GVWR) and front and rear Gross Axle
Weight Rating (GAWR). For information
about loading cargo into or onto your
vehicle, refer to “Loading your vehicle”
F 8-12. The maximum load limit of the
cargo, crossbars and carrying attachment
must not exceed 176 lbs (80 kg). Place
the heaviest load at the bottom, nearest
the roof, and evenly distribute the cargo.
Always properly secure all cargo. !
Installing carrying attachments on
the crossbars
When installing any carrying attachment
such as a bike carrier, ski carrier, kayak
carrier, cargo basket, etc. on the cross-
bars, follow the manufacturer ’s instruc-
tions and make sure that the attachment is
securely fixed to the crossbars. Use only
attachments designed specifically for the
crossbars. A set of the crossbars is
designed to carry loads (cargo and attach-
ment) of not more than 165 lbs (75 kg).
Before operating the vehicle, make sure
that the cargo is properly secured on the
attachment.
NOTE
Remember that the vehicle ’s center of
gravity is altered with the weight of the
load on the roof, thus affecting the
driving characteristics.
Drive carefully. Avoid rapid starts, hard
cornering and abrupt stops. Crosswind
effects will be increased.
Driving tips/Loading your vehicle
–CONTINUED –8-15
Page 467 of 594
Driving tips/Trailer towing (Crosstrek models)
!Trailer lights
CAUTION
Direct splicing or other improper
connection of trailer lights may
damage your vehicle ’s electrical
system and cause a malfunction of
your vehicle ’s lighting system.
Connection of trailer lights to your vehi-
cle ’s electrical system requires modifica-
tions to the vehicle’ s lighting circuit to
increase its capacity and accommodate
wiring changes. To ensure the trailer lights
are connected properly, please consult
your SUBARU dealer. Check for proper
operation of the turn signals and the brake
lights each time you connect a trailer to
your vehicle.
! Tires
WARNING
Never tow a trailer when the tem-
porary spare tire is used. The tem-
porary spare tire is not designed to
sustain the towing load. Use of the
temporary spare tire when towing
can result in failure of the spare tire
and/or less stability of the vehicle.
Make sure that all the tires on your vehicle are properly inflated. Refer to
“Tires”F 12-
8.
Trailer tire condition, size, load rating and
proper inflation pressure should be in
accordance with the trailer manufacturer ’s
specifications. Also check federal, state,
province and/or other applicable regula-
tions.
In the event your vehicle gets a flat tire
when towing a trailer, ask a commercial
road service representative or profes-
sional to repair the flat tire.
If you carry a regular size spare tire in your
vehicle or trailer as a precaution against
getting a flat tire, be sure that the spare
tire is firmly secured.
& Trailer towing tips
CAUTION
. For models equipped with the
BSD (Blind Spot Detection) and
RCTA (Rear Cross Traffic Alert)
driving support systems, when
towing a trailer, press the BSD/
RCTA OFF switch to deactivate
the system. The system may not
operate properly due to the
blocked radar waves. For details
about the BSD/RCTA OFF switch, refer to
“BSD/RCTA OFF switch ”
F 7-56.
. Never exceed 45 mph (72 km/h)
when towing a trailer in hilly
country on hot days.
. When towing a trailer, steering,
stability, stopping distance and
braking performance will be dif-
ferent when compared to normal
operation. For safety’ s sake, you
should employ extra caution
when towing a trailer and you
should never drive at excessive
speeds. You should also keep the
following tips in mind:
! Before starting out on a trip
. Check the towing regulations for trailer
or caravan vehicles that vary by state/
region. Failure to comply with the proce-
dures set forth will not only compromise
your safety, but will also negate your
insurance coverage and/or may violate
the state road and traffic acts and regula-
tions.
. Check that the vehicle and vehicle-to-
hitch mounting are in good condition. If
any problems are apparent, do not tow the
trailer.
. Check that the vehicle rests horizon-
tally with the trailer attached. If the vehicle
8-24
Page 468 of 594
is tipped sharply up at the front and down
at the rear, check the total trailer weight,
GVW, GAWs and tongue load again, then
confirm that the load and its distribution
are acceptable.
.Check that the tire rating and pressures
are correct.
. Check that the vehicle and trailer are
connected properly. Confirm that:
–the trailer tongue is connected
properly to the hitch ball.
– the trailer lights connector is con-
nected properly and trailer ’s brake
lights illuminate when the vehicle ’s
brake pedal is pressed, and that the
trailer ’s turn signal lights flash when
the vehicle’ s turn signal lever is oper-
ated.
– the safety chains are connected
properly.
– all cargo in the trailer is secured
safely in position.
– the side mirrors provide a good
rearward field of view without a sig-
nificant blind spot.
. Sufficient time should be taken to learn
the “feel ”of the vehicle/trailer combination
before starting out on a trip. In an area free
of traffic, practice turning, stopping and
backing up. !
Driving with a trailer
. You should allow for considerably more
stopping distance when towing a trailer.
Avoid sudden braking because it may
result in skidding or jackknifing and loss of
control.
. Avoid abrupt starts and sudden accel-
erations. If your vehicle has a manual
transmission, always start out in first gear
and release the clutch at moderate engine
revolution.
. Avoid uneven steering, sharp turns and
rapid lane changes.
. Slow down before turning. Make a
longer than normal turning radius because
the trailer wheels will be closer than the
vehicle wheels to the inside of the turn. In
a tight turn, the trailer could hit your
vehicle.
. Crosswinds will adversely affect the
handling of your vehicle and trailer, caus-
ing sway. Crosswinds can be due to
weather conditions or the passing of large
trucks or buses. If swaying occurs, firmly
grip the steering wheel and promptly begin
decelerating your vehicle at a gradual
pace.
. When passing other vehicles, consid-
erable distance is required because of the
added weight and length caused by
attaching the trailer to your vehicle.
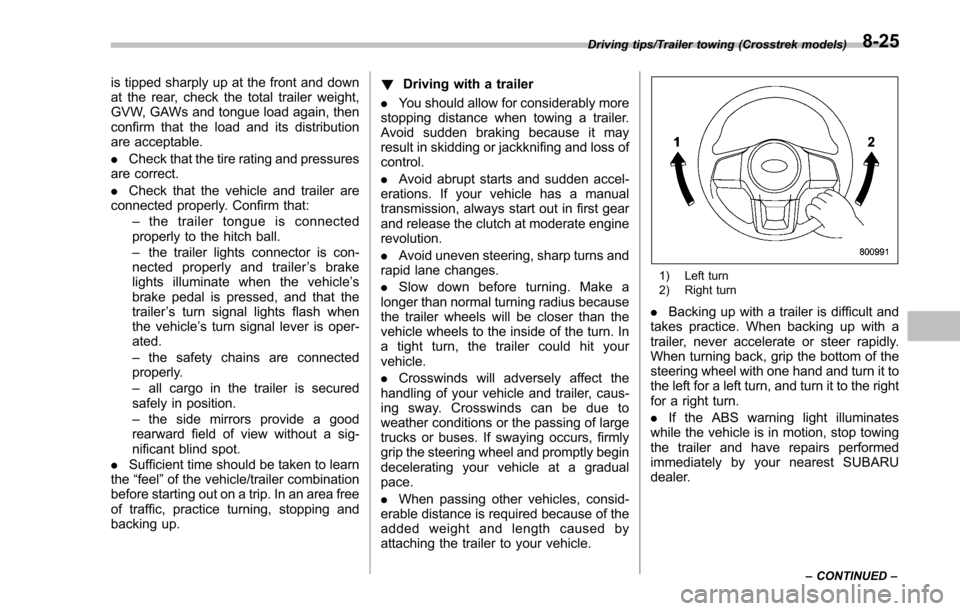
1) Left turn
2) Right turn
. Backing up with a trailer is difficult and
takes practice. When backing up with a
trailer, never accelerate or steer rapidly.
When turning back, grip the bottom of the
steering wheel with one hand and turn it to
the left for a left turn, and turn it to the right
for a right turn.
. If the ABS warning light illuminates
while the vehicle is in motion, stop towing
the trailer and have repairs performed
immediately by your nearest SUBARU
dealer.
Driving tips/Trailer towing (Crosstrek models)
–CONTINUED –8-25
Page 489 of 594
In case of emergency/If your vehicle is involved in an accident
CAUTION
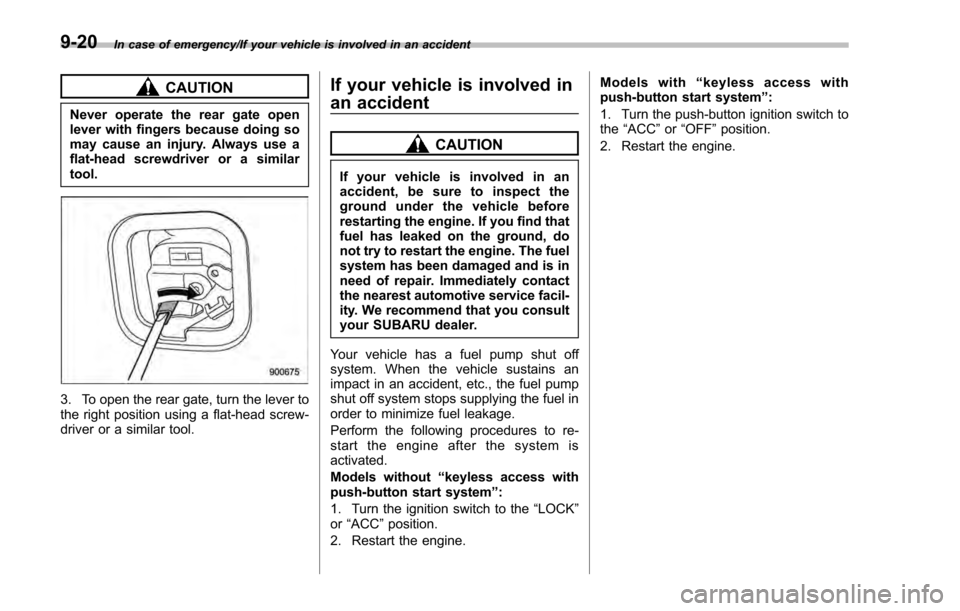
Never operate the rear gate open
lever with fingers because doing so
may cause an injury. Always use a
flat-head screwdriver or a similar
tool.
3. To open the rear gate, turn the lever to
the right position using a flat-head screw-
driver or a similar tool.
If your vehicle is involved in
an accident
CAUTION
If your vehicle is involved in an
accident, be sure to inspect the
ground under the vehicle before
restarting the engine. If you find that
fuel has leaked on the ground, do
not try to restart the engine. The fuel
system has been damaged and is in
need of repair. Immediately contact
the nearest automotive service facil-
ity. We recommend that you consult
your SUBARU dealer.
Your vehicle has a fuel pump shut off
system. When the vehicle sustains an
impact in an accident, etc., the fuel pump
shut off system stops supplying the fuel in
order to minimize fuel leakage.
Perform the following procedures to re-
start the engine after the system is
activated.
Models without “keyless access with
push-button start system ”:
1. Turn the ignition switch to the “LOCK”
or “ACC ”position.
2. Restart the engine. Models with
“keyless access with
push-button start system ”:
1. Turn the push-button ignition switch to
the “ACC ”or “OFF ”position.
2. Restart the engine.
9-20
Page 499 of 594
Maintenance and service/Maintenance precautions
erative. NEVER use a circuit
tester for this wiring. If your
SRS airbag or seatbelt preten-
sioner needs service, consult
your nearest SUBARU dealer.
NOTE
SUBARU does not endorse the use of
non-SUBARU approved flushing sys-
tems and strongly advises against
performing these services on a
SUBARU vehicle. Non-SUBARU ap-
proved flushing systems use chemi-
cals and/or solvents which have not
been tested or approved by SUBARU.
SUBARU warranties do not cover any
part of the vehicle which is damaged by
adding or applying chemicals and/or
solvents other than those approved or
recommended by SUBARU.
&Before checking or servicing
in the engine compartment
WARNING
. Always stop the engine and apply
the parking brake firmly to pre-
vent the vehicle from moving.
. Always let the engine cool down.
Engine parts become very hot when the engine is running and
remain hot for some time after
the engine has stopped.
. Do not spill engine oil, engine
coolant, brake fluid or any other
fluid on hot engine components.
This may cause a fire.
. When the ignition switch is in the
“ON ”position, the cooling fan
may operate suddenly even
when the engine is stopped. If
your body or clothes come into
contact with a rotating fan, that
could result in serious injury. To
avoid risk of injury, perform the
following precautions.
– Models with push-button start
system:
Always turn the push-button
ignition switch to the “OFF”
position and confirm that the
operation indicator on the
switch is turned off. Then take
the access key out from the
vehicle.
– Models without push-button
start system:
Always remove the key from
the ignition switch.
. Before performing any servicing
on a vehicle equipped with a remote engine start system (a
dealer option), temporarily place
the remote engine start system in
service mode to prevent it from
unexpectedly starting the engine.
&
When checking or servicing
in the engine compartment
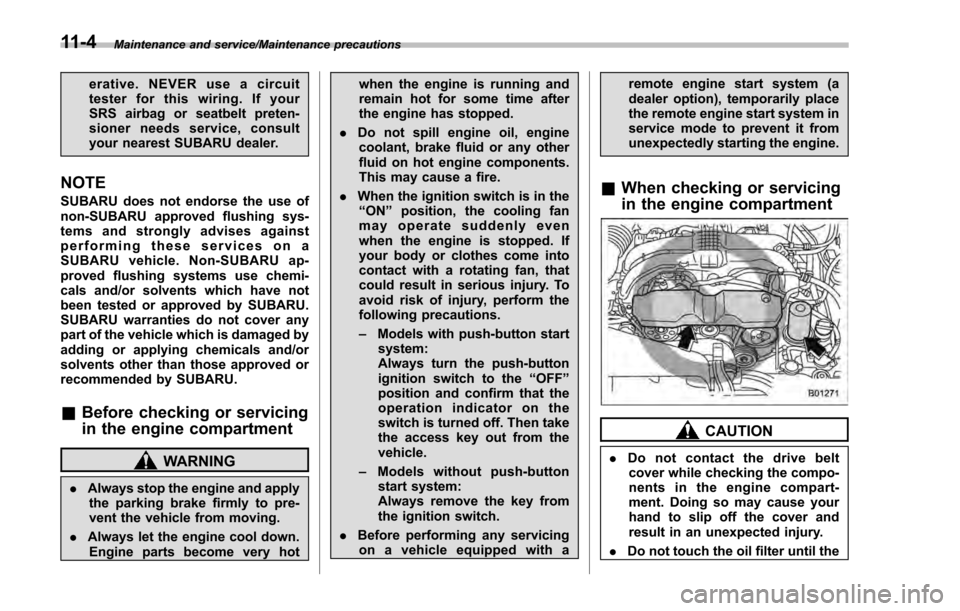
CAUTION
. Do not contact the drive belt
cover while checking the compo-
nents in the engine compart-
ment. Doing so may cause your
hand to slip off the cover and
result in an unexpected injury.
. Do not touch the oil filter until the
11-4
Page 513 of 594
Maintenance and service/Brake booster
Brake booster
If the brake booster does not operate as
described in the following, have it checked
by your SUBARU dealer.
1. With the ignition switch in the“LOCK” /
“ OFF ”position, depress the brake pedal
several times, applying the same pedal
force each time. The distance the pedal
travels should not vary.
2. With the brake pedal depressed, start
the engine. The pedal should move
slightly down to the floor.
3. With the brake pedal depressed, stop
the engine and keep the pedal depressed
for 30 seconds. The pedal height should
not change.
4. Start the engine again and run for
approximately one minute then turn it off.
Depress the brake pedal several times to
check the brake booster. The brake
booster operates properly if the pedal
stroke decreases with each depression.
Brake pedal
Check the brake pedal free play and
reserve distance according to the main-
tenance schedule in the “Warranty and
Maintenance Booklet ”.
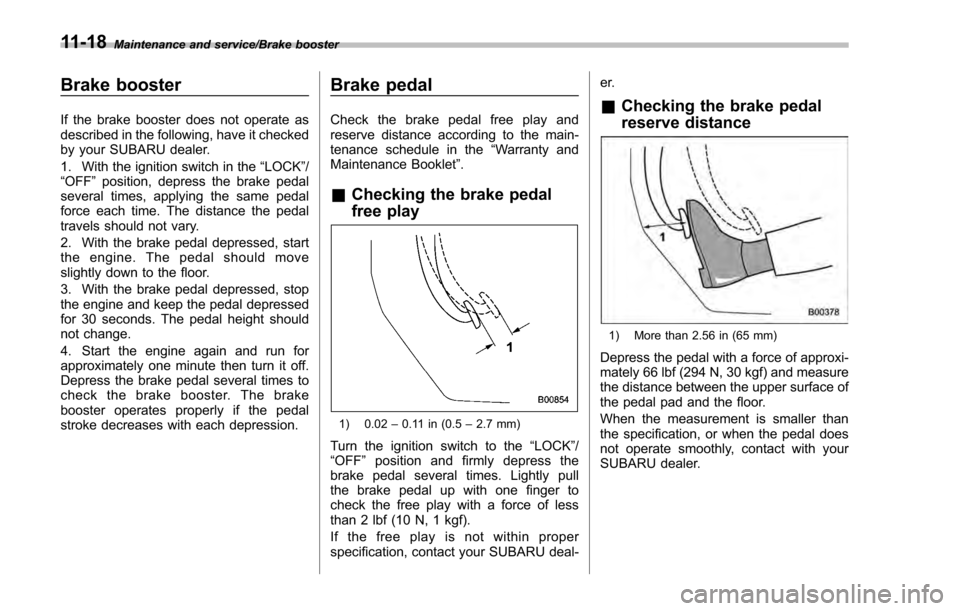
&Checking the brake pedal
free play
1) 0.02 –0.11 in (0.5 –2.7 mm)
Turn the ignition switch to the “LOCK”/
“OFF ”position and firmly depress the
brake pedal several times. Lightly pull
the brake pedal up with one finger to
check the free play with a force of less
than 2 lbf (10 N, 1 kgf).
If the free play is not within proper
specification, contact your SUBARU deal- er.
&
Checking the brake pedal
reserve distance
1) More than 2.56 in (65 mm)
Depress the pedal with a force of approxi-
mately 66 lbf (294 N, 30 kgf) and measure
the distance between the upper surface of
the pedal pad and the floor.
When the measurement is smaller than
the specification, or when the pedal does
not operate smoothly, contact with your
SUBARU dealer.
11-18
Page 514 of 594
Clutch pedal (MT models)
Check the clutch pedal free play and
reserve distance according to the main-
tenance schedule in the“Warranty and
Maintenance Booklet ”.
&Checking the clutch function
Check the clutch engagement and disen-
gagement.
1. With the engine idling, check that there
are no abnormal noises when the clutch
pedal is depressed, and that shifting into
1st or reverse feels smooth.
2. Start the vehicle by releasing the pedal
slowly to check that the engine and
transmission smoothly couple without
any sign of slippage.
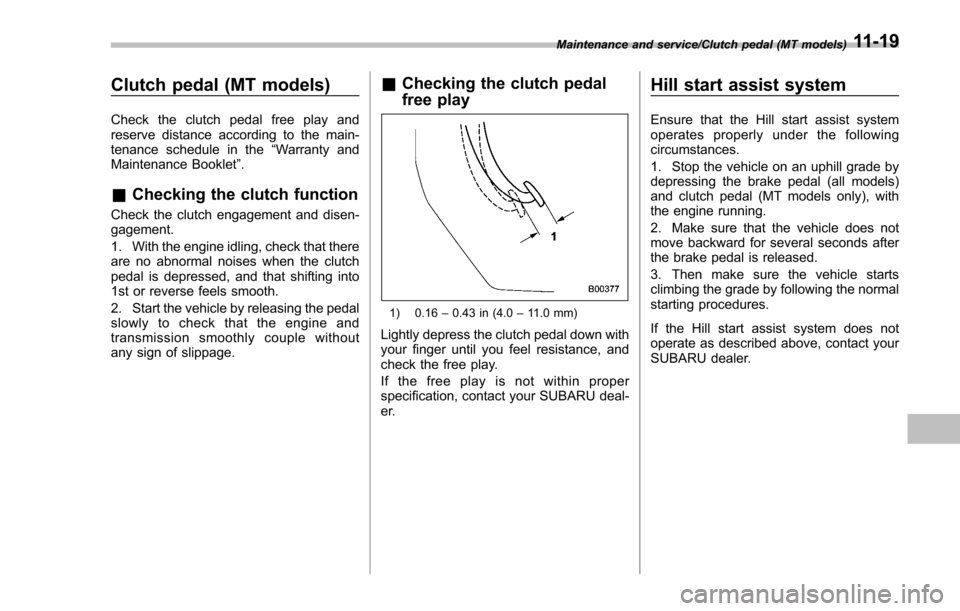
&Checking the clutch pedal
free play
1) 0.16 –0.43 in (4.0 –11.0 mm)
Lightly depress the clutch pedal down with
your finger until you feel resistance, and
check the free play.
If the free play is not within proper
specification, contact your SUBARU deal-
er.
Hill start assist system
Ensure that the Hill start assist system
operates properly under the following
circumstances.
1. Stop the vehicle on an uphill grade by
depressing the brake pedal (all models)
and clutch pedal (MT models only), with
the engine running.
2. Make sure that the vehicle does not
move backward for several seconds after
the brake pedal is released.
3. Then make sure the vehicle starts
climbing the grade by following the normal
starting procedures.
If the Hill start assist system does not
operate as described above, contact your
SUBARU dealer.
Maintenance and service/Clutch pedal (MT models)11-19