2016 SUBARU IMPREZA keyless
[x] Cancel search: keylessPage 224 of 594
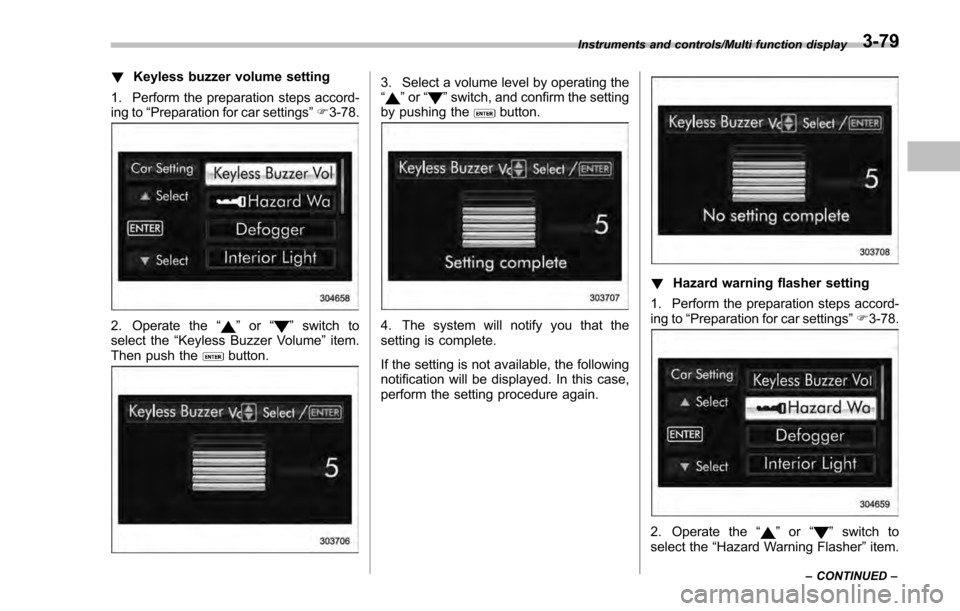
!Keyless buzzer volume setting
1. Perform the preparation steps accord-
ing to “Preparation for car settings” F3-78.
2. Operate the “”or “”switch to
select the “Keyless Buzzer Volume ”item.
Then push the
button.
3. Select a volume level by operating the
“” or “”switch, and confirm the setting
by pushing thebutton.
4. The system will notify you that the
setting is complete.
If the setting is not available, the following
notification will be displayed. In this case,
perform the setting procedure again.
! Hazard warning flasher setting
1. Perform the preparation steps accord-
ing to “Preparation for car settings ”F 3-78.
2. Operate the “”or “”switch to
select the “Hazard Warning Flasher ”item.
Instruments and controls/Multi function display
–CONTINUED –3-79
Page 229 of 594
Instruments and controls/Multi function display
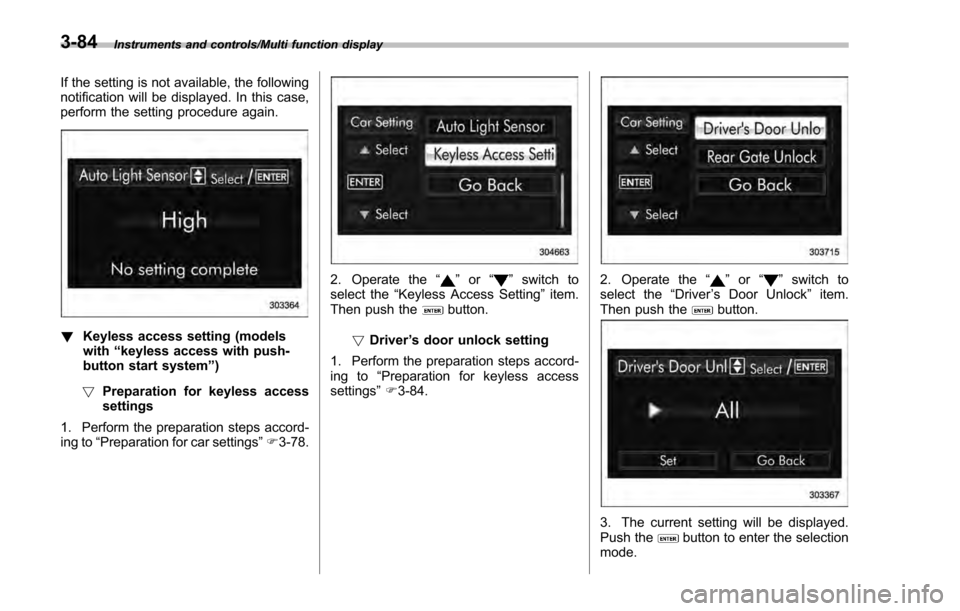
If the setting is not available, the following
notification will be displayed. In this case,
perform the setting procedure again.
!Keyless access setting (models
with “keyless access with push-
button start system”)
! Preparation for keyless access
settings
1. Perform the preparation steps accord-
ing to “Preparation for car settings” F3-78.
2. Operate the “”or “”switch to
select the “Keyless Access Setting ”item.
Then push the
button.
! Driver ’s door unlock setting
1. Perform the preparation steps accord-
ing to “Preparation for keyless access
settings” F3-84.
2. Operate the “”or “”switch to
select the “Driver’s Door Unlock ”item.
Then push the
button.
3. The current setting will be displayed.
Push thebutton to enter the selection
mode.
3-84
Page 230 of 594
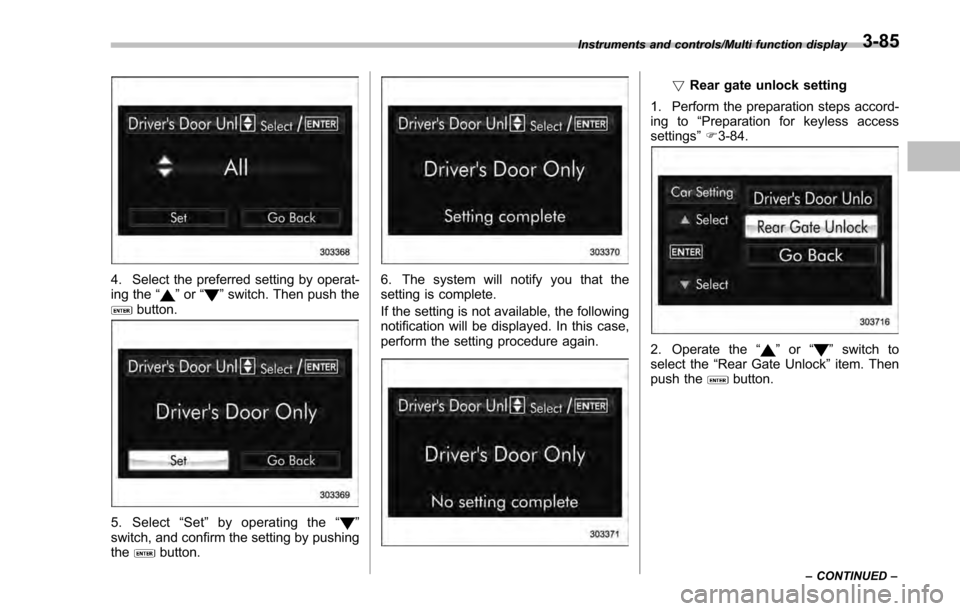
4. Select the preferred setting by operat-
ing the“”or “”switch. Then push thebutton.
5. Select “Set ”by operating the “”
switch, and confirm the setting by pushing
the
button.
6. The system will notify you that the
setting is complete.
If the setting is not available, the following
notification will be displayed. In this case,
perform the setting procedure again.
! Rear gate unlock setting
1. Perform the preparation steps accord-
ing to “Preparation for keyless access
settings ”F 3-84.
2. Operate the “”or “”switch to
select the “Rear Gate Unlock ”item. Then
push the
button.
Instruments and controls/Multi function display
–CONTINUED –3-85
Page 235 of 594

Instruments and controls/Light control switch
“”position: auto on/off headlights (if
equipped)
When the ignition switch is in the “ON ”
position, the instrument panel illumination,
headlights, parking lights, front side mar-
ker lights, rear side marker lights, tail lights
and license plate lights are automatically
on or off depending on the level of the
ambient light.
“
” position
The headlights are all off.
NOTE
The sensitivity of the auto on/off head-
lights can be changed by a SUBARU
dealer. Consult your SUBARU dealer
for details. Also, for models with a multi
function display, the setting can be
changed using the display. For details,
refer to “Auto light sensor sensitivity
setting ”F 3-83.
! Welcome lighting function (if
equipped)
The welcome lighting function turns on the
low beam headlight for smooth approach-
ing to or exiting from the vehicle at night or
in a dark place.
The function is activated while all of the
following conditions are met.
. The light control switch is in the “AUTO
”position
. It is dark enough to turn on the auto on/
off headlights
When approaching:
While the welcome lighting function is
activated, the low beam headlights will
automatically illuminate when unlocking
the doors (for 5-door, including the rear
gate) by using the remote keyless entry
system.
The low beam headlights will remain
illuminated for 30 seconds
*1and then turn
off. However, if any of the following
operations is done, the low beam head-
lights will turn off.
. The doors are locked.
. The light control switch is turned to a
position other than “AUTO”.
. The ignition switch is turned to the “ON”
position.
When exiting:
While the welcome lighting function is
activated, the low beam headlights will
remain illuminated even when either of the
following operation is done.
. Thepush-buttonignitionswitchis
turned to the “OFF”status (models with
“keyless access with push-button start
system ”) .
The key is pulled out from the ignition
switch (models without “keyless access
with push-button start system ”)
The low beam headlights will turn off
under any of the following conditions.
. 3 minutes have passed since the low
beam headlights were illuminated by the
welcome lighting function.
. 30 seconds have passed since the
door is opened and closed.
*1
. The light control switch is turned to a
position other than “AUTO”.
. The locking procedure is performed
twice. When performing the unlocking
procedure after performing the locking
procedure, perform the locking procedure
twice again.
*1: The setting for the period of time in which
the low beam headlights remain on by the
welcome lighting function can be changed by a
SUBARU dealer. Contact your SUBARU dealer
for details.
3-90
Page 367 of 594
Interior equipment/Interior lights
Interior lights
CAUTION
When leaving your vehicle, make
sure the lights are turned off to
avoid battery discharge.
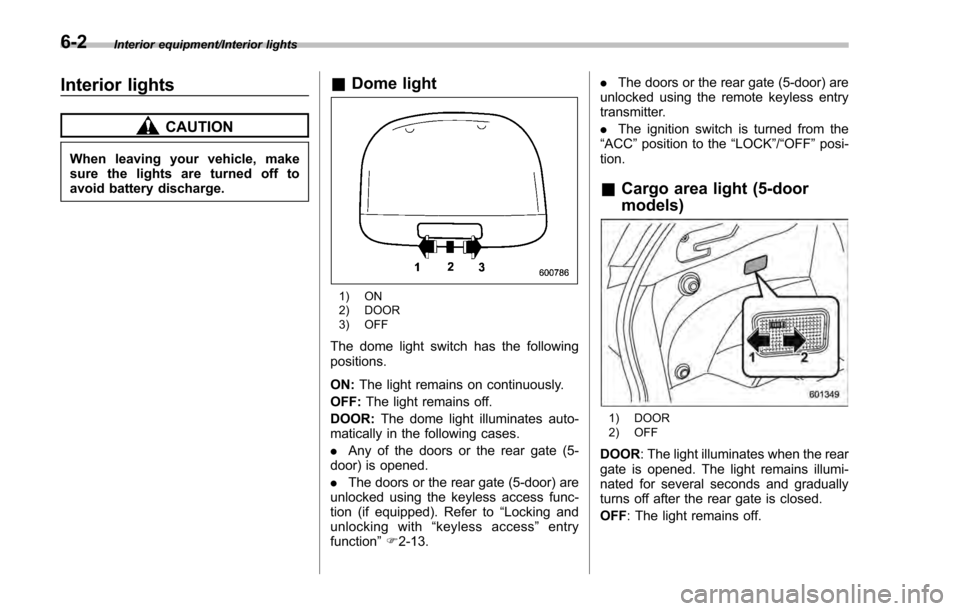
&Dome light
1) ON
2) DOOR
3) OFF
The dome light switch has the following
positions.
ON: The light remains on continuously.
OFF: The light remains off.
DOOR: The dome light illuminates auto-
matically in the following cases.
. Any of the doors or the rear gate (5-
door) is opened.
. The doors or the rear gate (5-door) are
unlocked using the keyless access func-
tion (if equipped). Refer to “Locking and
unlocking with “keyless access” entry
function ”F 2-13. .
The doors or the rear gate (5-door) are
unlocked using the remote keyless entry
transmitter.
. The ignition switch is turned from the
“ ACC ”position to the “LOCK”/ “OFF”posi-
tion.
& Cargo area light (5-door
models)
1) DOOR
2) OFF
DOOR : The light illuminates when the rear
gate is opened. The light remains illumi-
nated for several seconds and gradually
turns off after the rear gate is closed.
OFF : The light remains off.
6-2
Page 368 of 594
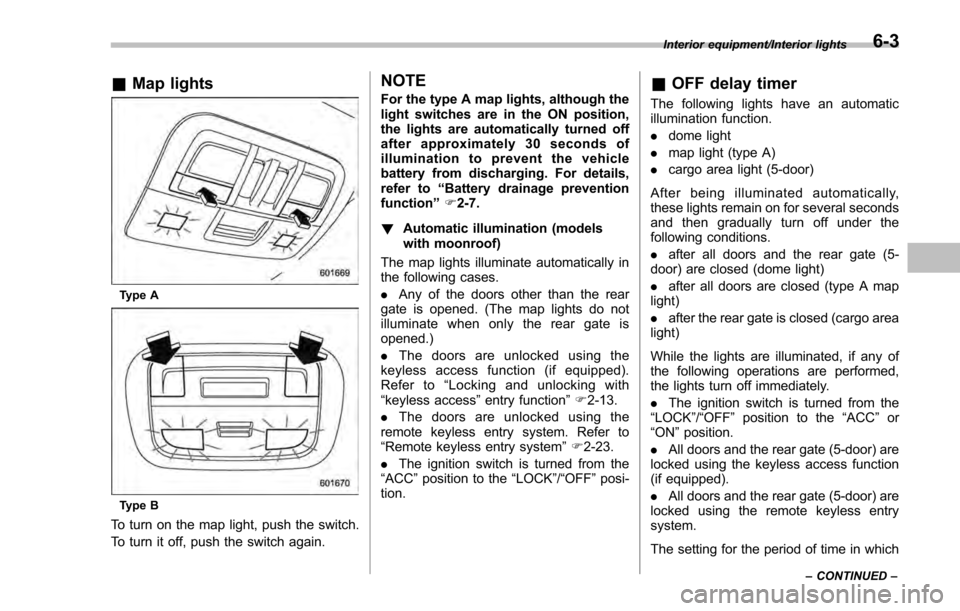
&Map lights
Type A
Type B
To turn on the map light, push the switch.
To turn it off, push the switch again.
NOTE
For the type A map lights, although the
light switches are in the ON position,
the lights are automatically turned off
after approximately 30 seconds of
illumination to prevent the vehicle
battery from discharging. For details,
refer to “Battery drainage prevention
function” F2-7.
! Automatic illumination (models
with moonroof)
The map lights illuminate automatically in
the following cases.
. Any of the doors other than the rear
gate is opened. (The map lights do not
illuminate when only the rear gate is
opened.)
. The doors are unlocked using the
keyless access function (if equipped).
Refer to “Locking and unlocking with
“keyless access” entry function”F 2-13.
. The doors are unlocked using the
remote keyless entry system. Refer to
“Remote keyless entry system ”F 2-23.
. The ignition switch is turned from the
“ACC ”position to the “LOCK”/ “OFF”posi-
tion.& OFF delay timer
The following lights have an automatic
illumination function.
. dome light
. map light (type A)
. cargo area light (5-door)
After being illuminated automatically,
these lights remain on for several seconds
and then gradually turn off under the
following conditions.
. after all doors and the rear gate (5-
door) are closed (dome light)
. after all doors are closed (type A map
light)
. after the rear gate is closed (cargo area
light)
While the lights are illuminated, if any of
the following operations are performed,
the lights turn off immediately.
. The ignition switch is turned from the
“ LOCK ”/“OFF ”position to the “ACC”or
“ON ”position.
. All doors and the rear gate (5-door) are
locked using the keyless access function
(if equipped).
. All doors and the rear gate (5-door) are
locked using the remote keyless entry
system.
The setting for the period of time in which
Interior equipment/Interior lights
–CONTINUED –6-3
Page 371 of 594
Interior equipment/Storage compartment
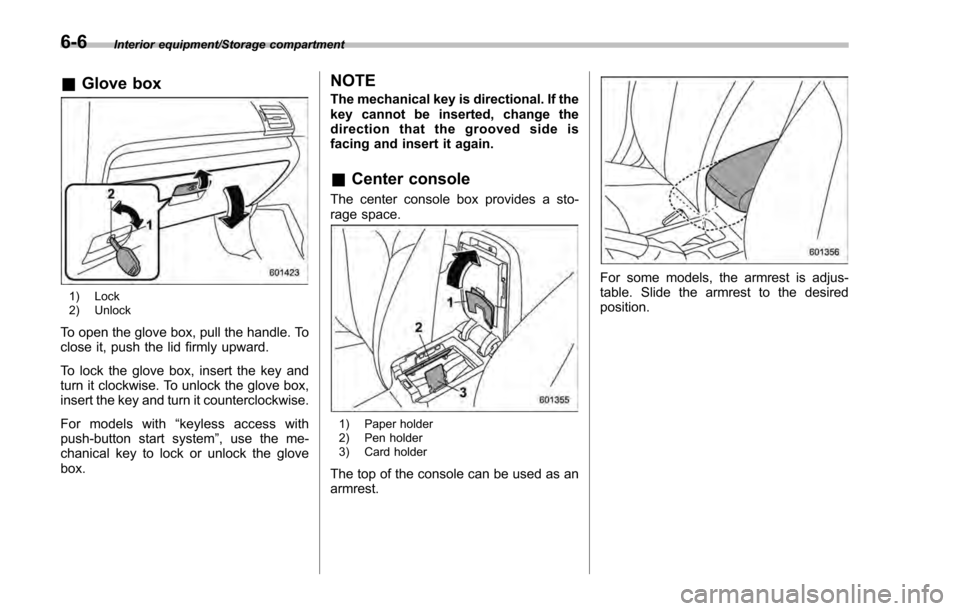
&Glove box
1) Lock
2) Unlock
To open the glove box, pull the handle. To
close it, push the lid firmly upward.
To lock the glove box, insert the key and
turn it clockwise. To unlock the glove box,
insert the key and turn it counterclockwise.
For models with “keyless access with
push-button start system ”, use the me-
chanical key to lock or unlock the glove
box.
NOTE
The mechanical key is directional. If the
key cannot be inserted, change the
direction that the grooved side is
facing and insert it again.
& Center console
The center console box provides a sto-
rage space.
1) Paper holder
2) Pen holder
3) Card holder
The top of the console can be used as an
armrest.
For some models, the armrest is adjus-
table. Slide the armrest to the desired
position.
6-6
Page 386 of 594

Fuel...................................................................... 7-3Fuel requirements ............................................... 7-3
Fuel filler lid and cap ........................................... 7-4
State emission testing (U.S. only) ...................... 7-7
Preparing to drive ............................................... 7-8
Starting and stopping the engine (models without push-button start system) .................. 7-9
Starting engine.................................................... 7-9
Stopping the engine ........................................... 7-11
Starting and stopping engine (models with
push-button start system) .............................. 7-12
Safety precautions............................................. 7-12
Operating range for push-button start system ............................................................. 7-12
Starting engine ................................................... 7-12
Stopping engine ................................................. 7-13
When access key does not operate properly ....... 7-14
Remote engine start system (dealer
option) .............................................................. 7-14
Models with “keyless access with push-button
start system ”................................................... 7-15
Models without “keyless access with push-button
start system ”................................................... 7-16
Entering the vehicle while it is running via remote start ................................................................. 7-19
Entering the vehicle following remote engine start shutdown ......................................................... 7-19
Pre-heating or pre-cooling the interior of the vehicle ............................................................. 7-19
Service mode (models without “keyless access
with push-button start system ”)........................ 7-19 Remote transmitter program (models without
“keyless access with push-button start
system ”).......................................................... 7-19
System maintenance .......................................... 7-20
Manual transmission ......................................... 7-22Shifting speeds.................................................. 7-22
Driving tips ........................................................ 7-23
Continuously variable transmission ................. 7-23Continuously variable transmission features . ..... 7-24
Select lever ....................................................... 7-24
Selection of manual mode (if equipped) .............. 7-26
Selection of “L”(if equipped) ... .......................... 7-28
Shift lock function ............................................. 7-28
Driving tips ........................................................ 7-29
Power steering ................................................... 7-30Power steering warning light .............................. 7-30
Power steering system features ......................... 7-30
Braking............................................................... 7-31Braking tips ....................................................... 7-31
Brake system .................................................... 7-31
Disc brake pad wear warning indicators ............. 7-32
ABS (Anti-lock Brake System).......................... 7-32ABS self-check.................................................. 7-32
ABS warning light .............................................. 7-33
Electronic Brake Force Distribution (EBD)
system ............................................................. 7-33
Steps to take if EBD system malfunctions .......... 7-33
Vehicle Dynamics Control system.................... 7-34Safety precautions............................................. 7-34
System features ................................................. 7-35
Vehicle Dynamics Control system monitor .......... 7-36
Starting and operating
7