Page 17 of 40

DAB station tracking
When a DAB transmitter is a part of several broadcast stations and if the cur-
rent station group is not available on any other frequency, then when the sig-
nal is poor, the same station will be searched in another channel group.
Automatic change from DAB to FM
With bad DAB reception the device tries to find an FM transmitter.
The station name is followed by (
) while the station is being received on the
FM band. The (
) marker disappears when the relevant DAB station can be re-
ceived again.
If a DAB station is also not available in the FM band due to poor reception, the
device will be switched to mute.Media
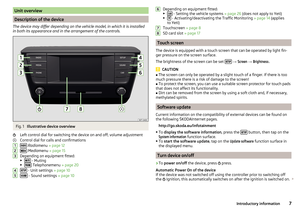
Operation
Main menu
Fig. 7
Main menu
›
To display the main menu, press the button.
Main menu » Fig. 7
Information on playing track
Playback timeline with a slider
Select the audio source
Depending on the audio source type: ▶ Folder / Title list
▶ Multimedia database
Settings of the main menu Media
Note
■
Information concerning the given title appears on the screen, if they are stor-
ed as so-called ID3 Tag on the audio source. If no ID3 tag is available, only the
title name is displayed.■
The remaining playback time indicated does not correspond to the actual re-
maining playback time for titles with variable bitrates.
ABC15Media
Page 18 of 40

Select audio sourceFig. 8
Select the audio source
›
In the Media main menu, tap on the function surface
A
» Fig. 8 and select
the desired audio source.
›
or : In the folder/track list and in the multimedia database press the function-
al surface
B
and select the desired audio source.
By selecting an audio source, playback of titles available starts (not for AUX).
Use play
The unit will play the contents of the connected audio source according to the
alphabetically sequenced directory and file name.
OperationActionPlay / PauseTap Play the previous titleTap (within 3 seconds after the
start of the track playback)Plays the current track from the startTap (after about 3 seconds after
the start of the track playback)Fast-reverse within the titlePress and hold Fast-forward within the titlePress and hold Play the next titleTap Switch on/off the random playback
from the current album or folderTap OperationActionSwitch on/off the repeat playback
from the current album or folderTap Switch on/off repeat playback of spe-
cific trackTap
The movement within the track is possible by finger touching the timeline
B
» Fig. 7 on page 15 .
Folder / track list
Fig. 9
Folder / Title list
›
To display the folder / track list on the Media main menu, tap on the function
surface.
The content of an audio source is displayed in alphabetical order in the fold- er/track list.
Folder/Title list » Fig. 9
Selected audio source / audio source folder (movement within the folder is
carried out by pressing the function surface for the folder)
Select the audio source
Folder
Playlist Currently playing title / track playback stopped
The title cannot be played (tapping on the function surface shows the
cause).
A
16Media
Page 19 of 40

Note■With more than 1,000 tracks in the folder only the first 1,000 tracks with the
oldest creation date are displayed.■
The scanning speed of the folder / track list depends on the connection
speed and volume of data.
Multimedia database
Fig. 10
Multimedia database
For some Apple devices connected via USB, the multimedia database is dis-
played instead of the folders and title lists.
In the multimedia database, the tracks are sorted according to individual cate-
gories
B
» Fig. 10 .
›
To display the multimedia database, in the Media main menu tap on the
function surface.
›
To
playback , select the category and then the title.
Multimedia database » Fig. 10
Selected audio source / Selected category / folder of the audio source
Tap - selection of the parent folder / Hold - selection of the audio source
Sorting categories
Media settings
›
Tap on the function surface in the Media main
surface.
■
Mix/repeat inc. subfolders
- Switch on/off the title display including subfolders
■
Bluetooth
- Settings for the Bluetooth ®
function
■
Traffic program (TP)
- Switches traffic programme on/off
■
Activate AUX
- Enables / disables the AUX input
AB■Remove SD card safely - Safe removal of the inserted SD storage card
■Remove USB safely
- safe removal of external devices connected to the USB in-
put
Audio sources
Introduction to the subject
›
To play , first connect the desired audio source or insert it into the device and
then select the audio source from the list » page 16. Playback starts auto-
matically (does not apply to AUX).
If AUX is selected as the audio source, the playback must be started on the
connected device.
CAUTION
■ Do not save any important data or that which has not been backed up on the
connected audio sources. ŠKODA assumes no responsibility for lost or dam-
aged files or connected audio sources.■
When changing or connecting an audio source, this may cause sudden
changes in volume. Reduce the volume before changing or connecting an au-
dio source.
■
When connecting an external audio source, the external source information
messages can be displayed. These messages must be observed and if neces-
sary confirmed (e.g. enabling data transfer etc).
SD-card
Fig. 11
Insert the SD card
›
Insert the SD card in the slot in the direction of arrow (with the cut end fac-
ing right), until this “locks” » Fig. 11.
›
To remove the SD card, tap on the Media main menu function surface
→
Remove SD card safely
.
Please wait...
→
SD can now be removed.
appears on the screen.
17Media
Page 20 of 40

›Press on the inserted SD memory card. The SD card “jumps” into the eject
position.
CAUTION
■ Do not use an SD card with a broken write protection slide - there is a risk of
damage to the SD card reader!■
When using an SD card with an adapter, vehicle vibrations might cause the
card to fall out of the adapter.
USB input
The USB input (shown with the symbol ) is located in the front centre con-
sole. The exact location of the input » Vehicle - Owner´s Manual .
The USB input audio source can be connected directly or via a connecting ca-
ble.
›
To connect , insert the USB audio source into the appropriate input.
›
To disconnect the USB audio source, tap on the Media main menu function
surface
→
Remove USB safely
.
Please wait...
→
USB device can be removed.
appears
on the screen.
›
Disconnect the audio source from the corresponding USB input.
Charge USB audio source
With the ignition on after connecting the USB audio source, the charging proc-
ess is automatically started (applies for audio sources where charging via the
USB connector is possible).
The charging efficiency can differ compared to the charging from the usual
mains power supply.
Some connected audio sources may not be recognised and cannot be charged.
CAUTION
USB extension cords, or reducers may impair the function of the connected au-
dio source.
Note
We recommend that you use extension cords from ŠKODA Original Accesso-
ries.
Bluetooth ®
player
The unit allows audio files of a connected Bluetooth ®
player to play using the
A2DP and AVRCP audio profile.
› To
connect the Bluetooth ®
player with the device - follow the same instruc-
tions as for pairing the device with a telephone » page 21.›
To disconnect the Bluetooth ®
player, end the connection in the list of paired
devices » page 22 .
Apple device
If an Apple device is connected as a Bluetooth ®
player, and this is connected to
the USB input, then the Bluetooth ®
connection is not dropped. If playback is
cancelled, playback must be started again. Only if USB is selected as the audio
source will the Apple device disconnect as a Bluetooth ®
player. In this regard,
an appropriate warning message appears on the device screen.
If an Apple device is connected to the USB input and playback is switched on, this device cannot be connected as a Bluetooth ®
player. In this regard, an ap-
propriate warning message appears on the device screen.
AUX - input
The AUX input (marked with the lettering) is located in the front centre
console. The exact location of the input » Vehicle - Owner´s Manual .
›
To connect , insert the plug of the AUX audio source into the appropriate con-
nector.
›
To disconnect , pull the plug out of the AUX audio source.
CAUTION
■
The AUX input must only be used for audio devices!■If an external audio source is connected to the AUX input, which is equipped
with an adapter for external power supply, the sound may be impaired.
Note
■ The 3.5 mm stereo jack plug is used for the AUX input.■We recommend that you use extension cords from ŠKODA Original Accesso-
ries.18Media
Page 21 of 40

Supported audio sources and file formats
Supported audio sourcesSourceInterfaceTypeSpecificationFile systemSD cardSD readerStandard sizeSD, SDHC, SDXC
FAT16VFAT
FAT32
exFATUSB-
devices
USB 1.x; 2.x and 3.x or
higher with support of USB 2.x
MSC
USB stick;
HDD (without any spe- cial software);
The MSC mode sup- ports USB devices
MTP
Devices with the An-
droid operating system or Windows mobile
(mobile phone, tablet)AppleDevices with the iOS operating system
(iPhone, iPod, iPad)Blue-
tooth ®
-
Player--Bluetooth proto-
colsA2DPand AVRCP (1.0 - 1.4)-
Supported audio file formats
Codec type
(File formats)File suffixMax bit rateMaximum sampling ratePlaylistsWindows MediaAudio 9 and 10wma384 kbit / s96 kHzm3u pls
wpl asxMPEG-1; 2 and 2.5 (Layer-3)mp3320 kbit / s48 kHz
Note
■The GPT standards (GUID partition table) method structured audio sources
are not supported by the device.■
Files that are protected by Digital Rights Management (DRM) technology
cannot be played back by the device.
19Media
Page 22 of 40

Telephone
Introductory information
Introduction to the subject
This chapter covers the operation of a Bluetooth ®
device connected to the tel-
ephone.
If a telephone is connected to the device with multiple SIM cards, then calls
can be accepted by all SIM cards of the connected phone.
For outgoing calls, it depends on the type of connected telephone, either only
the primary SIM card or one of the other SIM cards can be selected.
Phonebox
The storage compartment in the front centre console can be equipped with
the Phonebox function » Vehicle - Owner´s Manual .
If a telephone is directed, with its rear side downwards, on the pad in the stor-
age compartment, the phone signal is amplified by the roof antenna.
Telephones that support the Qi standard for wireless charging, can also be charged wirelessly in the storage compartment. At the start of the wireless
charging, the appropriate message appears on the device screen.
WARNINGThe general binding country-specific regulations for operating mobile
phones in the vehicle must be observed.
Telephone
Fig. 12
Main menu
›
To display , press the button.
The
Telephone main menu appears when a telephone is connected to the de-
vice.
Home page - information and function surfaces » Fig. 12
Name of the telephone service provider (with active roaming, the symbol
appears before the name
)
Display the list of paired telephones (the name of the connected tele-
phone appears in the function surface)
Function surfaces of preferred contacts
Emergency number dialling or function surface of the preferred contact
» page 23 , Manage preferred contacts (favourites)
Select a group of function surfaces for preferred contacts
Enter the telephone number
Display the telephone contact list
Display the call list (missed calls, in addition to the function surface, the
number of calls when absent is displayed)
Menu settings for Telephone
Symbols in the status bar Signal strength of the telephone service network
Charge status of the telephone battery
Missed call
Current call
Settings
›
In the main menu Telephone, tap on the function
surface.
■
Hands-free
- switch a call to the telephone / back to the device (the menu item
is displayed during a call)
■
Select telephone
- Search for available telephones/list of paired telephones/se-
lect telephone
■
Find
- search for available phones
■
Bluetooth
- Bluetooth ®
settings » page 11
■
User profile
- user profile settings
■
Manage favourites
- set the function surfaces for your favourite contacts
■
Sort by:
- Arrangement of telephone contact list
■
Surname
- sort by contact name
■
Name
- sort by contact first name
■
Imp. contacts
- Import telephone contacts
■
Select ringtone
- Selecting the ring tone
ABCD20Telephone
Page 23 of 40

■Simultaneous calls
- enable/disable the option to hold")
■Remember your mobile - Turn on/off the warning mode before forgetting the
phone in the vehicle (if the phone was connected to the device)
■Simultaneous calls
- enable/disable the option to hold two concurrent calls
Pair and connect
Introduction to the subject
The range of the connection to the hands-free system is limited to the passen-
ger compartment.
To pair a telephone with the device using Bluetooth ®
, it is necessary to pair
the two devices.
The pairing process is dependent on whether another telephone is connected
or not connected to the device at the time of pairing.
A telephone and a Bluetooth ®
player can be connected to the device. The tele-
phone can also be a player at the same time.
Up to 20 external devices can be paired with the device. After reaching the
maximum number, the pairing of the next external device will replace that of
the device that has not been used for the longest period of time.
A connection with a telephone that is already paired does not require pairing. It is enough to find the telephone that has been paired in the list of paired
phones and make the connection.
WARNINGPair and connect a telephone to the device only when the vehicle is at a
standstill - there is risk of accident!
conditions for pairing
The telephone can be paired with the device under the following conditions. The ignition is switched on.
The Bluetooth ®
function of the device and the telephone is switched on.
The visibility of the device and the telephone is switched on.
The telephone is within range of the Bluetooth ®
signal of the device.
The telephone is compatible with the device.
The telephone is connected to an external Bluetooth ®
device (e.g. “head-
set”).
The pairing can be initiated from the device or from the telephone.
During the pairing and connection process, information messages are dis-
played in the device screen and the telephone screen. These messages must
be observed and if necessary confirmed (e.g. enabling the contact import or
connecting the Bluetooth ®
player among others).
Please refer to the compatibility of telephones as well as updates which are available for the Bluetooth ®
device, and are available on the ŠKODA Internet
pages.
http://go.skoda.eu/infotainment
Pairing and connection process
Pair the telephone with the device
›
Search available Bluetooth ®
devices in your telephone.
›
Select the device (name of the device
→
Bluetooth
→
Name:
).
›
Confirm or enter the PIN code to confirm the pairing.
The telephone is connected to the device or merely paired, depending on
whether one or no other external device is already connected.
Pair the device with the telephone
›
If there is no telephone connected to the device, then press the button
then tap the function surface
Find telephone
.
›
If a telephone is connected to the device, press the button, then tap on
the function surface
→
Find telephone
.
›
Select the desired telephone from the list of selected external Bluetooth ®
devices.
›
Confirm or enter the PIN code to confirm the pairing.
If external Bluetooth ®
devices are already connected to the device, then dur-
ing the pairing and connection process messages and options for the possible
connection type (e.g. replacement of the connected external Bluetooth ®
de-
vice) are displayed.
21Telephone
Page 24 of 40

Managing paired devicesFig. 13
List of paired devices / Bluetooth ® profiles
›
In the Telephone main menu, tap on the function surface
→
Bluetooth
→
Paired devices
.
In the list of paired external devices, the following symbols of the Bluetooth ®
profile may appear for the individual external devices » Fig. 13
.
SymbolSymbol
colourOperationWhiteExternal device can be connected as telephoneGreenExternal device is connected as telephone
WhiteExternal device can be connected as Bluetooth ®
play-
erGreenExternal device is connected as Bluetooth ®
player
Connection set-up
▶ Select the desired external device from the list of paired external devices.
▶ Select the desired profile from the list of available Bluetooth ®
profiles
» Fig. 13 -
.
If external Bluetooth ®
devices are already connected to the device, then dur-
ing the connection process messages and options for the possible connection
type (e.g. replacement of the connected external Bluetooth ®
device) are dis-
played.
Disconnection
▶ Select the desired external device from the list of paired external devices.
▶ Select the desired profile from the list of available Bluetooth ®
profiles
» Fig. 13 -
.
Delete the paired external device
▶ To delete, tap on one of the following function surfaces.
- Delete all external devices
- Delete the desired external device
▶ Confirm the deletion by tapping on the function surface Delete
.
Note
The Bluetooth ®
audio profile can be switched on/off by pressing the but-
ton and then tapping on the function surface → Bluetooth
→
Bluetooth audio(A2DP/AVRCP)
.
Telephone functions
Enter telephone number and select
Fig. 14
Numeric keypad / editing the telephone number
Enter a telephone number and dial
›
In the Telephone main menu, tap on the function
surface.
›
Enter the telephone number using the numeric keypad » Fig. 14 -
.
›
Select the number entered by tapping on the function surface
.
Function surfaces of the numerical keyboard Enter the last dialled number / dial the telephone number entered
Dialling the emergency number (valid only in certain countries)
Dial the breakdown number in case of breakdown
Dial the info number (for information regarding the products and serv-
ices of the brand ŠKODA )
Selection of the mailbox number is not supported by the device
All 22Telephone