2016 SKODA KODIAQ spare wheel
[x] Cancel search: spare wheelPage 104 of 344
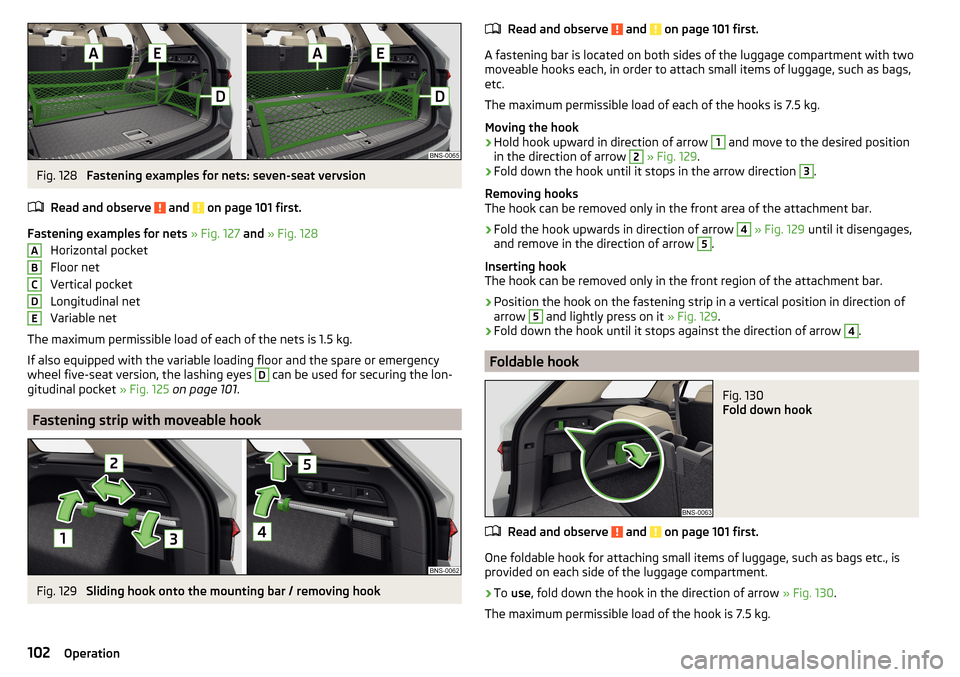
Fig. 128
Fastening examples for nets: seven-seat vervsion
Read and observe
and on page 101 first.
Fastening examples for nets » Fig. 127 and » Fig. 128
Horizontal pocket
Floor net
Vertical pocket
Longitudinal net
Variable net
The maximum permissible load of each of the nets is 1.5 kg.
If also equipped with the variable loading floor and the spare or emergency
wheel five-seat version, the lashing eyes
D
can be used for securing the lon-
gitudinal pocket » Fig. 125 on page 101 .
Fastening strip with moveable hook
Fig. 129
Sliding hook onto the mounting bar / removing hook
ABCDERead and observe and on page 101 first.
A fastening bar is located on both sides of the luggage compartment with two
moveable hooks each, in order to attach small items of luggage, such as bags,
etc.
The maximum permissible load of each of the hooks is 7.5 kg.
Moving the hook
›
Hold hook upward in direction of arrow
1
and move to the desired position
in the direction of arrow
2
» Fig. 129 .
›
Fold down the hook until it stops in the arrow direction
3
.
Removing hooks
The hook can be removed only in the front area of the attachment bar.
›
Fold the hook upwards in direction of arrow
4
» Fig. 129 until it disengages,
and remove in the direction of arrow
5
.
Inserting hook
The hook can be removed only in the front region of the attachment bar.
›
Position the hook on the fastening strip in a vertical position in direction of
arrow
5
and lightly press on it » Fig. 129.
›
Fold down the hook until it stops against the direction of arrow
4
.
Foldable hook
Fig. 130
Fold down hook
Read and observe and on page 101 first.
One foldable hook for attaching small items of luggage, such as bags etc., is
provided on each side of the luggage compartment.
›
To use , fold down the hook in the direction of arrow » Fig. 130.
The maximum permissible load of the hook is 7.5 kg.
102Operation
Page 236 of 344

WARNING■The general information relating to the use of assistance systems must
be observed » page 215, in section Introduction .■
During the parking process, the system automatically performs rapid
steering movements. While it is doing so, do not place your hands between
the steering wheel – risk of injury!
■
During a parking manoeuvre on loose or slippery surfaces (gravel, snow,
ice, etc.) you may stray from the calculated road. It is therefore recommen-
ded that you do not use the system in such situations.
CAUTION
The correct evaluation of the parking space and the parking procedure de-
pends on the circumference of the wheels on the vehicle.■
The system only works correctly if the vehicle is fitted with the wheel size
approved by ŠKODA AUTO.
■
Abstain from using the system when the vehicle is fitted with snow chains or
a temporary spare wheel.
■
If wheels other than those approved by ŠKODA AUTO are fitted, the resulting
position of the vehicle in the parking space can differ slightly. This can be avoi-
ded by readjusting the system at a specialist garage.
CAUTION
If other vehicles are parked behind or on the curb, the system can drive your
vehicle over the kerb or up to the kerb - there is a risk of damage to the
wheels. If necessary, intervene in time.
Note
■ We recommend performing the parking at a safe speed to about 5 km/h.■The parking procedure can be stopped at any time by pressing the
» Fig. 289 on page 234 button or by a steering intervention.OperationFig. 289
System button
Read and observe and on page 234 first.
The system support is provided in the following manner.
▶ While the parking space search is going on, a measurement and evaluation of
the parking space size is completed.
▶ The display of the instrument cluster (hereinafter only display) shows suita-
ble parking spaces and a parking mode is recommended.
▶ The display shows instructions and information before the start and during
the parking.
▶ Based on the calculated road surface, the front wheels will be automatically
rotated during the parking.
Conditions for the system function
The system can look for a parking space only if the following basic conditions
are met.
The system is activated.
The vehicle is travelling at less than 40 km/h.
The vehicle is travelling at less than 20 km/h.
The distance to a number of parked vehicles is approximately 0.5 - 1.5 m.
TCS is activated » page 217.
The system can only carry out the parking procedure if the following basic con- ditions are met.
The vehicle is travelling at less than 7 km/h.
The parking procedure takes less than 6 minutes.
There is no driver intervention in the automatic steering operation.
TCS is activated » page 217.
The TCS does not engage.
No trailer or other accessory is connected to the trailer socket.
234Driving
Page 271 of 344

Overview of service intervalsFig. 323
Vehicle data carrier: service interval
The service interval prescribed by the manufacturer is indicated on the vehicle
data » Fig. 323 . The vehicle data is pasted in the instructions and under the
floor covering in the luggage compartment (for vehicles with spare or emer-
gency wheel, the vehicle data carrier is below the respective wheel).
One of the following service intervals applies to your vehicle:
▶ Fixed service interval QI1.
▶ Fixed service interval QI2.
▶ Fixed service interval QI3.
▶ Fixed service interval QI4.
▶ Variable service interval QI6.
In order to operate a vehicle with a flexible service interval, it is necessary
that only the prescribed engine oil is used.
If this engine oil is not available, the oil change is subject to a fixed service in-
terval. In this case, the vehicle must be changed to the fixed service interval.
Note
■
The corresponding motor oil specifications » page 280.■For vehicles with flexible service interval QI6, you can initiate a return to the
fixed service interval or back to the flexible service interval to be performed by
a specialist garage.Fixed service intervals QI1 - QI4
Oil change serv- ice
QI1Every 5,000 km or every 1 year a)
.QI2Every 7,500 km or every 1 year a)
.QI3Every 10,000 km or every 1 year a)
.QI4Every 15,000 km or every 1 year. a)Inspectionb)
Variant 1
QI1 - QI4
After the first 30,000 km or 2 years a)
, then every
30,000 km or every 1 year a)
.Inspection b)
Variant 2Every 15,000 km or every 1 year. a)Inspectionb)
Variant 3Every 10,000 km or every 1 year a)
.Brake fluid
changeQI1 - QI4First change after 3 years, then every 2 years,a)
(whichever comes first).
b)
For information about the valid version for your vehicle, please contact a ŠKODA partner.
WARNINGThe brake fluid must always be changed after the first 3 years and then ev-
ery 2 years. Longer intervals between changing the brake fluid can cause
vapour bubbles to form in the brake system on sharp braking. This can im-
pair the efficiency of the brakes – risk of accident!
Note
For diesel operation with a high sulphur content, the oil must be changed ev-
ery 7,500 km. Ask your specialist garage for information on the countries
where diesel fuel has a high sulphur content.
Flexible service interval QI6
The oil change service intervals depend on the intensity at which the vehicle is
driven and the local conditions in which the vehicle is used. For example, your
vehicle is subjected to different demands when driven over short distances
than when driven over long distances. The intervals are therefore flexible.
Oil change serv-
iceAccording to the service interval display (at the latest af-
ter 30,000 km or 2 years a)
).Inspection b)
Variant 1After the first 30,000 km or 2 years a)
, then every 30,000
km or every 1 year a)
. 269Care and maintenance
Page 287 of 344
Disconnect/reconnect and changeRead and observe
and on page 283 first.
The new vehicle battery must have the same capacity, voltage, current and the
same size as the original Battery.
We recommend you have the battery replaced by a specialist garage.
›
To disconnect the battery, switch off the ignition and disconnect first the
negative terminal
, and only after this the positive
.
›
To connect the battery, first connect the positive terminal
, and only after
this the negative terminal
.
After disconnecting and re-connecting the vehicle battery, the following func-
tions or devices are partially or completely inoperative.
Function / deviceOperating measurePower windows» page 63Panorama sliding/tilting roof» page 64Sun screen» page 65Time setting» page 44
CAUTION
■ Disconnect the vehicle battery only with the ignition turned off - there is a
risk of damaging the electrical system of the vehicle.■
Before disconnecting the battery, close the electric tailgate, all the windows,
the sliding / tilting roof and the electric sunshade - otherwise malfunctions of
equipment elements may occur.
■
Under no circumstances must the connection cables be connected incorrect-
ly – risk of fire.
Note
After disconnecting and re-connecting the vehicle battery, we recommend
having the vehicle checked by a specialist to ensure that the full functionality
of all electrical systems is guaranteed.Wheels
Wheels and tyres
Introduction
This chapter contains information on the following subjects:
Advice on tyre/wheel usage
285
Tyre pressure
286
Tyre wear and wheel change
287
Spare wheel
287
Spare wheel
287
Tyre marking
288
Advice on tyre/wheel usage
New tyres , during the first 500 km, new tyres do not offer optimum grip and
appropriate care should therefore be taken when driving.
Always fit tyres with a greater profile depth on the front wheels.
Wheels and bolts are matched to each other in terms of design. We recom-
mend that you use wheel rims and wheel bolts from ŠKODA Original Accesso-
ries.
Always store wheels or tyres in a cool, dry and, where possible, dark place. The
tyres themselves should be stored standing.
Tyre life
Tyres age and lose their original characteristics, even if they are not being
used. Therefore, we recommend not using tyres that are more than 6 years
old.
The manufacturing date is indicated on the tyre sidewall (possibly on the in-
side ). For example, DOT ... 10 16... means, for example, that the tyre was manu-
factured in the 10th week of 2016.
Tyre damage
We recommend checking your tyres and wheel rims for damage (punctures,
cuts, splits and bulges, etc.) on a regular basis.
Remove any foreign objects in the tyre tread immediately (e.g. small stones).
Foreign bodies which have penetrated into the tyre (e.g. screws or nails)
should not be removed. Seek help from a specialist garage.
285Wheels
Page 288 of 344
Installation of new tyres
Only fit radial tyres of the same type, size (rolling circumference) and the same
tread pattern on one axle on all 4 wheels.
When mounting new tires the tires have to be replaced axle by axle.
Unidirectional tyres
Some tires may be directional. The direction of rotation of the tyres is marked by arrows on the wall of the tyre .
The specified running direction must be strictly adhered to, otherwise the fol-
lowing tyre characteristics may be degraded. ▶ Driving stability.
▶ Traction.
▶ Tyre noise and tyre wear.
Tires with increased resistance to air loss when punctured
Some vehicles may be fitted with tyres at the factory that have increased
puncture resistance (so-called “SEAL” tyres). For some countries, vehicles are
equipped with “SEAL” tyres delivered without a spare wheel and appropriate
tools.
If “SEAL”tyres are replaced with standard tyres, the vehicle must be retrofitted
with a puncture repair kit or spare wheel and appropriate hand tools.WARNING■ Never use tyres if you do not know anything about the condition and age.■Never drive with damaged tyres – risk of accident.
CAUTION
■The tyres must be protected from contact with substances such as oil,
grease and fuel, which could damage them. If the tyres come into contact with
these substances, then we recommend you have this checked out in a special-
ist workshop.■
Do not use rims with ground or polished surface in winter conditions - there
is a risk of wheel damage (e.g. from the road grit).
Note
■ We recommend that any work on the wheels or tyres is carried out by a spe-
cialist garage.■
We recommend that you use wheel rims, tyres, full wheel trims and snow
chains from ŠKODA Original Accessories.
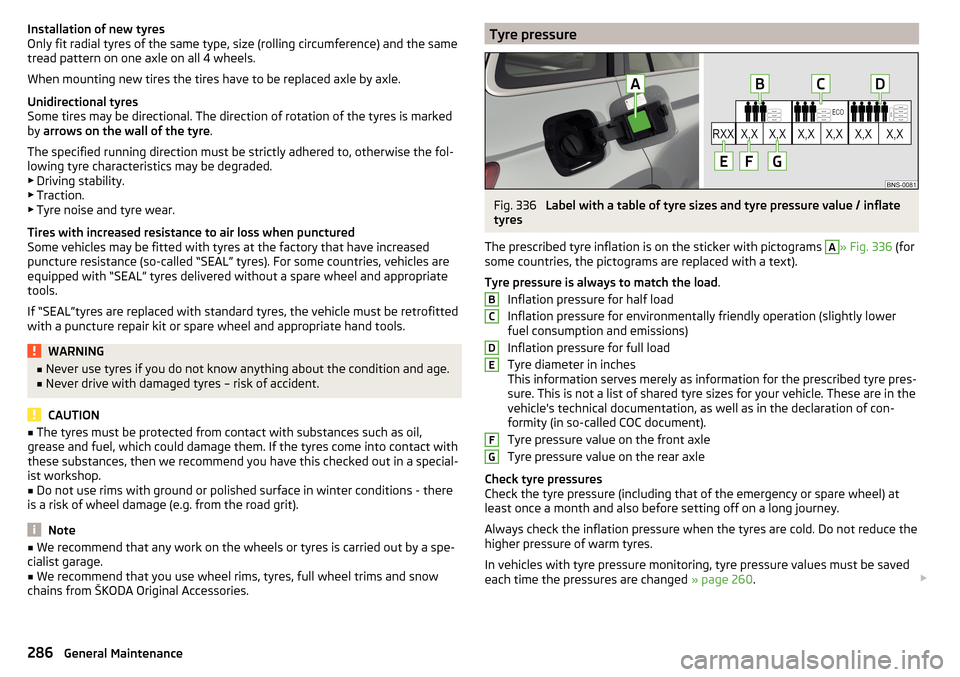
Tyre pressureFig. 336
Label with a table of tyre sizes and tyre pressure value / inflate
tyres
The prescribed tyre inflation is on the sticker with pictograms
A
» Fig. 336 (for
some countries, the pictograms are replaced with a text).
Tyre pressure is always to match the load .
Inflation pressure for half load
Inflation pressure for environmentally friendly operation (slightly lower
fuel consumption and emissions)
Inflation pressure for full load
Tyre diameter in inches
This information serves merely as information for the prescribed tyre pres-
sure. This is not a list of shared tyre sizes for your vehicle. These are in the
vehicle's technical documentation, as well as in the declaration of con-
formity (in so-called COC document).
Tyre pressure value on the front axle
Tyre pressure value on the rear axle
Check tyre pressures
Check the tyre pressure (including that of the emergency or spare wheel) at
least once a month and also before setting off on a long journey.
Always check the inflation pressure when the tyres are cold. Do not reduce the
higher pressure of warm tyres.
In vehicles with tyre pressure monitoring, tyre pressure values must be saved
each time the pressures are changed » page 260.
BCDEFG286General Maintenance
Page 289 of 344

WARNING■Do not drive with an incorrect tyre pressure - risk of accident.■In the event of very fast pressure loss, e.g. in the event of sudden tyre
damage, an attempt should be made to bring the vehicle carefully to a stop
without sudden steering movements and without any hard braking.
Note
The declaration of conformity (COC document), can be obtained from a ŠKODA 1)
partner.
Tyre wear and wheel change
Fig. 337
Tyre wear indicator / wheel change
The tyre wear increases in the following circumstances.
▶ Incorrect tyre pressure.
▶ Driving style (e.g. fast cornering, rapid acceleration / deceleration).
▶ Incorrect balancing of wheels (have the wheels balanced after changing
tyres / repair or with “restlessness” on the steering).
▶ Wheel alignment error.
Wear indicators are located in the profile of the tyres which display the per-
missible minimum tread depth » Fig. 337 -
. A tyre is to be regarded as worn
out when this indicator is flush with the tread. Markings on the walls of the
tyres with the letters “TWI”, triangular symbols or other symbols identify the
position of the wear indicators.
For uniform wear on all tyres, we recommend that you change the wheels ev-
ery 10 000 km according to the schedule » Fig. 337 -
.
WARNING■
Change when they are worn down to the wear indicators at the latest -
risk of accident.■
Improper wheel alignment affects the driving behaviour - there is an acci-
dent.
■
Unusual vibrations or “pulling” of the vehicle to one side could be a sign
of tyre damage. Reduce speed and stop! If no tyre damage is evident, seek
the assistance of a specialist garage.
Spare wheel
The size of the spare wheel is identical to that of the vehicle factory installed
wheels.
After changing the spare wheel, the tyre pressure must be adjusted.
In vehicles with tyre pressure monitoring, save the tyre pressure values in the
system » page 260 .
WARNING■
If, you get a puncture and a spare tyre has to be mounted with opposite
direction of rotation, then drive carefully. The tyre no longer retains its opti-
mal characteristics in this situation.■
If the dimensions or design of the spare wheel differ from the tyres fitted
to the vehicle (e.g. winter tyres or low-profile tyres), it must only be used
briefly in the event of a puncture and if an appropriately cautious style of
driving is adopted.
Spare wheel
Use the emergency spare wheel only to reach the nearest specialist garage, as
it is not intended for permanent use .
A warning label is displayed on the rim of the temporary spare wheel.
1)
Only valid for some countries and some models.
287Wheels
Page 290 of 344

Please note the following if you intend to use the temporary spare wheel.▶ Do not cover the signs.
▶ Be particularly observant when driving.
▶ Inflate the temporary spare wheel to the maximum inflation pressure for the
vehicle » page 286 (the prescribed tyre pressure of the spare wheel R 18 is
4.2 bar).
In vehicles with tyre pressure monitoring, save the tyre pressure values in the system » page 260 .WARNING■
Never drive with more than one spare wheel mounted!■When driving with the temporary spare wheel at full throttle acceleration,
avoid sharp braking and fast cornering.■
Do not use snow chains on the temporary spare wheel.
■
Observe instructions on the warning sign of the emergency wheel.
Tyre marking
Explanation of tyre markings - e.g. 235/55 R 18 100 V
235Tyre width in mm55Height/width ratio in %RCode letter for the type of tyre – Radial18Diameter of wheel in inches100load indexVSpeed symbol
Load index - indicates the maximum permissible load for each individual tyre
load index9596979899100101102103Load
(In kg)690710730750775800825850875Speed symbol - indicates the maximum permissible speed for a vehicle fitted
with tyres in the category concernedspeed
symbolMTUHVWYMaximum speed
(in km/h)130190200210240270300WARNINGNever exceed the maximum permissible load bearing capacity and speed
for the tyres fitted – risk of accident.
Operating in winter conditions
All-year (or “winter”) tyres
All-year or “winter” tyres (indicated by an M+S or a mountain peak/snowflake
symbol ) to improve the performance of the vehicle in winter conditions.
For the best possible handling, use all-season or “winter” tyres on all four
wheels with a minimum tread depth of 4 mm.
If using “winter” tyres, fit the summer tyres on again in good time as they pro-
vide better handling properties, a shorter braking distance, less tyre noise, and
reduced tyre wear on roads which are free of snow and ice as well as at tem-
peratures above 7 °C.
Speed symbol
All-season or “winter” tyres (marked with M+S and a peak/snowflake symbol
) of a lower speed category than stated in the technical vehicle documenta-
tion can be used, provided the permissible maximum speed of these tyres is
not exceeded even if the possible maximum speed of the vehicle is higher.
The speed limit for all-season or “Winter” tires can be adjusted in the Infotain-
ment menu
→
→
Tyres
.
If the vehicle has all-season or “winter” tires of a lower speed category then
the specified maximum speed of the vehicle (referring to tyres that have not
been delivered by the factory, a warning label with the maximum value of the
speed category provided for the mounted tyres must be fixed in the interior of
288General Maintenance
Page 293 of 344

›To
remove the fire extinguisher, release the safety catches on the two belts
in the direction of arrow » Fig. 340 and remove the fire extinguisher.›
To secure , place the fire extinguisher back in the mount and secure with the
belts.
The Owner´s Manual is fitted next to the fire extinguisher.
Pay attention to the expiration date of the fire extinguisher. After this date,
the correct function of the device is not guaranteed.
WARNINGAlways properly secure the fire extinguisher, there is a risk of injury in the
event of sudden braking or a vehicle collision.
Vehicle tool kit
Fig. 341
Vehicle tool kit
The box containing the vehicle tool kit is located in the storage compartment
for the spare wheel, and can be secured with a tape depending on the equip-
ment fitted.
Depending on the vehicle configuration, it may not contain all the compo-
nents listed in the on-board tool kit.
Adapter for anti-theft wheel bolts
Towing eye
Clamps for removing the wheel trims
Jack with sign
Crank for the jack
12345Wheel wrench
Extraction pliers for the wheel bolt caps
Breakdown kitWARNING■ The factory-supplied lifting jack is only intended for your model of vehicle.
Under no circumstances attempt to lift other vehicles or loads with this –
there is a risk of injury.■
Always securely stow the tool in the respective box and make sure that it
is secured to the spare wheel using the tape - there is a risk of injury in the
event of sudden braking or a vehicle collision.
CAUTION
Screw the jack back to its starting position prior to putting it back in its box -
Otherwise, there is a risk of damage to the box.
Note
The declaration of conformity is included with the jack or the log folder.
Changing a wheel
Preliminary work
For safety's sake, the following instructions must be observed before
changing a wheel on the road.
›
As far as possible, park the vehicle far away from the traffic flow - find a
place with a flat and firm surface.
›
Switch off the engine.
›
For vehicles with manual transmission , select 1st gear.
›
For vehicles with
automatic transmission , place the selector lever in the P
position.
›
Switch on the parking brake.
›
Position the hazard warning system and the warning triangle at the prescri-
bed distance.
›
All the occupants should get out of the vehicle. The passengers should not
stand on the road (instead they should remain behind a crash barrier, for in-
stance) while the wheel is being changed.
›
Uncouple any trailers.
678291Emergency equipment and self-help