2016 RENAULT TALISMAN change
[x] Cancel search: changePage 46 of 328

1.40
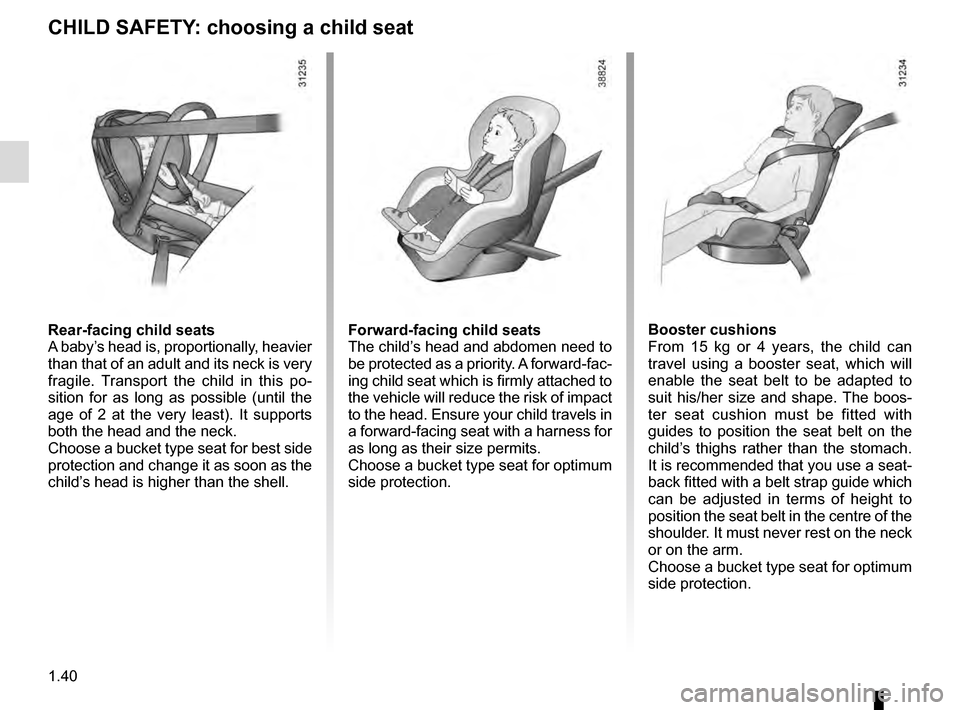
CHILD SAFETY: choosing a child seat
Rear-facing child seats
A baby’s head is, proportionally, heavier
than that of an adult and its neck is very
fragile. Transport the child in this po-
sition for as long as possible (until the
age of 2 at the very least). It supports
both the head and the neck.
Choose a bucket type seat for best side
protection and change it as soon as the
child’s head is higher than the shell.Forward-facing child seats
The child’s head and abdomen need to
be protected as a priority. A forward-fac-
ing child seat which is firmly attached to
the vehicle will reduce the risk of impact
to the head. Ensure your child travels in
a forward-facing seat with a harness for
as long as their size permits.
Choose a bucket type seat for optimum
side protection.Booster cushions
From 15 kg or 4 years, the child can
travel using a booster seat, which will
enable the seat belt to be adapted to
suit his/her size and shape. The boos-
ter seat cushion must be fitted with
guides to position the seat belt on the
child’s thighs rather than the stomach.
It is recommended that you use a seat-
back fitted with a belt strap guide which
can be adjusted in terms of height to
position the seat belt in the centre of the
shoulder. It must never rest on the neck
or on the arm.
Choose a bucket type seat for optimum
side protection.
Page 49 of 328

1.43
CHILD SAFETY: fitting a child seat, general information (1/2)
The types of child seat indicated may
not be available. Before using a differ-
ent child seat, check with the manufac-
turer that it can be fitted.
In the front seat
The laws concerning children travel-
ling in the front passenger seat differ in
every country. Consult the legislation in
force and follow the indications on the
diagram on the following page.
Before fitting a child seat in this seat (if
authorised):
– lower the seat belt as far as possible;
– move the seat as far back as pos-sible;
– gently tilt the seatback away from vertical (approximately 25°);
– on equipped vehicles, raise the seat base as far as possible.
In all situations, reinsert the headrest to
its full extent so that it does not interfere
with the child seat (see the information
on “Front headrests” in Section 1);
Some seats are not suitable for fitting
child seats. The diagram on the fol-
lowing page shows you how to attach
a child seat.
Fit the child seat in a rear
seat wherever possible.
Make sure that the child
seat or the child’s feet do
not prevent the front seat from lock-
ing correctly. Refer to the informa-
tion on the “Front seat” in Section 1.
Check that when installing the child
seat in the vehicle it is not at risk of
coming loose from its base.
If you have to remove the headrest,
check that it is correctly stored so
that it does not come loose under
harsh braking or impact.
Always attach the child seat to the
vehicle even if it is not in use so that
it does not come loose under harsh
braking or impact.
RISK OF DEATH OR
SERIOUS INJURY: before
fitting a rear-facing child
seat to this seat, check
that the air bag has been deacti-
vated (refer to the information on
“Child safety: deactivating/activa-
ting the front passenger air bag” in
Section 1).
After installing the child seat, if neces-
sary, the seat may be advanced (so as
to leave enough space in the rear seats
for passengers or other child seats).
For a rear-facing child seat, do not let
it touch the dashboard or move it to the
furthest forward position.
Do not change other settings after in-
stalling the child seat.
Page 65 of 328

1.59
WARNING LIGHTS (4/6)
ÉPreheating warning light
(diesel version)
This should come on when the igni-
tion is switched on. It indicates that the
heater plugs are in operation.
It goes out when preheating is com-
plete. The engine can be started.
}Handbrake or electronic
parking brake warning light
Refer to the information on the “Assisted
parking brake” in Section 2.
A
The display of information shown below DEPENDS ON THE VEHICLE EQUIPMENT \
AND COUNTRY.
åAir bag warning light
This warning light will be dis-
played on the instrument panel when
the ignition is switched on or the engine
is started, and will then go out after a
few seconds.
If it does not come on when the igni-
tion is switched on, or comes on when
the engine is running, there is a fault in
the system.
Contact your approved Dealer as soon
as possible.
ÔCoolant temperature warn-
ing light
This lights up red when the ignition is
switched on or the engine is started.
If it turns red, stop and let the engine
idle for a minute or two.
The temperature should lower and the
warning light should return to a blue
colour. If not, stop the engine. Let the
engine cool down before checking the
coolant.
Contact an approved Dealer.
Rear seat belt reminder
(depending
on vehicle)
Warning light
ß comes on, accom-
panied (depending on the vehicle) by
a message indicating the number of
fastened seat belts on the instrument
panel for approximately 30 seconds,
each time the vehicle is started, a door
is opened or a rear seat belt is fas-
tened/unfastened. Check that the rear
passengers are wearing seat belts and
that the number of seat belts shown as
fastened corresponds to the number of
rear seat places occupied.
Š ‰Gear change indicator
This lights up to advise you to
change to a higher gear (up arrow) or
lower gear (down arrow).
Please refer to the information on
“Driving advice, Eco-driving” in
Section 2.
2 Door(s) open warning light
Page 71 of 328

1.65
DISPLAYS AND INDICATORS (4/4)
Operating faults
In the event of a malfunction (the dis-
play fails to open when the engine is
started, or the display retracts, with the
engine running, following an object im-
pacting the display):
– stop and restart the engine;
or
– from the multifunction screen, change the display opening settings.
If there is still a problem, contact an au-
thorised dealer.
With the display opened or closed,
no object should be placed on it or
in its housing.
Do not use solvents, detergents or
an abrasive cloth to clean the dis-
play.
Only use a microfibre wipe.
Vehicles not fitted with a navigation
system
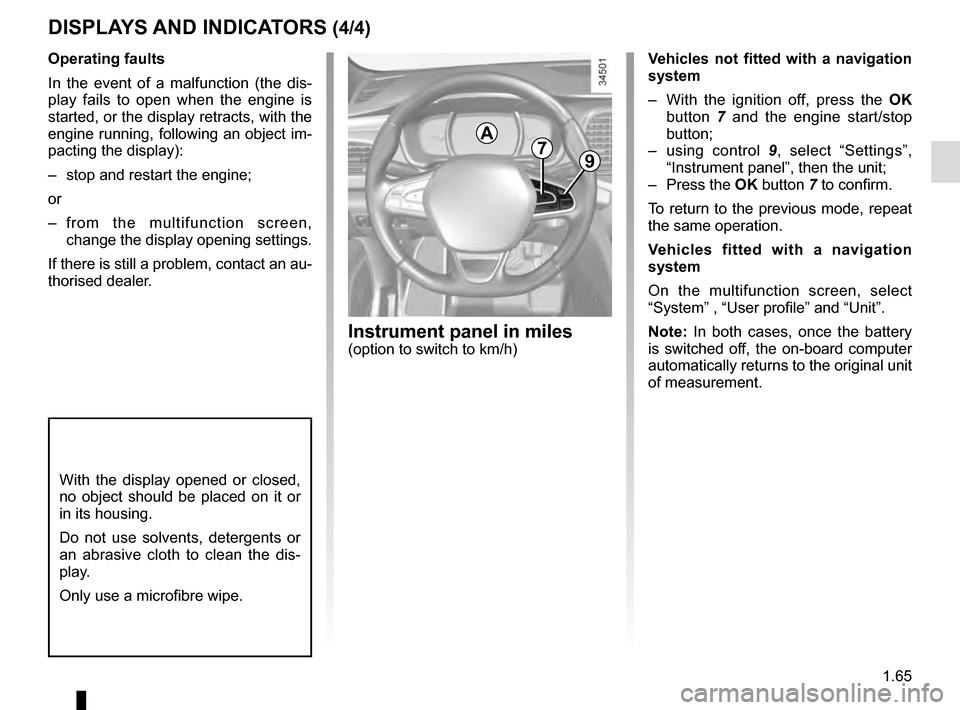
– With the ignition off, press the OK
button 7 and the engine start/stop
button;
– using control 9, select “Settings”,
“Instrument panel”, then the unit;
– Press the OK button 7 to confirm.
To return to the previous mode, repeat
the same operation.
Vehicles fitted with a navigation
system
On the multifunction screen, select
“System” , “User profile” and “Unit”.
Note: In both cases, once the battery
is switched off, the on-board computer
automatically returns to the original unit
of measurement.
A79
Instrument panel in miles(option to switch to km/h)
Page 76 of 328

1.70
ON-BOARD COMPUTER: trip settings (3/5)
The display of information shown below DEPENDS ON THE VEHICLE EQUIPMENT \
AND COUNTRY.
Examples of selectionsInterpreting the display selected
On-board computer with mileage-
before-service message
c) Mileage before service or oil change.Mileage before service
With the ignition switched on, the engine not running and
the display set to “Reichweite bis zur Wartung”, press button
OK for approximately 5 seconds to display the mileage before
service (distance or time to the next service). When the distance
value approaches its limit, there are several possible scenarios:
– distance/time remaining less than 900 miles (1,500 km) or
one month : the message “Service due in” is displayed along
with the nearest limit (distance or time);
– range equal to 0 km/miles or service date reached: the
message “Service required” is displayed accompanied by
warning light
©.
The vehicle requires a service as soon as possible.
Service Intervals
Service in
30 000 Kms / 12 mo
Service due in
300 Kms / 24 days
Service required
Resetting: to reset the distance before service, press and hold button 2 for approximately 10 seconds until the display shows
the mileage permanently.
Note: If a service is performed without changing the engine oil, only the mi\
leage before the next service should be reset. In the
event of an oil change, both the distance before the next service and th\
e next oil change should be reset.
Page 77 of 328

1.71
The display of information shown below DEPENDS ON THE VEHICLE EQUIPMENT \
AND COUNTRY.
ON-BOARD COMPUTER: trip settings (4/5)
Examples of selectionsInterpreting the display selected
On-board computer with distance before
next service message (cntd.)
c) Mileage before service or oil change.Mileage before service
With the ignition on, the engine not running and the display
selected “Reichweite bis zur Wartung”, press button OK for about
5 seconds to display the mileage before the next service, then
press button 2 to view the mileage before the next oil change
(distance or time remaining before the next service). When the
distance value approaches its limit, there are several possible
scenarios:
– distance/time remaining less than 900 miles (1,500 km) or
one month : the message “Service due in” is displayed, ac-
companied by the nearest term (distance or time);
– range equal to 0 km/miles or service date reached: the
message “Service required” is displayed accompanied by
warning light
©.
The vehicle requires an oil change as soon as possible.
Service Intervals
Oil change in
30 000 Kms / 24 mo
Service due in
300 Kms / 24 days
Service required
Depending on the vehicle, the mileage before an oil change varies accord\
ing to the driving style (frequent driving at low speed ,
door-to-door journeys, extensive use at idling speed, towing a trailer, etc.). The distance remaining until the next oil change can
therefore decrease more quickly in some cases than the actual distance t\
ravelled.
Resetting: to reset the mileage before a service, press and hold button 2 for approximately 10 seconds until the display shows
the range permanently.
Note: If a service is performed without changing the engine oil, only the mi\
leage before the next service should be reset. In the
event of an oil change, both the distance before the next service and th\
e next oil change should be reset.
Page 97 of 328

1.91
Special note
When driving the vehicle, the wiping
speed slows down whenever the ve-
hicle stops. For example, fast wiping
speed will slow to normal wiping speed.
As soon as the vehicle moves off,
wiping will return to the speed originally
selected.
If stalk 1 is operated, it overrides and
cancels the automatic function.Vehicle fitted with intermittent
windscreen wipers
A single sweep
A short push will trigger one sweep
of the wipers.
B stop
C intermittent wiping
The wipers will pause for several
seconds between sweeps. It is
possible to change the time be-
tween sweeps by turning ring 2.
D slow continuous wiping
E fast continuous wiping
Positions A, C and D are accessible
with the ignition on. Position E is
accessible only when the engine is
running.
1
FRONT WINDSCREEN WASH/WIPE (1/6)
Check the condition of the wiper
blades. You are responsible for their
service life:
– they must remain clean: clean the blades, windscreen and
rear screen regularly with soapy
water;
– do not use them when the wind- screen or rear screen are dry;
– free them from the windscreen or rear screen when they have not
been used for a long time.
In all cases, replace them as soon
as they begin to lose efficiency: ap-
proximately once a year.
Before using the rear wiper, check
that no object obstructs the travel of
the blade.
Do not use the wiper arm to open or
close the tailgate.
12A
B
C
D
E
Page 98 of 328

1.92
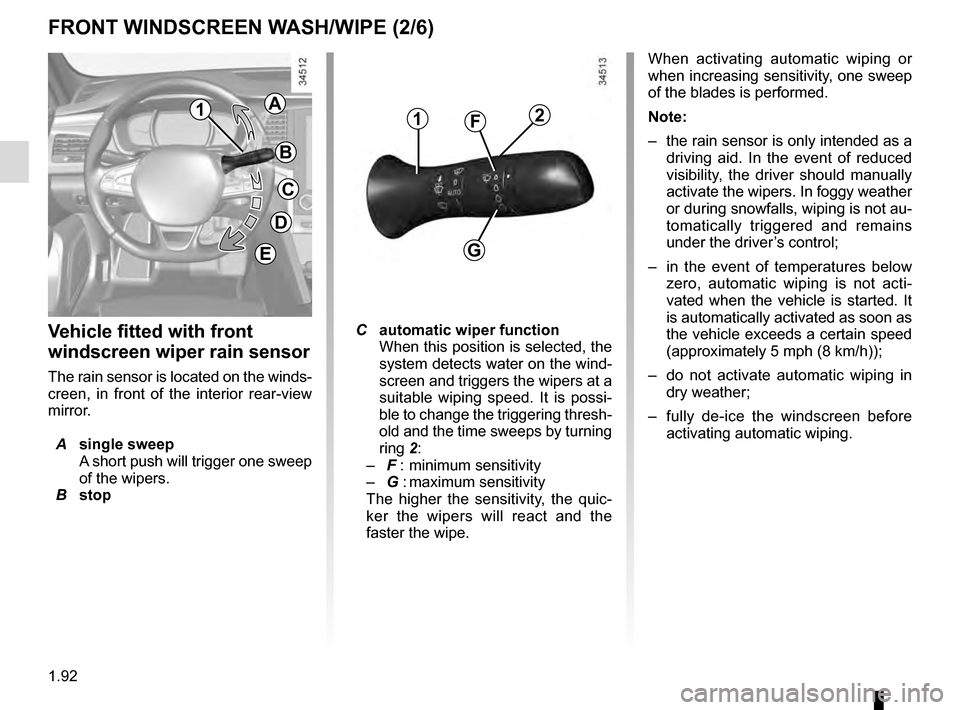
Vehicle fitted with front
windscreen wiper rain sensor
The rain sensor is located on the winds-
creen, in front of the interior rear-view
mirror.
A single sweep
A short push will trigger one sweep
of the wipers.
B stop
2
G
F1
FRONT WINDSCREEN WASH/WIPE (2/6)
C automatic wiper function
When this position is selected, the
system detects water on the wind-
screen and triggers the wipers at a
suitable wiping speed. It is possi-
ble to change the triggering thresh-
old and the time sweeps by turning
ring 2:
– F : minimum sensitivity
– G : maximum sensitivity
The higher the sensitivity, the quic-
ker the wipers will react and the
faster the wipe. When activating automatic wiping or
when increasing sensitivity, one sweep
of the blades is performed.
Note:
–
the rain sensor is only intended as a
driving aid. In the event of reduced
visibility, the driver should manually
activate the wipers. In foggy weather
or during snowfalls, wiping is not au-
tomatically triggered and remains
under the driver’s control;
– in the event of temperatures below
zero, automatic wiping is not acti-
vated when the vehicle is started. It
is automatically activated as soon as
the vehicle exceeds a certain speed
(approximately 5 mph (8 km/h));
– do not activate automatic wiping in
dry weather;
– fully de-ice the windscreen before
activating automatic wiping.
1A
B
C
D
E