Page 70 of 328

1.64
DISPLAYS AND INDICATORS (3/4)
Head-up display 8
The display details driving and navi-
gation information from the instrument
panel and the multifunction screen.
If fitted to the vehicle, this comes on
when the engine is started and is re-
tracted when the engine is switched off.
8
You can adjust certain settings from the
multifunction screen: with the engine
running, access menu “System”,
“Display” then “Head-up display”.
Adjusting the display information
height
Depending on your driving position,
you can raise or lower the information
on the display.
Adjusting the display brightness
You can adjust the brightness (day or
night mode)
– automatically : the brightness will
vary depending on the outdoor light.
– manually: the brightness automati-
cally switches with the activation/de-
activation of the lights.
In both cases, the day mode varies
based on the outdoor brightness.
Good information visibility can be af-
fected by:
– the seat position;
– the presence of an object placed
on the opened display;
– the polarisation of some spectacle
lenses;
– extreme weather conditions (rain,
snow, very strong sunlight, etc.).
In the event of contradic-
tory information between
the instrument panel and
the head-up display/multi-
function screen, please refer to the
information displayed on the instru-
ment panel.
Do not manually force the opening/
closure of the head-up display.
For safety reasons, carry
out any adjustments when
the vehicle is stationary.
Page 82 of 328
1.76
VEHICLE SETTINGS CUSTOMISATION MENU (1/2)
Adjusting the settings
Select the function to modify:
a) unlocking the driver’s door;
b) automatic locking of the doors while driving;
c) hands-free function;
d) indicator audio volume;
e) internal welcome sound;
f) external welcome;
g) reading lamp in automatic mode;
h) configuration of the driving style indi- cator;
i) Active noise control.
Select “ON” or “OFF” to activate or de-
activate the function.
For the “Light brightness intensity”
function, select the intensity by press-
ing “+” or “-”.
Depending on the vehicle equipment,
this function allows you to activate/
deactivate and adjust some of the vehi-
cle’s functions.
Vehicles fitted with a
navigation system
Accessing the settings menu
With the vehicle at a standstill, using
the multifunction screen
1, select menu
“Vehicle”, “User settings” to access the
various settings.
1
For safety reasons, carry
out any adjustments when
the vehicle is stationary.
Page 85 of 328

1.79
STEERING WHEEL (1/2)
Adjusting the steering wheel
height and depth
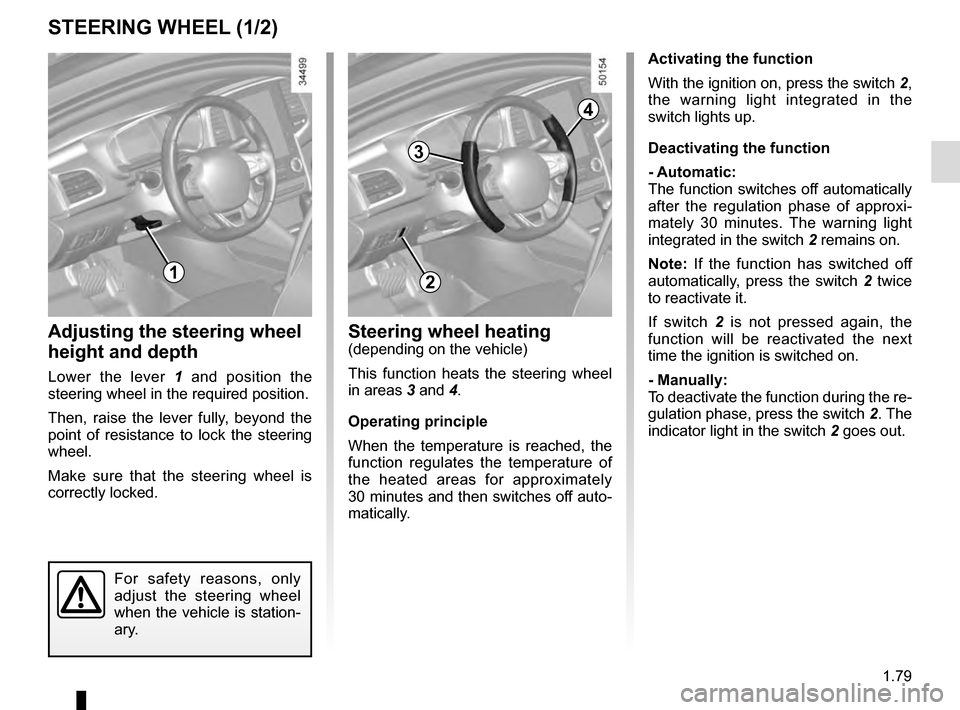
Lower the lever 1 and position the
steering wheel in the required position.
Then, raise the lever fully, beyond the
point of resistance to lock the steering
wheel.
Make sure that the steering wheel is
correctly locked.
For safety reasons, only
adjust the steering wheel
when the vehicle is station-
ary.
1
Steering wheel heating(depending on the vehicle)
This function heats the steering wheel
in areas 3 and 4.
Operating principle
When the temperature is reached, the
function regulates the temperature of
the heated areas for approximately
30 minutes and then switches off auto-
matically.
2
3
4
Activating the function
With the ignition on, press the switch 2,
the warning light integrated in the
switch lights up.
Deactivating the function
- Automatic:
The function switches off automatically
after the regulation phase of approxi-
mately 30 minutes. The warning light
integrated in the switch 2 remains on.
Note: If the function has switched off
automatically, press the switch 2 twice
to reactivate it.
If switch 2 is not pressed again, the
function will be reactivated the next
time the ignition is switched on.
- Manually:
To deactivate the function during the re-
gulation phase, press the switch 2. The
indicator light in the switch 2 goes out.
Page 89 of 328

1.83
Interior rear view mirrorIts position can be adjusted.
Rear-view mirror with lever 4
When driving at night, to avoid being
dazzled by the headlights of the vehicle
behind, depress the little lever located
behind rear view mirror 4.
Rear-view mirror without lever 4
The rear-view mirror automatically
darkens when you are being followed
by a vehicle using main beam head-
lights or in very bright lighting.
REAR-VIEW MIRRORS (3/3)
Special feature:
When the rear-view mirror has been
manually deployed or folded back, it is
possible to reset it to a usage position.
To do this, position the switch 3 to C.
A mechanical noise from the rear-view
mirror unit will be heard.
If it is not the case, place switch 3 to A
and then place switch 3 to C until the
mechanical noise of the rear-view
mirror is heard.
A
C3
Information regarding the activation
and deactivation of the front pas-
senger airbag is displayed on the in-
terior rear-view mirror (please refer
to information in “Child safety: front
passenger airbag deactivation/acti-
vation” in Section 1).
4
Page 90 of 328

1.84
AUDIBLE AND VISUAL SIGNALS
Horn
Press the steering wheel boss A to ac-
tivate the horn.
Headlight flasher
Pull stalk 1 towards you to flash the
headlights.
éHazard warning lights
Press switch 2. This switch ac-
tivates all four direction indicators and
the side indicator lights simultaneously.
It must only be used in an emergency to
warn drivers of other vehicles that you
have had to stop in an area where stop-
ping is prohibited or unexpected or that
you are obliged to drive under special
conditions.
Depending on the vehicle, the hazard
warning lights may come on automati-
cally under heavy deceleration. You can
switch them off by pressing switch 2.
Direction indicators
Move stalk 1 parallel to the steering
wheel and in the direction you are going
to turn it.
One-touch mode
When driving, it is possible that the
steering wheel may not be turned suf-
ficiently to return the stalk automatically
to its starting position.
In this case, briefly turn stalk 1 to the in-
termediate position, then release it: the
stalk returns to its original point and the
indicator light flashes three times.
2
A
1
Page 91 of 328

1.85
áMain beam headlights
With the dipped beam
headlights lit, push stalk 1. This indica-
tor light on the instrument panel comes
on.
To return to the dipped headlight posi-
tion, pull the stalk 1 towards you again.
EXTERIOR LIGHTING AND SIGNALS (1/5)
šSide lights
Turn ring 4 until the symbol is
opposite mark 3: this indicator light on
the instrument panel comes on.
If the side lights are switched on, it is
possible to set the brightness of the
instrument panel and the dashboard by
turning control knob 2.
kDipped beam
headlights
Manual operation
Turn ring 4 until the symbol is opposite
mark 3 . This indicator light on the ins-
trument panel comes on.
Automatic operation
Turn ring 4 until the AUTO symbol is op-
posite mark 3: with the engine running,
the dipped beam headlights switch on
or off automatically depending on the
brightness of the light outside, without
any action on stalk 1.
Before driving at night: check that the electrical equipment is operatin\
g
correctly. As a general precaution, check that the lights are not obscured
(by dirt, mud, snow or objects being transported).
1
4
3
2
1
When driving on the left in a
left-hand drive vehicle (or vice
versa), drivers must readjust their
lights throughout their stay (see
«Electrical adjustment of the dipped
beam headlights» in Section 1).
Page 92 of 328

1.86
Automatic main beam
headlights
Depending on the vehicle, this system
switches the main beam headlights on
and off automatically. The function uses
a camera located behind the interior
rear-view mirror to detect vehicles that
are following and coming in the oppo-
site direction.
The main beam headlights come on au-
tomatically if:
– exterior light is weak;
– no other vehicles or lighting are de-tected;
– the vehicle speed is above approxi- mately 30 mph (45 km/h).
If any of the above conditions are not
fulfilled, the system switches to dipped
beam headlights.
The “automatic main beam
headlights” system should
under no circumstances be
used to replace driver atten-
tion and responsibility with regard
to vehicle lighting and adapting to
light, visibility and traffic conditions.Using the portable naviga-
tion system at night in the
windscreen area below the
camera may disturb the
operation of the “automatic main
beam headlights” system (risk of re-
flection on the windscreen).
EXTERIOR LIGHTING AND SIGNALS (2/5)
4
3
The system may encounter difficul-
ties under certain conditions, inclu-
ding :
– extreme weather conditions (rain, snow, fog, etc.);
– obstruction in front of the winds- creen or camera;
– when a following or oncoming vehicle has weak or hidden li-
ghting;
– incorrect settings for the front headlights;
– reflective systems;
– ...
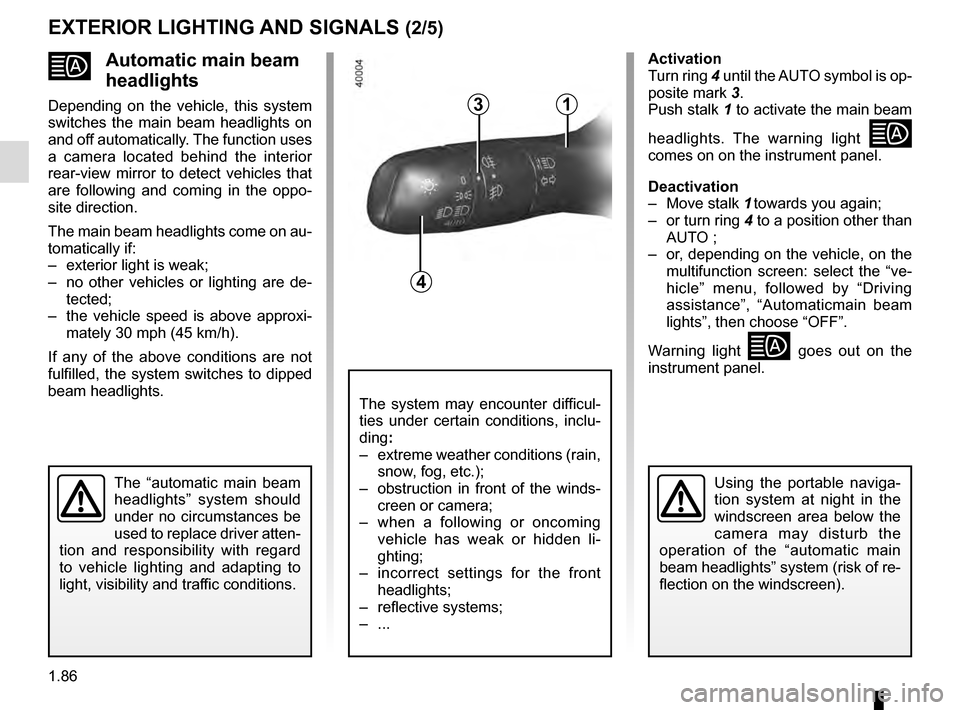
Activation
Turn ring 4 until the AUTO symbol is op-
posite mark 3.
Push stalk 1 to activate the main beam
headlights. The warning light
comes on on the instrument panel.
Deactivation
– Move stalk 1 towards you again;
– or turn ring 4 to a position other than AUTO ;
– or, depending on the vehicle, on the multifunction screen: select the “ve-
hicle” menu, followed by “Driving
assistance”, “Automaticmain beam
lights”, then choose “OFF”.
Warning light
goes out on the
instrument panel.
1
Page 93 of 328

1.87
Operating faults
When the message “Check auto li-
ghting” appears on the instrument
panel, the system is deactivated.
Consult an approved dealer.
EXTERIOR LIGHTING AND SIGNALS (3/5)
Switching off the lights
There are two possibilities:
– manually, move ring 4 to position 0;
– the lights will go out automatically when the engine is switched off, the
driver’s door is opened or the vehicle
is locked. In this case, the next time
the engine is started the lights will be
switched back on according to the
position of the ring 4.
Lights-on reminder buzzer
A warning beep sounds when the dri-
ver’s door is opened to warn you that
the lights are still on.
Daytime running lights
function
The daytime running lights come on
automatically with no action on stalk 1
when the engine is started, and they go
off once the engine is switched off.
Operating faults
When the message “Check lighting”
with warning light
© is displayed
and warning light
k flashes on the
instrument panel, this indicates that
there is a lighting fault.
Consult an approved dealer.4
3
1