Page 214 of 270

5.14
TYRES (2/3)
Tyre pressures
Adhere to the tyre pressures (including
the emergency spare wheel). The tyre
pressures should be checked at least
once a month and additionally before
any long journey (refer to the label af-
fixed to the edge of the driver’s door).Pressures should be checked when the
tyres are cold; ignore higher pressures
which may be reached in hot weather
or following a fast journey.
If tyre pressures cannot be checked
when the tyres are
cold, the normal
pressures must be increased by 0.2 to
0.3 bar (or 3 PSI).
Never deflate a hot tyre.
Special note
Depending on the vehicle, there may
be an adapter which needs to be posi-
tioned on the valve before air is added. Vehicle fitted with a tyre pressure
monitoring system
If under-inflated (puncture, low pres-
sure, etc.), the warning light
�
lights up on the instrument panel;
please refer to “Tyre pressure loss
warning” or “Tyre pressure monitoring
system” in Section 2.
Emergency spare wheel
Refer to the information on “Puncture”
and “Changing a wheel” in Section 5.
Changing wheels around
This practice is not recommended.
Incorrect tyre pressures
lead to abnormal tyre wear
and unusually hot running.
These are factors which
may seriously affect safety and lead
to:
– poor road holding,
– risk of bursting or tread separa- tion.
The pressure depends on the load
and the speed of use. Adjust the
pressure according to the condi-
tions of use (refer to the label affixed
to the edge of the driver’s door).
Please be aware that a
poorly tightened or miss-
ing valve cap can make the
tyres less airtight and lead
to pressure loss.
Always use valve caps identical to
those fitted originally and tighten
them fully.
Page 232 of 270

5.32
TOWING: breakdown (1/2)
1
2
Before towing, unlock the steering
column: with the clutch depressed,
engage first gear (lever in position N
or R for vehicles with automatic gear-
boxes), insert the RENAULT card in the
card reader, then press the engine start
button for two seconds.
Reposition the lever to neutral (position
N for vehicles fitted with an automatic
gearbox).
The column is unlocked, the acces-
sory functions are supplied: the vehi-
cle lights can be used (indicators, brake
lights etc.). At night the vehicle must
have its lights on.
Once you have finished towing, press
the engine start button twice (risk of
running down the battery). The speed specified by current legis-
lation for towing must always be ob-
served. If your vehicle is the towing
vehicle, do not exceed the maximum
towing weight for your vehicle (refer to
the information on “Weights” in Section
6).
Towing a vehicle with an
automatic gearbox
With the engine switched off, the trans-
mission is no longer lubricated. It is
preferable to tow this type of vehicle on
a trailer or tow it with the front wheels
off the ground.
Under exceptional circumstances
,
you may tow the vehicle with all four
wheels on the ground, only going for-
ward, with the gear lever in the N posi-
tion, and for a distance not exceeding
48 miles (80 km).
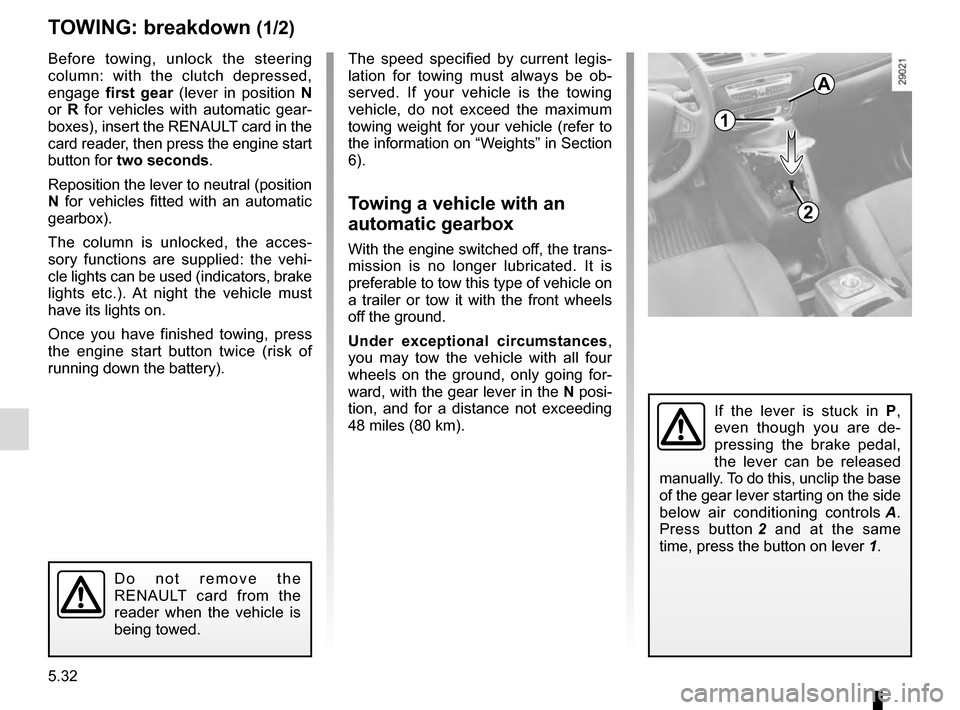
If the lever is stuck in P ,
even though you are de-
pressing the brake pedal,
the lever can be released
manually. To do this, unclip the base
of the gear lever starting on the side
below air conditioning controls A.
Press button 2 and at the same
time, press the button on lever 1.
Do not remove the
RENAULT card from the
reader when the vehicle is
being towed.
A
Page 249 of 270
6.9
Original parts are based on strict specifications and are subject to hig\
hly-specialised tests. Therefore, they are of at least the same
level of quality as the parts fitted originally.
If you always fit genuine replacement parts to your vehicle, you will en\
sure that it performs well. Furthermore, repairs carried out
within the manufacturer’s Network using original parts are guaranteed according to the condition\
s set out on the reverse of the
repair order.
REPLACEMENT PARTS AND REPAIRS
Page 256 of 270
6.16
ANTICORROSION CHECK (1/6)
If the continuation of the warranty is subject to repair, it is indicated below.
VIN: ..........................................................
Corrosion repair operation to be carried
out:
Stamp
Date of repair:
Repair to be carried out:
Stamp
Date of repair:
Repair to be carried out:
Stamp
Date of repair:
Page 257 of 270
6.17
ANTICORROSION CHECK (2/6)
If the continuation of the warranty is subject to repair, it is indicated below.
VIN: ..........................................................
Corrosion repair operation to be carried
out:
Stamp
Date of repair:
Repair to be carried out:
Stamp
Date of repair:
Repair to be carried out:
Stamp
Date of repair:
Page 258 of 270
6.18
ANTICORROSION CHECK (3/6)
If the continuation of the warranty is subject to repair, it is indicated below.
VIN: ..........................................................
Corrosion repair operation to be carried
out:
Stamp
Date of repair:
Repair to be carried out:
Stamp
Date of repair:
Repair to be carried out:
Stamp
Date of repair:
Page 259 of 270
6.19
ANTICORROSION CHECK (4/6)
If the continuation of the warranty is subject to repair, it is indicated below.
VIN: ..........................................................
Corrosion repair operation to be carried
out:
Stamp
Date of repair:
Repair to be carried out:
Stamp
Date of repair:
Repair to be carried out:
Stamp
Date of repair:
Page 260 of 270
6.20
ANTICORROSION CHECK (5/6)
If the continuation of the warranty is subject to repair, it is indicated below.
VIN: ..........................................................
Corrosion repair operation to be carried
out:
Stamp
Date of repair:
Repair to be carried out:
Stamp
Date of repair:
Repair to be carried out:
Stamp
Date of repair: