2016 RENAULT SCENIC air con
[x] Cancel search: air conPage 150 of 270
3.10
Manual use
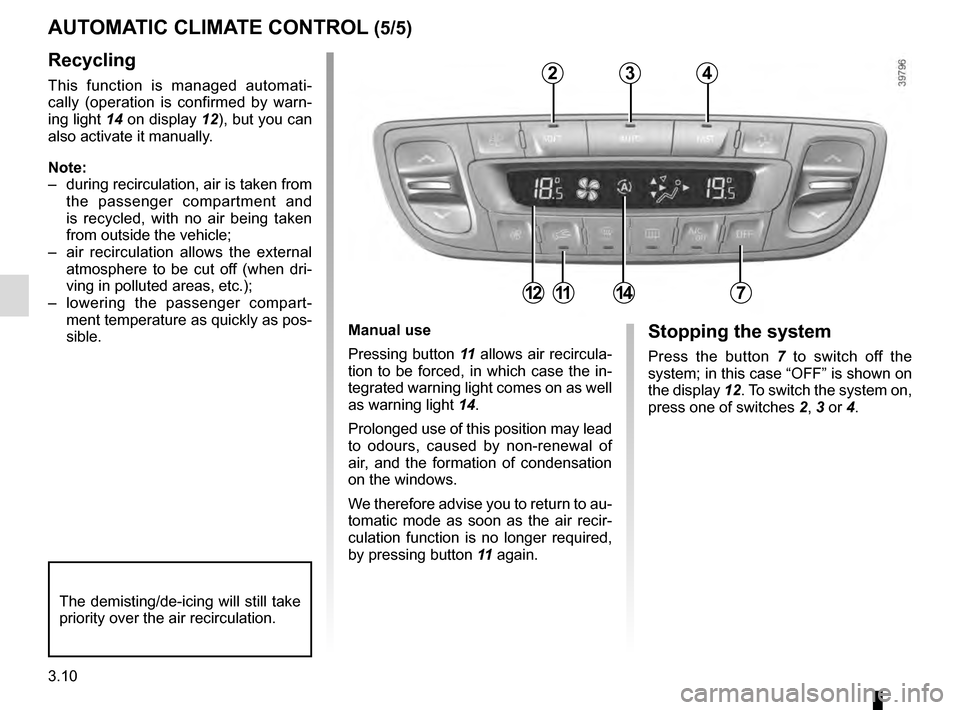
Pressing button 11 allows air recircula-
tion to be forced, in which case the in-
tegrated warning light comes on as well
as warning light 14.
Prolonged use of this position may lead
to odours, caused by non-renewal of
air, and the formation of condensation
on the windows.
We therefore advise you to return to au-
tomatic mode as soon as the air recir-
culation function is no longer required,
by pressing button 11 again.Stopping the system
Press the button 7 to switch off the
system; in this case “OFF” is shown on
the display 12. To switch the system on,
press one of switches 2, 3 or 4.
Recycling
This function is managed automati-
cally (operation is confirmed by warn-
ing light 14 on display 12), but you can
also activate it manually.
Note:
– during recirculation, air is taken from the passenger compartment and
is recycled, with no air being taken
from outside the vehicle;
– air recirculation allows the external atmosphere to be cut off (when dri-
ving in polluted areas, etc.);
– lowering the passenger compart- ment temperature as quickly as pos-
sible.
AUTOMATIC CLIMATE CONTROL (5/5)
The demisting/de-icing will still take
priority over the air recirculation.
234
7111214
Page 151 of 270

3.11
AIR CONDITIONING: information and advice on use
Fuel consumption
You will normally notice an increase
in fuel consumption (especially
when driving in town) when the air
conditioning is operating.
For vehicles fitted with manual air
conditioning, switch off the system
when it is not required.
Advice for reducing
consumption and therefore
helping to preserve the
environment:
Drive with the air vents open and
the windows closed.
If the vehicle has been parked in
the sun, open the doors for a few
moments to let the hot air escape
before starting the engine.
Maintenance
Refer to the Maintenance Document
for your vehicle for the inspection
frequency.Operating faults
As a general rule, contact your ap-
proved dealer in the event of an op-
erating fault.
– Reduction in de-icing, demist-
ing or air conditioning per-
formance. This may be caused
by the passenger compartment
filter cartridge becoming clogged.
– No cold air is being produced.
Check that the controls are set
correctly and that the fuses are
sound. Otherwise, switch off the
system.
Advice on use
In some situations, (air conditioning
off, air recirculation activated, venti-
lation speed at zero or low, etc.) you
may notice that condensation starts
to form on the windows and wind-
screen.
If there is condensation, use the
“Clear View” function to remove it,
then use the air conditioning in auto-
matic mode to stop it forming again.
If the condensation does not clear,
use the FAST programme.
Do not open the refriger-
ant fluid circuit. The fluid
may damage eyes or skin.
Note
Presence of water under the ve-
hicle. After prolonged use of the air
conditioning system, it is normal for
water to be present under the vehi-
cle. This is caused by condensation.
Page 197 of 270
4.15
BODYWORK MAINTENANCE (1/2)
You should
Wash your car frequently, with the
engine off, with cleaning products rec-
ommended by the manufacturer (never
use abrasive products). Rinse thor-
oughly beforehand with a jet:
– spots of tree resin and industrial
grime;
– mud in the wheel arches and under-
neath the body which forms damp
patches;
– bird droppings , which cause a
chemical reaction with the paint that
rapidly discolours paintwork and
may even cause the paint to peel
off;
wash the vehicle immediately to
remove these marks since it is im-
possible to remove them by polish-
ing;
– salt, particularly in the wheel arches
and underneath the body after driv-
ing in areas where the roads have
been gritted.
Remove any plant matter (resin, leaves,
etc.) from the vehicle regularly.
What you should not doDo not degrease or clean mechani-
cal components (e.g. the engine com-
partment), underneath the body, parts
with hinges (e.g. inside the doors) and
painted plastic external fittings (e.g.
bumpers) using high-pressure clean-
ing equipment or by spraying on prod-
ucts not approved by our Technical
Department. Doing this could give rise
to corrosion or operational faults.
Wash the vehicle in bright sunlight or
freezing temperatures.
Do not scrape off mud or dirt without
pre-wetting.
Allow dirt to accumulate on the exterior.
Allow rust to form following minor im-
pacts.
Do not use solvents not approved by
our Technical Department to remove
stains as this could damage the paint-
work.
Do not drive in snow or muddy condi-
tions without washing the vehicle, par-
ticularly under the wheel arches and
body.
A well-maintained vehicle will last
longer. It is therefore recommended to
maintain the exterior of the vehicle reg-
ularly.
Your vehicle has been treated with very
effective anti-corrosion products. It is
nevertheless subject to various outside
influences.
Corrosive agents in the atmosphere
–
atmospheric pollution (built-up and
industrial areas),
– saline atmospheres (near the sea,
particularly in hot weather),
– seasonal and damp weather condi-
tions (e.g. road salt in winter, water
from road cleaners, etc.).
Minor impacts
Abrasive action
Dust and sand in the air, mud, road grit
thrown up by other vehicles, etc.
You should take a number of minor pre-
cautions in order to safeguard your ve-
hicle against such risks.
Page 198 of 270

4.16
Respect local regulations about wash-
ing vehicles (e.g. do not wash your ve-
hicle on a public highway).
Observe the vehicle stopping distances
when driving on gravelled surfaces to
prevent paint damage.
Repair, or have repaired quickly, areas
where the paint has been damaged, to
prevent corrosion spreading.
Remember to visit the body shop pe-
riodically in order to maintain your
anti-corrosion warranty. Refer to the
Maintenance Document.
If it is necessary to clean mechani-
cal components, hinges, etc., spray
them with products approved by our
Technical Department to protect them
after they have been cleaned.
BODYWORK MAINTENANCE (2/2)
We have selected special products
to care for your vehicle and you can
obtain these from the manufactur-
er’s accessory outlets.
Using a roller type car wash
Return the windscreen wiper stalk to
the Park position (refer to the informa-
tion on the “Windscreen washer, wiper”
in Section 1). Check the mounting of
external accessories, additional lights
and mirrors, and ensure that the wiper
blades are secured with adhesive tape.
Remove the radio aerial mast if your
vehicle is fitted with this equipment.
Remember to remove the tape and refit
the antenna after washing.
Cleaning the headlights
As the headlights are made of plastic
“glass”, use a soft cloth or cotton wool
to clean them. If this does not clean
them properly, moisten the cloth with
soapy water, then wipe clean with a soft
damp cloth or cotton wool.
Finally, carefully dry off with a soft dry
cloth.
Cleaning products containing alco-
hol must not be used.
Vehicles with a matte paint
finish
This type of paint requires certain pre-
cautions.
Do not do the following
– use wax-based products (polishing);
– rub hard;
– wash the vehicle in a roller-type car
wash;
– wash the vehicle using a high-pres-
sure device;
– attach stickers to the paintwork (risk
of leaving marks).
You should do the following
Wash the vehicle by hand using plenty
of water, using a soft cloth or a gentle
sponge.
Page 204 of 270
5.4
TYRE INFLATION KIT (1/5)
The kit is only approved for
inflating the tyres of the ve-
hicle originally equipped
with the kit.
It must never be used to inflate
the tyres of another vehicle, or any
other inflatable object (rubber ring,
rubber boat, etc.).
Avoid spillage on skin when han-
dling the repair liquid bottle. If drop-
lets do leak out, rinse them off with
plenty of water.
Keep the repair kit away from chil-
dren.
Do not dispose of the empty bottle
in the countryside. Return it to your
approved dealer or to a recycling or-
ganisation.
The bottle has a limited service
life which is indicated on its label.
Check the expiry date.
Contact an approved dealer to re-
place the inflation tube and repair
product bottle.
A
B
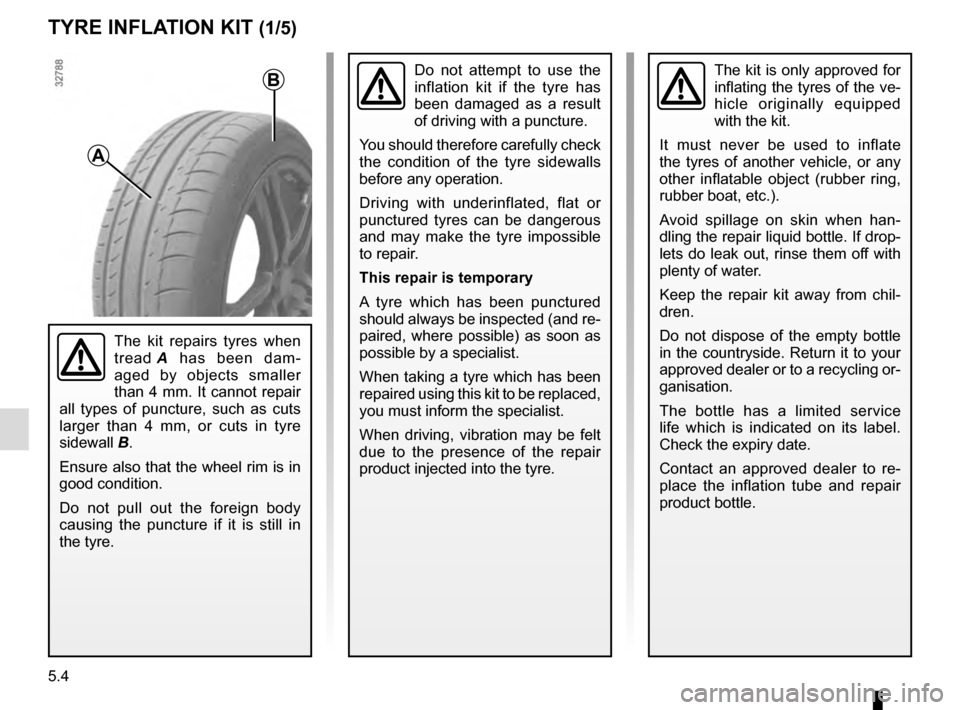
The kit repairs tyres when
tread A has been dam-
aged by objects smaller
than 4 mm. It cannot repair
all types of puncture, such as cuts
larger than 4 mm, or cuts in tyre
sidewall B.
Ensure also that the wheel rim is in
good condition.
Do not pull out the foreign body
causing the puncture if it is still in
the tyre.
Do not attempt to use the
inflation kit if the tyre has
been damaged as a result
of driving with a puncture.
You should therefore carefully check
the condition of the tyre sidewalls
before any operation.
Driving with underinflated, flat or
punctured tyres can be dangerous
and may make the tyre impossible
to repair.
This repair is temporary
A tyre which has been punctured
should always be inspected (and re-
paired, where possible) as soon as
possible by a specialist.
When taking a tyre which has been
repaired using this kit to be replaced,
you must inform the specialist.
When driving, vibration may be felt
due to the presence of the repair
product injected into the tyre.
Page 205 of 270

5.5
TYRE INFLATION KIT (2/5)
Inflation kit E
Depending on the vehicle, in the event
of a puncture, use the kit located in
storage compartment C or underneath
luggage compartment carpet D.
Open the kit, remove caps 1 and 3 (the
cap must not be removed from the
bottle) then screw bottle 2 to its base 3.
Engine running, parking brake ap-
plied:
– unscrew the valve cap on the wheel concerned and screw inflation
adapter 6 onto the valve;
– connect adapter 8 to the accessories
socket on the dashboard of the vehi-
cle; – press switch
5 to inflate the tyre to
the recommended pressure (check
the label affixed to the edge of the
driver’s door);
– after a maximum of 5 minutes, stop inflating and read the pressure (on
pressure gauge 4);
Note: while the bottle is emptying
(approximately 30 seconds), pres-
sure gauge 4 will briefly indicate a
pressure of 6 bar, then the pressure
will drop.
– adjust the pressure: to increase it, continue inflating with the kit, to
reduce it, turn button 7 located on
the inflation adapter.
C
D
If a minimum pressure of 1.8 bar is
not reached after 15 minutes, repair
is not possible; do not drive the ve-
hicle but contact an approved dealer.1234
5
6
78
C
D
E
Before using this kit, park
the vehicle at a sufficient
distance from traffic, switch
on the hazard warning
lights, apply the handbrake, ask all
passengers to leave the vehicle and
keep them away from traffic.
If the vehicle is parked on
the hard shoulder, you must
warn other road users of
your vehicle’s presence
with a warning triangle or with other
devices as per the legislation apply-
ing to the country you are in.
Page 206 of 270
5.6
TYRE INFLATION KIT (3/5)
Precautions when using the kit
The kit should not be operated for more
than 15 consecutive minutes.
Nothing should be placed
around the driver’s feet
as such objects may slide
under the pedals during
sudden braking manoeuvres and
obstruct their use.
Please be aware that a
poorly tightened or miss-
ing valve cap can make the
tyres less airtight and lead
to pressure loss.
Always use valve caps identical to
those fitted originally and tighten
them fully.
Following repair with the kit,
do not travel further than
120 miles (200 km). In addi-
tion, reduce your speed and
under no circumstances exceed
48 mph (80 km/h). The sticker,
which you must affix in a prominent
position on the dashboard, reminds
you of this.
Depending on the country or local
legislation, a tyre repaired with the
inflation kit may need to be replaced.
9
8
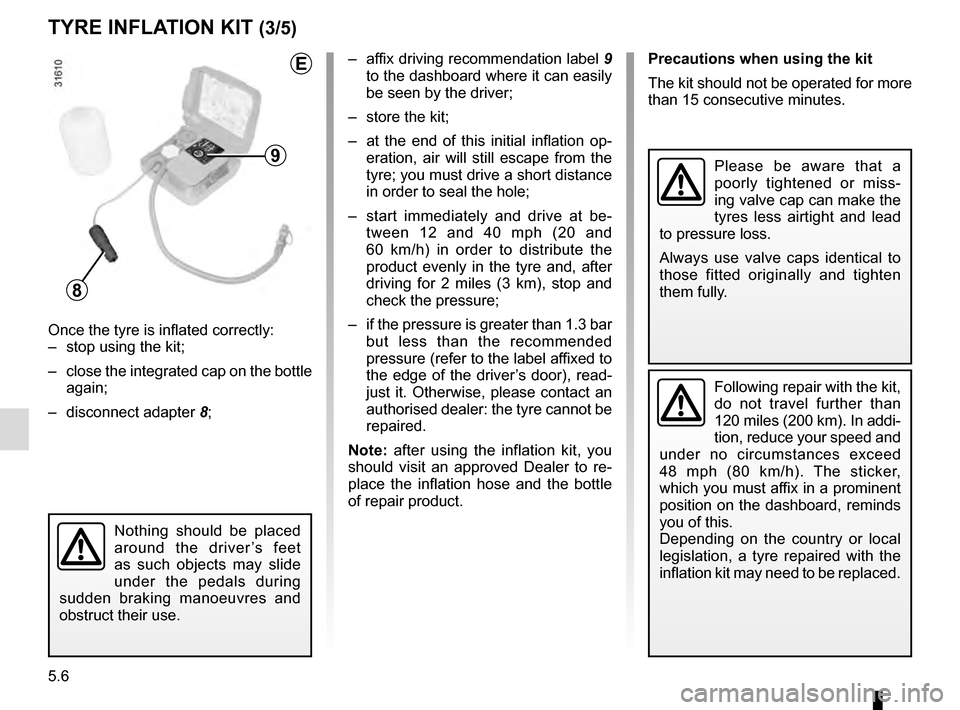
Once the tyre is inflated correctly:
– stop using the kit;
– close the integrated cap on the bottle again;
– disconnect adapter 8;– affix driving recommendation label
9
to the dashboard where it can easily
be seen by the driver;
– store the kit;
– at the end of this initial inflation op- eration, air will still escape from the
tyre; you must drive a short distance
in order to seal the hole;
– start immediately and drive at be- tween 12 and 40 mph (20 and
60 km/h) in order to distribute the
product evenly in the tyre and, after
driving for 2 miles (3 km), stop and
check the pressure;
– if the pressure is greater than 1.3 bar but less than the recommended
pressure (refer to the label affixed to
the edge of the driver’s door), read-
just it. Otherwise, please contact an
authorised dealer: the tyre cannot be
repaired.
Note: after using the inflation kit, you
should visit an approved Dealer to re-
place the inflation hose and the bottle
of repair product.
E
Page 208 of 270
5.8
TYRE INFLATION KIT (5/5)
Precautions when using the kit
The kit should not be operated for more
than 15 consecutive minutes.
Nothing should be placed
around the driver’s feet
as such objects may slide
under the pedals during
sudden braking manoeuvres and
obstruct their use.
Please be aware that a
poorly tightened or miss-
ing valve cap can make the
tyres less airtight and lead
to pressure loss.
Always use valve caps identical to
those fitted originally and tighten
them fully.
Following repair with the kit,
do not travel further than
120 miles (200 km). In addi-
tion, reduce your speed and
under no circumstances exceed
48 mph (80 km/h). The sticker,
which you must affix in a prominent
position on the dashboard, reminds
you of this.
Depending on the country or local
legislation, a tyre repaired with the
inflation kit may need to be replaced.
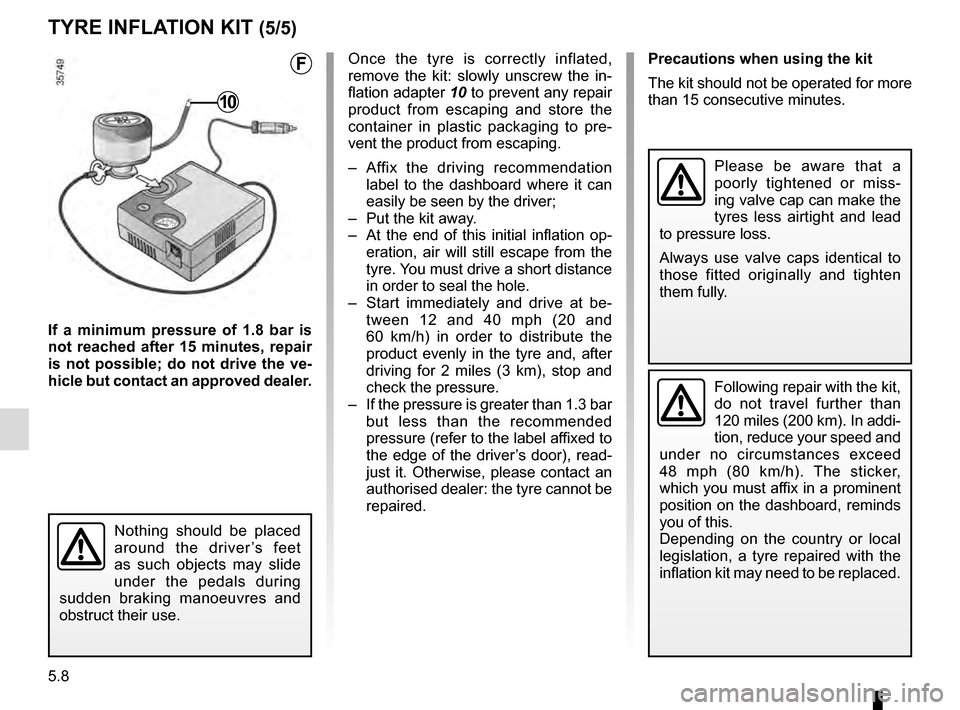
10
If a minimum pressure of 1.8 bar is
not reached after 15 minutes, repair
is not possible; do not drive the ve-
hicle but contact an approved dealer. Once the tyre is correctly inflated,
remove the kit: slowly unscrew the in-
flation adapter
10 to prevent any repair
product from escaping and store the
container in plastic packaging to pre-
vent the product from escaping.
– Affix the driving recommendation label to the dashboard where it can
easily be seen by the driver;
– Put the kit away.
– At the end of this initial inflation op- eration, air will still escape from the
tyre. You must drive a short distance
in order to seal the hole.
– Start immediately and drive at be- tween 12 and 40 mph (20 and
60 km/h) in order to distribute the
product evenly in the tyre and, after
driving for 2 miles (3 km), stop and
check the pressure.
– If the pressure is greater than 1.3 bar but less than the recommended
pressure (refer to the label affixed to
the edge of the driver’s door), read-
just it. Otherwise, please contact an
authorised dealer: the tyre cannot be
repaired.
F