Page 154 of 284

2.40
The self-locking differential controls the
torque transmitted to each rear wheel.
Depending on the grip conditions on
the road surface, and at low speeds
(under 20 mph / 30 kph), this device en-
ables wheel torque to move automati-
cally, thereby providing increased grip.
This enables the grip potential of each
wheel to be used to the fullest possi-
ble extent, thereby enabling the vehicle
to run over areas with decreased grip
(e.g.: work sites, muddy ground, etc.).
Once the rear wheels return to surfaces
with normal grip (eg: return to paved
roads), the self-locking differential
device will be deactivated, sometimes
accompanied by a noise (with no con-
sequence to vehicle behaviour). You
have the option of turning this device
off yourself, once normal grip condi-
tions have resumed, by briefly releas-
ing the accelerator
SELF-LOCKING DIFFERENTIAL
This function is an addi-
tional driving aid.
However, it does not in-
crease the vehicle’s limits
and should not encourage you to
drive more quickly.
It cannot, therefore, under any cir-
cumstances replace the vigilance or
the responsibility of the driver.
Page 176 of 284
3.16
INTERIOR LIGHTING
12
Courtesy light
Use switch 1 to:
– permanent lighting;
– intermittent lighting, which comes on when a door is opened. It goes out
when the doors concerned are prop-
erly closed;
– immediate switching off.
Map reading lights(depending on the vehicle)
Move switch 2.
Note
Remote unlocking of the doors triggers
timed lighting of the passenger com-
partment.
If one of the front or rear doors is
opened, the timed lighting will start
again.
Then the courtesy light and the luggage
compartment light dim and go out. The
lighting timer will cut out for various rea-
sons:
– if a door has been open for 15 min- utes;
– if all the doors have been closed for 15 seconds:
– when the ignition is switched on.
Rear light 3
Turn switch 4 to:
– switch on continuous lighting;
– switch on intermittent lighting when one of the rear doors is opened. The
lights only go out when the doors are
correctly closed;
– force the lights off.
3
4
Page 183 of 284

3.23
Note: make sure the tray is put back in
place correctly before lifting the back of
the centre seat. Check that the back of
the centre seat is properly locked.
PASSENGER COMPARTMENT STORAGE/FITTINGS (5/6)
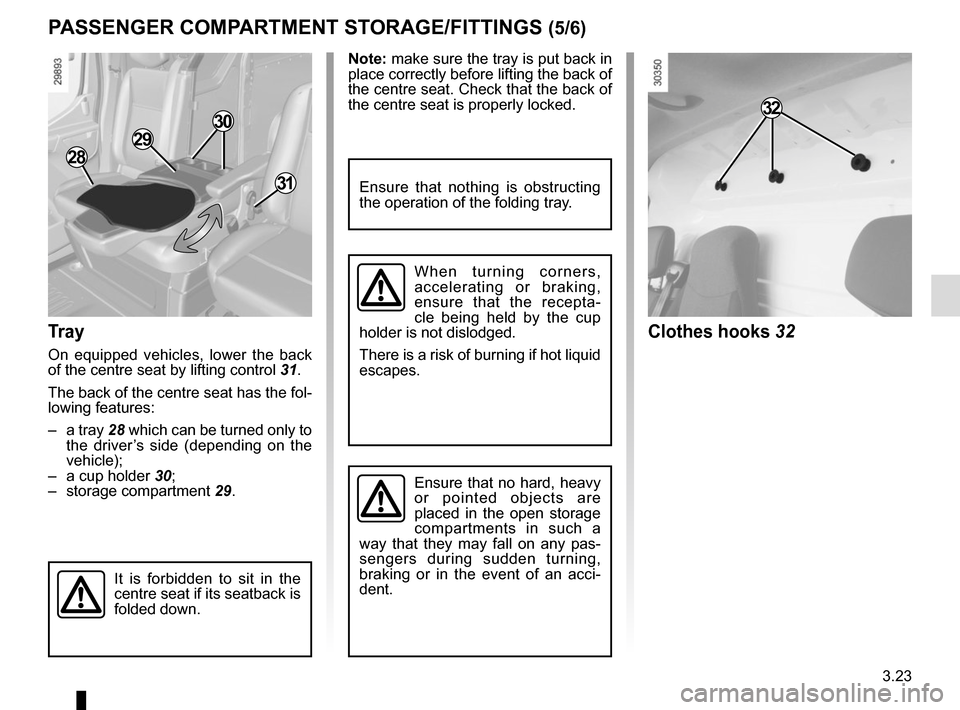
Tray
On equipped vehicles, lower the back
of the centre seat by lifting control 31.
The back of the centre seat has the fol-
lowing features:
– a tray 28 which can be turned only to
the driver’s side (depending on the
vehicle);
– a cup holder 30;
– storage compartment 29.
When turning corners,
accelerating or braking,
ensure that the recepta-
cle being held by the cup
holder is not dislodged.
There is a risk of burning if hot liquid
escapes.
It is forbidden to sit in the
centre seat if its seatback is
folded down.
Ensure that no hard, heavy
or pointed objects are
placed in the open storage
compartments in such a
way that they may fall on any pas-
sengers during sudden turning,
braking or in the event of an acci-
dent.
Ensure that nothing is obstructing
the operation of the folding tray.
28
29
30
31
Clothes hooks 32
32
Page 185 of 284
3.25
Access to the rear seats
Move the handle 1 backwards to lower
the seat back.
To return the seat to its original position,
bring the seatback back into position.
REAR BENCH SEATS (1/2)
Removing the bench seat
Lift levers 2 situated behind each bench
seat. The spigots 3 protrude to indicate
that the bench seat is unlocked.
Pull the bench seat backwards to re-
lease the anchoring points, then lift it to
remove it.
For safety reasons, carry
out any adjustments when
the vehicle is not being
driven.
Removing the anchoring
points is prohibited.
1
2
The bench seat is rather
heavy (approximately 65
kg). For your own safety,
please handle it carefully.
Risk of injury.
3
Page 186 of 284
3.26
REAR BENCH SEATS (2/2)
When moving the rear
bench seat, check that
the bench seat anchor-
age points are clean (they
should be free from grit, cloths or
any other item which may prevent
the bench seat from locking se-
curely).
Refitting the rear bench seat
– Position the guides 4 on the rails set
back in relation to the anchorage
points;
– slide the bench seat forwards.
The bench seat will lock automatically.
Check that the red spigots 3 can no
longer be seen.
The rear bench seats must
be placed on their original
anchorage points.
Driving with the bench seat
in a rear-facing position is prohib-
ited.
4
3
The row bench seats in rows 2 and
3 are not interchangeable. Do not
force them into position.
Risk of damage.
Page 192 of 284
4.2
BONNET (1/2)
To open the bonnet, pull handle 1.
Unlocking the bonnet catch
To unlock, pull control 2.
In the event of even a slight
impact involving the radia-
tor grille or bonnet, have the
bonnet lock checked by an
authorised dealer as soon as pos-
sible.
1
2
The engine may be hot
when carrying out opera-
tions in close proximity. In
addition, the engine cooling
fan can come on at any moment.
Risk of injury.
Page 193 of 284
4.3
BONNET (2/2)
3
4
5
Closing the bonnet
Ensure that the windscreen wiper
blades are correctly positioned.
Place stay 4 back into its holders 5,
hold the bonnet in the middle and lower
it to 20 cm above the closed position,
then release it. It will latch automatically
under its own weight.
Ensure that the bonnet is
properly locked.
Check that nothing is pre-
venting the catch from lock-
ing (gravel, cloth, etc.).
Opening the bonnet
Lift the bonnet and release stay 4 from
its holders 5. For your own safety, it is
essential to fix the stay into retainer 3
in the bonnet.
After any procedure in the
engine compartment, make
sure that you do not forget
anything (cloth, tools, etc.).
Otherwise, this may lead to engine
damage or cause a fire.
Page 206 of 284

4.16
Glass instrument panel(e.g.: instrument panel, clock, exterior
temperature display, radio display, mul-
timedia or multifunction display etc.)
Use a soft cloth (or cotton wool).
If this does not clean them properly,
use a soft cloth (or cotton wool) slightly
moistened with soapy water and then
wipe clean with another soft damp cloth
or cotton wool.
Finally, carefully dry off with a soft dry
cloth.
Do not use products containing alco-
hol and/or spray fluids on the area.
Seat belts
These must be kept clean.
Use products selected by our Technical
Department (Approved outlets) or
warm, soapy water and a sponge and
wipe with a dry cloth.
Detergents or dyes must not be used
under any circumstances.
INTERIOR TRIM MAINTENANCE (1/2)
Textiles (seats, door trim, etc)
Vacuum-clean the textiles regularly.
Liquid stain
Use soapy water.
Dab lightly (never rub) with a soft cloth,
rinse and remove the excess.
Solid or pasty stain
Carefully remove the excess solid or
pasty material immediately with a
spatula (working from the edges to the
centre to avoid spreading the stain).
Clean as for a liquid stain.
Special instructions for sweets or
chewing gum
Put an ice cube on the stain to solidify
it, then proceed as for a solid stain.
A well-maintained vehicle will last
longer. It is therefore recommended to
maintain the interior of the vehicle regu-
larly.
A stain should always be dealt with
swiftly.
Whatever type of stain is on the trim,
use
cold (or warm) soapy water with
natural soap.
Detergents (washing-up liquid, pow-
dered products, alcohol-based prod-
ucts) should not be used.
Use a soft cloth.
Rinse and soak up the excess.
For further recommendations for
maintaining the interior, and/or for
any unsatisfactory results, please
see an authorised dealer.