2016 RENAULT KADJAR temperature
[x] Cancel search: temperaturePage 183 of 300
3.5
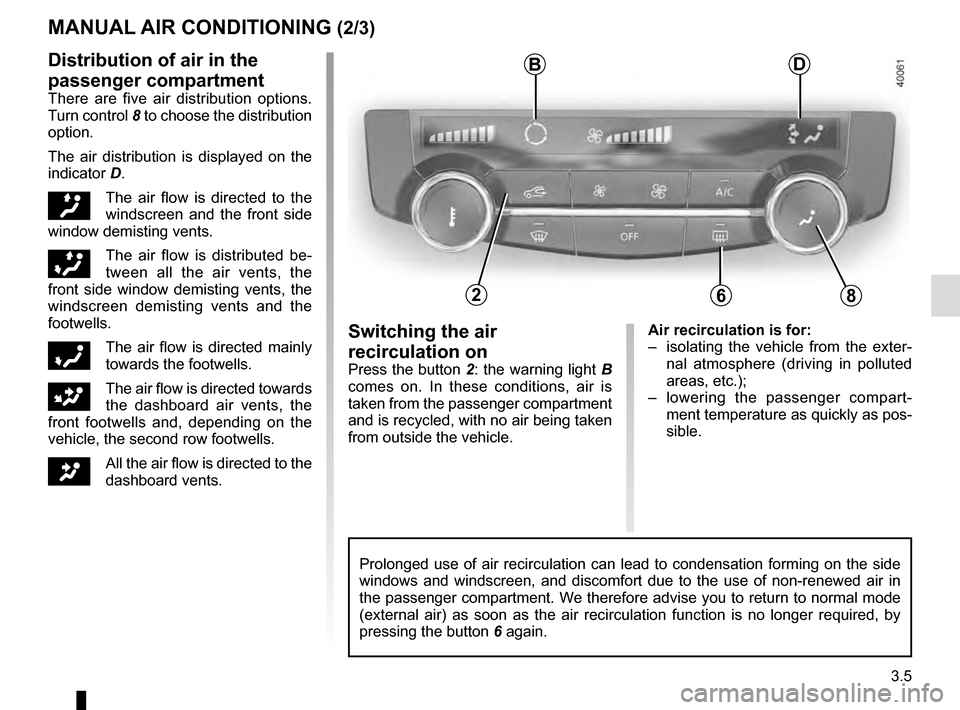
Air recirculation is for:
– isolating the vehicle from the exter-nal atmosphere (driving in polluted
areas, etc.);
– lowering the passenger compart- ment temperature as quickly as pos-
sible.Switching the air
recirculation on
Press the button 2: the warning light B
comes on. In these conditions, air is
taken from the passenger compartment
and is recycled, with no air being taken
from outside the vehicle.
MANUAL AIR CONDITIONING (2/3)
Prolonged use of air recirculation can lead to condensation forming on t\
he side
windows and windscreen, and discomfort due to the use of non-renewed air\
in
the passenger compartment. We therefore advise you to return to normal mode
(external air) as soon as the air recirculation function is no longer \
required, by
pressing the button 6 again.
Distribution of air in the
passenger compartment
There are five air distribution options.
Turn control 8 to choose the distribution
option.
The air distribution is displayed on the
indicator D.
õThe air flow is directed to the
windscreen and the front side
window demisting vents.
÷The air flow is distributed be-
tween all the air vents, the
front side window demisting vents, the
windscreen demisting vents and the
footwells.
óThe air flow is directed mainly
towards the footwells.
GThe air flow is directed towards
the dashboard air vents, the
front footwells and, depending on the
vehicle, the second row footwells.
JAll the air flow is directed to the
dashboard vents.
B
682
D
Page 184 of 300
3.6
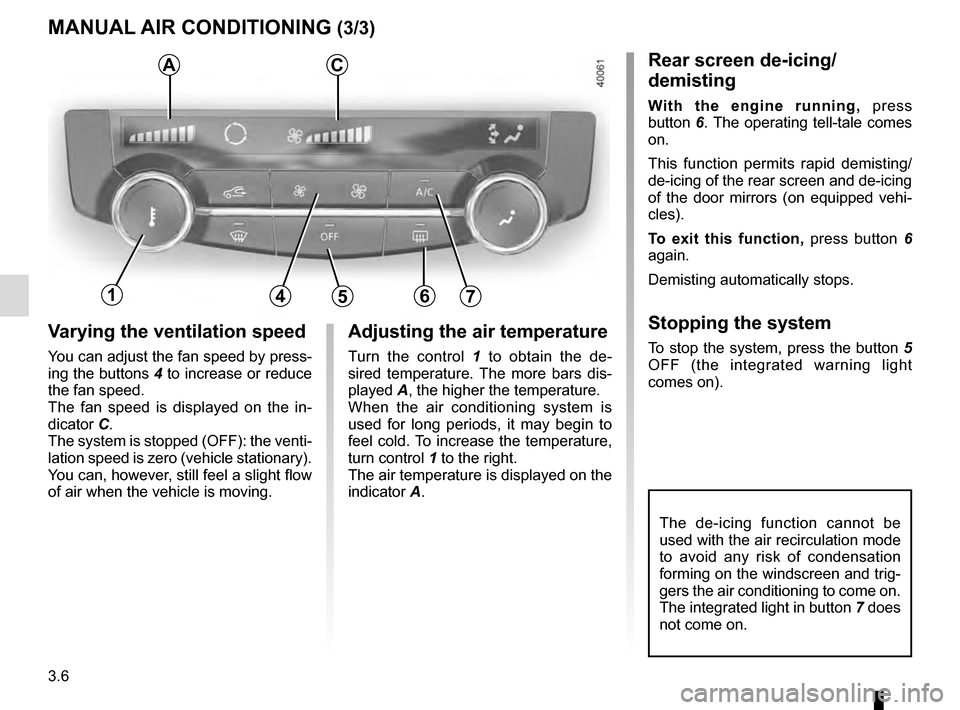
Varying the ventilation speed
You can adjust the fan speed by press-
ing the buttons 4 to increase or reduce
the fan speed.
The fan speed is displayed on the in-
dicator C.
The system is stopped (OFF): the venti-
lation speed is zero (vehicle stationary).
You can, however, still feel a slight flow
of air when the vehicle is moving.
MANUAL AIR CONDITIONING (3/3)
Adjusting the air temperature
Turn the control 1 to obtain the de-
sired temperature. The more bars dis-
played A, the higher the temperature.
When the air conditioning system is
used for long periods, it may begin to
feel cold. To increase the temperature,
turn control 1 to the right.
The air temperature is displayed on the
indicator A.
The de-icing function cannot be
used with the air recirculation mode
to avoid any risk of condensation
forming on the windscreen and trig-
gers the air conditioning to come on.
The integrated light in button 7 does
not come on.
Rear screen de-icing/
demisting
With the engine running, press
button 6. The operating tell-tale comes
on.
This function permits rapid demisting/
de-icing of the rear screen and de-icing
of the door mirrors (on equipped vehi-
cles).
To exit this function, press button 6
again.
Demisting automatically stops.
Stopping the system
To stop the system, press the button 5
OFF (the integrated warning light
comes on).
AC
14567
Page 185 of 300

3.7
AUTOMATIC CLIMATE CONTROL (1/6)Automatic mode
The automatic climate control system
guarantees comfort in the passen-
ger compartment and good visibility
(except in the event of extreme condi-
tions), while optimising consumption.
The system controls the ventilation
speed, air distribution, air recirculation,
and starting and stopping the air condi-
tioning and air temperature.
AUTO: allows the selected com-
fort level to be best attained, depend-
ing on the exterior conditions. Press
button 7. The integrated indicator light
on button 7 comes on.
Varying the ventilation speedIn automatic mode, the system uses
the most suitable amount of air to reach
and maintain the desired comfort level.
You can still adjust the fan speed by
pressing the buttons 6 to increase or
reduce the fan speed.
In this case, the integrated indicator
light on button 7 goes out and the ven-
tilation speed selected is displayed on
the indicator C.
Indicators
A Left-hand side air temperature.
B Distribution of air.
C Fan speed.
D Automatic air recirculation warning
light.
E Right-hand side air temperature.
The controls
1 Stopping the system or, depending on the vehicle, de-icing/demisting
the windscreen.
2 and 10 air temperature.
3 “Clear View” function.
4 and 5 Passenger compartment air
distribution.
6 Fan speed and, depending on the ventilation, stopping the system.
7 Automatic programme.
8 Air conditioning.
9 Air recirculation.
11 De-icing/demisting of the rear screen
and, depending on the vehicle, the
door mirrors.
12 DUAL function
124567891012
ABCDE
311
Page 186 of 300

3.8
AUTOMATIC CLIMATE CONTROL (2/6)
Temperature adjustment
There are two types of settings:
– uniform passenger compartment setting;
– adjustment in DUAL function to inde- pendently adjust the left and/or right-
hand side of the passenger compart-
ment.
Uniform passenger compartment
setting
Use control 2.
The displayed temperature values
show a comfort level.
When starting the engine, increas-
ing or decreasing the value dis-
played will not allow the com-
fort level to be reached any more
quickly. The system will always op-
timise the temperature increase or
decrease (the ventilation system
does not start instantly at maximum
speed: it gradually increases). This
may take several minutes.
Generally speaking, unless there is
a particular reason not to, the dash-
board air vents should remain open.DUAL function setting
Press button 12 to activate.
Use the control 2 to adjust the left side
and control 10 for the right side.
21012
Page 190 of 300
3.12
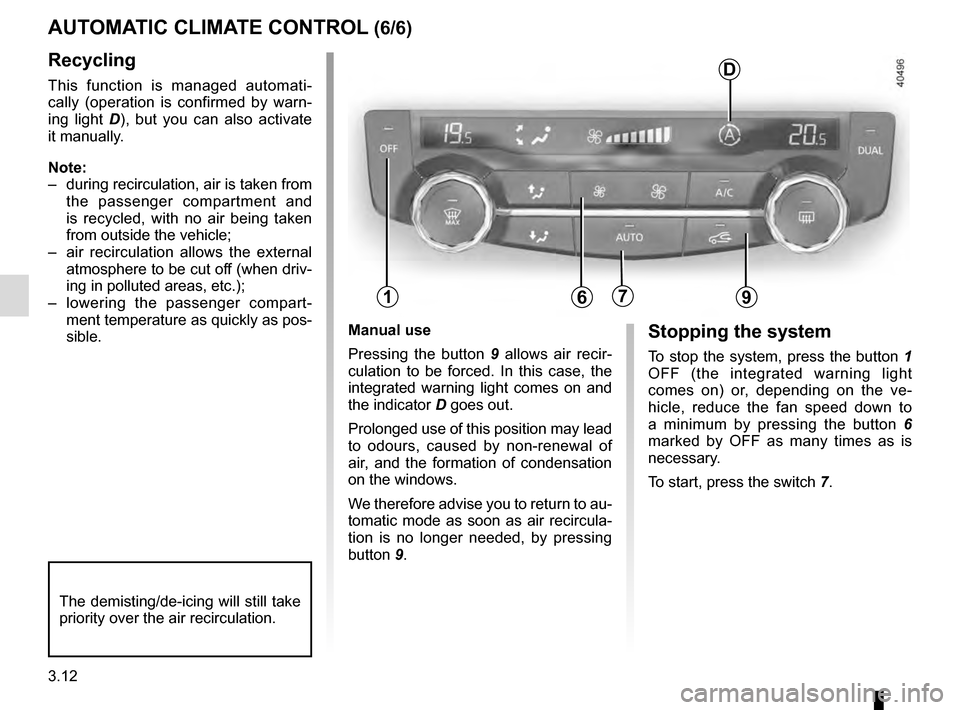
Manual use
Pressing the button 9 allows air recir-
culation to be forced. In this case, the
integrated warning light comes on and
the indicator D goes out.
Prolonged use of this position may lead
to odours, caused by non-renewal of
air, and the formation of condensation
on the windows.
We therefore advise you to return to au-
tomatic mode as soon as air recircula-
tion is no longer needed, by pressing
button 9.Stopping the system
To stop the system, press the button 1
OFF (the integrated warning light
comes on) or, depending on the ve-
hicle, reduce the fan speed down to
a minimum by pressing the button 6
marked by OFF as many times as is
necessary.
To start, press the switch 7.
Recycling
This function is managed automati-
cally (operation is confirmed by warn-
ing light D), but you can also activate
it manually.
Note:
– during recirculation, air is taken from the passenger compartment and
is recycled, with no air being taken
from outside the vehicle;
– air recirculation allows the external atmosphere to be cut off (when driv-
ing in polluted areas, etc.);
– lowering the passenger compart- ment temperature as quickly as pos-
sible.
AUTOMATIC CLIMATE CONTROL (6/6)
The demisting/de-icing will still take
priority over the air recirculation.
179
D
6
Page 228 of 300
4.12
BATTERY (1/2)
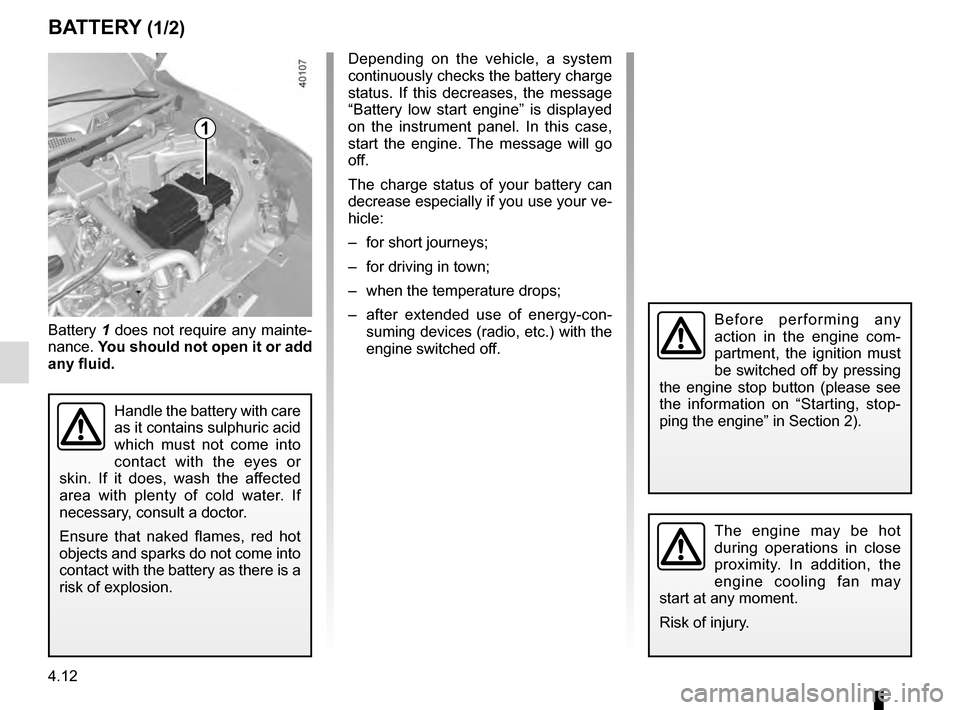
1
Battery 1 does not require any mainte-
nance. You should not open it or add
any fluid.
Handle the battery with care
as it contains sulphuric acid
which must not come into
contact with the eyes or
skin. If it does, wash the affected
area with plenty of cold water. If
necessary, consult a doctor.
Ensure that naked flames, red hot
objects and sparks do not come into
contact with the battery as there is a
risk of explosion.
Depending on the vehicle, a system
continuously checks the battery charge
status. If this decreases, the message
“Battery low start engine” is displayed
on the instrument panel. In this case,
start the engine. The message will go
off.
The charge status of your battery can
decrease especially if you use your ve-
hicle:
– for short journeys;
– for driving in town;
– when the temperature drops;
– after extended use of energy-con- suming devices (radio, etc.) with the
engine switched off.
The engine may be hot
during operations in close
proximity. In addition, the
engine cooling fan may
start at any moment.
Risk of injury.
Before performing any
action in the engine com-
partment, the ignition must
be switched off by pressing
the engine stop button (please see
the information on “Starting, stop-
ping the engine” in Section 2).
Page 230 of 300
4.14
BODYWORK MAINTENANCE (1/2)
You should
Wash your car frequently, with the
engine off, with cleaning products rec-
ommended by the manufacturer (never
use abrasive products). Rinse thor-
oughly beforehand with a jet:
– spots of tree resin and industrial
grime;
– mud in the wheel arches and under-
neath the body which forms damp
patches;
– bird droppings , which cause a
chemical reaction with the paint that
rapidly discolours paintwork and
may even cause the paint to peel
off;
wash the vehicle immediately to
remove these marks since it is im-
possible to remove them by polish-
ing;
– salt, particularly in the wheel arches
and underneath the body after driv-
ing in areas where the roads have
been gritted.
Remove any plant matter (resin, leaves,
etc.) from the vehicle regularly.
What you should not doDo not degrease or clean mechani-
cal components (e.g. the engine com-
partment), underneath the body, parts
with hinges (e.g. inside the doors) and
painted plastic external fittings (e.g.
bumpers) using high-pressure clean-
ing equipment or by spraying on prod-
ucts not approved by our Technical
Department. Doing this could give rise
to corrosion or operational faults.
Wash the vehicle in bright sunlight or
freezing temperatures.
Do not scrape off mud or dirt without
pre-wetting.
Allow dirt to accumulate on the exterior.
Allow rust to form following minor im-
pacts.
Do not use solvents not approved by
our Technical Department to remove
stains as this could damage the paint-
work.
Do not drive in snow or muddy condi-
tions without washing the vehicle, par-
ticularly under the wheel arches and
body.
A well-maintained vehicle will last
longer. It is therefore recommended to
maintain the exterior of the vehicle reg-
ularly.
Your vehicle has been treated with very
effective anti-corrosion products. It is
nevertheless subject to various outside
influences.
Corrosive agents in the atmosphere
–
atmospheric pollution (built-up and
industrial areas),
– saline atmospheres (near the sea,
particularly in hot weather),
– seasonal and damp weather condi-
tions (e.g. road salt in winter, water
from road cleaners, etc.).
Minor impacts
Abrasive action
Dust and sand in the air, mud, road grit
thrown up by other vehicles, etc.
You should take a number of minor pre-
cautions in order to safeguard your ve-
hicle against such risks.
Page 232 of 300
4.16
Glass instrument panel(e.g.: instrument panel, clock, exterior
temperature display, radio display, mul-
timedia or multifunction display etc.)
Use a soft cloth (or cotton wool).
If this does not clean them properly,
use a soft cloth (or cotton wool) slightly
moistened with soapy water and then
wipe clean with another soft damp cloth
or cotton wool.
Finally, carefully dry off with a soft dry
cloth.
Do not use products containing alco-
hol and/or spray fluids on the area.
Seat belts
These must be kept clean.
Use products selected by our Technical
Department (Approved outlets) or
warm, soapy water and a sponge and
wipe with a dry cloth.
Detergents or dyes must not be used
under any circumstances.
INTERIOR TRIM MAINTENANCE (1/2)
Textiles (seats, door trim, etc)
Vacuum-clean the textiles regularly.
Liquid stain
Use soapy water.
Dab lightly (never rub) with a soft cloth,
rinse and remove the excess.
Solid or pasty stain
Carefully remove the excess solid or
pasty material immediately with a
spatula (working from the edges to the
centre to avoid spreading the stain).
Clean as for a liquid stain.
Special instructions for sweets or
chewing gum
Put an ice cube on the stain to solidify
it, then proceed as for a solid stain.
A well-maintained vehicle will last
longer. It is therefore recommended to
maintain the interior of the vehicle regu-
larly.
A stain should always be dealt with
swiftly.
Whatever type of stain is on the trim,
use
cold (or warm) soapy water with
natural soap.
Detergents (washing-up liquid, pow-
dered products, alcohol-based prod-
ucts) should not be used.
Use a soft cloth.
Rinse and soak up the excess.
For further recommendations for
maintaining the interior, and/or for
any unsatisfactory results, please
see an authorised dealer.