Page 131 of 318

2.23
TYRE PRESSURE MONITORING SYSTEM (1/3)
If the vehicle is equipped with the func-
tion, this system monitors the tyre pres-
sure.
Operating principle
Each wheel (except for the emergency
spare wheel) has a sensor in the infla-
tion valve which periodically measures
the tyre pressure.
The system displays the current pres-
sures on the instrument panel 1 and
alerts the driver in the event of insuffi-
cient pressure.
Resetting the standard level
for the tyre pressures
This should be done:
– when the standard tyre pressure needs to be changed to adapt to
usage conditions (empty, carrying a
load, motorway driving, etc.);
– after swapping a wheel (however this practice is not recommended);
– after changing a wheel.
It should always be done after checking
the tyre pressure of all four tyres when
cold.
Tyre pressures must correspond to the
current usage of the vehicle (empty,
carrying a load, motorway driving, etc.).
21
Resetting procedure
With the ignition on:
– repeatedly and briefly press con- trol 2 to select the tyre pressure dis-
play and the “Tyre pressure” func-
tion;
– press and hold (around 3 seconds) the button 2 to launch the reset. The
flashing tyres followed by the mes-
sages “Learning TP initiated” and
then “Tyres location in progress” in-
dicates that the reset request for the
tyre pressure reference value has
been acknowledged.
Reset can take several minutes of driv-
ing.
If the resetting is followed by short
trips, the message “Tyres location in
progress” can remain displayed after
successive restarts.
Note
The standard tyre pressure cannot be
less than that recommended and indi-
cated on the door frame.
3
Resetting can also be done from the
multifunction screen 3. Select the
menu “Vehicle”, “Tyre pressure”.
Page 132 of 318

2.24
TYRE PRESSURE MONITORING SYSTEM (2/3)
Display
The display 1 and the warning light 4
� on the instrument panel warn
you of any tyre pressure faults (flat tyre,
punctured tyre, system fault, etc.).
“Puncture”
A wheel B is shown in red, the warning
light 4
� comes on, the message
“Puncture” appears and there is a beep.
This message appears along with the
® warning light.
They indicate that the affected wheel
is punctured or severely underinflated.
Replace it or contact an approved
dealer if it is punctured. Top up the tyre
pressure if the wheel is deflated.
“Check tyre pressure sensors”
A wheel A disappears, the warning
light 4
� flashes for several sec-
onds then comes on continuously and
the message “Check tyre pressure sen-
sors” appears.
This message appears along with the
© warning light. They indicate that
at least one wheel is not fitted with sen-
sors (e.g. emergency spare wheel).
Otherwise, consult an authorised
dealer.
“Adjust tyre pressure”
A wheel B
is shown in orange, the
warning light 4
� comes on and
the message “Adjust tyre pressure” ap-
pears.
They indicate that a wheel is deflated.
Check and, if necessary, readjust the
pressures of the four wheels when cold.
The warning light 4
� goes off after
a few minutes’ driving.
A
B
4
1
For your safety, the warning
light
® requires you to
stop immediately as soon
as traffic conditions allow.
The sudden loss of pressure in a tyre (burst tyre, etc.) cannot be det\
ected by the
system.
Page 138 of 318

2.30
DRIVER CORRECTION DEVICES AND AIDS (5/12)
Advanced traction control
If fitted on the vehicle, grip control
makes it easier to control the vehicle on
low grip surfaces (soft ground, etc.).
Tyres
When they need to be re-
placed, only tyres of the
same make, size, type and
profile should be used.
Tyres fitted to the vehicle should
either be identical to those fitted
originally or conform to those re-
commended by your approved
dealer.
These functions are an ad-
ditional aid in the event of
critical driving conditions,
enabling the vehicle beha-
viour to be adapted to suit the dri-
ving conditions.
However, the functions do not take
the place of the driver. They do
not increase the vehicle’s limits
and should not encourage you
to drive more quickly. Therefore,
they can under no circumstances
replace the vigilance or responsibi-
lity of the driver when manoeuvring
the vehicle (the driver must always
be ready for sudden incidents which
may occur when driving).
Activating or deactivating the
system
From the multifunction screen, select
menu “Vehicle”, “Driving assistance”,
“Traction control” then select the mode:
« Auto »
The “Auto Advanced Traction Control”
message is shown on the instrument
panel for approximately 15 seconds.
This position enables optimal usage
under normal driving conditions (dry-
ness, humidity, light snow, etc.).
« Expert »
This position enables optimal usage on
soft ground (mud, sand, dead leaves,
etc.). “Expert” mode uses traction con-
trol functions.
The system automatically switches
to «Auto" mode at speeds above ap-
proximately 24.8 mph (40 km/h) and
the message "Auto Advanced Traction
Control» is displayed on the instrument
panel for approximately 15 seconds. Note: The system’s default mode is
“Auto” mode.
Page 139 of 318

2.31
DRIVER CORRECTION DEVICES AND AIDS (6/12)
If the driver depresses the brake pedal
and the system still detects a risk of col-
lision, the brake force is increased.
If the driver fails to react following
an alert of an imminent collision, the
system activates the brakes.
Active emergency braking
Using the sensor 1, the system calcu-
lates the distance separating the vehi-
cle from the one in front and alerts the
driver if there is a risk of a front-end col-
lision. The driver can then brake the ve-
hicle to limit the damage arising from a
collision.
Note: Make sure that the sensor 1 is
not obscured (by dirt, mud, snow, etc.).
Operation
While driving (at speeds of between 20
and 90 mph (30 and 140 km/h)), if there
is a risk of collision with the vehicle in
front, warning light 2 will be displayed
on the instrument panel in red and, de-
pending on the vehicle, on the head-up
display, alongside a beep.
The system only detects vehicles
driving in the same direction of traf-
fic. The system cannot detect mo-
torcycles because of the difficulty in
forecasting their trajectory.
12
Page 140 of 318

2.32
Conditions for non-activation of the
system
The system cannot be activated:
– when the gear lever is in neutral;
– when the parking brake is activated;
– while cornering.
Activating or deactivating the
system
From the multifunction screen 3, select
menu “Vehicle”, “Driving assistance”,
“Active braking” then choose “ON” or
“OFF”.
Warning light
� is displayed on the
instrument panel when the system is
deactivated.
This system is reactivated each time
the ignition is switched on.
DRIVER CORRECTION DEVICES AND AIDS (7/12)
You can access the “Driving as-
sistance” menu directly from the
button 4
\b.
Operating faults
When the system detects an operating
fault, the
� warning light lights up
on the instrument panel, with the mes-
sage “Active braking disconnected”.
There are two possibilities:
– The system is temporarily experien- cing difficulties (for example: sensor
obscured by dirt, mud, snow, etc.)
in this case, park the vehicle and
switch off the engine. Clean the de-
tection zone of the radar. When you
next start the engine, the warning
light and the message go out;
– If this is not the case, this may arise from another cause; contact an
Approved Dealer.3
4
Page 145 of 318

2.37
Rear wheel steering
On equipped vehicles, this system,
when the vehicle is being driven, steers
the rear wheels according to driving
conditions: at low speed this system
offers manoeuvrability, at higher speeds
it optimises stability.
When driving at low speeds, the rear
wheels steer in the opposite direction to
the front wheels (figure A) to increase
the vehicle’s manoeuvrability. This is
used when driving in towns, on winding
roads, during parking manoeuvres, etc. When driving at higher speeds, the rear
wheels steer in the same direction as
the front wheels (figure B
) to optimise
the vehicle’s stability. This is useful
when changing lanes or when corner-
ing etc.
Note: The system configuration (agility,
etc.) depends on the mode selected in
the «Multi-sense» menu (please refer
to the information on «Multi-sense» in
Section 3). Operating faults
– If the
© warning light, together
with the message “Check power
steering”, is displayed on the instru-
ment panel: please contact an au-
thorised dealer.
– If the warning light
®, together
with the message “Power steering
fault”, is displayed on the instrument
panel, this indicates a fault in the
system.
DRIVER CORRECTION DEVICES AND AIDS (12/12)
AB
® requires you to stop
as soon as traffic conditions
allow. Contact an approved
Dealer.
An impact to the underside of the
vehicle (e.g.: striking a post, raised
kerb or other street furniture) may
result in damage to the vehicle (e.g.:
deformation of an axle).
To avoid any risk of accident, have
your vehicle checked by an appro-
ved Dealer.
Page 147 of 318

2.39
LANE DEPARTURE WARNING (2/3)Conditions for non-activation
of alerts
– Indicators activated or having been activated less than approximately
four seconds prior to departing from
the lane;
– Very fast lane departure;
– Driving continuously on a line;
– On bends, the function allows for slightly cutting the bend;
– ...
Activation/deactivation
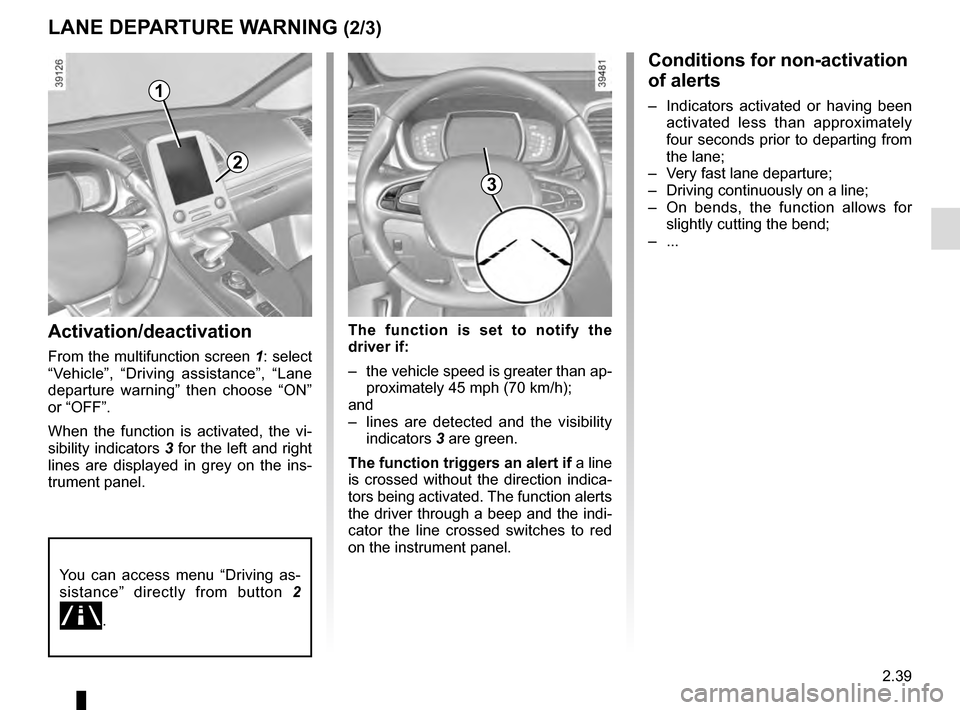
From the multifunction screen 1: select
“Vehicle”, “Driving assistance”, “Lane
departure warning” then choose “ON”
or “OFF”.
When the function is activated, the vi-
sibility indicators 3 for the left and right
lines are displayed in grey on the ins-
trument panel.
1
The function is set to notify the
driver if:
– the vehicle speed is greater than ap- proximately 45 mph (70 km/h);
and
– lines are detected and the visibility indicators 3 are green.
The function triggers an alert if a line
is crossed without the direction indica-
tors being activated. The function alerts
the driver through a beep and the indi-
cator the line crossed switches to red
on the instrument panel.
You can access menu “Driving as-
sistance” directly from button 2
\b.
2
3
Page 148 of 318
2.40
Adjustment
From the multifunction screen 1, select
“Vehicle”, “Driving assistance”, “Lane
departure warning settings” then in:
– volume: adjust the alert volume to one of five levels;
– sensitivity: adjust the sensitivity level for line detection. To do this select:
– “Low” line detected upon cros-
sing;
– “Middle” line detected on ap-
proach;
– “high” line detected nearby.
LANE DEPARTURE WARNING (3/3)
Operating faults
In the event of a malfunction, a mes-
sage “Lane departure warning check” is
displayed on the instrument panel, and
the visibility indicators for the left and
right lines disappear from the instru-
ment panel.
Consult an approved dealer.1