Page 366 of 919
– Tire Pressure is an information only function andcannot be reset.
– Refer to the �Tire Pressure Information System
(TPIS)” under �Starting and Operating� for further
information.
• Transmission Temperature – Automatic Transmission
Only
• Oil Temperature
• Oil Life
• Battery Voltage — If Equipped
• Gauge Summary:
– Coolant Temperature
– Transmission Temperature (automatic only)
– Oil Temperature
– Oil Pressure
• Engine HoursFuel Economy
Push and release the UPorDOWN arrow
button until the Fuel Economy Menu icon/title
is highlighted. Push and hold the RIGHT arrow
button to reset feature.
• Range
• Current MPG or L/100 km
• Average MPG or L/100 km
Trip A
Push and release the UPorDOWNar-
row button until the Trip A icon/title is
highlighted in the DID. The Trip A informa-
tion will display the following:
• Distance MI or km
364 UNDERSTANDING YOUR INSTRUMENT PANEL
Page 378 of 919

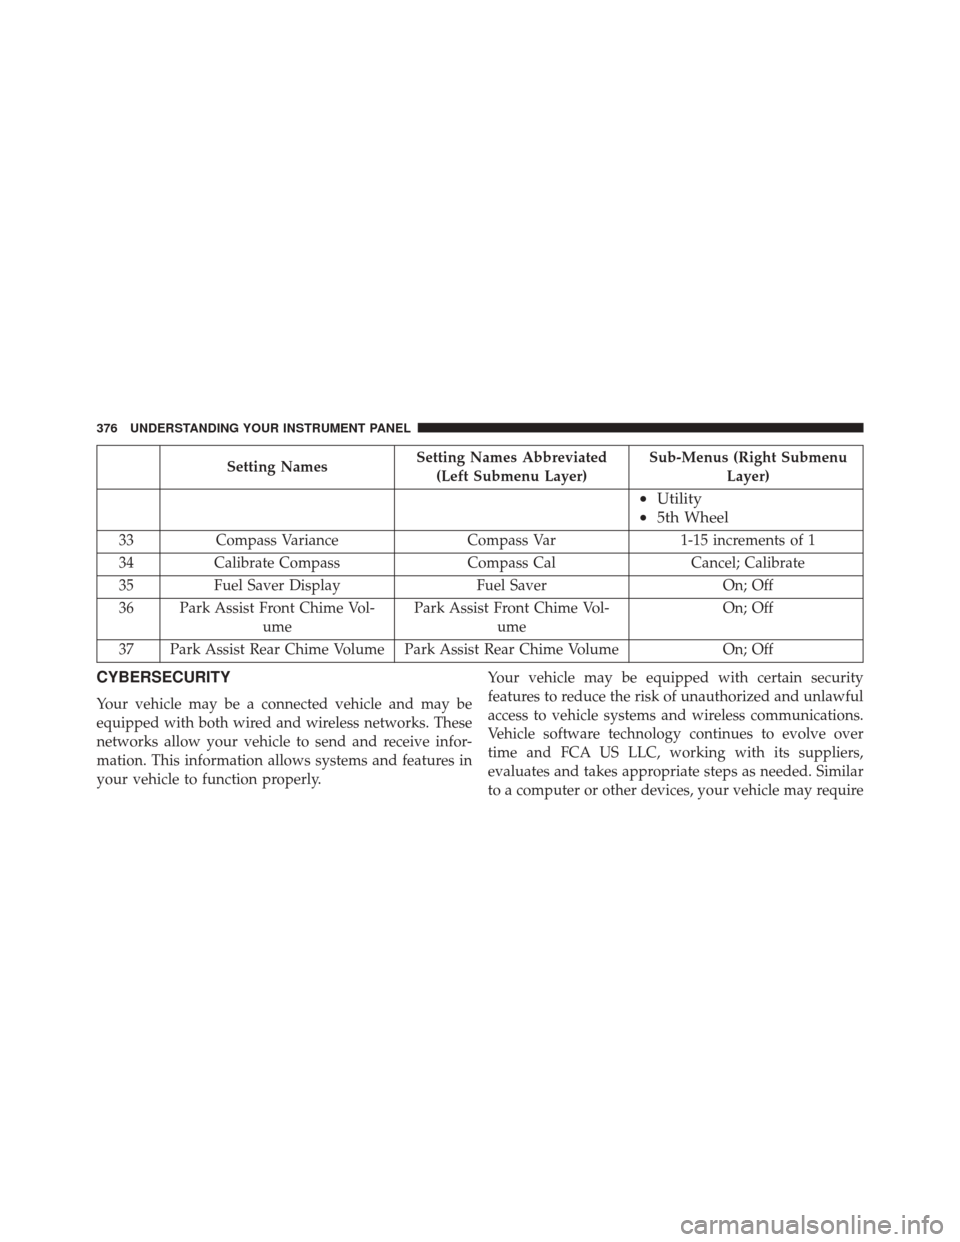
Setting NamesSetting Names Abbreviated
(Left Submenu Layer) Sub-Menus (Right Submenu
Layer)
•Utility
• 5th Wheel
33 Compass Variance Compass Var1-15 increments of 1
34 Calibrate Compass Compass CalCancel; Calibrate
35 Fuel Saver Display Fuel SaverOn; Off
36 Park Assist Front Chime Vol- ume Park Assist Front Chime Vol-
ume On; Off
37 Park Assist Rear Chime Volume Park Assist Rear Chime Volume On; Off
CYBERSECURITY
Your vehicle may be a connected vehicle and may be
equipped with both wired and wireless networks. These
networks allow your vehicle to send and receive infor-
mation. This information allows systems and features in
your vehicle to function properly.Your vehicle may be equipped with certain security
features to reduce the risk of unauthorized and unlawful
access to vehicle systems and wireless communications.
Vehicle software technology continues to evolve over
time and FCA US LLC, working with its suppliers,
evaluates and takes appropriate steps as needed. Similar
to a computer or other devices, your vehicle may require
376 UNDERSTANDING YOUR INSTRUMENT PANEL
Page 384 of 919

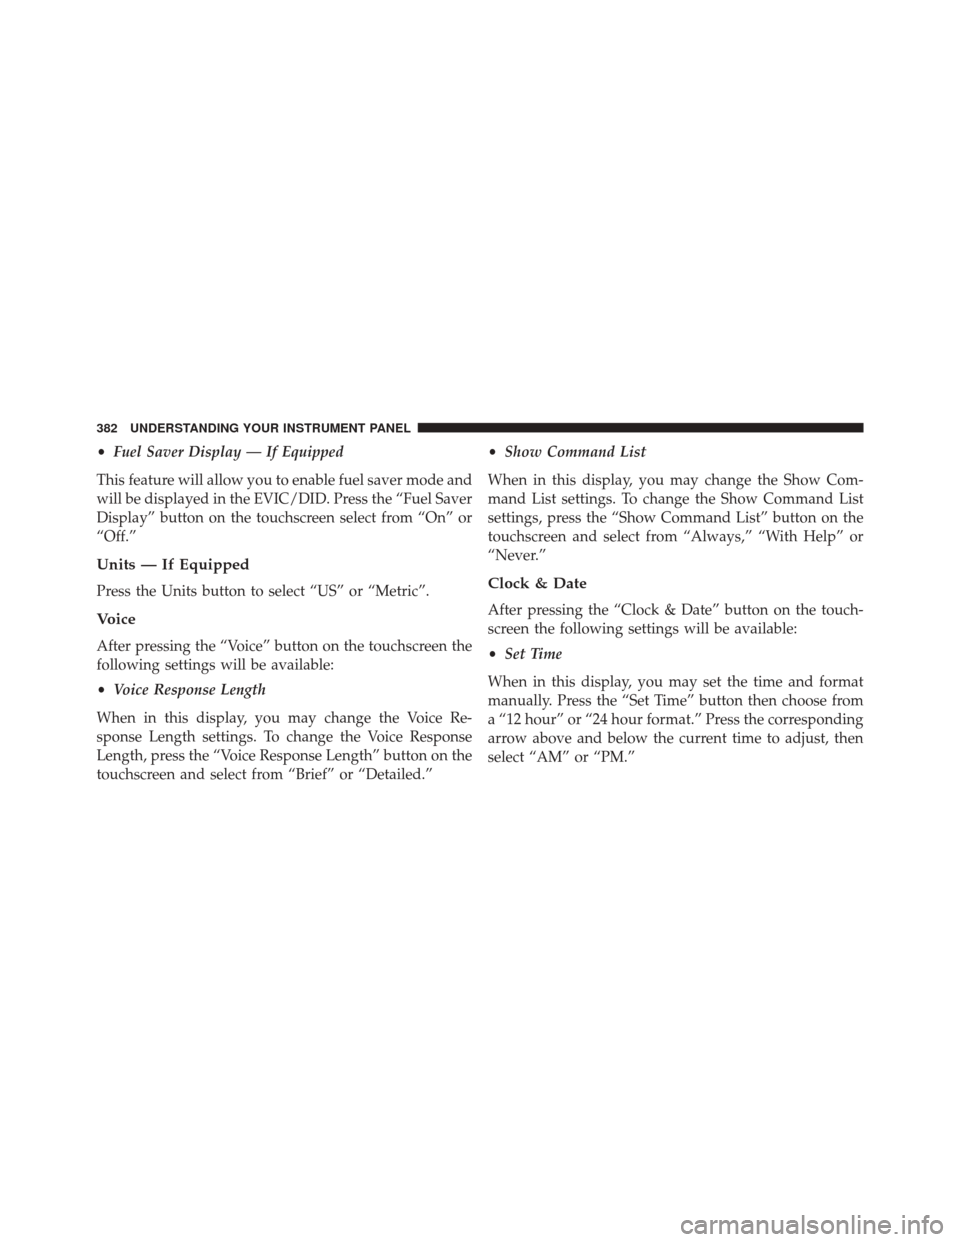
•Fuel Saver Display — If Equipped
This feature will allow you to enable fuel saver mode and
will be displayed in the EVIC/DID. Press the “Fuel Saver
Display” button on the touchscreen select from “On” or
“Off.”
Units — If Equipped
Press the Units button to select “US” or “Metric”.
Voice
After pressing the “Voice” button on the touchscreen the
following settings will be available:
• Voice Response Length
When in this display, you may change the Voice Re-
sponse Length settings. To change the Voice Response
Length, press the “Voice Response Length” button on the
touchscreen and select from “Brief” or “Detailed.” •
Show Command List
When in this display, you may change the Show Com-
mand List settings. To change the Show Command List
settings, press the “Show Command List” button on the
touchscreen and select from “Always,” “With Help” or
“Never.”
Clock & Date
After pressing the “Clock & Date” button on the touch-
screen the following settings will be available:
• Set Time
When in this display, you may set the time and format
manually. Press the “Set Time” button then choose from
a “12 hour” or “24 hour format.” Press the corresponding
arrow above and below the current time to adjust, then
select “AM” or “PM.”
382 UNDERSTANDING YOUR INSTRUMENT PANEL
Page 401 of 919

•Controls Screen Time-Out — If Equipped
When this feature is selected, the Controls Screen will
stay open for five seconds before the screen times out.
With the feature deselected, the screen will stay open
until it is manually closed. Press the “Controls Screen
Time-Out” button on the touchscreen, until a check-mark
appears next to the setting, showing that setting has been
selected.
• Fuel Saver Display — If Equipped
This feature will allow you to enable fuel saver mode and
will be displayed in the DID. Press the “Fuel Saver
Display” button on the touchscreen, until a check-mark
appears next to the setting, showing that setting has been
selected.
Units
After pressing the “Units” button on the touchscreen you
may select each unit of measure independently displayed in the Driver Information Display (DID), and navigation
system (if equipped). The following selectable units of
measure are listed below:
•
Speed
Select from: “MPH” or “km/h.”
• Distance
Select from: “mi” or “km.”
• Fuel Consumption
Select from: “MPG” (US), “MPG” (UK), “L/100 km” or
“km/L.”
• Capacity
Select from: “gal” (US), “gal” (UK), “L/100 km” or “L.”
• Pressure
Select from: “psi,” “kPa,” or “bar.”
4
UNDERSTANDING YOUR INSTRUMENT PANEL 399
Page 426 of 919

Bi-Level Mode
Air is directed through the panel and floor outlets.
NOTE: There is a difference in temperature (in any
conditions other than full cold or full hot), between the
upper and lower outlets for added comfort. The warmer
air goes to the floor outlets. This feature gives improved
comfort during sunny but cool conditions.
Floor Mode
Air is directed through the floor outlets with a
small amount through the defrost and side win-
dow demist outlets.
Mix Mode
Air is directed through the floor, defrost and side
window demist outlets. This setting works best in
cold or snowy conditions that require extra heat at the
windshield. This setting is good for maintaining comfort,
while reducing moisture on the windshield.
Defrost Mode
Air is directed through the windshield and side
window demist outlets. Use the DEFROST mode
with maximum blower and warm temperature settings
for best windshield and side window defrosting.
NOTE: The air conditioning compressor operates in MIX
and DEFROST, or a blend of these modes even if the A/C
button is not pushed. This dehumidifies the air to help
dry the windshield. To improve fuel economy, use these
modes only when necessary.
424 UNDERSTANDING YOUR INSTRUMENT PANEL
Page 431 of 919

6. Modes
The airflow distribution mode can be adjusted so air
comes from the instrument panel outlets, floor outlets,
and demist outlets. The Mode settings are as follows:•Panel Mode
Air comes from the outlets in the instrument
panel. Each of these outlets can be individu-
ally adjusted to direct the flow of air. The air
vanes of the center outlets and outboard outlets can
be moved up and down or side to side to regulate
airflow direction. There is a shut off wheel located
below the air vanes to shut off or adjust the amount
of airflow from these outlets.
• Bi-Level Mode
Air comes from the instrument panel outlets
and floor outlets. A slight amount of air is
directed through the defrost and side window
demister outlets. NOTE:
BI-LEVEL mode is designed under comfort con-
ditions to provide cooler air out of the panel outlets and
warmer air from the floor outlets.
•Floor Mode
Air comes from the floor outlets. A slight
amount of air is directed through the defrost
and side window demister outlets.
• Mix Mode
Air comes from the floor, defrost and side
window demister outlets. This mode works
best in cold or snowy conditions.
NOTE: The air conditioning compressor operates in MIX
and DEFROST modes even if the A/C button is not
pressed. This dehumidifies the air to help dry the wind-
shield. To improve fuel economy, utilize these modes
only when required.
4
UNDERSTANDING YOUR INSTRUMENT PANEL 429
Page 439 of 919

14. Driver Temperature Control Up Button
(Uconnect 8.4)
Provides the driver with independent temperature con-
trol. Push the button on the faceplate button for warmer
temperature settings or on the touchscreen, press and
slide the temperature bar towards the red arrow for
warmer temperature settings.
NOTE:In Sync mode, this button will also automatically
adjust the passenger temperature setting at the same
time.
15. Temperature Control (Uconnect 5.0)
Press the temperature button on the touchscreen to
regulate the temperature of the air inside the passenger
compartment. Moving the temperature bar into the red
area, indicates warmer temperatures. Moving the tem-
perature bar into the blue area indicates cooler tempera-
tures.Climate Control Functions
A/C (Air Conditioning)
The Air Conditioning (A/C) button allows the operator
to manually activate or deactivate the air conditioning
system. When the air conditioning system is turned on,
cool dehumidified air will flow through the outlets into
the cabin. For improved fuel economy, press the A/C
button to turn off the air conditioning and manually
adjust the blower and airflow mode settings. Also, make
sure to select only Panel, Bi-Level or Floor modes.
NOTE:
• For Manual Climate Controls, if the system is in Mix,
Floor or Defrost Mode, the A/C can be turned off, but
the A/C system shall remain active to prevent fogging
of the windows.
4
UNDERSTANDING YOUR INSTRUMENT PANEL 437
Page 466 of 919
TIP:Once you perform a search, you can reorganize the
results by selecting either the Best Match, Rating or
Distance tab on the top of the touchscreen display.SiriusXM Travel Link (8.4A/8.4AN)
Need to find a gas station, view local movie listings,
check a sports score or the 5 - day weather forecast?
SiriusXM Travel Link is a suite of services that brings a
wealth of information right to your Uconnect 8.4AN
system. (Not available for 8.4A system.)
Push the VR button
. After the beep, say one of the
following commands:
• Show fuel prices
• Show 5 - day weather forecast
• Show extended weather
Yelp
464 UNDERSTANDING YOUR INSTRUMENT PANEL