2016 Peugeot Partner Tepee power steering fluid
[x] Cancel search: power steering fluidPage 14 of 296

12
Location
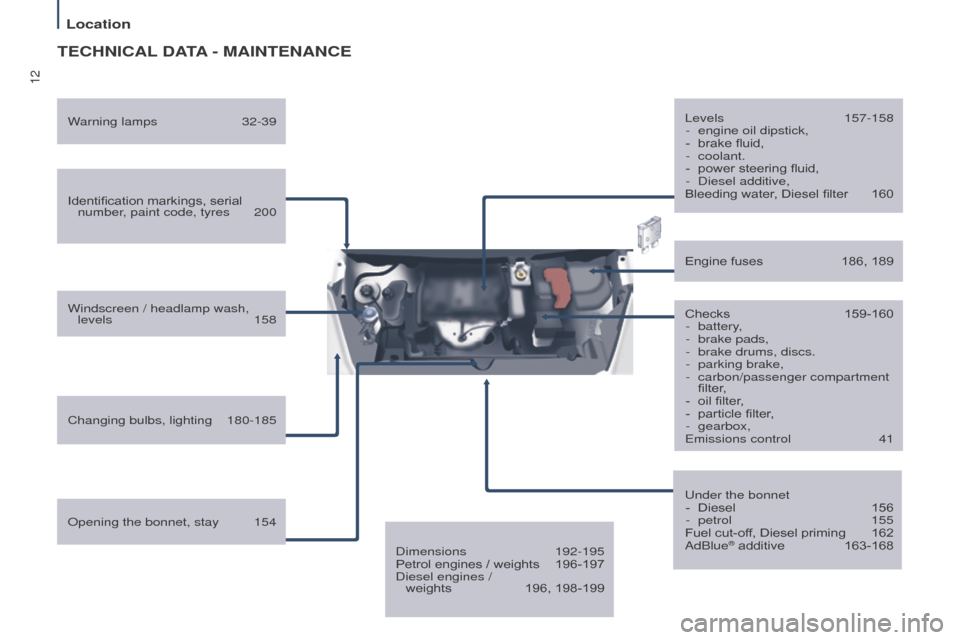
teCHNICAL DAtA - M AIN te NANC e
Identification markings, serial
number, paint code, tyres 200
Windscreen / headlamp wash, levels
158
Changing bulbs, lighting
180-185 Checks
159-160
-
battery
,
-
brake pads,
-
brake drums, discs.
-
parking brake,
-
carbon/passenger compartment
filter
,
-
oil filter
,
-
particle filter
,
-
gearbox,e
missions control
41
Engine fuses
186, 189
o
pening the bonnet, stay
154 Levels
157-158
-
engine oil dipstick,
-
brake fluid,
-
coolant.
-
power steering fluid,
-
Diesel additive,
Bleeding water
, Diesel filter 160
W arning lamps
32-39
u
nder the bonnet
-
Diesel
156
-
petrol
155
Fuel cut-of
f, Diesel priming
162
AdBlue® additive 163-168
Dimensions
192-195
Petrol engines / weights
196-197
Diesel engines /
weights
196, 198-199
Page 34 of 296

Instruments and controls
32
WARNINg LAMPS
Warning lamp is indicatesSolution - action
S to Pon, associated
with another
warning
lamp and
accompanied
by a message
in the screen. major faults linked with
the "Brake fluid level",
"
e ngine oil pressure and
temperature", "Coolant
temperature", "
e lectronic
brake force distribution" and
"Power steering" warning
lamps. You must stop as soon as it is safe to do
so. Park and switch off the ignition. Have it
checked by a P
eugeot dealer or a qualified
workshop.
Parking
brake
/ Brake
fluid level /
e
BFD on.
that the parking brake is applied
or has not been released fully.Releasing the parking brake switches off the
warning lamp.
on. low brake fluid level. Top up using a fluid recommended by PEUGEOT.
remaining on even
though the level
is correct and
associated with the
ABS warning lamp.
a fault with the electronic
brake force distribution.You must stop as soon as it is safe to do so.
Park and switch off the ignition.
Have it checked by a P
eugeot dealer or a
qualified workshop.
e
ngine oil
pressure and
temperature on while
driving.
low pressure or a high
temperature. Park and switch off the ignition then allow to cool.
Visually check the level.
Chapter 7, "Levels" section.
remaining on,
even though the
level is correct.a major fault.
Have it checked by a P eugeo T dealer or a
qualified workshop.
e
ach time the vehicle is started: a series of warning lamps comes on appl\
ying a self-test check. They go off almost immediately.
Engine running: the lamp becomes a warning if it remains on continuously or flashes.
This initial warning may be accompanied by an audible signal and a messa\
ge in the screen.
Do not ignore these warnings.
Page 157 of 296

155
PetRoL eN g IN e
1. Screenwash fluid reservoir .
2.
Fusebox.
3.
e ngine coolant header tank.
Battery connections:
+
Positive terminal.
-
Negative point (earth).
T
ake care when working under the bonnet.
4. Brake and clutch fluid reservoir .
5.
Air filter
.
6.
e ngine oil dipstick.7.
Engine oil filler cap.
8.
Power steering fluid reservoir
.
CHeCKS
7
under the bonnet
Page 158 of 296

156
DIeSeL eN g IN e
4. Brake and clutch fluid reservoir .
5.
Air filter
.
6.
e ngine oil dipstick. 7.
Engine oil filler cap.
8.
Power steering fluid reservoir
.
9.
Priming pump.
1.
Screenwash fluid reservoir
.
2.
Fusebox.
3.
e
ngine coolant header tank.
Battery connections:
+
Positive terminal.
-
Negative point (earth).
T
ake care when working under the bonnet.
under the bonnet
Page 160 of 296

158
Cooling system
Only use the fluid recommended by the
manufacturer.
o
therwise, you risk seriously damaging
your engine.
When the engine is warm, the
temperature of the coolant is controlled
by the engine fan. As this fan can
operate with the ignition key removed
and because the cooling system is
pressurised, wait for at least one hour
after the engine has stopped before
carrying out any work.
Slacken the cap by 1/4 of a turn to
release the pressure to prevent any
risk of scalding. When the pressure
has dropped, remove the cap and top
up the level with coolant.
If fluid has to be added frequently,
this indicates a fault which must be
checked by a P
eugeo T dealer as
soon as possible.
Power steering fluid level
The vehicle must be parked on level
ground with the engine cold. u nscrew
the cap integrated with the gauge and
check the level which must be between
the MIN and MAX marks. In order to regenerate the filter, you
are advised to drive at a speed higher
than 40 mph (60 km/h) for at least five
minutes as soon as possible, when
traffic conditions permit (until the
message disappears and the service
warning lamp goes off).
During regeneration of the particle
emission filter, the noise of a relay
operating may be heard under the
dashboard.
If the message is still displayed and
if the service warning lamp remains
on, contact a P
eugeo T dealer or a
qualified workshop.
topping up
The level must be between the MIN
and MAX marks on the expansion
bottle. If more than 1 litre of fluid is
required to top up the level, have
the system checked by a P
eugeo
T
dealer or a qualified workshop.
Screenwash and headlamp
wash level
For best quality cleaning and for your
safety, we would advise that you use
products of the P
eugeo T range.
For optimum cleaning and to avoid
freezing, this fluid must not be topped
up or replaced with plain water.
Capacity of the screenwash reservoir:
approximately 3 litres.
If your vehicle is fitted with headlamp
washers, the capacity of the reservoir
is 6 litres.
Diesel additive level
(Diesel with particle
filter)
topping up
This additive must be topped up by
a PEUGEOT
dealer or a qualified
workshop without delay.
Waste products
Avoid prolonged contact of used oil
with the skin.
Brake fluid is harmful to health and
very corrosive.
Do not dispose of used oil, brake fluid
or coolant into drains or into the ground
but into the containers dedicated to this
use at a P
eugeo T dealer (France) or
an authorised waste disposal site.
The minimum level of this additive
is indicated by lighting of the service
warning lamp, accompanied by an
audible signal and a message in the
screen.
When this occurs with the engine
running it is due to the start of
saturation of the particle filter
(exceptionally prolonged urban type
driving conditions: low speed, long
traffic jams, ...).
Levels
Page 173 of 296

171
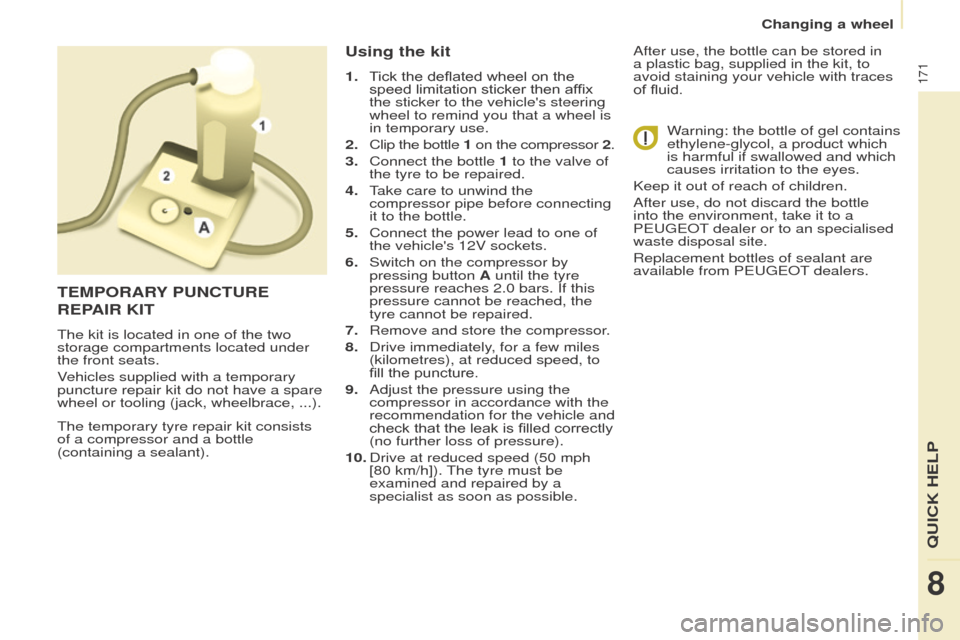
The temporary tyre repair kit consists
of a compressor and a bottle
(containing a sealant).
using the kit
1. Tick the deflated wheel on the speed limitation sticker then affix
the sticker to the vehicle's steering
wheel to remind you that a wheel is
in temporary use.
2.
Clip the bottle
1 on the compressor
2.
3.
Connect the bottle
1 to the valve of
the tyre to be repaired.
4.
T
ake care to unwind the
compressor pipe before connecting
it to the bottle.
5.
Connect the power lead to one of
the vehicle's 12V sockets.
6.
Switch on the compressor by
pressing button
A until the tyre
pressure reaches 2.0 bars. If this
pressure cannot be reached, the
tyre cannot be repaired.
7.
Remove and store the compressor
.
8.
Drive immediately
, for a few miles
(kilometres), at reduced speed, to
fill the puncture.
9.
Adjust the pressure using the
compressor in accordance with the
recommendation for the vehicle and
check that the leak is filled correctly
(no further loss of pressure).
10.
Drive at reduced speed (50
mph
[80 km/h]). The tyre must be
examined and repaired by a
specialist as soon as possible. After use, the bottle can be stored in
a plastic bag, supplied in the kit, to
avoid staining your vehicle with traces
of fluid.
Warning: the bottle of gel contains
ethylene-glycol, a product which
is harmful if swallowed and which
causes irritation to the eyes.
Keep it out of reach of children.
After use, do not discard the bottle
into the environment, take it to a
P
eugeo T dealer or to an specialised
waste disposal site.
Replacement bottles of sealant are
available from P
eugeo T dealers.
teMPoRARY P u NC tu R e
R
e PAIR KI t
The kit is located in one of the two
storage compartments located under
the front seats.
Vehicles supplied with a temporary
puncture repair kit do not have a spare
wheel or tooling (jack, wheelbrace, ...).
8
QuICK HeLP
Changing a wheel