2016 Peugeot 508 RXH wheel
[x] Cancel search: wheelPage 188 of 364

186
508_en_Chap06_conduite_ed01-2016
Tyre under-inflation detection
System which automatically checks the pressures of the tyres while driving.the system continuously monitors the pressures of the four tyres, as soon as the vehicle is moving.
th
e tyre under-inflation detection
system is an aid to driving which does
not replace the need for vigilance on
the part of the driver.
A pressure sensor is located in the valve of
each tyre (except the spare wheel).
th
e system triggers an alert if a drop in
pressure is detected in one or more tyres.
th
is system does not avoid the need
to check the tyre pressures regularly
(including the spare wheel) and before
a long journey.
Driving with under-inflated tyres
adversely affects road holding,
extends braking distances and causes
premature tyre wear, particularly under
arduous conditions (vehicle loaded,
high speed, long journey). Driving with under-inflated tyres
increases fuel consumption.
th
e tyre pressures for your vehicle can
be found on the tyre pressure label.
th
e tyre pressures must be checked
when the tyres cold (vehicle stopped
for 1 hour or after driving for less then
6 miles (10 km) at moderate speed).
Other wise, add 0.3 bar to the values
indicated on the label.
For more information on identification
markings, including the tyre pressure
label, refer to the corresponding
section.
Driving
Page 189 of 364

187
508_en_Chap06_conduite_ed01-2016
the loss of pressure detected does not
always lead to visible deformation of
the tyre.
Do not rely on just a visual check.
th
e alert is maintained until the tyre or
tyres concerned is reinflated, repaired
or replaced.
th
e spare wheel (space-saver type or a
steel rim) does not have a sensor.
Under-inflation alert
the alert is given by the fixed illumination
of this warning lamp, accompanied by
an audible signal, and depending on
equipment, the display of a message.
In the event of a problem on one of the tyres,
the symbol or the message appears, according
to equipment, to identify it.
F
R
educe speed, avoid sudden steering
movements or harsh brake applications.
F
S
top as soon as it is safe to do so.
F
I
f you have a compressor (the one in the
temporary puncture repair kit for example),
check the four tyre pressures when cold.
I
f it is not possible to check the tyre
pressures at the time, drive carefully at
reduced speed.
or
F
I
n the event of a puncture, use the
temporary puncture repair kit or the spare
wheel (according to equipment).
Operating fault
the flashing and then fixed
illumination of the under-inflation
warning lamp accompanied by the
illumination of the service warning
lamp indicates a fault with the system.
th
is alert is also displayed when one or more
wheels is not fitted with a sensor (for example,
a space-saver or steel spare wheel).
go t
o a P
e
uge
Ot
dealer or a qualified
workshop
to have the system checked
or, following the repair of a puncture, to
have the original wheel, equipped with a
sensor, refitted.
Any tyre repair or replacement on a
wheel fitted with this system must be
carried out by a P
e
uge
Ot
dealer or a
qualified workshop.
If after changing a tyre, a wheel is not
detected by your vehicle (fitting snow
tyres for example), you must have the
system reinitialised by a P
e
uge
Ot
dealer or a qualified workshop.
In this case, monitoring of the tyre pressures is
not assured.
6
Driving
Page 205 of 364
203
508_en_Chap07_info-pratiques_ed01-2016
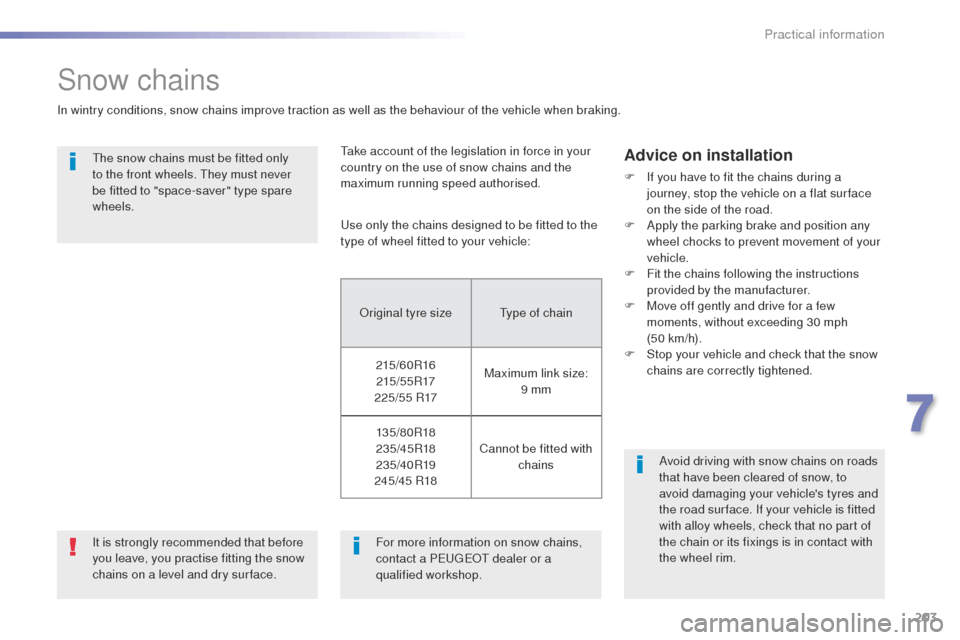
Snow chains
In wintry conditions, snow chains improve traction as well as the behaviour of the vehicle when braking.
th
e snow chains must be fitted only
to the front wheels.
t
h
ey must never
be fitted to "space-saver" type spare
wheels.
us
e only the chains designed to be fitted to the
type of wheel fitted to your vehicle:
Advice on installation
F If you have to fit the chains during a journey, stop the vehicle on a flat sur face
on the side of the road.
F
A
pply the parking brake and position any
wheel chocks to prevent movement of your
vehicle.
F
F
it the chains following the instructions
provided by the manufacturer.
F
M
ove off gently and drive for a few
moments, without exceeding 30 mph
(50
km/h).
F
S
top your vehicle and check that the snow
chains are correctly tightened.
Avoid driving with snow chains on roads
that have been cleared of snow, to
avoid damaging your vehicle's tyres and
the road sur face. If your vehicle is fitted
with alloy wheels, check that no part of
the chain or its fixings is in contact with
the wheel rim.
For more information on snow chains,
contact a P
e
uge
Ot
dealer or a
qualified workshop.
It is strongly recommended that before
you leave, you practise fitting the snow
chains on a level and dry sur face.
ta
ke account of the legislation in force in your
country on the use of snow chains and the
maximum running speed authorised.
Original tyre size
ty
pe of chain
215/60R16 215 / 5 5 R17
225/55 R17 Maximum link size:
9 mm
13 5 /8 0 R18
235/45R18
235/40R19
245/45 R18 Cannot be fitted with
chains
7
Practical information
Page 208 of 364

206
508_en_Chap07_info-pratiques_ed01-2016
towbar with quickly detachable towball
Presentation
this towbar allows the towball to be fitted and
removed quickly and easily without the use
of tools. Installed behind the rear bumper, the
towbar is invisible after removing the towball
and folding the trailer harness socket carrier.
1.
Carrier.
2.
P
rotective blanking plug.
3.
S
ecurity ring.
4.
F
olding trailer harness socket.
5.
D
etachable towball.
6.
L
ocking / unlocking wheel.
7.
Sec
urity key lock.
8.
L
ocking wheel protector.
9.
Ba
ll protector.
10.
St
orage bag.A. Locked position
the locking wheel is not in contact with the
towball (gap of about 5 mm).
the
green mark is visible.
th
e lock for the locking wheel is facing
rearward.
th
e bolt is visible and extends beyond the
towball.
B. Unlocked position
the locking wheel is in contact with the towball.then green mark is hidden.
th
e lock for the locking wheel is facing for ward.
th
e peg is not visible. Observe the legislation in force in the
country in which you are driving.
For information on the maximum trailer
weight and the recommended nose
weight, refer to the "
te
chnical data"
section.
For information on safely towing a
trailer, refer to the "
to
wing a trailer"
section.
Practical information
Page 209 of 364
207
508_en_Chap07_info-pratiques_ed01-2016
Before each use
Check that the towball is correctly fitted by verifying the following points:
- t he towball is correctly locked in place (position A ),
-
t
he security key lock is on and the key removed; the locking wheel can no longer be
operated,
-
t
he towball must no longer move at all in its carrier; try to shake it by hand.
During use
Never unlock the towball when a trailer or load carrier is fitted.
Never exceed the maximum authorised weight for the vehicle plus trailer (gr oss tr ain
Weight -
gt
W
).
Before driving, check the adjustment of the headlamp beam height.
For more information on adjusting the headlamps, refer to the corresponding section.
After use
For journeys made without a trailer or load carrier, the trailer harness socket must be folded
away, the towball removed and the protective blanking plug inserted in the carrier. th is
measure applies particularly if the towball could hinder visibility of the number plate or
lighting.
7
Practical information
Page 210 of 364
208
508_en_Chap07_info-pratiques_ed01-2016
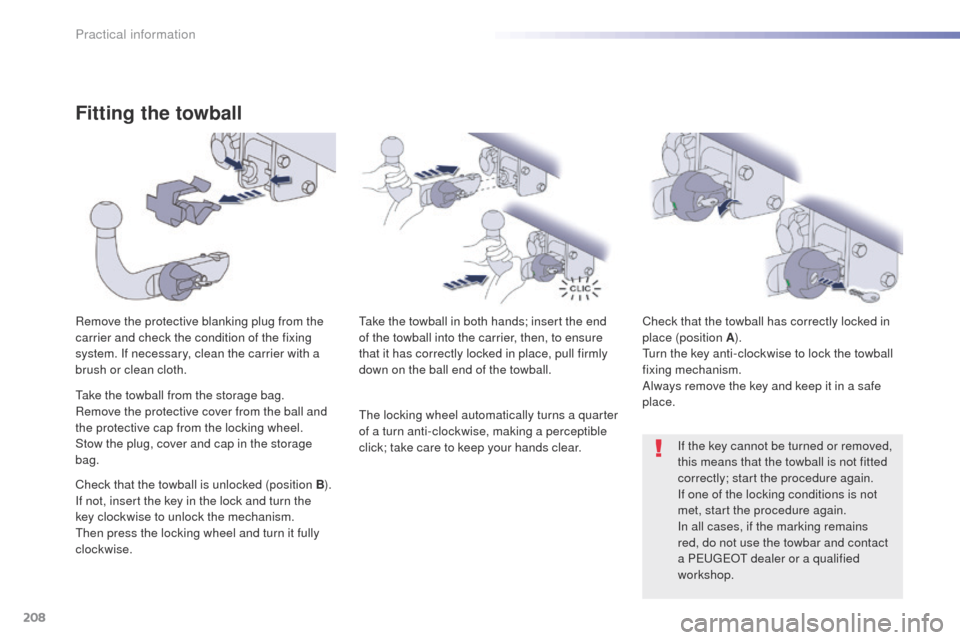
Fitting the towball
Remove the protective blanking plug from the
carrier and check the condition of the fixing
system. If necessary, clean the carrier with a
brush or clean cloth.take the towball in both hands; insert the end
of the towball into the carrier, then, to ensure
that it has correctly locked in place, pull firmly
down on the ball end of the towball. Check that the towball has correctly locked in
place (position A
).
tu
rn the key anti-clockwise to lock the towball
fixing mechanism.
Always remove the key and keep it in a safe
place.
If the key cannot be turned or removed,
this means that the towball is not fitted
correctly; start the procedure again.
If one of the locking conditions is not
met, start the procedure again.
In all cases, if the marking remains
red, do not use the towbar and contact
a P
e
uge
Ot
dealer or a qualified
workshop.
ta
ke the towball from the storage bag.
Remove the protective cover from the ball and
the protective cap from the locking wheel.
Stow the plug, cover and cap in the storage
bag.
Check that the towball is unlocked (position
B).
If not, insert the key in the lock and turn the
key clockwise to unlock the mechanism.
th
en press the locking wheel and turn it fully
clockwise.
th
e locking wheel automatically turns a quarter
of a turn anti-clockwise, making a perceptible
click; take care to keep your hands clear.
Practical information
Page 212 of 364
210
508_en_Chap07_info-pratiques_ed01-2016
Maintenance
Correct operation is only possible if the towball
and its carrier remain clean.
Before cleaning the vehicle with a high
pressure jet wash, the towbar harness socket
carrier must be folded away, the towball
removed and the protective blanking plug
inserted in the carrier.
For any work on the towbar, go to a P
e
uge
Ot
dealer or a qualified workshop.
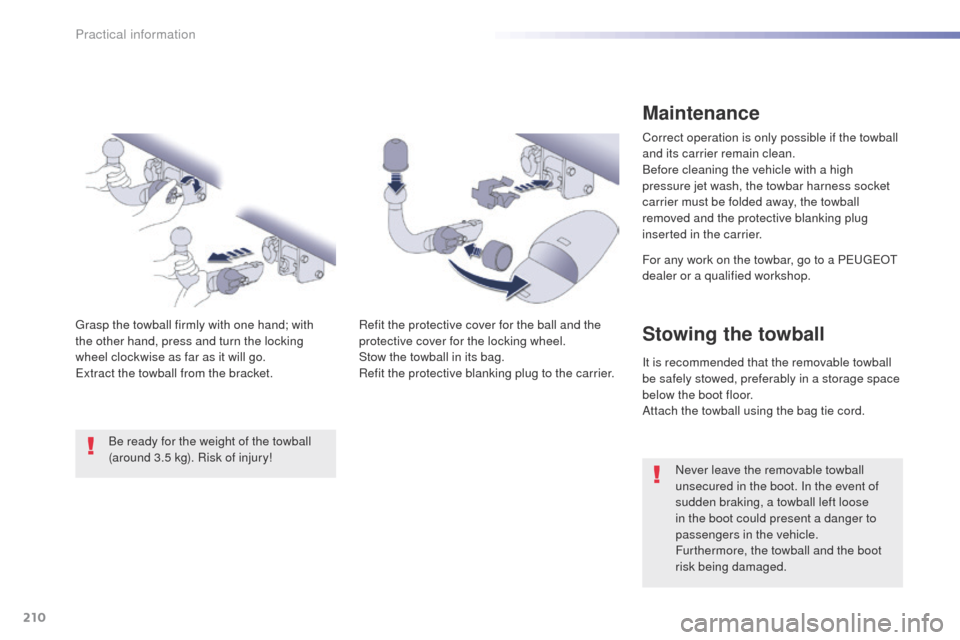
Refit the protective cover for the ball and the
protective cover for the locking wheel.
Stow the towball in its bag.
Refit the protective blanking plug to the carrier.
gr
asp the towball firmly with one hand; with
the other hand, press and turn the locking
wheel
clockwise as far as it will go.
ex
tract the towball from the bracket. Be ready for the weight of the towball
(around 3.5 kg). Risk of injury!
Stowing the towball
It is recommended that the removable towball
be safely stowed, preferably in a storage space
below the boot floor.
Attach the towball using the bag tie cord. Never leave the removable towball
unsecured in the boot. In the event of
sudden braking, a towball left loose
in the boot could present a danger to
passengers in the vehicle.
Furthermore, the towball and the boot
risk being damaged.
Practical information
Page 227 of 364
225
508_en_Chap07_info-pratiques_ed01-2016
Never store bottles of AdBlue® in your
vehicle.
Recommendations on storage
AdBlue® freezes at about -11°C and
deteriorates above 25°C. It is recommended
that bottles be stored in a cool area and
protected from direct sunlight.
und
er these conditions, the additive can be
kept for at least a year.
If the additive has frozen, it can be used once it
has completely thawed out.
Procedure
Before topping-up, ensure that the vehicle is
parked on a flat and level sur face.
In wintry conditions, ensure that the
temperature of the vehicle is above -11°C.
Otherwise the AdBlue
® may be frozen and
so cannot be poured into its tank. Park your
vehicle in a warmer area for a few hours to
allow the top-up to be carried out.
F
S
witch off the ignition and remove the
key, or if your vehicle has one, press the
S
tA
R
t/
S
tO
P button to switch off the
engine. F
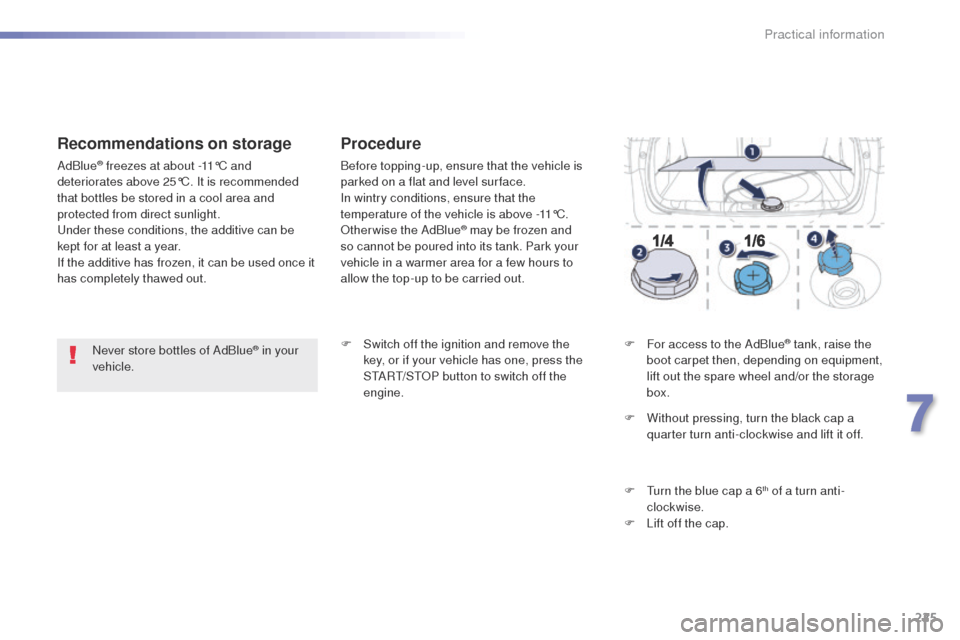
F
or access to the AdBlue
® tank, raise the
boot carpet then, depending on equipment,
lift out the spare wheel and/or the storage
box.
F
W
ithout pressing, turn the black cap a
quarter turn anti-clockwise and lift it off.
F
t
u
rn the blue cap a 6
th of a turn anti-
clockwise.
F
L
ift off the cap.
7
Practical information