2016 Peugeot 508 RXH remote control
[x] Cancel search: remote controlPage 82 of 364
80
508_en_Chap03_ergonomie-et-confort_ed01-2016
Mirrors
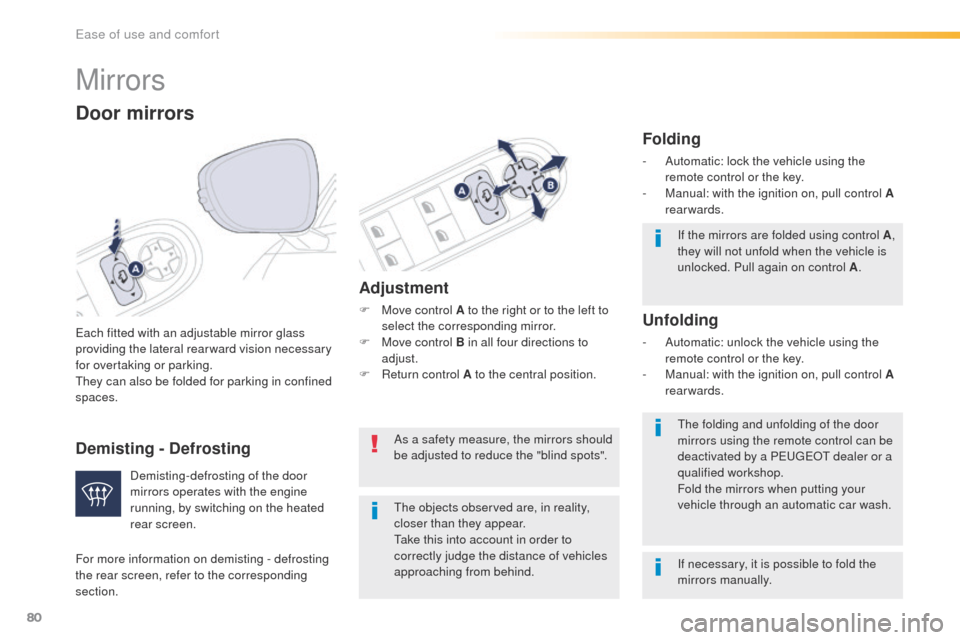
each fitted with an adjustable mirror glass
providing the lateral rear ward vision necessary
for overtaking or parking.
th
ey can also be folded for parking in confined
spaces.
Door mirrors
If the mirrors are folded using control A ,
they will not unfold when the vehicle is
unlocked. Pull again on control A .
th
e folding and unfolding of the door
mirrors using the remote control can be
deactivated by a P
e
uge
Ot
dealer or a
qualified workshop.
Fold the mirrors when putting your
vehicle through an automatic car wash.
th
e objects observed are, in reality,
closer than they appear.
ta
ke this into account in order to
correctly judge the distance of vehicles
approaching from behind.
Demisting-defrosting of the door
mirrors operates with the engine
running, by switching on the heated
rear screen.
Adjustment
F Move control A to the right or to the left to
select the corresponding mirror.
F
M
ove control B in all four directions to
adjust.
F
R
eturn control A to the central position.
Folding
- Automatic: lock the vehicle using the remote control or the key.
-
M
anual: with the ignition on, pull control A
rearwards.
Unfolding
- Automatic: unlock the vehicle using the remote control or the key.
-
M
anual: with the ignition on, pull control A
rearwards.
As a safety measure, the mirrors should
be adjusted to reduce the "blind spots".
If necessary, it is possible to fold the
mirrors manually.
For more information on demisting - defrosting
the rear screen, refer to the corresponding
section.
Demisting - Defrosting
ease of use and comfort
Page 104 of 364
102
508_en_Chap03_ergonomie-et-confort_ed01-2016
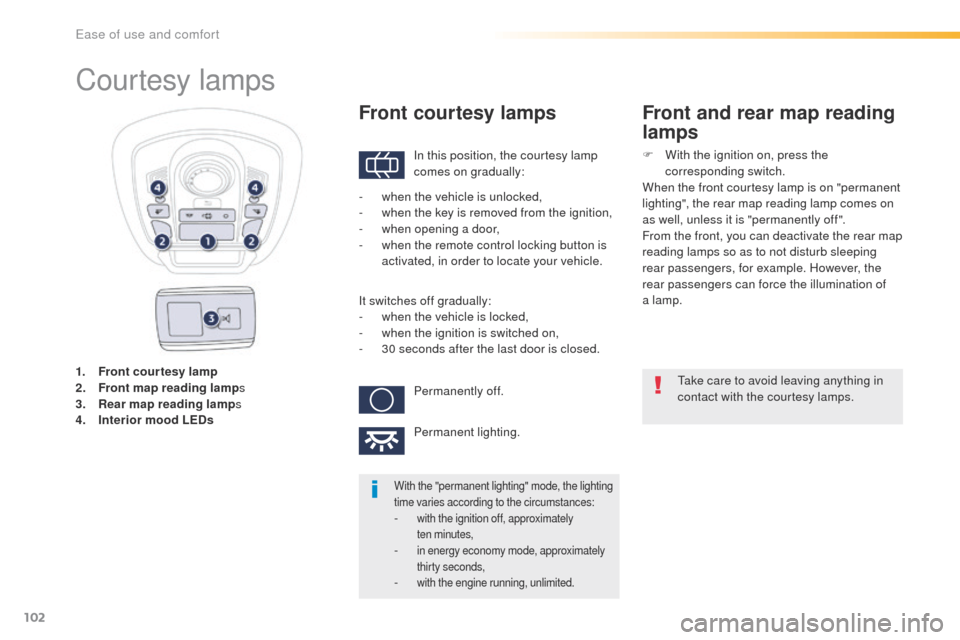
1. Front courtesy lamp
2. Front map reading lamp s
3.
R
ear map reading lamp s
4.
I
nterior mood LEDs
Courtesy lamps
In this position, the courtesy lamp
comes on gradually:
Front courtesy lamps
take care to avoid leaving anything in
contact with the courtesy lamps.
With the "permanent lighting" mode, the lighting
time varies according to the circumstances:
- with the ignition off, approximately ten minutes,
- in energy economy mode, approximately thirty seconds,
- with the engine running, unlimited.
- when the vehicle is unlocked,
- w hen the key is removed from the ignition,
-
w
hen opening a door,
-
w
hen the remote control locking button is
activated, in order to locate your vehicle.
It switches off gradually:
-
w
hen the vehicle is locked,
-
w
hen the ignition is switched on,
-
3
0 seconds after the last door is closed.Permanently off.
Permanent lighting.
Front and rear map reading
lamps
F With the ignition on, press the corresponding switch.
When the front courtesy lamp is on "permanent
lighting", the rear map reading lamp comes on
as well, unless it is "permanently off ".
From the front, you can deactivate the rear map
reading lamps so as to not disturb sleeping
rear passengers, for example. However, the
rear passengers can force the illumination of
a lamp.
ease of use and comfort
Page 127 of 364

125
508_en_Chap04_eclairage-et-visibilite_ed01-2016
Exterior welcome lighting
Remote switching on of the lighting makes your
approach to the vehicle easier in poor light. th e
lighting comes on or not depending on the the
level of ambient light detected by the sunshine
sensor.
Switching off
the exterior welcome lighting
switches off automatically after a set
time, when the ignition is switched on
or on locking the vehicle.
Door mirror spotlamps
to make your approach to the vehicle easier,
these illuminate:
Switching on
the spotlamps come on:
- w hen you unlock the vehicle,
-
w
hen you remove the key from the ignition,
-
w
hen you open a door,
-
w
hen you use the remote control.
Switching off
they are timed to go off automatically. -
t
he zones facing the driver’s and
passenger’s doors,
-
t
he zones for ward of the door mirrors and
rear ward of the front doors.
Switching on
F Press the open padlock on the remote control.
th
e dipped beam headlamps and the
sidelamps come on; your vehicle is also
unlocked.
Parking lamps
Side markers for the vehicle by illumination of
the sidelamps on the traffic side only.
F
W
ithin one minute of switching off the
ignition, operate the lighting control stalk
up or down depending on the traffic side
(for example: when parking on the left;
lighting control stalk upwards; the right
hand sidelamps are on).
th
is is confirmed by an audible signal and
illumination of the corresponding direction
indicator warning lamp in the instrument panel.
to s
witch off the parking lamps, return the
lighting control stalk to the middle position or
switch on the ignition.
Programming
the activation/deactivation and
lighting duration are set in the Main
menu of instrument panel screen.
Select " Vehicle parameters " then
" Lighting ", then change the lighting
duration.
4
Lighting and visibility
Page 160 of 364
158
508_en_Chap05_securite_ed01-2016
electric child lock
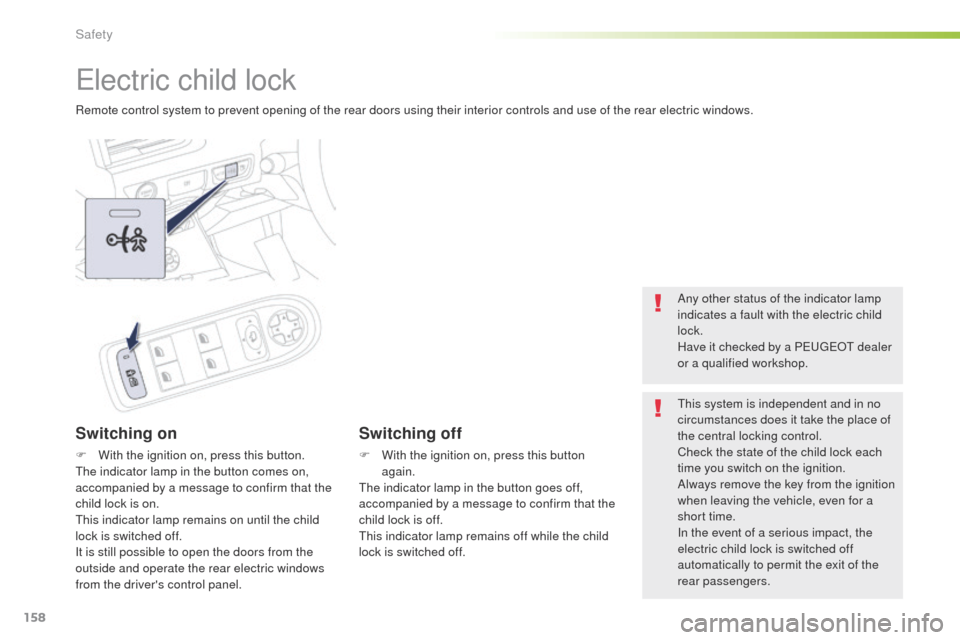
Remote control system to prevent opening of the rear doors using their interior controls and use of the rear electric windows.
Switching on
F With the ignition on, press this button.the indicator lamp in the button comes on,
accompanied by a message to confirm that the
child lock is on.
th
is indicator lamp remains on until the child
lock is switched off.
It is still possible to open the doors from the
outside and operate the rear electric windows
from the driver's control panel.
Switching off
F With the ignition on, press this button again.
th
e indicator lamp in the button goes off,
accompanied by a message to confirm that the
child lock is off.
th
is indicator lamp remains off while the child
lock is switched off. Any other status of the indicator lamp
indicates a fault with the electric child
lock.
Have it checked by a P
e
uge
Ot
dealer
or a qualified workshop.
th
is system is independent and in no
circumstances does it take the place of
the central locking control.
Check the state of the child lock each
time you switch on the ignition.
Always remove the key from the ignition
when leaving the vehicle, even for a
short time.
In the event of a serious impact, the
electric child lock is switched off
automatically to permit the exit of the
rear passengers.
Safety
Page 163 of 364
161
508_en_Chap06_conduite_ed01-2016
Starting-switching off the engine using the remote control key
the parking brake must be applied.
Starting
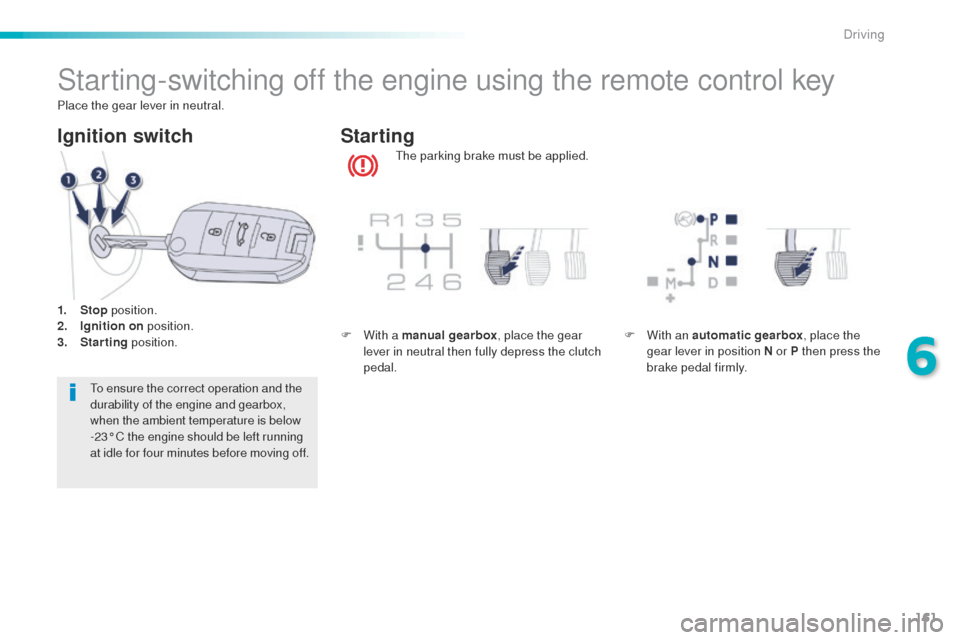
Ignition switch
to ensure the correct operation and the
durability of the engine and gearbox,
when the ambient temperature is below
-23° C the engine should be left running
at idle for four minutes before moving off.
Place the gear lever in neutral.
1.
Sto
p
position.
2.
I
gnition on
position.
3.
S
tarting
position. F
W
ith a manual gearbox
, place the gear
lever in neutral then fully depress the clutch
pedal. F
W
ith an automatic gearbox
, place the
gear lever in position N or P then press the
brake pedal firmly.
6
Driving
Page 228 of 364
226
508_en_Chap07_info-pratiques_ed01-2016
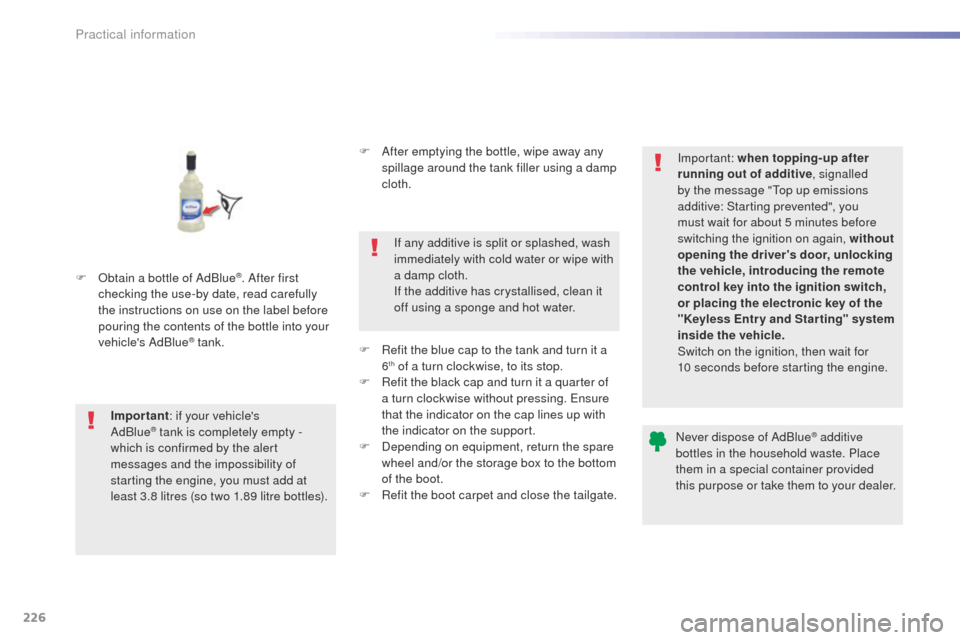
F Obtain a bottle of AdBlue®. After first
checking the use-by date, read carefully
the instructions on use on the label before
pouring the contents of the bottle into your
vehicle's AdBlue
® tank.
Important : if your vehicle's
AdBlue
® tank is completely empty -
w
hich is confirmed by the alert
messages and the impossibility of
starting the engine, you must add at
least 3.8 litres (so two 1.89 litre bottles). F
A
fter emptying the bottle, wipe away any
spillage around the tank filler using a damp
cloth.
If any additive is split or splashed, wash
immediately with cold water or wipe with
a damp cloth.
If the additive has crystallised, clean it
off using a sponge and hot water.
F
R
efit the blue cap to the tank and turn it a
6
th of a turn clockwise, to its stop.
F
R
efit the black cap and turn it a quarter of
a turn clockwise without pressing.
e
n
sure
that the indicator on the cap lines up with
the indicator on the support.
F
D
epending on equipment, return the spare
wheel and/or the storage box to the bottom
of the boot.
F
R
efit the boot carpet and close the tailgate. Important: when topping-up after
running out of additive
, signalled
by the message "
to
p up emissions
additive: Starting prevented", you
must wait for about 5 minutes before
switching the ignition on again, without
opening the driver's door, unlocking
the vehicle, introducing the remote
control key into the ignition switch,
or placing the electronic key of the
"Keyless Entr y and Star ting" system
inside the vehicle.
Switch on the ignition, then wait for
10 seconds before starting the engine.
Never dispose of AdBlue
® additive
bottles in the household waste. Place
them in a special container provided
this purpose or take them to your dealer.
Practical information
Page 255 of 364
253
508_en_Chap08_en-cas-de-pannes_ed01-2016
12 V battery
Versions equipped with Stop & Start are
fitted with a 12 V lead-acid battery of
specific technology and specification.
Its replacement should be carried
out only by a P
e
uge
Ot
dealer or a
qualified workshop.
th
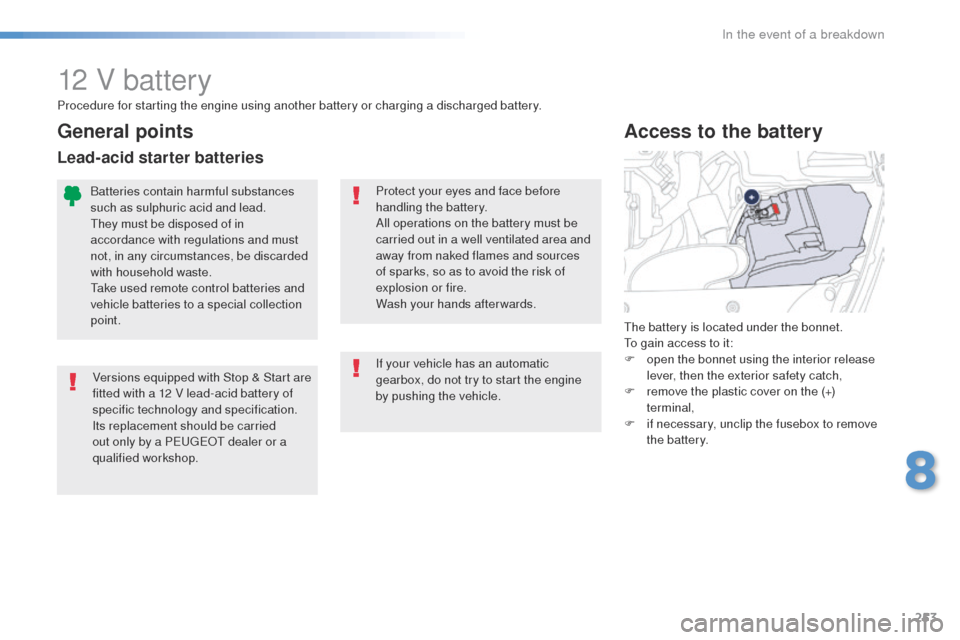
e battery is located under the bonnet.
to g
ain access to it:
F
o
pen the bonnet using the interior release
lever, then the exterior safety catch,
F r emove the plastic cover on the (+)
terminal,
F
i
f necessary, unclip the fusebox to remove
the battery.
Access to the battery
Procedure for starting the engine using another battery or charging a discharged battery.
Protect your eyes and face before
handling the battery.
All operations on the battery must be
carried out in a well ventilated area and
away from naked flames and sources
of sparks, so as to avoid the risk of
explosion or fire.
Wash your hands afterwards.
Batteries contain harmful substances
such as sulphuric acid and lead.
th
ey must be disposed of in
accordance with regulations and must
not, in any circumstances, be discarded
with household waste.
ta
ke used remote control batteries and
vehicle batteries to a special collection
point.
General points
Lead-acid starter batteries
If your vehicle has an automatic
gearbox, do not try to start the engine
by pushing the vehicle.
8
In the event of a breakdown
Page 258 of 364
256
508_en_Chap08_en-cas-de-pannes_ed01-2016
Do not force the lever as locking will
not be possible if the clamp is not
positioned correctly; start the procedure
again.
Disconnecting the battery
In order to maintain an adequate state
of charge for starting the engine, it is
recommended that the battery be disconnected
if the vehicle is taken out of service for a long
period.
Wait 2 minutes after switching off the ignition
before disconnecting the battery.
F
c
lose the windows and the doors before
disconnecting the battery,
F
s
witch off all electrical consumers (audio
system, wipers, lighting, ...),
F
s
witch off the ignition and wait for
four
minutes.
Having exposed the battery, it is only
necessary to disconnect the (+) terminal.Following reconnection of
the battery
After reconnecting the battery, switch on the
ignition and wait 1 minute before starting to
allow initialisation of the electronic systems.
However, if minor problems persist following
this operation, contact a P
e
uge
Ot
dealer or a
qualified workshop.
Referring to the corresponding section, you
must yourself reinitialise or reset certain
systems, such as:
-
t
he remote control or electronic key
(depending on version),
-
t
he electric blind(s),
-
t
he electric windows
-
t
he date and time,
-
t
he radio preset stations.
Quick release terminal
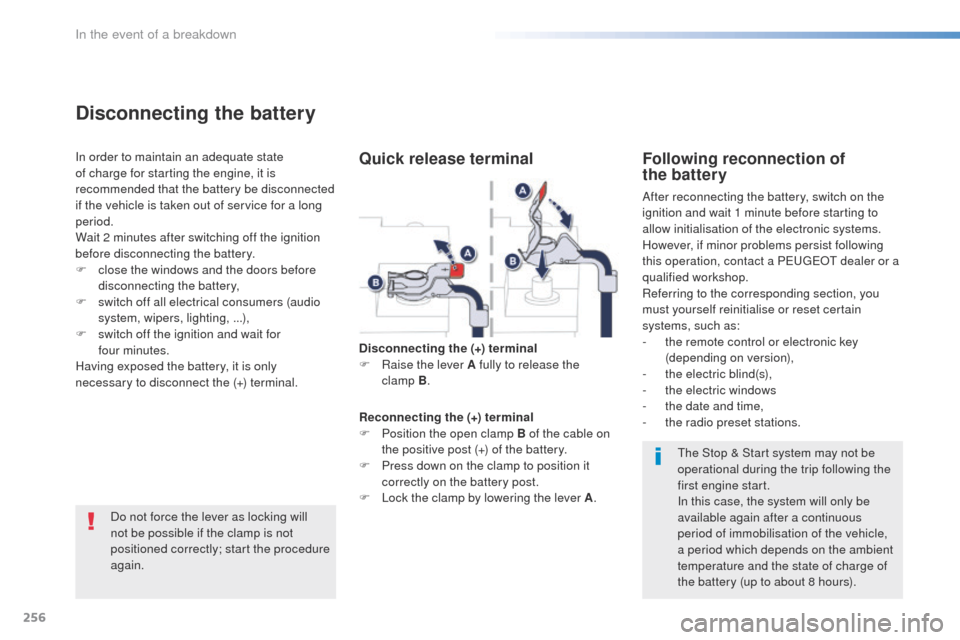
Disconnecting the (+) terminal
F Ra ise the lever A fully to release the
clamp
B.
Reconnecting the (+) terminal
F
P
osition the open clamp B of the cable on
the positive post (+) of the battery.
F
P
ress down on the clamp to position it
correctly on the battery post.
F
L
ock the clamp by lowering the lever A .
th
e Stop & Start system may not be
operational during the trip following the
first engine start.
In this case, the system will only be
available again after a continuous
period of immobilisation of the vehicle,
a period which depends on the ambient
temperature and the state of charge of
the battery (up to about 8 hours).
In the event of a breakdown