2016 Peugeot 508 RXH boot
[x] Cancel search: bootPage 128 of 364

126
508_en_Chap04_eclairage-et-visibilite_ed01-2016
Manual adjustment of
halogen headlampsAutomatic adjustment of
"full-LED" headlamps
to avoid causing a nuisance to other road
users, the beams of the halogen headlamps
should be adjusted according to the load in the
vehicle.
0
D
river or driver + front passenger.
-
D
river + front passenger + rear
passengers.
1
5
people.
-
5 p
eople + a load in the boot.
2
D
river + a load in the boot.
If a fault occurs, this warning lamp
is displayed in the instrument panel,
accompanied by an audible signal and a
message in the instrument panel screen.
In order to avoid causing a nuisance to other
road users, this system corrects the height of
the "full L e
D
" headlamps beam automatically,
according to the load in the vehicle.If a fault occurs, do not touch the "full
LeD " light sources. Contact a Pe ugeOt
dealer or a qualified workshop.
the initial setting is position "0" .
Travelling abroad
the design of the dipped beam
headlamps allows, without modification,
driving in a country that drives on the
other side of the road to the country in
which your vehicle was sold.
th
e system then places your headlamps in the
lowest position.
Headlamp beam height adjustment
Lighting and visibility
Page 130 of 364
128
508_en_Chap04_eclairage-et-visibilite_ed01-2016
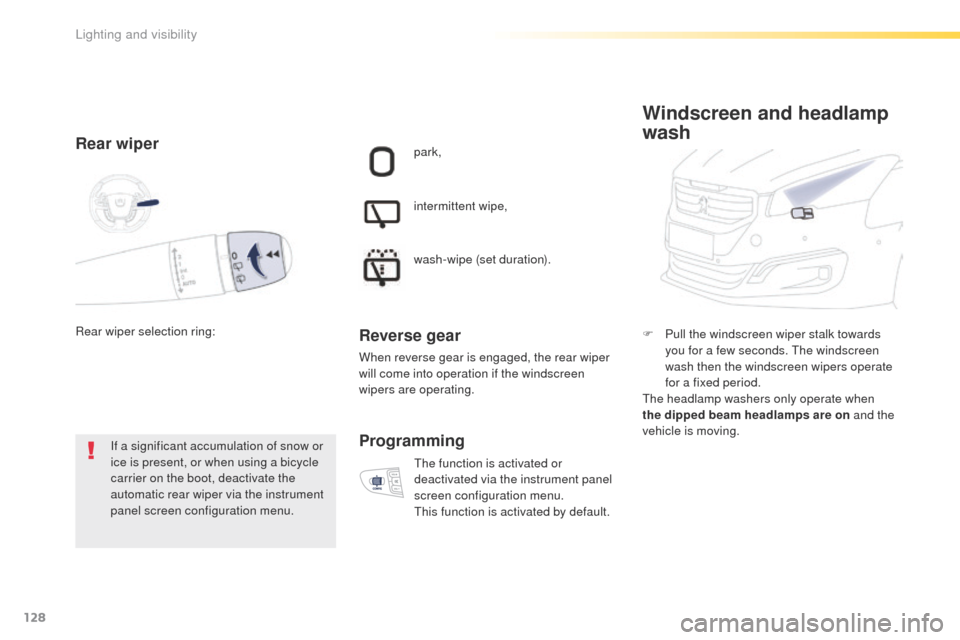
Rear wiper
If a significant accumulation of snow or
ice is present, or when using a bicycle
carrier on the boot, deactivate the
automatic rear wiper via the instrument
panel screen configuration menu.
Rear wiper selection ring: park,
intermittent wipe,
wash-wipe (set duration).
Reverse gear
When reverse gear is engaged, the rear wiper
will come into operation if the windscreen
wipers are operating.
th
e function is activated or
deactivated via the instrument panel
screen configuration menu.
th
is function is activated by default.
Programming
F Pull the windscreen wiper stalk towards you for a few seconds. th e windscreen
wash then the windscreen wipers operate
for a fixed period.
the
headlamp washers only operate when
the dipped beam headlamps are on and the
vehicle is moving.
Windscreen and headlamp
wash
Lighting and visibility
Page 201 of 364

199
508_en_Chap06_conduite_ed01-2016
Reversing camera
the reversing camera is activated automatically
when reverse gear is engaged.
Depending on version, the image is displayed
in the touch screen or the instrument panel.
th
e reversing camera cannot in any
circumstances be a substitute for the
vigilance and responsibility of the driver.
th
e reversing camera function completes the
parking assistance.the superimposed representation of guide
lines helps with the manoeuvre.
th
ey are represented by lines marked "on
the ground" and do not allow the position of
the vehicle to be determined relative to tall
obstacles (for example: other vehicles, ...).
the blue lines represent the general direction
of the vehicle (the difference corresponds to
the width of your vehicle without the mirrors).
th
e red lines represent a distance of about
30 cm beyond the edge of your vehicle's rear
b u m p e r.
th
e green lines represent distances of
about 1
and 2 metres beyond the edge of your
vehicle's rear bumper. Opening the boot causes the display to
disappear.
Clean the reversing camera regularly
using a soft, dry cloth.High pressure jet washing
When washing your vehicle, do not direct the
lance within 30 cm of the camera lens.
It is normal to be able to see part of
the number plate at the bottom of the
screen.
6
Driving
Page 212 of 364
210
508_en_Chap07_info-pratiques_ed01-2016
Maintenance
Correct operation is only possible if the towball
and its carrier remain clean.
Before cleaning the vehicle with a high
pressure jet wash, the towbar harness socket
carrier must be folded away, the towball
removed and the protective blanking plug
inserted in the carrier.
For any work on the towbar, go to a P
e
uge
Ot
dealer or a qualified workshop.
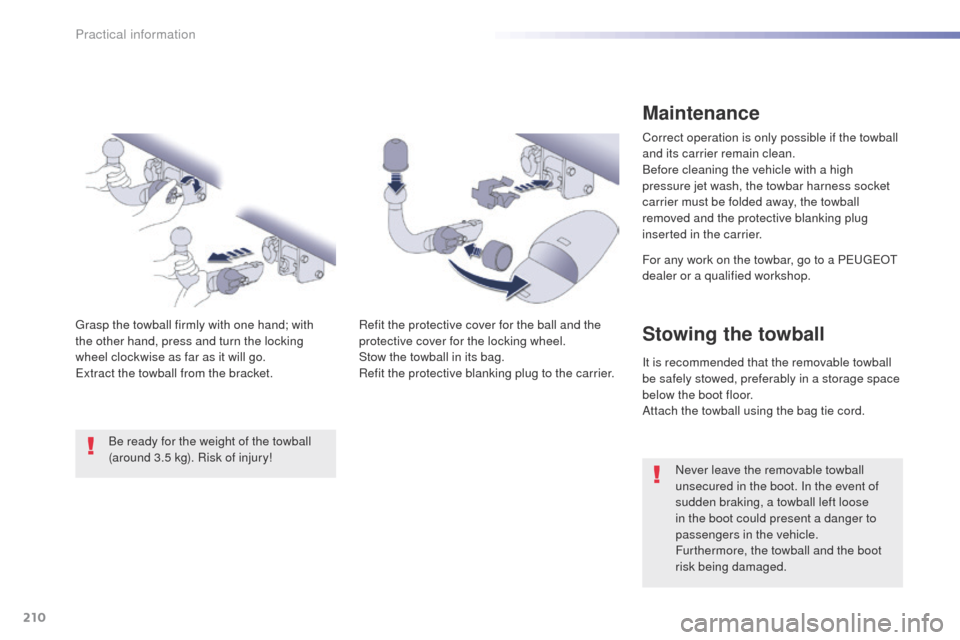
Refit the protective cover for the ball and the
protective cover for the locking wheel.
Stow the towball in its bag.
Refit the protective blanking plug to the carrier.
gr
asp the towball firmly with one hand; with
the other hand, press and turn the locking
wheel
clockwise as far as it will go.
ex
tract the towball from the bracket. Be ready for the weight of the towball
(around 3.5 kg). Risk of injury!
Stowing the towball
It is recommended that the removable towball
be safely stowed, preferably in a storage space
below the boot floor.
Attach the towball using the bag tie cord. Never leave the removable towball
unsecured in the boot. In the event of
sudden braking, a towball left loose
in the boot could present a danger to
passengers in the vehicle.
Furthermore, the towball and the boot
risk being damaged.
Practical information
Page 225 of 364
223
508_en_Chap07_info-pratiques_ed01-2016
AdBlue® additive and SCR system
for BlueHDi Diesel engines
to assure respect for the environment and
conformity with the new
eu ro 6 emissions
standard, without adversely affecting the
per formance or fuel consumption of Diesel
engines, P
e
uge
Ot
has taken the decision to
equip its vehicles with an effective system that
associates SCR (Selective Catalytic Reduction)
with a particle filter (FAP) for the treatment of
exhaust gases.
Presentation of the SCR system
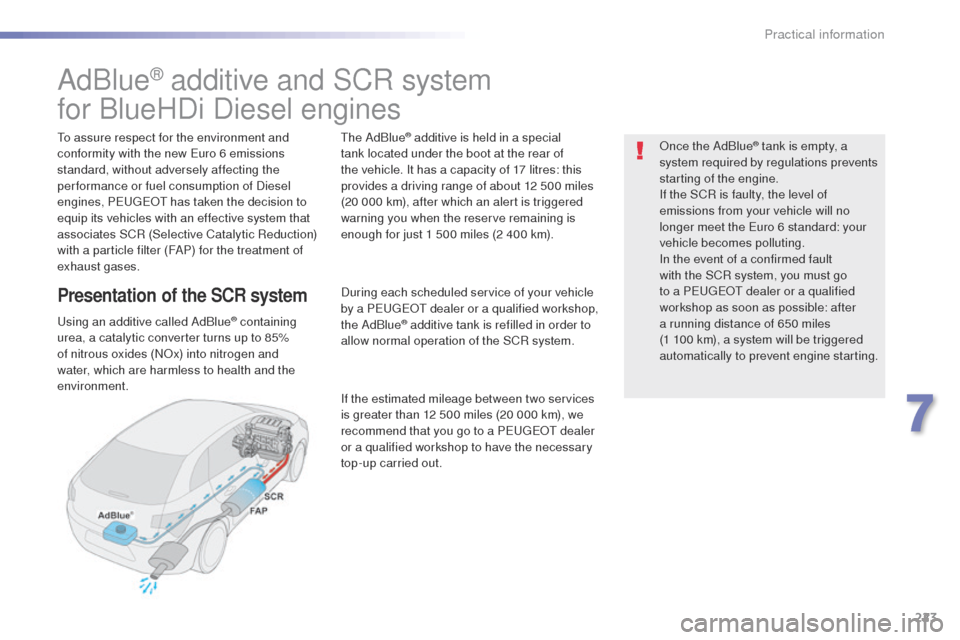
using an additive called AdBlue® containing
urea, a catalytic converter turns up to 85%
of nitrous oxides (NOx) into nitrogen and
water, which are harmless to health and the
environment.
th
e AdBlue
® additive is held in a special
tank located under the boot at the rear of
the vehicle. It has a capacity of 17 litres: this
provides a driving range of about 12 500 miles
(20 000 km), after which an alert is triggered
warning you when the reserve remaining is
enough for just 1 500 miles (2 400 km).
During each scheduled service of your vehicle
by a P
e
uge
Ot
dealer or a qualified workshop,
the AdBlue
® additive tank is refilled in order to
allow normal operation of the SCR system.
If the estimated mileage between two services
is greater than 12 500 miles (20 000 km), we
recommend that you go to a P
e
uge
Ot
dealer
or a qualified workshop to have the necessary
top-up carried out. Once the AdBlue
® tank is empty, a
s
ystem required by regulations prevents
starting of the engine.
If the SCR is faulty, the level of
emissions from your vehicle will no
longer meet the
e
u
ro 6 standard: your
vehicle becomes polluting.
In the event of a confirmed fault
with the SCR system, you must go
to a P
e
uge
Ot
dealer or a qualified
workshop as soon as possible: after
a running distance of 650 miles
(1 100 km), a system will be triggered
automatically to prevent engine starting.
7
Practical information
Page 227 of 364
225
508_en_Chap07_info-pratiques_ed01-2016
Never store bottles of AdBlue® in your
vehicle.
Recommendations on storage
AdBlue® freezes at about -11°C and
deteriorates above 25°C. It is recommended
that bottles be stored in a cool area and
protected from direct sunlight.
und
er these conditions, the additive can be
kept for at least a year.
If the additive has frozen, it can be used once it
has completely thawed out.
Procedure
Before topping-up, ensure that the vehicle is
parked on a flat and level sur face.
In wintry conditions, ensure that the
temperature of the vehicle is above -11°C.
Otherwise the AdBlue
® may be frozen and
so cannot be poured into its tank. Park your
vehicle in a warmer area for a few hours to
allow the top-up to be carried out.
F
S
witch off the ignition and remove the
key, or if your vehicle has one, press the
S
tA
R
t/
S
tO
P button to switch off the
engine. F
F
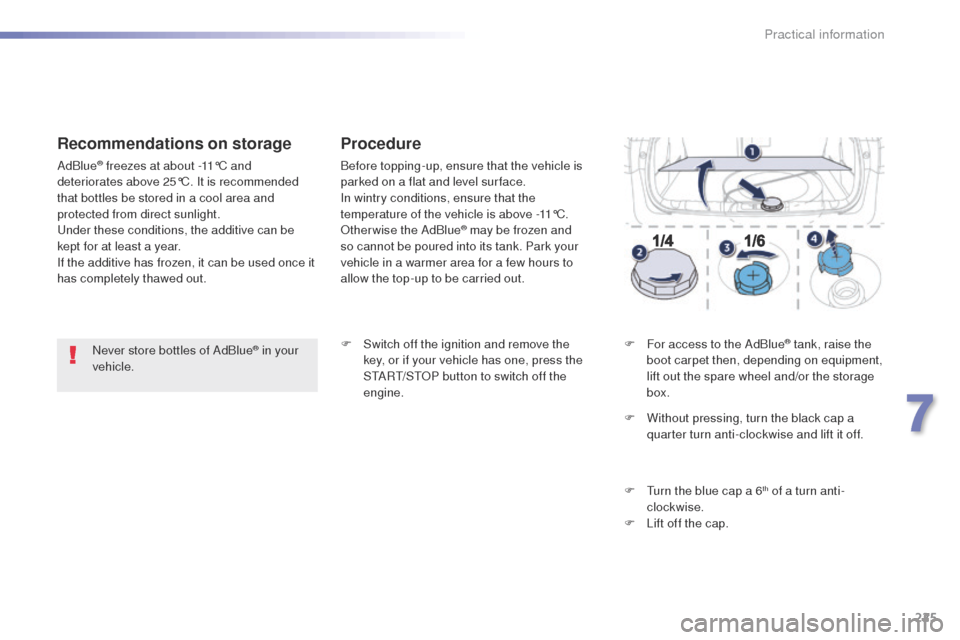
or access to the AdBlue
® tank, raise the
boot carpet then, depending on equipment,
lift out the spare wheel and/or the storage
box.
F
W
ithout pressing, turn the black cap a
quarter turn anti-clockwise and lift it off.
F
t
u
rn the blue cap a 6
th of a turn anti-
clockwise.
F
L
ift off the cap.
7
Practical information
Page 228 of 364
226
508_en_Chap07_info-pratiques_ed01-2016
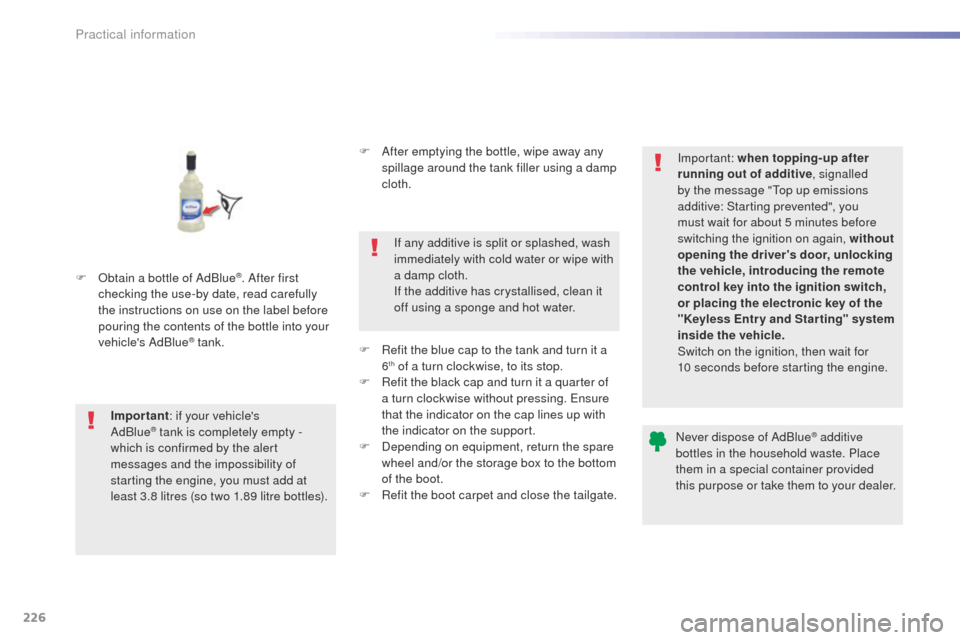
F Obtain a bottle of AdBlue®. After first
checking the use-by date, read carefully
the instructions on use on the label before
pouring the contents of the bottle into your
vehicle's AdBlue
® tank.
Important : if your vehicle's
AdBlue
® tank is completely empty -
w
hich is confirmed by the alert
messages and the impossibility of
starting the engine, you must add at
least 3.8 litres (so two 1.89 litre bottles). F
A
fter emptying the bottle, wipe away any
spillage around the tank filler using a damp
cloth.
If any additive is split or splashed, wash
immediately with cold water or wipe with
a damp cloth.
If the additive has crystallised, clean it
off using a sponge and hot water.
F
R
efit the blue cap to the tank and turn it a
6
th of a turn clockwise, to its stop.
F
R
efit the black cap and turn it a quarter of
a turn clockwise without pressing.
e
n
sure
that the indicator on the cap lines up with
the indicator on the support.
F
D
epending on equipment, return the spare
wheel and/or the storage box to the bottom
of the boot.
F
R
efit the boot carpet and close the tailgate. Important: when topping-up after
running out of additive
, signalled
by the message "
to
p up emissions
additive: Starting prevented", you
must wait for about 5 minutes before
switching the ignition on again, without
opening the driver's door, unlocking
the vehicle, introducing the remote
control key into the ignition switch,
or placing the electronic key of the
"Keyless Entr y and Star ting" system
inside the vehicle.
Switch on the ignition, then wait for
10 seconds before starting the engine.
Never dispose of AdBlue
® additive
bottles in the household waste. Place
them in a special container provided
this purpose or take them to your dealer.
Practical information
Page 229 of 364

227
508_en_Chap08_en-cas-de-pannes_ed01-2016
Warning triangle
Before leaving your vehicle to set up
and install the triangle, switch on the
hazard warning lamps and put on your
high visibility vest.
th
e dimensions of the triangle (once folded) or
its storage box must be:
-
A : l
ength = 438 mm,
-
B : h
eight = 56 mm,
-
C : w
idth = 38 mm.
Saloon
F Press the lug 1 and pull the assembly
towards you.
SW and non-hybrid RXH
F turn the knob 2 to remove the cover.
F H old the cover and the triangle so that they
do not fall. F
P
lace the triangle behind the vehicle, as
required by the legislation in force in your
c o unt r y.
th
e triangle is available as an
accessory; contact a P
e
uge
Ot
dealer
or a qualified workshop.
Placing the triangle in
the roadthis safety device should be used in addition to
the hazard warning lamps.
Its presence in the vehicle is mandatory.
th
e location for stowing a folded
triangle is in the inner trim panel of the
boot lid or tailgate.
Refer to the manufacturer's instructions
on unfolding and installing supplied with
the triangle.
8
In the event of a breakdown