Page 186 of 364
184
508_en_Chap06_conduite_ed01-2016
Head-up display
System which projects various information onto
a smoked blade in the driver's field of vision,
so that they do not have to take their eyes off
the road.1.
H
ead-up display on.
2.
H
ead-up display off (long press).
3.
Br
ightness adjustment.
4.
D
isplay height adjustment.Buttons
Once the system has been activated, the
following information is grouped together in the
head-up display:
A.
t
h
e speed of your vehicle.
B.
C
ruise control/speed limiter information.
C.
N
avigation information (depending on
ve r s i o n).
Displays during operation
For more information on the navigation
system, refer to the "Audio equipment
and telematics" section.
this system operates when the engine is running and
the settings are stored when the ignition is switched off.
Driving
Page 196 of 364

194
508_en_Chap06_conduite_ed01-2016
In addition to the rear parking sensors, the
front parking sensors are triggered when an
obstacle is detected in front and the speed of
the vehicle is still below 6 mph (10 km/h).
th
e front parking sensors are interrupted if
the vehicle stops for more than three seconds
in for ward gear, if no further obstacles are
detected or when the speed of the vehicle
exceeds 6 mph (10 km/h).
Front parking sensors
the function will be deactivated
automatically if a trailer is being towed
or a bicycle carrier is fitted (vehicle
fitted with a towbar or bicycle carrier
recommended by P
e
uge
Ot)
.
Deactivation / Activation of the
front and rear parking sensors
the function is deactivated by pressing this button. th e indicator lamp in the button comes on.
Pressing this button again reactivates the function. th e indicator lamp in the button goes off.
th
e sound emitted by the speaker (front
or rear) indicates whether the obstacle
is in front or behind. With
audio system or for HYbrid4 version With
touch screen
Driving
Page 199 of 364

197
508_en_Chap06_conduite_ed01-2016
No alert will be given in the following situations:
- i n the presence of immobile objects
(parked vehicles, barriers, street lamps,
road signs...),
-
w
ith vehicles moving in the opposite
direction,
-
d
riving on a sinuous road or a sharp
c o r n e r,
Sensors fitted in the front and rear bumpers
monitor the blind spots.
th
e alert is given by a warning lamp which
comes on in the door mirror on the side in
question as soon as a vehicle - car, lorry,
cycle
- is detected.
For this, the following conditions must be met:
-
a
ll the vehicles must be moving in the
same direction,
-
t
he speed of your vehicle is between 7 and
75 mph (12 and 140 km/h),
-
w
hen you overtake a vehicle with a speed
difference of less than 6 mph (10 km/h),
-
w
hen a vehicle overtakes you with a speed
difference of less than 15 mph (25 km/h),
-
t
he traffic must be flowing normally,
-
i
n the case of an overtaking manoeuvre,
if this is prolonged and the vehicle being
overtaken remains in the blind spot,
-
y
ou are driving on a straight or slightly
curved road,
-
y
our vehicle is not pulling a trailer,
a
caravan...
Operation
F On switching on the ignition, or engine running, press this button
to activate the function; the
warning lamp comes on.
With audio system or for HYbrid4 version
With touch screen
6
Driving
Page 252 of 364
250
508_en_Chap08_en-cas-de-pannes_ed01-2016
Dashboard fuses
the fusebox is placed in the lower dashboard
(left-hand side).
Access to the fuses
F Open the hinged panel, then apply light force to bypass the stops. Fuse
N° Rating
(A) Functions
F6 A or B 15Audio system.
F8 3Alarm.
F13 10Front cigar lighter.
F14 10Front 12 V socket.
F16 3Rear courtesy lamp, rear map reading lamps.
F17 3Front courtesy lamp, courtesy mirror.
F28 A or B 15Audio system.
F30 20Rear wiper.
F32 10Audio amplifier.
In the event of a breakdown
Page 253 of 364
251
508_en_Chap08_en-cas-de-pannes_ed01-2016
Fuse N° Rating
(A) Functions
F3 15Driver's electric window panel, 12 V socket for rear seats.
F4 1512 V socket in boot.
F5 30One-touch rear window.
F6 30One-touch front window.
F11 20
tr
ailer unit.
F12 20Audio amplifier.
F15 20Panoramic sunroof blind
(SW and non-hybrid R XH).
F16 5Driver's electric window switch panel.Fuses behind the glove box
8
In the event of a breakdown
Page 256 of 364

254
508_en_Chap08_en-cas-de-pannes_ed01-2016
Some functions, including Stop & Start,
are not available if the battery is not
sufficiently charged.
F
C
onnect the other end of the green or black
cable to the earth point C on the broken
down vehicle.
F
S
tart the engine of the vehicle with the
good battery and leave it running for a
few
minutes.
F
O
perate the starter on the broken down
vehicle and let the engine run.
I
f the engine does not start straight away,
switch off the ignition and wait a few
moments before trying again.
When your vehicle's battery is discharged, the
engine can be started using a slave battery
(external or on another vehicle) and jump lead
cables or a battery booster.
Starting using another
battery
Never try to start the engine by
connecting a battery charger.
Never use a 24 V or higher battery
b o o s t e r.
First check that the slave battery has a
nominal voltage of 12 V and a capacity
at least equal to that of the discharged
battery.
th
e two vehicles must not be in contact
with each other.
Switch off the electrical consumers on
both vehicles (audio system, wipers,
lighting, ...).
en
sure that the jump lead cables do
not pass close to moving parts of the
engine (cooling fan, belts, ...).
Do not disconnect the (+) terminal when
the engine is running. F
R
aise the plastic cover on the (+) terminal,
if your vehicle has one.
F
C
onnect the red cable to the positive
terminal (+) of the flat battery A (at
the metal elbow) then to the positive
terminal
(+) of the slave battery B or the
b o o s t e r.
F
C
onnect one end of the green or black
cable to the negative terminal (-) of the
slave battery B or the booster (or earth
point on the other vehicle). F
W
ait until the engine returns to idle then
disconnect the jump lead cables in the
reverse order.
F
R
efit the plastic cover to the (+) terminal, if
your vehicle has one.
F
A
llow the engine to run for at least
30
minutes, by driving or with the vehicle
stationary, so that the battery reaches an
adequate state of charge.
In the event of a breakdown
Page 257 of 364

255
508_en_Chap08_en-cas-de-pannes_ed01-2016
Follow the instructions for use provided
by the manufacturer of the charger.
Never reverse polarities.
For optimum service life of the battery, it is
essential to maintain an adequate state of
charge.
In some circumstances it may be necessary to
charge the battery:
-
i
f you use your vehicle essentially for short
journeys,
-
i
f the vehicle is to be taken off the road for
several weeks.
Contact a P
e
uge
Ot
dealer or a qualified
workshop.
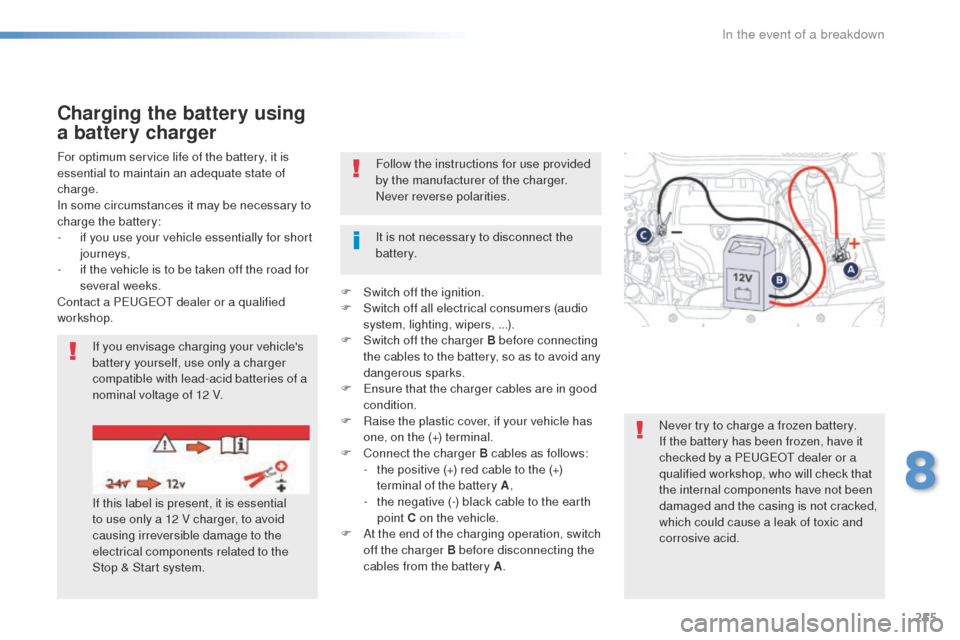
Charging the battery using
a battery charger
If you envisage charging your vehicle's
battery yourself, use only a charger
compatible with lead-acid batteries of a
nominal voltage of 12 V.
If this label is present, it is essential
to use only a 12 V charger, to avoid
causing irreversible damage to the
electrical components related to the
Stop & Start system. Never try to charge a frozen battery.
If the battery has been frozen, have it
checked by a P
e
uge
Ot
dealer or a
qualified workshop, who will check that
the internal components have not been
damaged and the casing is not cracked,
which could cause a leak of toxic and
corrosive acid.
It is not necessary to disconnect the
battery.
F
S
witch off the ignition.
F
S
witch off all electrical consumers (audio
system, lighting, wipers, ...).
F S witch off the charger B before connecting
the cables to the battery, so as to avoid any
dangerous sparks.
F
e
n
sure that the charger cables are in good
condition.
F
R
aise the plastic cover, if your vehicle has
one, on the (+) terminal.
F
C
onnect the charger B cables as follows:
-
t
he positive (+) red cable to the (+)
terminal of the battery A ,
-
t
he negative (-) black cable to the earth
point C on the vehicle.
F
A
t the end of the charging operation, switch
off the charger B before disconnecting the
cables from the battery A .
8
In the event of a breakdown
Page 258 of 364

256
508_en_Chap08_en-cas-de-pannes_ed01-2016
Do not force the lever as locking will
not be possible if the clamp is not
positioned correctly; start the procedure
again.
Disconnecting the battery
In order to maintain an adequate state
of charge for starting the engine, it is
recommended that the battery be disconnected
if the vehicle is taken out of service for a long
period.
Wait 2 minutes after switching off the ignition
before disconnecting the battery.
F
c
lose the windows and the doors before
disconnecting the battery,
F
s
witch off all electrical consumers (audio
system, wipers, lighting, ...),
F
s
witch off the ignition and wait for
four
minutes.
Having exposed the battery, it is only
necessary to disconnect the (+) terminal.Following reconnection of
the battery
After reconnecting the battery, switch on the
ignition and wait 1 minute before starting to
allow initialisation of the electronic systems.
However, if minor problems persist following
this operation, contact a P
e
uge
Ot
dealer or a
qualified workshop.
Referring to the corresponding section, you
must yourself reinitialise or reset certain
systems, such as:
-
t
he remote control or electronic key
(depending on version),
-
t
he electric blind(s),
-
t
he electric windows
-
t
he date and time,
-
t
he radio preset stations.
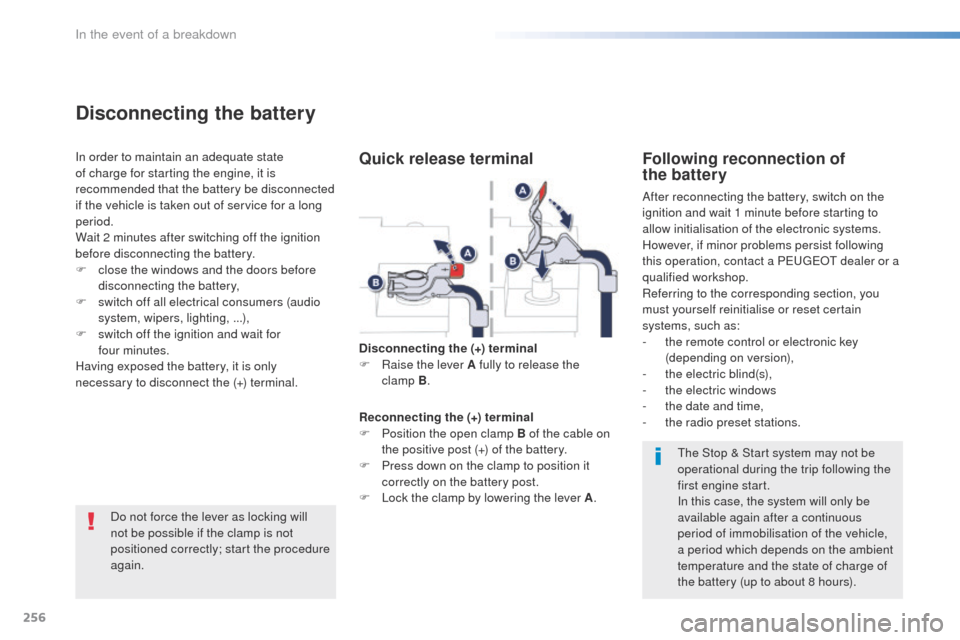
Quick release terminal
Disconnecting the (+) terminal
F Ra ise the lever A fully to release the
clamp
B.
Reconnecting the (+) terminal
F
P
osition the open clamp B of the cable on
the positive post (+) of the battery.
F
P
ress down on the clamp to position it
correctly on the battery post.
F
L
ock the clamp by lowering the lever A .
th
e Stop & Start system may not be
operational during the trip following the
first engine start.
In this case, the system will only be
available again after a continuous
period of immobilisation of the vehicle,
a period which depends on the ambient
temperature and the state of charge of
the battery (up to about 8 hours).
In the event of a breakdown