Page 14 of 371

12
508_en_Chap00c_eco-conduite_ed01-2016
Limit the causes of excess consumption
Spread loads throughout the vehicle; place the heaviest items in the
bottom of the boot, as close as possible to the rear seats.
Limit the loads carried in the vehicle and reduce wind resistance (roof
bars, roof rack, bicycle carrier, trailer...). u
s
e a roof box in preference.
Remove roof bars and roof racks after use.
At the end of winter, remove snow tyres and refit your summer tyres.
Observe the recommendations on
maintenance
Check the tyre pressures regularly, when cold, referring to the label in
the door aperture, driver's side.
Carry out this check in particular:
-
b
efore a long journey,
-
a
t each change of season,
-
a
fter a long period out of use.
Don't forget the spare wheel and the tyres on any trailer or caravan.
Have your vehicle serviced regularly (engine oil, oil filter, air filter,
passenger compartment filter...) and observe the schedule of
operations recommended in the manufacturer's service schedule.
With a BlueHDi Diesel engine, if the SCR system is faulty your vehicle
becomes polluting; go to a P
e
uge
Ot
dealer or a qualified workshop
without delay to have the emissions of nitrous oxides brought back to
the legal level.
When refuelling, do not continue after the third cut-off of the nozzle to
avoid any over flow.
At the wheel of your new vehicle, it is only after the first 1 800 miles
(3
000 kilometres) that you will see the fuel consumption settle down to
a consistent average.
eco-driving
Page 178 of 371

176
508_en_Chap06_conduite_ed01-2016
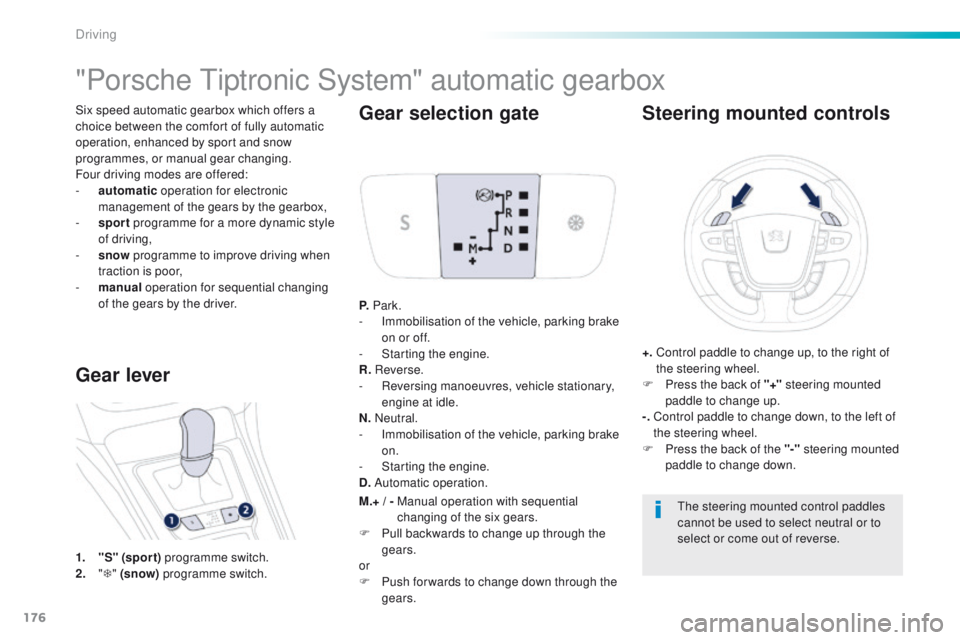
Six speed automatic gearbox which offers a
choice between the comfort of fully automatic
operation, enhanced by sport and snow
programmes, or manual gear changing.
Four driving modes are offered:
-
a
utomatic operation for electronic
management of the gears by the gearbox,
-
sp
ort programme for a more dynamic style
of driving,
-
s
now programme to improve driving when
traction is poor,
-
m
anual operation for sequential changing
of the gears by the driver.
"Porsche ti ptronic System" automatic gearbox
1. "S" (spor t) programme switch.
2. " T "
(snow) programme switch.
Gear lever Gear selection gate
P.
Park.
- I mmobilisation of the vehicle, parking brake
on or off.
-
S
tarting the engine.
R. Reverse.
-
R
eversing manoeuvres, vehicle stationary,
engine at idle.
N. Neutral.
-
I
mmobilisation of the vehicle, parking brake
on.
-
S
tarting the engine.
D. Automatic operation.
Steering mounted controls
+. Control paddle to change up, to the right of
the steering wheel.
F
P
ress the back of "+" steering mounted
paddle to change up.
-.
C
ontrol paddle to change down, to the left of
the steering wheel.
F
P
ress the back of the "-" steering mounted
paddle to change down.
th
e steering mounted control paddles
cannot be used to select neutral or to
select or come out of reverse.
M.+
/ -
M
anual operation with sequential
changing of the six gears.
F
P
ull backwards to change up through the
gears.
or
F
P
ush for wards to change down through the
gears.
Driving
Page 237 of 371

235
508_en_Chap08_en-cas-de-pannes_ed01-2016
Spare wheel
the tools are installed in the boot under the
f l o o r.
to g
ain access to them:
F
o
pen the boot,
F
p
osition the floor vertically (SW and non-
hybrid R XH: in its guide) for access to the
tools.
Procedure for changing a wheel with punctured tyre for the spare wheel using the tools provided with the vehicle.
List of tools
All of these tools are specific to your
vehicle and can vary according to the level
of equipment. Do not use them for other
purposes.
1.
Wheelbrace.
F
or removing the wheel trim and removing
the wheel bolts.
2.
J
ack with integral handle.
F
or raising the vehicle. 3.
W
heel bolt cover removal tool.
F
or removing the bolt protectors (covers)
on alloy wheels.
4.
S
ocket for the security bolts (located in the
glove box).
F
or adapting the wheelbrace to the special
"security" bolts.
5.
A w
heel chock for immobilising the
vehicle*.
6.
t
o
wing eye.
S
ee "
to
wing the vehicle".
Access to the tools
* Depending on country of sale or equipment.
th
e jack must only be used to change a
wheel with a damaged tyre.
th
e jack conforms to e
u
ropean
legislation, such as defined in the
Machinery Directive 2006/42/C
e.
the jack does not require any maintenance.
8
In the event of a breakdown
Page 240 of 371

238
508_en_Chap08_en-cas-de-pannes_ed01-2016
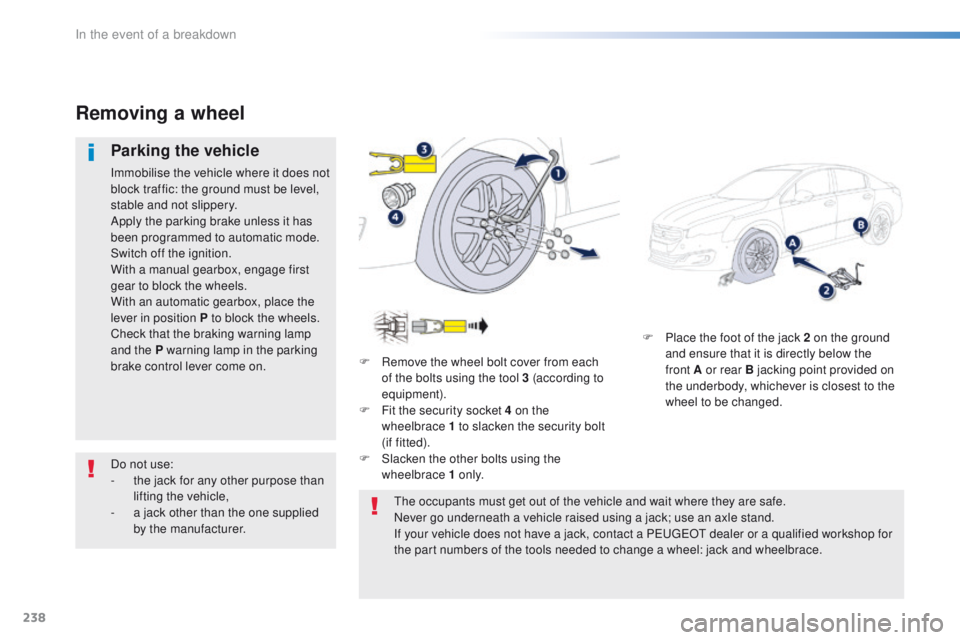
F Place the foot of the jack 2 on the ground and ensure that it is directly below the
front
A or rear B jacking point provided on
the underbody, whichever is closest to the
wheel to be changed.
Removing a wheel
Parking the vehicle
Immobilise the vehicle where it does not
block traffic: the ground must be level,
stable and not slippery.
Apply the parking brake unless it has
been programmed to automatic mode.
Switch off the ignition.
With a manual gearbox, engage first
gear to block the wheels.
With an automatic gearbox, place the
lever in position P to block the wheels.
Check that the braking warning lamp
and the P warning lamp in the parking
brake control lever come on. F
R
emove the wheel bolt cover from each
of the bolts using the tool 3 (according to
equipment).
F
F
it the security socket 4 on the
wheelbrace
1 to slacken the security bolt
(if
fitted).
F
S
lacken the other bolts using the
wheelbrace 1 o n l y.
th
e occupants must get out of the vehicle and wait where they are safe.
Never go underneath a vehicle raised using a jack; use an axle stand.
If your vehicle does not have a jack, contact a P
e
uge
Ot
dealer or a qualified workshop for
the part numbers of the tools needed to change a wheel: jack and wheelbrace.
Do not use:
-
t
he jack for any other purpose than
lifting the vehicle,
-
a j
ack other than the one supplied
by the manufacturer.
In the event of a breakdown