2016 Peugeot 508 instrument panel
[x] Cancel search: instrument panelPage 197 of 371
195
508_en_Chap06_conduite_ed01-2016
In bad weather or in winter, ensure
that the sensors are not covered with
mud, ice or snow. When reverse gear is
engaged, an audible signal (long beep)
indicates that the sensors may be dirty.
Certain sound sources (motorcycle,
lorry, pneumatic drill, etc.) may trigger
the audible signals of the parking
sensor system.In the event of a malfunction of
the system, when reverse gear
is engaged this warning lamp is
Operating fault
displayed in the instrument panel and/or a
message appears in the screen, accompanied
by an audible signal (short beep).
Contact a P
e
uge
Ot
dealer or a qualified
workshop.
6
Driving
Page 201 of 371
199
508_en_Chap06_conduite_ed01-2016
Reversing camera
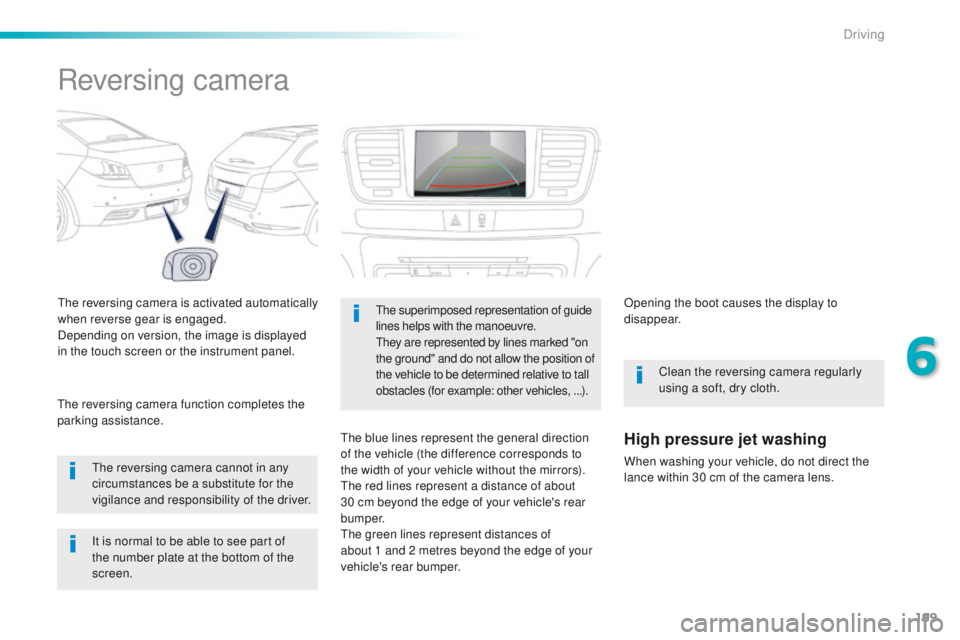
the reversing camera is activated automatically
when reverse gear is engaged.
Depending on version, the image is displayed
in the touch screen or the instrument panel.
th
e reversing camera cannot in any
circumstances be a substitute for the
vigilance and responsibility of the driver.
th
e reversing camera function completes the
parking assistance.the superimposed representation of guide
lines helps with the manoeuvre.
th
ey are represented by lines marked "on
the ground" and do not allow the position of
the vehicle to be determined relative to tall
obstacles (for example: other vehicles, ...).
the blue lines represent the general direction
of the vehicle (the difference corresponds to
the width of your vehicle without the mirrors).
th
e red lines represent a distance of about
30 cm beyond the edge of your vehicle's rear
b u m p e r.
th
e green lines represent distances of
about 1
and 2 metres beyond the edge of your
vehicle's rear bumper. Opening the boot causes the display to
disappear.
Clean the reversing camera regularly
using a soft, dry cloth.High pressure jet washing
When washing your vehicle, do not direct the
lance within 30 cm of the camera lens.
It is normal to be able to see part of
the number plate at the bottom of the
screen.
6
Driving
Page 203 of 371
201
508_en_Chap07_info-pratiques_ed01-2016
Low fuel level
When the low fuel level in the tank is
reached, this warning lamp comes on
in the instrument panel, accompanied
by an audible warning and a message
in the instrument panel screen.
Fuel supply cut-off
Your vehicle is equipped with a safety device
which cuts off the fuel supply in the event of
a
collision. It is still possible to use a fuel can to fill
the tank but this must be done slowly.
In order to ensure a good flow of fuel,
do not place the nozzle of the fuel can
in direct contact with the flap of the
misfuel prevention device.
Diesel misfuel prevention
Travelling abroad
As Diesel fuel pump nozzles may be different
in other countries, the presence of the misfuel
prevention device may make refuelling
impossible.
Not all Diesel vehicles are fitted with misfuel
protection, so before travelling abroad, we
recommend that you check with the P
e
uge
Ot
dealer network, whether your vehicle is suitable
for the fuel pumps in the country in which you
want to travel.
When it first comes on, around 7 litres of fuel
remain in the tank.
You must refuel as soon as possible to avoid
running out.
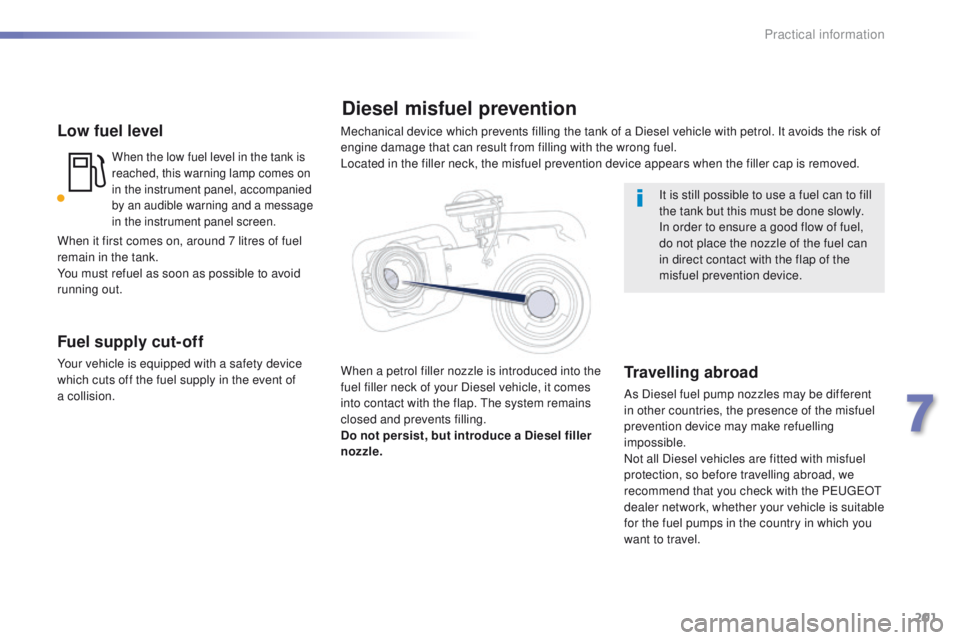
Mechanical device which prevents filling the tank of a Diesel vehicle with petrol. It avoids the risk of
engine damage that can result from filling with the wrong fuel.
Located in the filler neck, the misfuel prevention device appears when the filler cap is removed.
When a petrol filler nozzle is introduced into the
fuel filler neck of your Diesel vehicle, it comes
into contact with the flap.
th
e system remains
closed and prevents filling.
Do not persist, but introduce a Diesel filler
nozzle.
7
Practical information
Page 220 of 371
218
508_en_Chap07_info-pratiques_ed01-2016
Checking levels
take care when working under the
bonnet, as certain areas of the engine
may be extremely hot (risk of burns) and
the cooling fan could start at any time
(even with the ignition off).
Engine oil level
the check is carried out either when
the ignition is switched on using the
oil level indicator in the instrument
panel for vehicles so equipped, or
using the dipstick.
to e
nsure that the reading is correct,
your vehicle must be parked on a level
sur face with the engine having been off
for more than 30 minutes.
It is normal to top up the oil level between
two services (or oil changes). P
e
uge
Ot
recommends that you check the level, and top
up if necessary, every 3 000 miles (5 000 kms). Check all of these levels regularly, in line with the manufacturer's service schedule. t
o
p them up if necessary, unless other wise indicated.
If a level drops significantly, have the corresponding system checked by a P
e
uge
Ot
dealer or a qualified workshop.
Checking using the dipstick
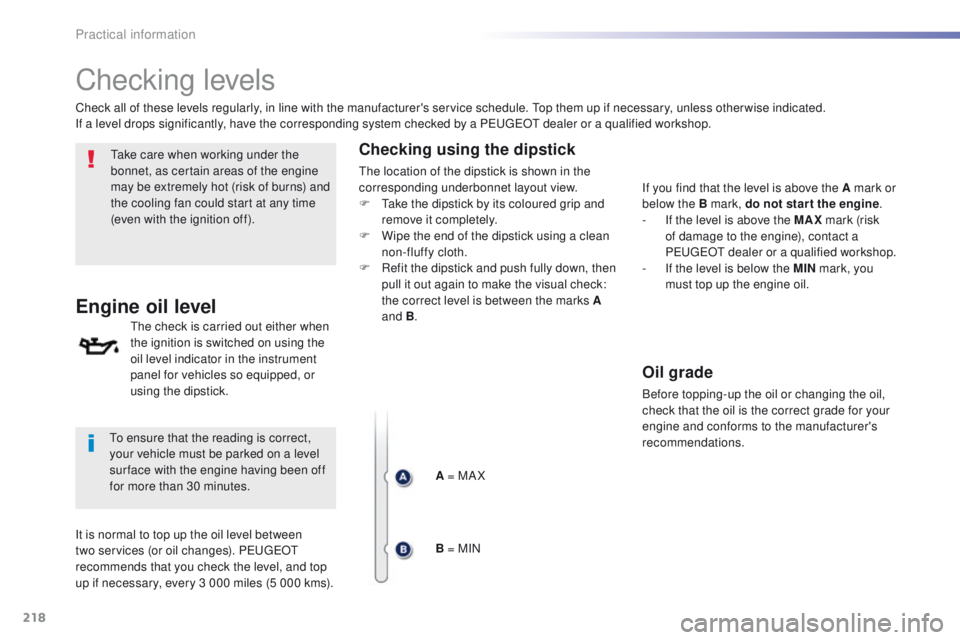
the location of the dipstick is shown in the
corresponding underbonnet layout view.
F
t
a
ke the dipstick by its coloured grip and
remove it completely.
F
W
ipe the end of the dipstick using a clean
non-fluffy cloth.
F
R
efit the dipstick and push fully down, then
pull it out again to make the visual check:
the correct level is between the marks A
and B .
A = MA X
B = MIN If you find that the level is above the A mark or
below the B mark, do not star t the engine
.
-
I
f the level is above the MAX mark (risk
of damage to the engine), contact a
P
e
uge
Ot
dealer or a qualified workshop.
-
I
f the level is below the MIN mark, you
must top up the engine oil.
Oil grade
Before topping-up the oil or changing the oil,
check that the oil is the correct grade for your
engine and conforms to the manufacturer's
recommendations.
Practical information
Page 221 of 371

219
508_en_Chap07_info-pratiques_ed01-2016
Power steering fluid level
the power steering fluid level should
be close to the "MA X" mark. With
the engine cold, unscrew the cap to
check the level.
th
e brake fluid level should be close
to the "MA X" mark. If it is not, check
the brake pad wear.
Brake fluid level
Changing the fluid
Refer to the manufacturer's service schedule
for details of the interval for this operation.
Fluid specification
the brake fluid must conform to the
manufacturer's recommendations.
Topping-up the engine oil level
the location of the oil filler cap is shown in the
corresponding underbonnet layout view.
F
u
n
screw the oil filler cap to reveal the filler
aperture.
F
A
dd oil in small quantities, avoiding any
spills on engine components (risk of fire).
F
W
ait a few minutes before checking the
level again using the dipstick.
F
A
dd more oil if necessary.
F
A
fter checking the level, carefully refit the
oil filler cap and the dipstick in its tube.
After topping-up the oil, the check when
switching on the ignition with the oil level
indicator in the instrument panel is not valid
during the 30 minutes after topping up.
Engine oil change
Refer to the manufacturer's service schedule
for details of the interval for this operation.
In order to maintain the reliability of the engine
and emission control system, never use
additives in the engine oil.
7
Practical information
Page 222 of 371

220
508_en_Chap07_info-pratiques_ed01-2016
Coolant level
the coolant level should be close
to the "MA X" mark but should never
exceed it.
In addition, as the cooling system is pressurised,
wait at least one hour after switching off the engine
before carrying out any work.
to a
void any risk of scalding, unscrew the cap by
two turns to allow the pressure to drop. When the
pressure has dropped, remove the cap and top up
the level.
Changing the coolant
the coolant does not have to be replaced at routine services.
Fluid specification
the coolant must conform to the
manufacturer's recommendations.
Fluid specification
For optimum cleaning and to avoid freezing,
this fluid must not be topped up with or
replaced with plain water.
Screenwash and headlamp
wash fluid
In the case of vehicles fitted with
headlamp washers, the low fluid level
is indicated by an audible signal and
a message in the instrument panel
screen.
Avoid prolonged contact of used oil or
fluids with the skin.
Most of these fluids are harmful to
health or indeed very corrosive.
Do not discard used oil or fluids into
sewers or onto the ground.
ta
ke used oil to a P
e
uge
Ot
dealer or
a qualified workshop (France) or to an
authorised waste disposal site.
Used products
A low additive level is indicated by illumination
of this warning lamp, accompanied by an
audible warning and a message in the
instrument panel screen.
Diesel additive level (Diesel
engine with particle filter)
When the engine is warm, the temperature of
the coolant is regulated by the fan.
to
p up the reservoir when you next stop
the
vehicle.
In wintry conditions, the use of an
ethyl alcohol or methanol base fluid is
recommended.
The cooling fan may star t after
switching off the engine: take care
with articles and clothing that might
be caught by the fan blades.
To p p i n g u p
this additive must be topped up by a
Pe
ugeOt dealer or a qualified workshop
without delay.
Practical information
Page 263 of 371

261
508_en_Chap08_en-cas-de-pannes_ed01-2016
System which manages the duration of use of certain functions to conserve a sufficient level of
charge in the battery.
After the engine has stopped, you can still use functions such as the audio and telematics
system, windscreen wipers, dipped beam headlamps, courtesy lamps, etc. for a maximum
combined duration of about forty minutes.
energy economy mode
Switching to economy
mode
A message then appears in the instrument
panel screen indicating that the vehicle has
switched to economy mode and the active
functions are put on standby.
If a telephone call is being made at this time, it
will be maintained for around 10 minutes with
the Bluetooth hands-free system of your audio
system.
Exiting economy mode
these functions are reactivated automatically
next time the vehicle is driven.
In order to restore the use of these functions
immediately, start the engine and let it run:
-
f
or less than ten minutes, to use the
equipment for approximately five minutes,
-
f
or more than ten minutes, to use the
equipment for up to approximately
thirty
minutes.
Let the engine run for the duration specified to
ensure that the battery charge is sufficient.
Do not repeatedly and continuously restart the
engine in order to charge the battery.
A flat battery prevents the engine from starting.
For more information on the battery, refer to the
corresponding section.
Load reduction mode
System which manages the use of certain
functions according to the level of charge
remaining in the battery.
When the vehicle is being driven, the load
reduction function temporarily deactivates
certain functions, such as the air conditioning,
the heated rear screen...
th
e deactivated functions are reactivated
automatically as soon as conditions permit.
8
In the event of a breakdown
Page 282 of 371
280
508_en_Chap10c_SMegplus_ed01-2016
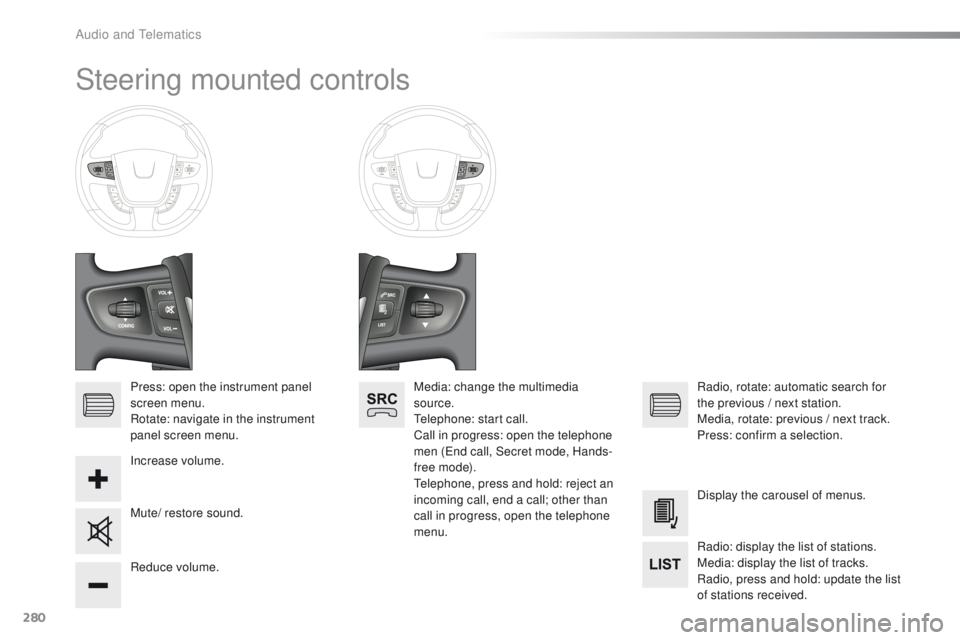
Steering mounted controls
Press: open the instrument panel
screen menu.
Rotate: navigate in the instrument
panel screen menu.
Increase volume.
Reduce volume.Media: change the multimedia
source.
te
lephone: start call.
Call in progress: open the telephone
men (
en
d call, Secret mode, Hands-
free mode).
te
lephone, press and hold: reject an
incoming call, end a call; other than
call in progress, open the telephone
menu. Radio, rotate: automatic search for
the previous
/ next station.
Media, rotate: previous
/ next track.
Press: confirm a selection.
Mute/ restore sound. Display the carousel of menus.
Radio: display the list of stations.
Media: display the list of tracks.
Radio, press and hold: update the list
of stations received.
Audio and telematics