Page 76 of 371
74
508_en_Chap02_ouvertures_ed01-2016
Reinitialising the electric
windows
Always remove the key from the ignition
when leaving the vehicle, even for a
short time.
In the event of contact during operation
of the windows, you must reverse the
movement of the window. t
o d
o this,
press the switch concerned.
When operating the passenger electric
window switches, the driver must
ensure that no one is preventing correct
closing of the windows.
th
e driver must ensure that the
passengers use the electric windows
c o r r e c t l y.
Be aware of children when operating
the windows.
Following reconnection of the battery, the
safety anti-pinch function must be reinitialised.
th
e safety anti-pinch function is not active
during these operations:
-
l
ower the window completely, then raise
it, it will rise in steps of a few centimetres
each time the switch is pressed. Repeat
the operation until the window closes
completely,
-
c
ontinue to press the switch for at least
one
second after reaching this position,
window closed.
Access
Page 78 of 371
76
508_en_Chap03_ergonomie-et-confort_ed01-2016
Electric adjustments
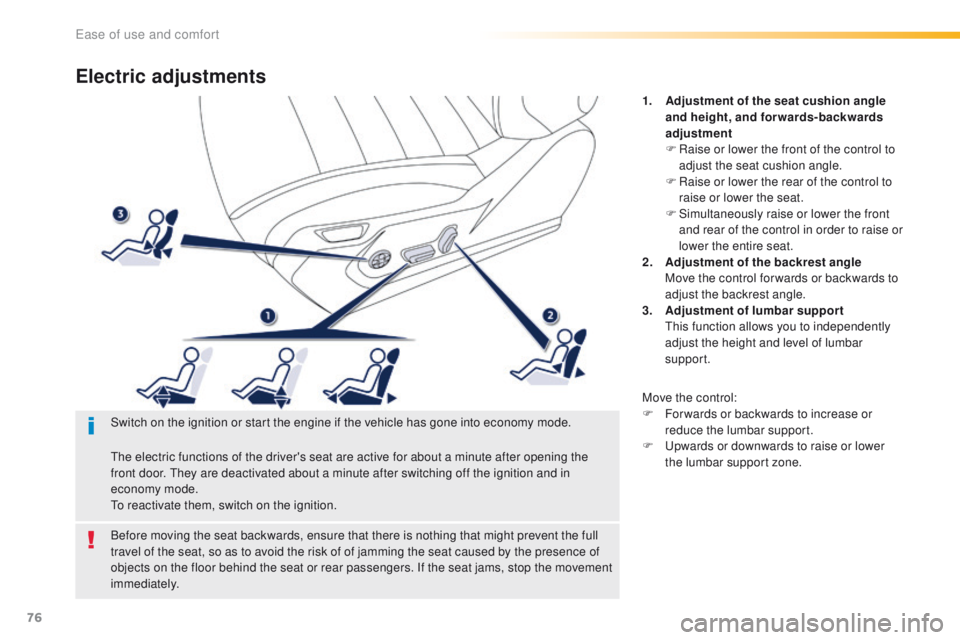
1. Adjustment of the seat cushion angle and height, and forwards-backwards
adjustment
F
R
aise or lower the front of the control to
adjust the seat cushion angle.
F
R
aise or lower the rear of the control to
raise or lower the seat.
F
S
imultaneously raise or lower the front
and rear of the control in order to raise or
lower the entire seat.
2.
A
djustment of the backrest angle
M
ove the control for wards or backwards to
adjust the backrest angle.
3.
A
djustment of lumbar support
t
h
is function allows you to independently
adjust the height and level of lumbar
support.
Move the control:
F
F
or wards or backwards to increase or
reduce the lumbar support.
F
u
p
wards or downwards to raise or lower
the lumbar support zone.
Before moving the seat backwards, ensure that there is nothing that might prevent the full
travel of the seat, so as to avoid the risk of of jamming the seat caused by the presence of
objects on the floor behind the seat or rear passengers. If the seat jams, stop the movement
immediately. Switch on the ignition or start the engine if the vehicle has gone into economy mode.
th
e electric functions of the driver's seat are active for about a minute after opening the
front door.
t
h
ey are deactivated about a minute after switching off the ignition and in
economy mode.
to r
eactivate them, switch on the ignition.
ease of use and comfort
Page 79 of 371
77
508_en_Chap03_ergonomie-et-confort_ed01-2016
Storing driving positions
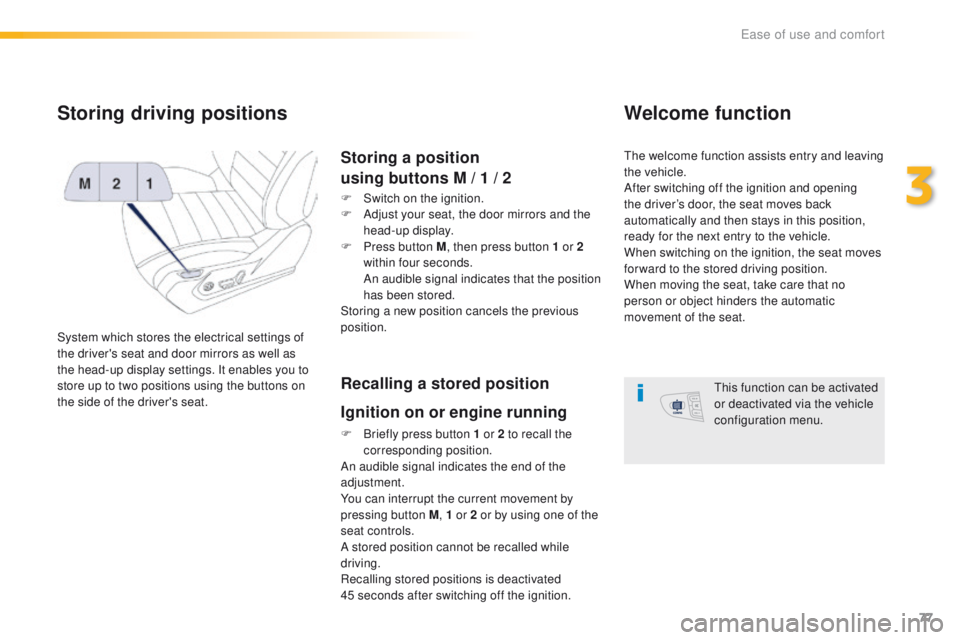
System which stores the electrical settings of
the driver's seat and door mirrors as well as
the head-up display settings. It enables you to
store up to two positions using the buttons on
the side of the driver's seat.
Storing a position
using buttons M / 1 / 2
F Switch on the ignition.
F
A djust your seat, the door mirrors and the
head-up display.
F
P
ress button M , then press button 1 or 2
within four seconds.
A
n audible signal indicates that the position
has been stored.
Storing a new position cancels the previous
position.
Recalling a stored position
Ignition on or engine running
F Briefly press button 1 or 2 to recall the corresponding position.
An audible signal indicates the end of the
adjustment.
You can interrupt the current movement by
pressing button M , 1 or 2 or by using one of the
seat controls.
A stored position cannot be recalled while
driving.
Recalling stored positions is deactivated
45
seconds after switching off the ignition.
Welcome function
the welcome function assists entry and leaving
the vehicle.
After switching off the ignition and opening
the driver’s door, the seat moves back
automatically and then stays in this position,
ready for the next entry to the vehicle.
When switching on the ignition, the seat moves
for ward to the stored driving position.
When moving the seat, take care that no
person or object hinders the automatic
movement of the seat.
th
is function can be activated
or deactivated via the vehicle
configuration menu.
3
ease of use and comfort
Page 82 of 371
80
508_en_Chap03_ergonomie-et-confort_ed01-2016
Mirrors
each fitted with an adjustable mirror glass
providing the lateral rear ward vision necessary
for overtaking or parking.
th
ey can also be folded for parking in confined
spaces.
Door mirrors
If the mirrors are folded using control A ,
they will not unfold when the vehicle is
unlocked. Pull again on control A .
th
e folding and unfolding of the door
mirrors using the remote control can be
deactivated by a P
e
uge
Ot
dealer or a
qualified workshop.
Fold the mirrors when putting your
vehicle through an automatic car wash.
th
e objects observed are, in reality,
closer than they appear.
ta
ke this into account in order to
correctly judge the distance of vehicles
approaching from behind.
Demisting-defrosting of the door
mirrors operates with the engine
running, by switching on the heated
rear screen.
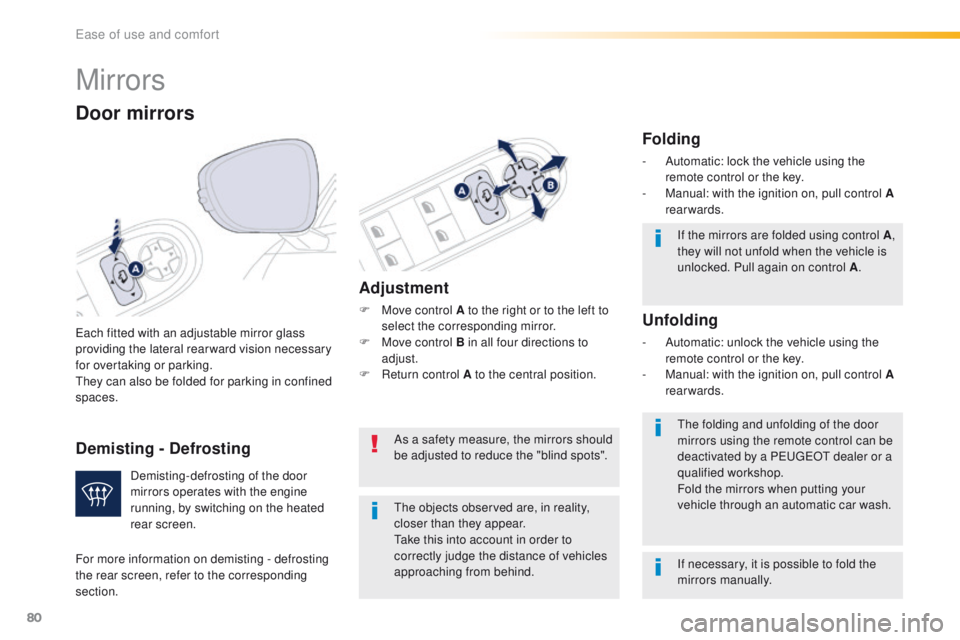
Adjustment
F Move control A to the right or to the left to
select the corresponding mirror.
F
M
ove control B in all four directions to
adjust.
F
R
eturn control A to the central position.
Folding
- Automatic: lock the vehicle using the remote control or the key.
-
M
anual: with the ignition on, pull control A
rearwards.
Unfolding
- Automatic: unlock the vehicle using the remote control or the key.
-
M
anual: with the ignition on, pull control A
rearwards.
As a safety measure, the mirrors should
be adjusted to reduce the "blind spots".
If necessary, it is possible to fold the
mirrors manually.
For more information on demisting - defrosting
the rear screen, refer to the corresponding
section.
Demisting - Defrosting
ease of use and comfort
Page 99 of 371
97
508_en_Chap03_ergonomie-et-confort_ed01-2016
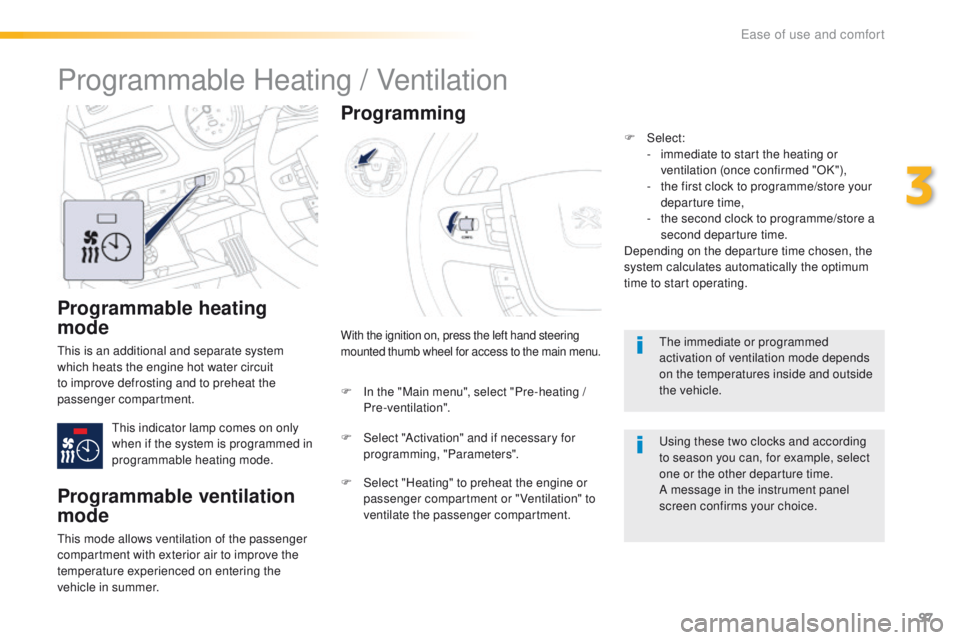
Programmable heating
mode
this is an additional and separate system
which heats the engine hot water circuit
to improve defrosting and to preheat the
passenger compartment.
th
is indicator lamp comes on only
when if the system is programmed in
programmable heating mode.With the ignition on, press the left hand steering
mounted thumb wheel for access to the main menu.
Programming
F In the "Main menu", select "Pre-heating /
Pre-ventilation".
F
S
elect "Activation" and if necessary for
programming, "Parameters".
F
S
elect "Heating" to preheat the engine or
passenger compartment or "Ventilation" to
ventilate the passenger compartment.
Programmable Heating / Ventilation
Programmable ventilation
mode
this mode allows ventilation of the passenger
compartment with exterior air to improve the
temperature experienced on entering the
vehicle in summer. F
Select:
-
i
mmediate to start the heating or
ventilation (once confirmed "OK"),
-
t
he first clock to programme/store your
departure time,
-
t
he second clock to programme/store a
second departure time.
Depending on the departure time chosen, the
system calculates automatically the optimum
time to start operating.
th
e immediate or programmed
activation of ventilation mode depends
on the temperatures inside and outside
the vehicle.
us
ing these two clocks and according
to season you can, for example, select
one or the other departure time.
A message in the instrument panel
screen confirms your choice.
3
ease of use and comfort
Page 103 of 371

101
508_en_Chap03_ergonomie-et-confort_ed01-2016
Sun visor
the sun visors have a vanity mirror with flap
and a map holder (or ticket holder) for the
driver.
F
W
ith the ignition on, raise the concealing
flap; the mirror is illuminated automatically.
Illuminated glove box 12 V accessory socket
Observe the maximum power rating to
avoid damaging your accessory.
th
e connection of an electrical device
not approved by P
e
uge
Ot, s
uch as a
uS
B charger, may adversely affect the
operation of vehicle electrical systems,
causing faults such as poor telephone
reception or inter ference with displays
in the screens.
It has dedicated locations for storing a water
bottle, the vehicle's handbook pack...
Its lid has locations for storing a pen, a pair of
glasses, tokens, maps, a cup...
F
to o
pen the glove box, raise the handle.th
e glove box is illuminated when the lid is
opened.
It gives access to the passenger's front airbag
deactivation switch A .
It contains an adjustable ventilation nozzle B ,
distributing the same conditioned air as the
vents in the passenger compartment. F
t
o c
onnect a 12 V accessory (maximum
power: 120 Watts), raise the cap and
connect a suitable adaptor.
3
ease of use and comfort
Page 104 of 371
102
508_en_Chap03_ergonomie-et-confort_ed01-2016
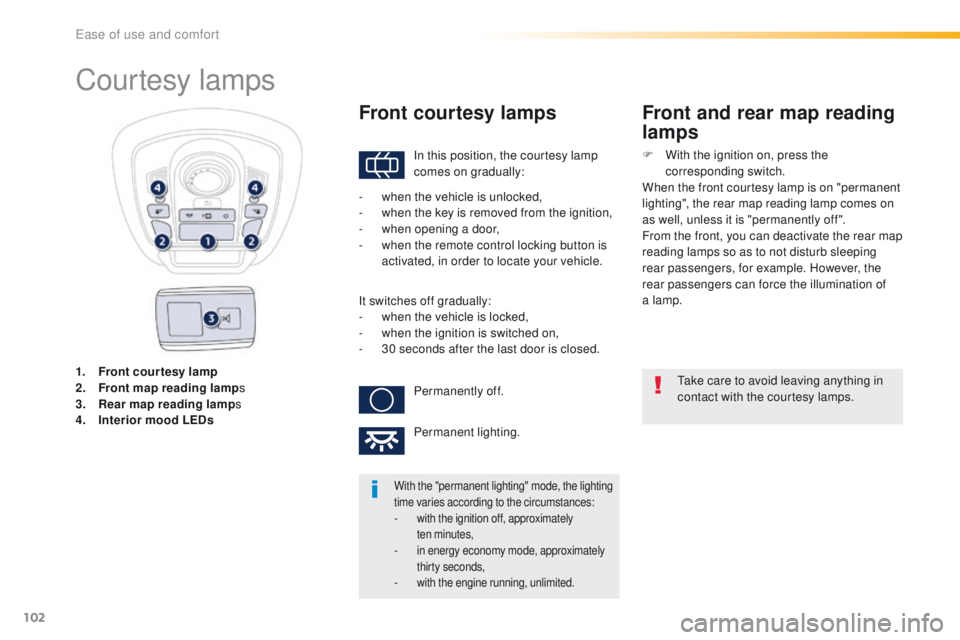
1. Front courtesy lamp
2. Front map reading lamp s
3.
R
ear map reading lamp s
4.
I
nterior mood LEDs
Courtesy lamps
In this position, the courtesy lamp
comes on gradually:
Front courtesy lamps
take care to avoid leaving anything in
contact with the courtesy lamps.
With the "permanent lighting" mode, the lighting
time varies according to the circumstances:
- with the ignition off, approximately ten minutes,
- in energy economy mode, approximately thirty seconds,
- with the engine running, unlimited.
- when the vehicle is unlocked,
- w hen the key is removed from the ignition,
-
w
hen opening a door,
-
w
hen the remote control locking button is
activated, in order to locate your vehicle.
It switches off gradually:
-
w
hen the vehicle is locked,
-
w
hen the ignition is switched on,
-
3
0 seconds after the last door is closed.Permanently off.
Permanent lighting.
Front and rear map reading
lamps
F With the ignition on, press the corresponding switch.
When the front courtesy lamp is on "permanent
lighting", the rear map reading lamp comes on
as well, unless it is "permanently off ".
From the front, you can deactivate the rear map
reading lamps so as to not disturb sleeping
rear passengers, for example. However, the
rear passengers can force the illumination of
a lamp.
ease of use and comfort
Page 120 of 371
118
508_en_Chap04_eclairage-et-visibilite_ed01-2016
Model without AUTO lighting
Model with AUTO lighting Selection ring for main lighting
mode
turn the ring to align the desired symbol with
the marking.
Lighting off (ignition off) / Front daytime
running lamps (engine running).
Automatic illumination of headlamps.
Sidelamps only.
Dipped or main beam headlamps.Pull the stalk to switch the lighting between
dipped / main beam headlamps.
In the lighting off and sidelamps modes, the
driver can switch on the main beam headlamps
temporarily ("headlamp flash") by maintaining a
pull on the stalk.
Display
Illumination of the corresponding indicator lamp
in the instrument panel confirms the lighting
switched on.
Dipping the headlamps
Lighting and visibility