2016 Peugeot 508 seat adjustment
[x] Cancel search: seat adjustmentPage 4 of 371

.
.
508_en_Chap00a_sommaire_ed01-2016
Instrument panel 13
Indicator and warning lamps
1
4
Indicators
29
Distance recorders
2
9
tr
ip computer
3
9
to
uch screen
4
3
Setting the date and time
4
7
Remote control key
4
9
Back-up procedure - Remote controls
5
3
"Keyless
e
n
try and Starting"
electronic key
5
5
Back-up procedure -
e
le
ctronic keys
6
2
Boot
65
Motorised tailgate (SW and non-hybrid RHX)
6
6
Alarm
70
el
ectric windows
7
3Front seats
7
5
Steering wheel adjustment
7
9
Mirrors 80
Heating and Ventilation
8
3
Manual air conditioning
8
6
Dual-zone digital air conditioning
8
8
Quad-zone digital air conditioning
9
1
Front demist - defrost
9
6
Rear screen demist - defrost 96
Programmable Heating / Ventilation 9 7
Front fittings
9
9
Courtesy lamps
1
02
Interior mood lighting
1
03
Sunroof
104
Panoramic sunroof (SW and non-hybrid RHX)
1
06
Centre console
1
07
Rear seats
1
09
Rear fittings
1
11
Boot fittings (Saloon)
1
12
Boot fittings (SW and non-hybrid RHX)
1
13Lighting controls
1
17
Direction indicators
1
20
Daytime running lamps
1
20
Automatic illumination of headlamps
1
21
Adaptive lighting
1
22
Cornering lighting
1
23
gu
ide-me-home lighting
1
24
Headlamp beam height adjustment
1
26
Wiper controls 1 27
Automatic rain sensitive wipers 1 29
ge
neral safety
recommendations
131
Hazard warning lamps
1
32
H or n
132
em
ergency or assistance call
1
32
ele
ctronic stability control
(
e
SC) 133
Seat belts
1
36
Airbags
139
Child seats
1
43
Deactivating the passenger's front airbag
146
ISOFIX child seats
1
52
Child lock
1
58
Over view
e
co-driving
Instruments
Accessea se of use and comfort
Lighting and visibility
Safety
Contents
Page 77 of 371
75
508_en_Chap03_ergonomie-et-confort_ed01-2016
Front seats
Manual adjustments
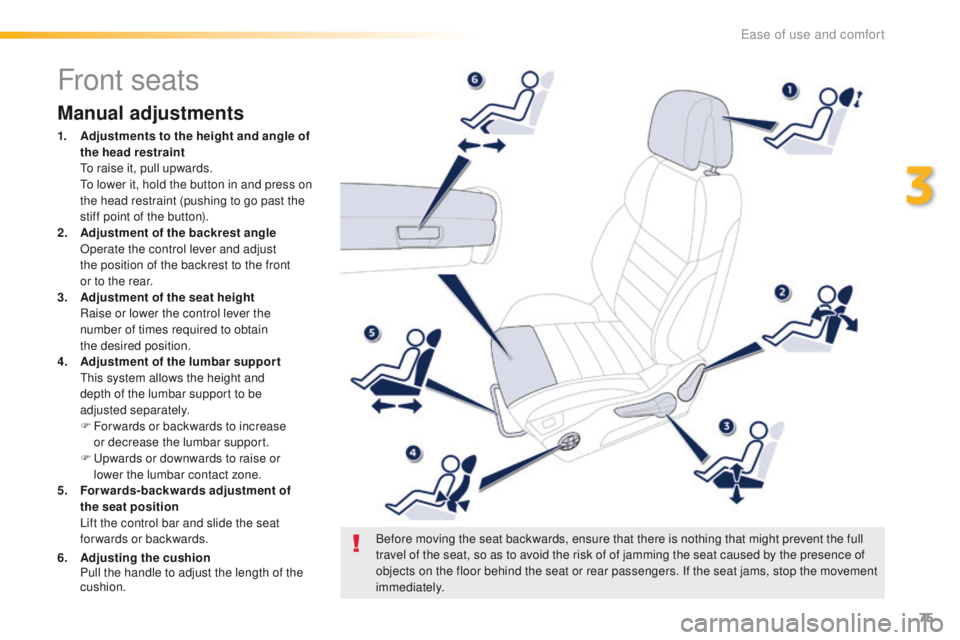
1. Adjustments to the height and angle of the head restraint
t
o r
aise it, pull upwards.
t
o l
ower it, hold the button in and press on
the head restraint (pushing to go past the
stiff point of the button).
2.
A
djustment of the backrest angle
O
perate the control lever and adjust
the
position of the backrest to the front
or
to the rear.
3.
A
djustment of the seat height
R
aise or lower the control lever the
number
of times required to obtain
the
desired position.
4.
A
djustment of the lumbar suppor t
t
h
is system allows the height and
depth
of the lumbar support to be
adjusted
separately.
F
F
or wards or backwards to increase
or
decrease the lumbar support.
F
u
p
wards or downwards to raise or
lower
the lumbar contact zone.
5.
F
orwards-backwards adjustment of
the
seat position
L
ift the control bar and slide the seat
forwards or backwards.
6.
A
djusting the cushion
P
ull the handle to adjust the length of the
cushion. Before moving the seat backwards, ensure that there is nothing that might prevent the full
travel of the seat, so as to avoid the risk of of jamming the seat caused by the presence of
objects on the floor behind the seat or rear passengers. If the seat jams, stop the movement
immediately.
3
ease of use and comfort
Page 78 of 371
76
508_en_Chap03_ergonomie-et-confort_ed01-2016
Electric adjustments
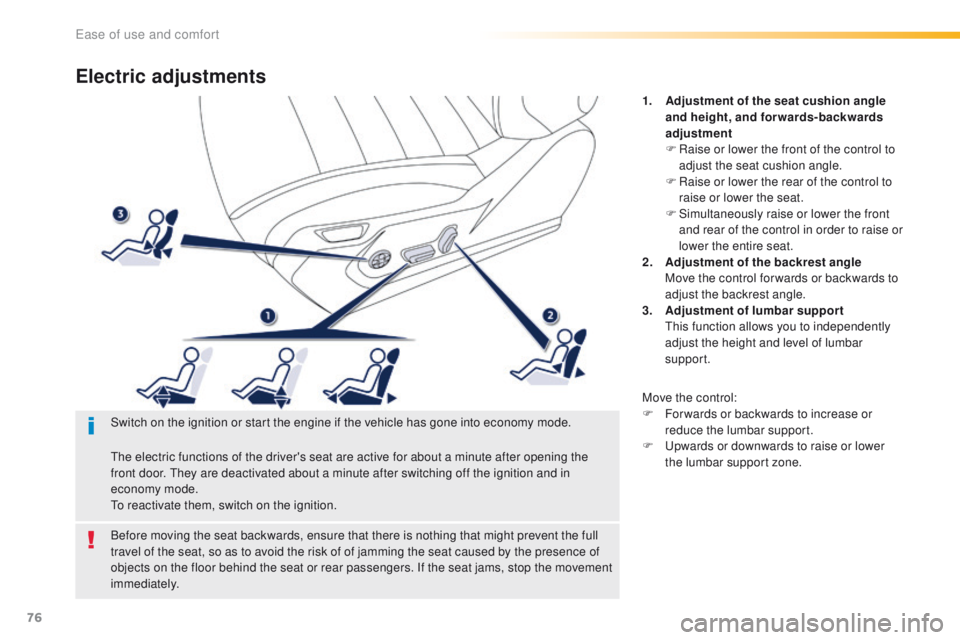
1. Adjustment of the seat cushion angle and height, and forwards-backwards
adjustment
F
R
aise or lower the front of the control to
adjust the seat cushion angle.
F
R
aise or lower the rear of the control to
raise or lower the seat.
F
S
imultaneously raise or lower the front
and rear of the control in order to raise or
lower the entire seat.
2.
A
djustment of the backrest angle
M
ove the control for wards or backwards to
adjust the backrest angle.
3.
A
djustment of lumbar support
t
h
is function allows you to independently
adjust the height and level of lumbar
support.
Move the control:
F
F
or wards or backwards to increase or
reduce the lumbar support.
F
u
p
wards or downwards to raise or lower
the lumbar support zone.
Before moving the seat backwards, ensure that there is nothing that might prevent the full
travel of the seat, so as to avoid the risk of of jamming the seat caused by the presence of
objects on the floor behind the seat or rear passengers. If the seat jams, stop the movement
immediately. Switch on the ignition or start the engine if the vehicle has gone into economy mode.
th
e electric functions of the driver's seat are active for about a minute after opening the
front door.
t
h
ey are deactivated about a minute after switching off the ignition and in
economy mode.
to r
eactivate them, switch on the ignition.
ease of use and comfort
Page 79 of 371
77
508_en_Chap03_ergonomie-et-confort_ed01-2016
Storing driving positions
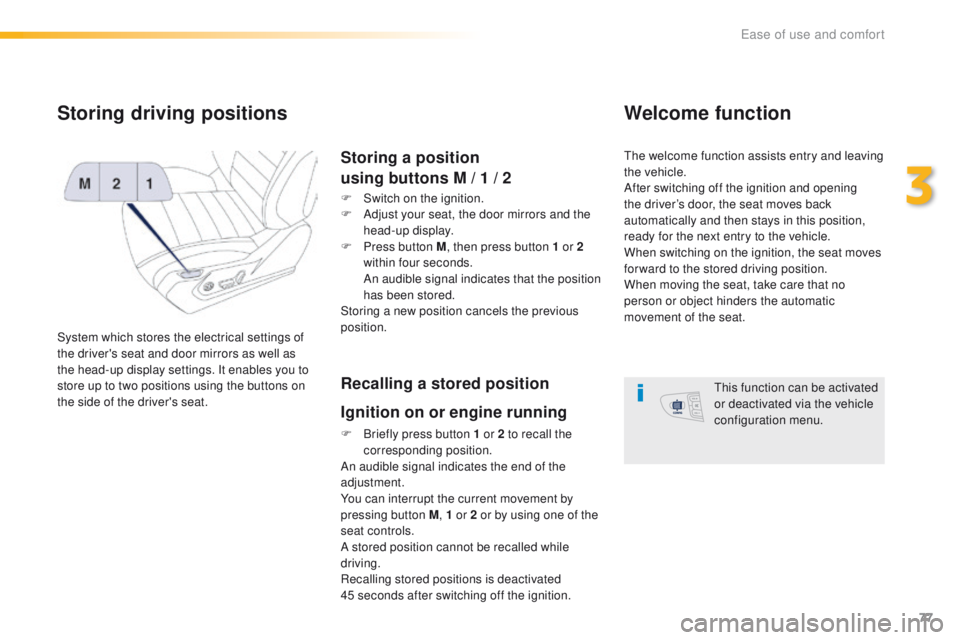
System which stores the electrical settings of
the driver's seat and door mirrors as well as
the head-up display settings. It enables you to
store up to two positions using the buttons on
the side of the driver's seat.
Storing a position
using buttons M / 1 / 2
F Switch on the ignition.
F
A djust your seat, the door mirrors and the
head-up display.
F
P
ress button M , then press button 1 or 2
within four seconds.
A
n audible signal indicates that the position
has been stored.
Storing a new position cancels the previous
position.
Recalling a stored position
Ignition on or engine running
F Briefly press button 1 or 2 to recall the corresponding position.
An audible signal indicates the end of the
adjustment.
You can interrupt the current movement by
pressing button M , 1 or 2 or by using one of the
seat controls.
A stored position cannot be recalled while
driving.
Recalling stored positions is deactivated
45
seconds after switching off the ignition.
Welcome function
the welcome function assists entry and leaving
the vehicle.
After switching off the ignition and opening
the driver’s door, the seat moves back
automatically and then stays in this position,
ready for the next entry to the vehicle.
When switching on the ignition, the seat moves
for ward to the stored driving position.
When moving the seat, take care that no
person or object hinders the automatic
movement of the seat.
th
is function can be activated
or deactivated via the vehicle
configuration menu.
3
ease of use and comfort
Page 80 of 371
78
508_en_Chap03_ergonomie-et-confort_ed01-2016
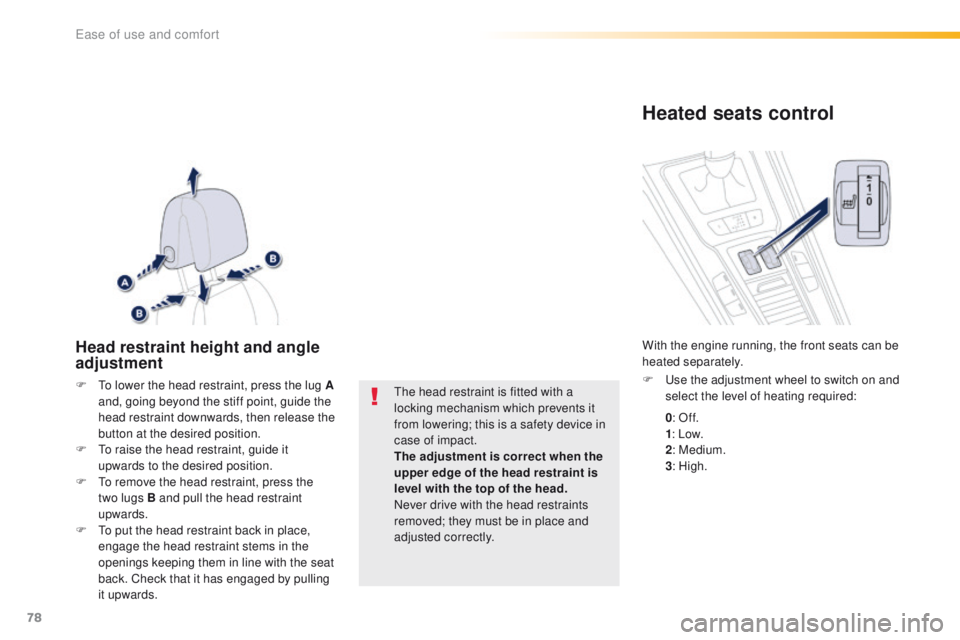
Head restraint height and angle
adjustment
F to lower the head restraint, press the lug A and, going beyond the stiff point, guide the
head restraint downwards, then release the
button at the desired position.
F
t
o r
aise the head restraint, guide it
upwards to the desired position.
F
t
o r
emove the head restraint, press the
two
lugs B and pull the head restraint
upwards.
F
t
o p
ut the head restraint back in place,
engage the head restraint stems in the
openings keeping them in line with the seat
back. Check that it has engaged by pulling
it upwards.th e head restraint is fitted with a
locking mechanism which prevents it
from lowering; this is a safety device in
case of impact.
The adjustment is correct when the
upper edge of the head restraint is
level with the top of the head.
Never drive with the head restraints
removed; they must be in place and
adjusted correctly.
Heated seats control
F use the adjustment wheel to switch on and select the level of heating required:
With the engine running, the front seats can be
heated separately.
0: Of f.
1 : Low.
2 : Medium.
3 : High.
ease of use and comfort
Page 93 of 371
91
508_en_Chap03_ergonomie-et-confort_ed01-2016
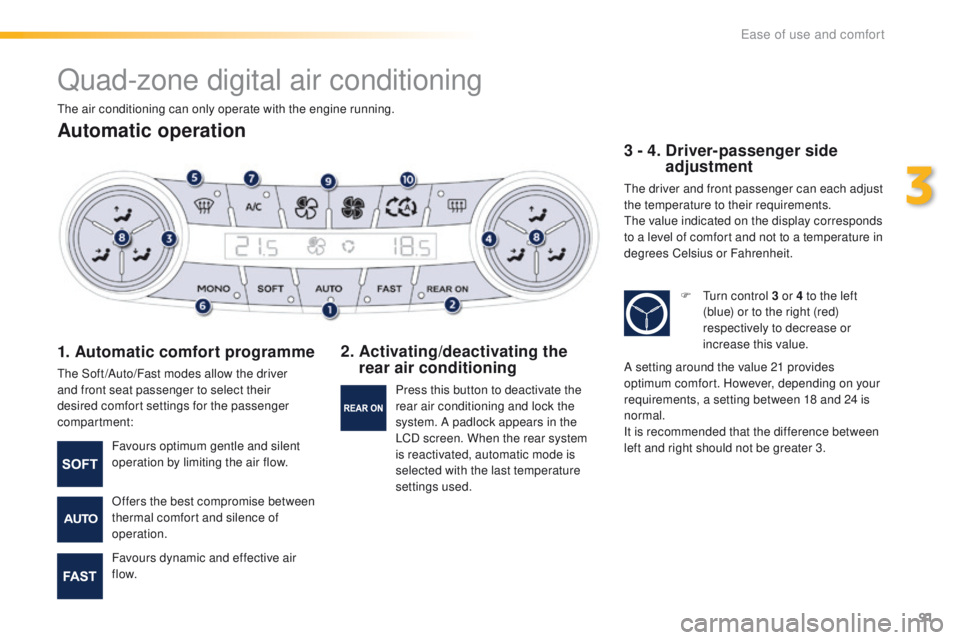
Quad-zone digital air conditioning
Automatic operation
1. Automatic comfort programme
the Soft /Auto/Fast modes allow the driver
and front seat passenger to select their
desired comfort settings for the passenger
compartment:
2. Activating/deactivating the rear air conditioning 3 - 4.
D
river-passenger side
adjustment
the driver and front passenger can each adjust
the temperature to their requirements.
th
e value indicated on the display corresponds
to a level of comfort and not to a temperature in
degrees Celsius or Fahrenheit.
Favours optimum gentle and silent
operation by limiting the air flow.
Offers the best compromise between
thermal comfort and silence of
operation.
Favours dynamic and effective air
f low. Press this button to deactivate the
rear air conditioning and lock the
system. A padlock appears in the
LCD screen. When the rear system
is reactivated, automatic mode is
selected with the last temperature
settings used. F
t
u
rn control 3 or 4 to the left
(blue) or to the right (red)
respectively to decrease or
increase this value.
A setting around the value 21 provides
optimum comfort. However, depending on your
requirements, a setting between 18 and 24 is
normal.
It is recommended that the difference between
left and right should not be greater 3.
th
e air conditioning can only operate with the engine running.
3
ease of use and comfort
Page 139 of 371
137
508_en_Chap05_securite_ed01-2016
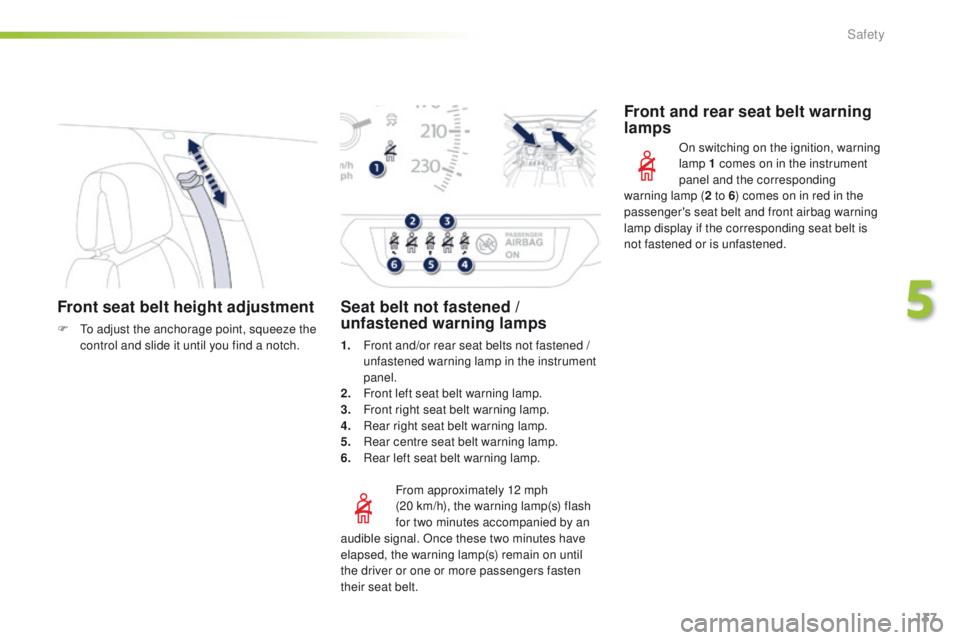
Front seat belt height adjustment
F to adjust the anchorage point, squeeze the control and slide it until you find a notch.
From approximately 12 mph
(20
km/h), the warning lamp(s) flash
for two
minutes accompanied by an
Seat belt not fastened /
unfastened warning lamps
1. Front and/or rear seat belts not fastened / unfastened warning lamp in the instrument
panel.
2.
F
ront left seat belt warning lamp.
3.
F
ront right seat belt warning lamp.
4.
R
ear right seat belt warning lamp.
5.
R
ear centre seat belt warning lamp.
6.
R
ear left seat belt warning lamp.
Front and rear seat belt warning
lamps
On switching on the ignition, warning
lamp 1 comes on in the instrument
panel and the corresponding
audible signal. Once these two minutes have
elapsed, the warning lamp(s) remain on until
the driver or one or more passengers fasten
their seat belt. warning lamp (
2 to 6) comes on in red in the
passenger's seat belt and front airbag warning
lamp display if the corresponding seat belt is
not fastened or is unfastened.
5
Safety
Page 140 of 371
138
508_en_Chap05_securite_ed01-2016
the driver must ensure that passengers use
the seat belts correctly and that they are all
fastened before setting off.
Wherever you are seated in the vehicle,
always fasten your seat belt, even for short
journeys.
Do not interchange the seat belt buckles as
they will not fulfil their role fully.
th
e seat belts are fitted with an inertia reel
permitting automatic adjustment of the
length of the strap to your size.
t
h
e seat belt
is stowed automatically when not in use.
Before and after use, ensure that the seat
belt is reeled in correctly.
th
e lower part of the strap must be
positioned as low as possible on the pelvis.
th
e upper part must be positioned in the
hollow of the shoulder.
th
e inertia reels are fitted with an automatic
locking device which comes into operation in
the event of a collision, emergency braking
or if the vehicle rolls over. You can release
the device by pulling the strap firmly and
then releasing it so that it reels in slightly.Recommendations for children
use a suitable child seat if the passenger is
less than 12 years old or shorter than one
and a half metres.
Never use the same seat belt to secure more
than one person.
Never allow a child to travel on your lap.
For more information on child seats, refer to
the corresponding section.
In order to be effective, a seat belt must:
-
b
e tightened as close to the body as
possible,
-
b
e pulled in front of you with a smooth
movement, checking that it does not
twist,
-
b
e used to restrain only one person,
-
n
ot bear any trace of cuts or fraying,
-
n
ot be converted or modified to avoid
affecting its performance.
In accordance with current safety
regulations, for all repairs on your vehicle's
seat belts, go to a qualified workshop with
the skills and equipment needed, which a
P
e
uge
Ot d
ealer is able to provide.
Have your seat belts checked regularly by a
P
e
uge
Ot
dealer or a qualified workshop,
particularly if the straps show signs of
damage.
Clean the seat belt straps with soapy
water or a textile cleaning product, sold by
P
e
uge
Ot d
ealers.
After folding or moving a seat or rear bench
seat, ensure that the seat belt is positioned
and reeled in correctly.
In the event of an impact
Depending on the nature and
seriousness of the impact , the
pretensioning device may be deployed
before and independently of the airbags.
Deployment of the pretensioners is
accompanied by a slight discharge of
harmless smoke and a noise, due to the
activation of the pyrotechnic cartridge
incorporated in the system.
In all cases, the airbag warning lamp comes
on.
Following an impact, have the seat belts
system checked, and if necessary replaced,
by a P
e
uge
Ot
dealer or a qualified
workshop.
Advice
Safety