2016 Peugeot 508 display
[x] Cancel search: displayPage 47 of 371
45
508 _en_Chap01_instrument-bord_ed01-2016
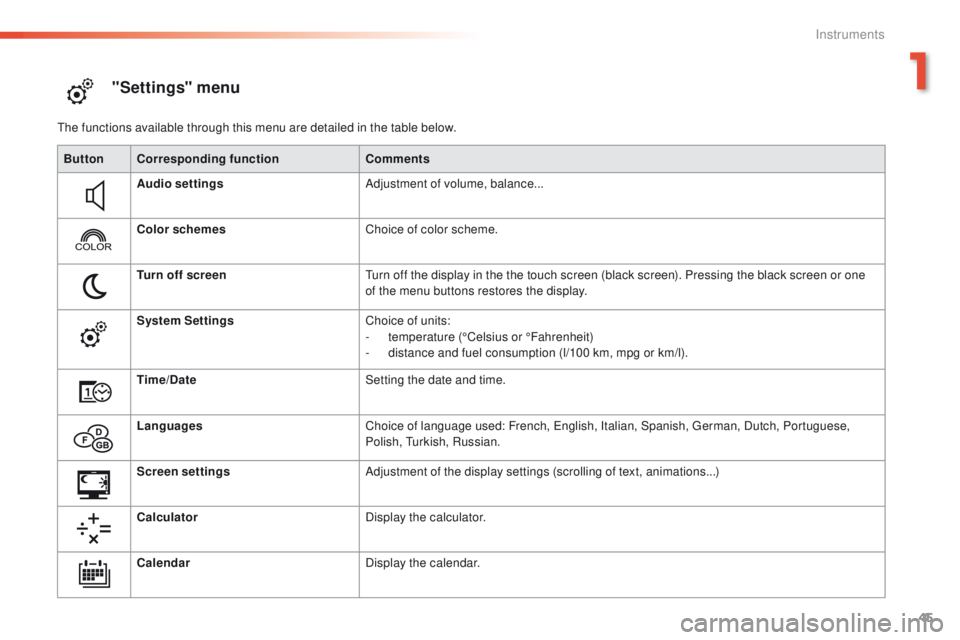
"Settings" menu
the functions available through this menu are detailed in the table below.Button Corresponding function Comments
Audio settings Adjustment of volume, balance...
Color schemes Choice of color scheme.
Turn off screen
tu
rn off the display in the the touch screen (black screen). Pressing the black screen or one
of the menu buttons restores the display.
System Settings Choice of units:
-
t
emperature (°Celsius or °Fahrenheit)
-
d
istance and fuel consumption (l/100 km, mpg or km/l).
Time/Date Setting the date and time.
Languages Choice of language used: French,
e
n
glish, Italian, Spanish, g
e
rman, Dutch, Portuguese,
Polish,
t
u
rkish, Russian.
Screen settings Adjustment of the display settings (scrolling of text, animations...)
Calculator Display the calculator.
Calendar Display the calendar.
1
Instruments
Page 49 of 371
47
508 _en_Chap01_instrument-bord_ed01-2016
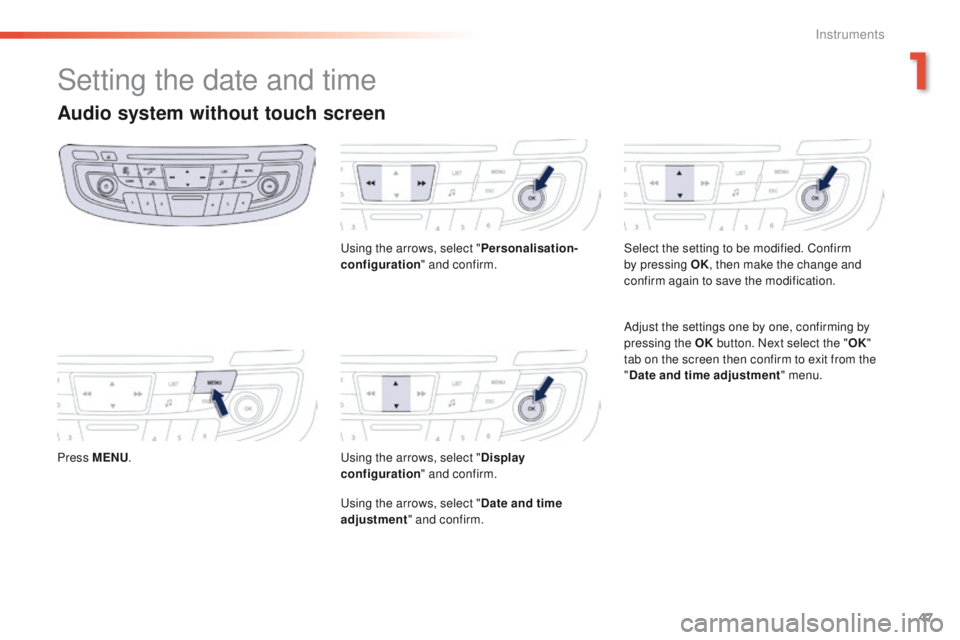
Setting the date and time
Audio system without touch screen
Press MENU.
us
ing the arrows, select "
Personalisation-
configuration " and confirm.us ing the arrows, select "Display
configuration " and confirm.
us
ing the arrows, select "Date and time
adjustment " and confirm. Select the setting to be modified. Confirm
by pressing OK
, then make the change and
confirm again to save the modification.
Adjust the settings one by one, confirming by
pressing the OK button. Next select the " OK"
tab on the screen then confirm to exit from the
" Date and time adjustment " menu.
1
Instruments
Page 65 of 371
63
508_en_Chap02_ouvertures_ed01-2016
Do not throw the remote control
batteries away, they contain metals
which are harmful to the environment.
ta
ke them to an approved collection
point.
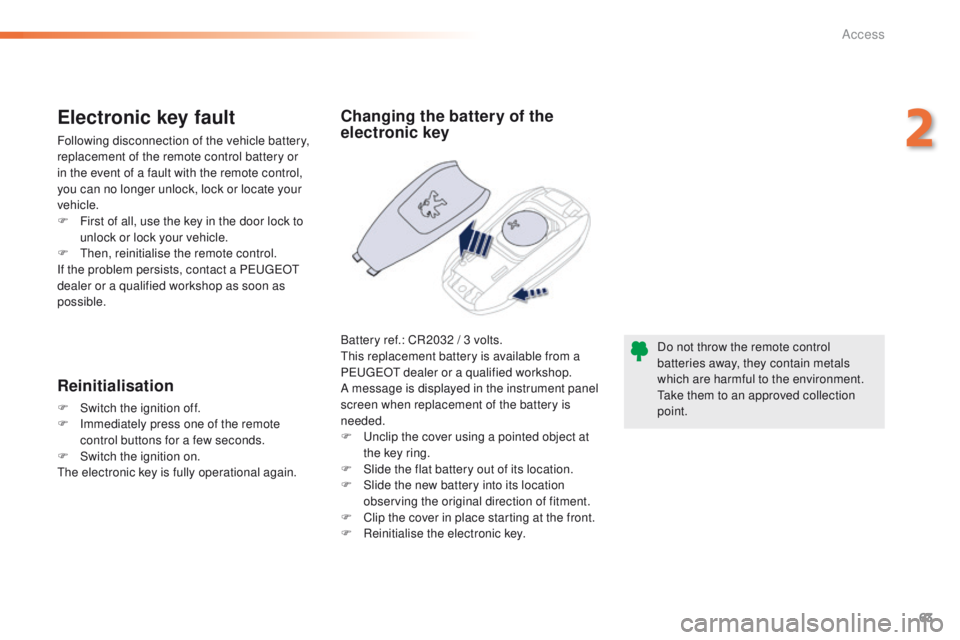
Changing the battery of the
electronic key
Battery ref.: CR2032 / 3 volts.th is replacement battery is available from a
P
e
uge
Ot
dealer or a qualified workshop.
A message is displayed in the instrument panel
screen when replacement of the battery is
needed.
F
u
n
clip the cover using a pointed object at
the key ring.
F
S
lide the flat battery out of its location.
F
S
lide the new battery into its location
observing the original direction of fitment.
F
C
lip the cover in place starting at the front.
F
R
einitialise the electronic key.
Electronic key fault
Following disconnection of the vehicle battery,
replacement of the remote control battery or
in the event of a fault with the remote control,
you can no longer unlock, lock or locate your
vehicle.
F
F
irst of all, use the key in the door lock to
unlock or lock your vehicle.
F
t
hen
, reinitialise the remote control.
If the problem persists, contact a P
e
uge
Ot
dealer or a qualified workshop as soon as
possible.
Reinitialisation
F Switch the ignition off.
F I mmediately press one of the remote
control buttons for a few seconds.
F
S
witch the ignition on.
th
e electronic key is fully operational again.
2
Access
Page 70 of 371
68
508_en_Chap02_ouvertures_ed01-2016
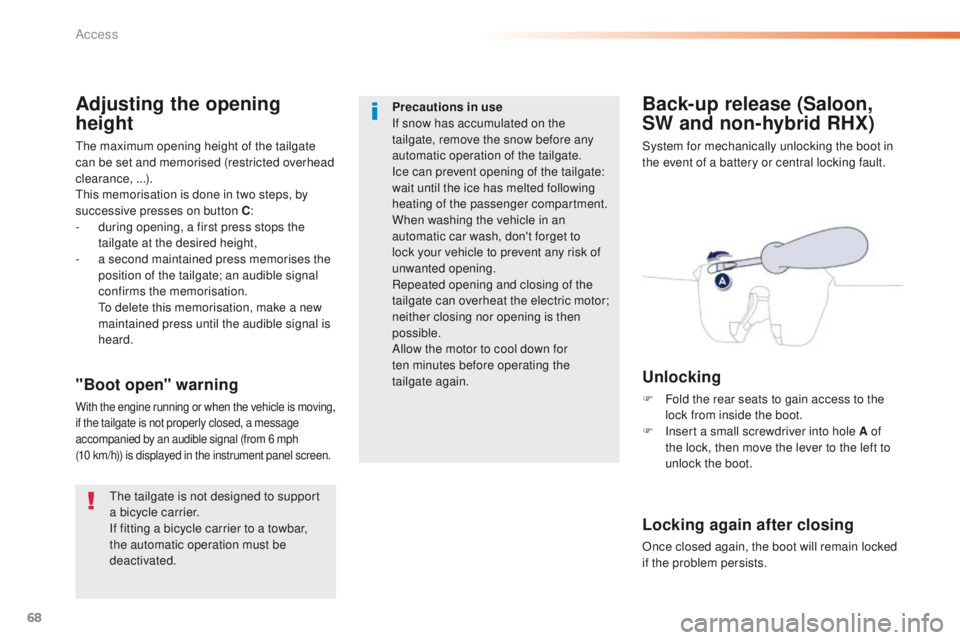
Back-up release (Saloon,
SW and non-hybrid RHX)
System for mechanically unlocking the boot in
the event of a battery or central locking fault.
Unlocking
F Fold the rear seats to gain access to the lock from inside the boot.
F
I
nsert a small screwdriver into hole A of
the lock, then move the lever to the left to
unlock the boot."Boot open" warning
With the engine running or when the vehicle is moving,
if the tailgate is not properly closed, a message
accompanied by an audible signal (from 6 mph
(10
km/h)) is displayed in the instrument panel screen.
Locking again after closing
Once closed again, the boot will remain locked
if the problem persists.
Adjusting the opening
height
the maximum opening height of the tailgate
can be set and memorised (restricted overhead
clearance, ...).
th
is memorisation is done in two steps, by
successive presses on button C :
-
d
uring opening, a first press stops the
tailgate at the desired height,
-
a s
econd maintained press memorises the
position of the tailgate; an audible signal
confirms the memorisation.
t
o d
elete this memorisation, make a new
maintained press until the audible signal is
heard.
th
e tailgate is not designed to support
a bicycle carrier.
If fitting a bicycle carrier to a towbar,
the automatic operation must be
deactivated. Precautions in use
If snow has accumulated on the
tailgate, remove the snow before any
automatic operation of the tailgate.
Ice can prevent opening of the tailgate:
wait until the ice has melted following
heating of the passenger compartment.
When washing the vehicle in an
automatic car wash, don't forget to
lock your vehicle to prevent any risk of
unwanted opening.
Repeated opening and closing of the
tailgate can overheat the electric motor;
neither closing nor opening is then
possible.
Allow the motor to cool down for
ten
minutes before operating the
tailgate again.
Access
Page 79 of 371
77
508_en_Chap03_ergonomie-et-confort_ed01-2016
Storing driving positions
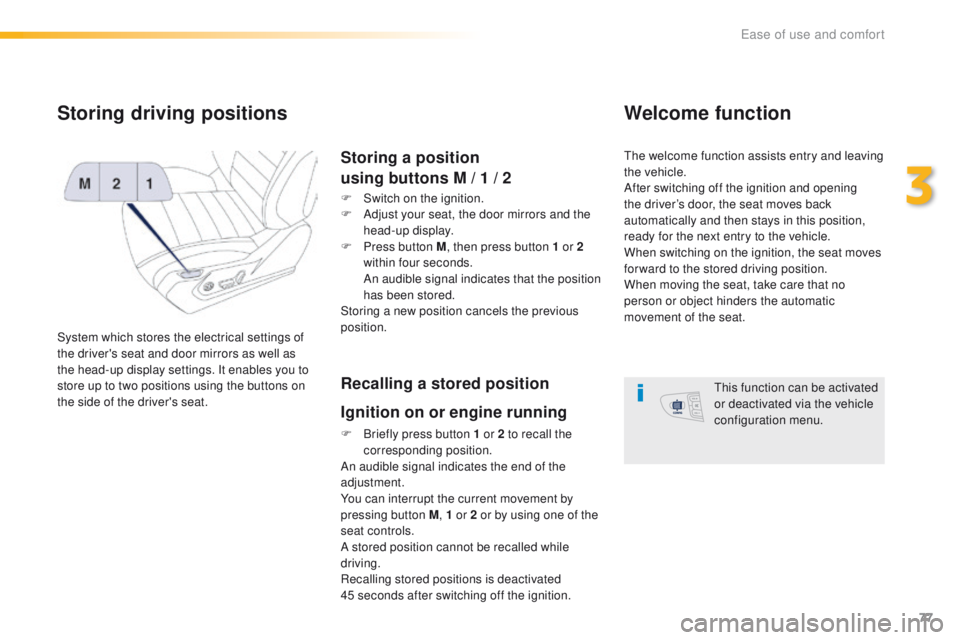
System which stores the electrical settings of
the driver's seat and door mirrors as well as
the head-up display settings. It enables you to
store up to two positions using the buttons on
the side of the driver's seat.
Storing a position
using buttons M / 1 / 2
F Switch on the ignition.
F
A djust your seat, the door mirrors and the
head-up display.
F
P
ress button M , then press button 1 or 2
within four seconds.
A
n audible signal indicates that the position
has been stored.
Storing a new position cancels the previous
position.
Recalling a stored position
Ignition on or engine running
F Briefly press button 1 or 2 to recall the corresponding position.
An audible signal indicates the end of the
adjustment.
You can interrupt the current movement by
pressing button M , 1 or 2 or by using one of the
seat controls.
A stored position cannot be recalled while
driving.
Recalling stored positions is deactivated
45
seconds after switching off the ignition.
Welcome function
the welcome function assists entry and leaving
the vehicle.
After switching off the ignition and opening
the driver’s door, the seat moves back
automatically and then stays in this position,
ready for the next entry to the vehicle.
When switching on the ignition, the seat moves
for ward to the stored driving position.
When moving the seat, take care that no
person or object hinders the automatic
movement of the seat.
th
is function can be activated
or deactivated via the vehicle
configuration menu.
3
ease of use and comfort
Page 90 of 371
88
508_en_Chap03_ergonomie-et-confort_ed01-2016
Dual-zone digital air conditioning
the air conditioning can only operate with the engine running.
Automatic operation
When the engine is cold, to prevent
too great a distribution of cold air, the
air flow will reach its optimum level
gradually.
In cold weather, it favours the
distribution of warm air to the
windscreen, side windows and footwells
o n l y.
F
P
ress this "AUTO"
button. th
e
indicator lamp comes on.
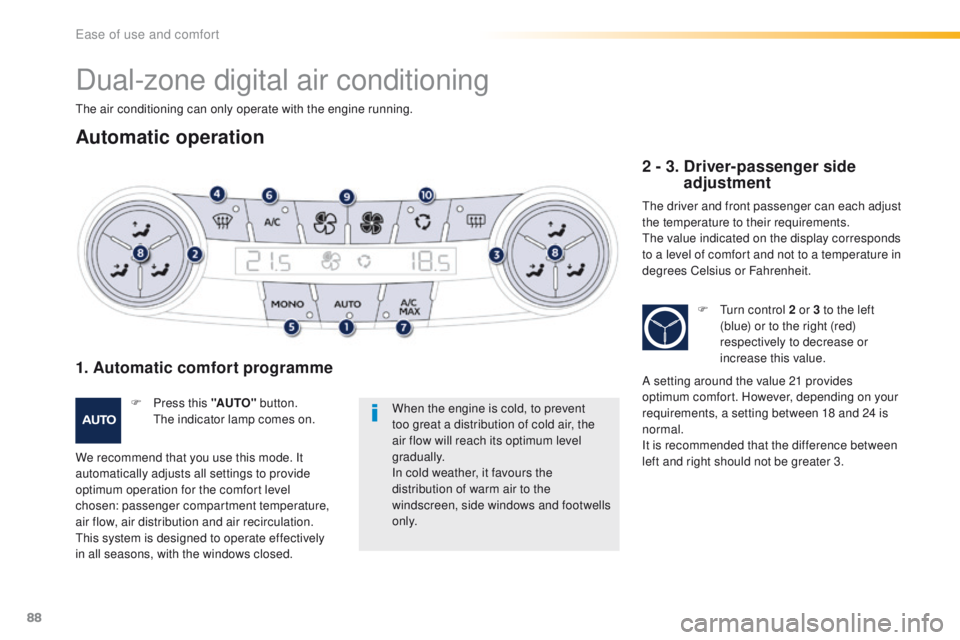
1. Automatic comfort programme
We recommend that you use this mode. It
automatically adjusts all settings to provide
optimum operation for the comfort level
chosen: passenger compartment temperature,
air flow, air distribution and air recirculation.
th
is system is designed to operate effectively
in all seasons, with the windows closed.
2 - 3. Driver-passenger side adjustment
the driver and front passenger can each adjust
the temperature to their requirements.
th
e value indicated on the display corresponds
to a level of comfort and not to a temperature in
degrees Celsius or Fahrenheit.
F
t
u
rn control 2 or 3 to the left
(blue) or to the right (red)
respectively to decrease or
increase this value.
A setting around the value 21 provides
optimum comfort. However, depending on your
requirements, a setting between 18 and 24 is
normal.
It is recommended that the difference between
left and right should not be greater 3.
ease of use and comfort
Page 91 of 371
89
508_en_Chap03_ergonomie-et-confort_ed01-2016
With Stop & Start, when demisting has
been activated, the StOP mode is not
available.
On entering the vehicle, if the interior
temperature is much colder or warmer
than the comfort value, there is no
need to change the value displayed in
order to obtain the comfort required.
th
e system corrects the difference
in temperature automatically and as
quickly as possible.
For maximum cooling or heating of the
passenger compartment, it is possible
to exceed the minimum value 14 or the
maximum value 28.
F tu rn control 2 or 3 to the left
until
"LO" is displayed or to the
right until "HI" is displayed.
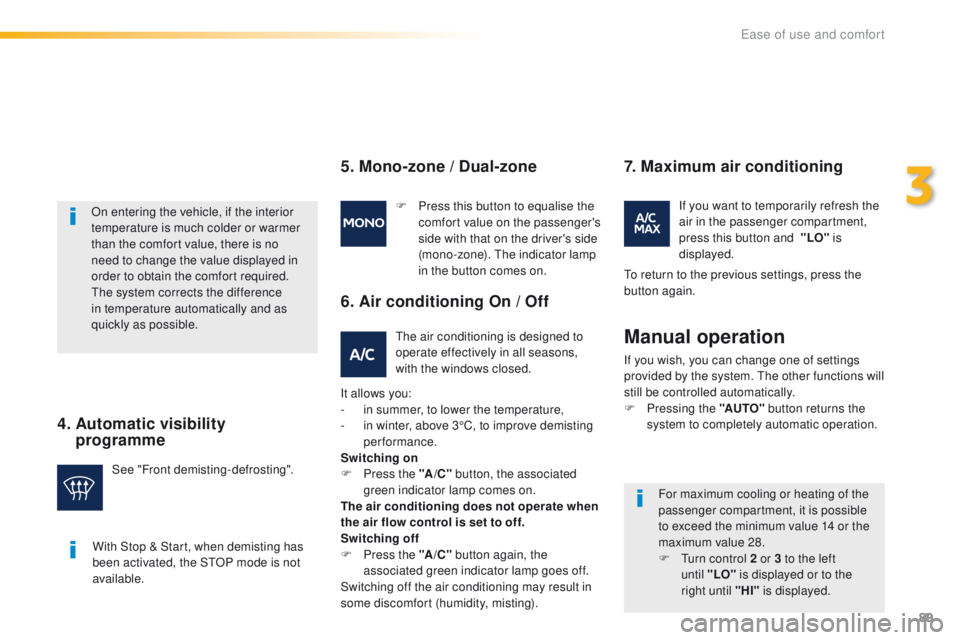
4. Automatic visibility
programme
See "Front demisting-defrosting". F
P
ress this button to equalise the
comfort value on the passenger's
side with that on the driver's side
(mono-zone). t
h
e indicator lamp
in the button comes on.
5. Mono-zone / Dual-zone
the air conditioning is designed to
operate effectively in all seasons,
with the windows closed.
6. Air conditioning On / Off
It allows you:
-
i n summer, to lower the temperature,
-
i
n winter, above 3°C, to improve demisting
performance.
Switching on
F
P
ress the " A/C" button, the associated
green indicator lamp comes on.
The air conditioning does not operate when
the air flow control is set to off.
Switching off
F
P
ress the "A /C " button again, the
associated green indicator lamp goes off.
Switching off the air conditioning may result in
some discomfort (humidity, misting). If you want to temporarily refresh the
air in the passenger compartment,
press this button and
"LO" is
displayed.
7. Maximum air conditioning
to return to the previous settings, press the
button again.
Manual operation
If you wish, you can change one of settings
provided by the system. th e other functions will
still be controlled automatically.
F
P
ressing the "AUTO" button returns the
system to completely automatic operation.
3
ease of use and comfort
Page 93 of 371
91
508_en_Chap03_ergonomie-et-confort_ed01-2016
Quad-zone digital air conditioning
Automatic operation
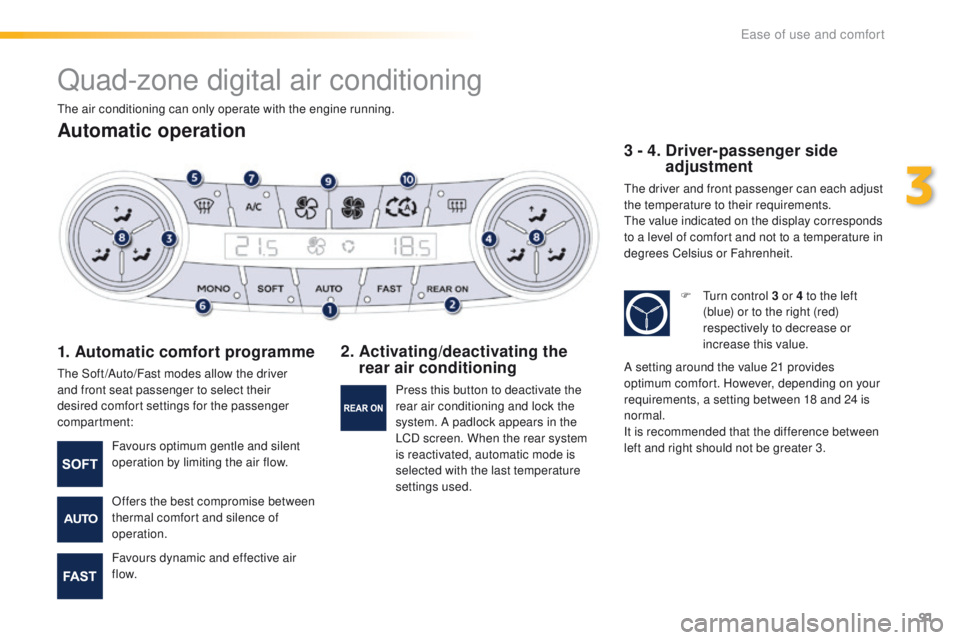
1. Automatic comfort programme
the Soft /Auto/Fast modes allow the driver
and front seat passenger to select their
desired comfort settings for the passenger
compartment:
2. Activating/deactivating the rear air conditioning 3 - 4.
D
river-passenger side
adjustment
the driver and front passenger can each adjust
the temperature to their requirements.
th
e value indicated on the display corresponds
to a level of comfort and not to a temperature in
degrees Celsius or Fahrenheit.
Favours optimum gentle and silent
operation by limiting the air flow.
Offers the best compromise between
thermal comfort and silence of
operation.
Favours dynamic and effective air
f low. Press this button to deactivate the
rear air conditioning and lock the
system. A padlock appears in the
LCD screen. When the rear system
is reactivated, automatic mode is
selected with the last temperature
settings used. F
t
u
rn control 3 or 4 to the left
(blue) or to the right (red)
respectively to decrease or
increase this value.
A setting around the value 21 provides
optimum comfort. However, depending on your
requirements, a setting between 18 and 24 is
normal.
It is recommended that the difference between
left and right should not be greater 3.
th
e air conditioning can only operate with the engine running.
3
ease of use and comfort