Page 193 of 364

191
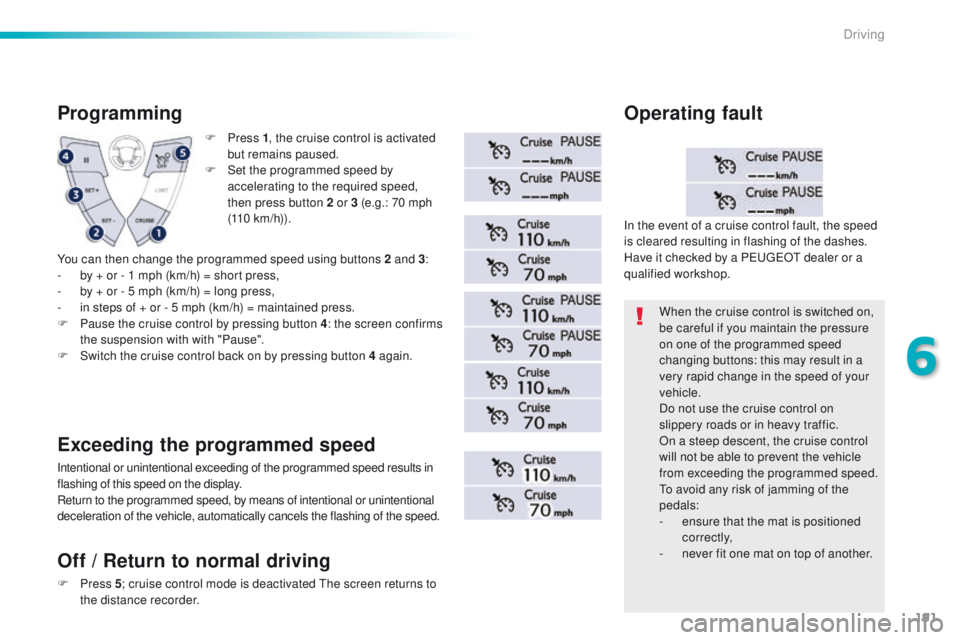
F Press 1, t he cruise control is activated
but remains paused.
F
S
et the programmed speed by
accelerating to the required speed,
then press button 2 or 3 (e.g.: 70 mph
(110
km/h)).
Programming
You can then change the programmed speed using buttons 2 and 3 :
- b y + or - 1 mph (km/h) = short press,
-
b
y + or - 5 mph (km/h) = long press,
-
i
n steps of + or - 5 mph (km/h) = maintained press.
F
P
ause the cruise control by pressing button 4 : the screen confirms
the suspension with with "Pause".
F
S
witch the cruise control back on by pressing button 4 again.
Exceeding the programmed speed
Intentional or unintentional exceeding of the programmed speed results in
flashing of this speed on the display.
Return to the programmed speed, by means of intentional or unintentional
deceleration of the vehicle, automatically cancels the flashing of the speed. When the cruise control is switched on,
be careful if you maintain the pressure
on one of the programmed speed
changing buttons: this may result in a
very rapid change in the speed of your
vehicle.
Do not use the cruise control on
slippery roads or in heavy traffic.
On a steep descent, the cruise control
will not be able to prevent the vehicle
from exceeding the programmed speed.
to a
void any risk of jamming of the
pedals:
-
e
nsure that the mat is positioned
c o r r e c t l y,
-
n
ever fit one mat on top of another.
In the event of a cruise control fault, the speed
is cleared resulting in flashing of the dashes.
Have it checked by a P
e
uge
Ot
dealer or a
qualified workshop.
Operating fault
Off
/ Return to normal driving
F Press 5; c ruise control mode is deactivated th e screen returns to
the distance recorder.
6
Driving
Page 194 of 364

192
Memorising speeds
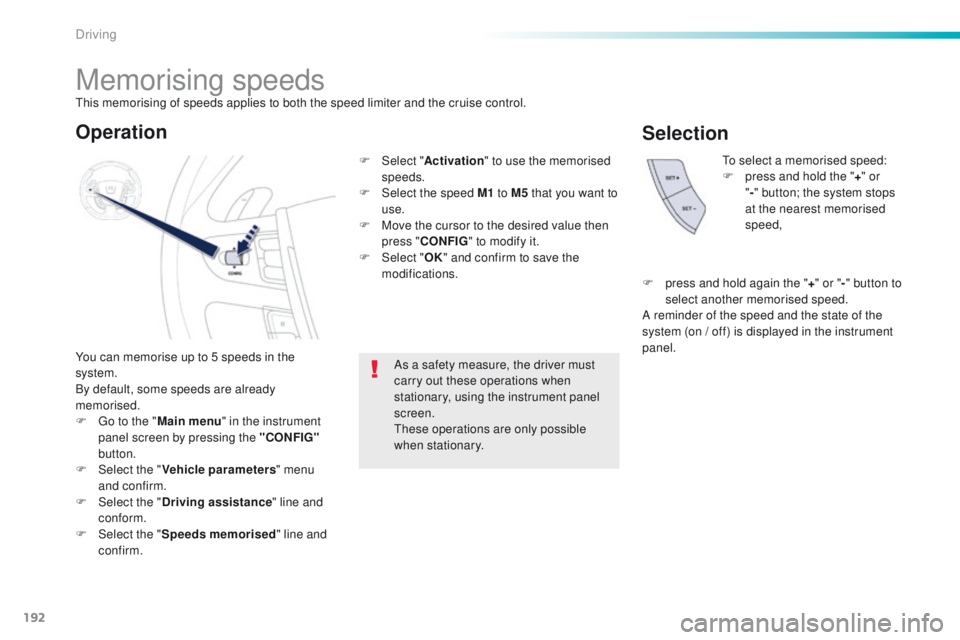
You can memorise up to 5 speeds in the
system.
By default, some speeds are already
memorised.
F g
o t
o the "Main menu " in the instrument
panel screen by pressing the "CONFIG"
button.
F
Sel
ect the " Vehicle parameters " menu
and confirm.
F
Sel
ect the " Driving assistance " line and
conform.
F
Sel
ect the " Speeds memorised " line and
confirm.
to
select a memorised speed:
F
p
ress and hold the "
+" or
" - " button; the system stops
at the nearest memorised
speed,
As a safety measure, the driver must
carry out these operations when
stationary, using the instrument panel
screen.
th
ese operations are only possible
when stationary.
Operation
F Select " Activation" to use the memorised
speeds.
F
Sel
ect the speed M1 to M5 that you want to
use.
F
M
ove the cursor to the desired value then
press " CONFIG " to modify it.
F
Sel
ect "OK" and confirm to save the
modifications.
Selection
F press and hold again the "+ " or " -" button to
select another memorised speed.
A reminder of the speed and the state of the
system (on
/ off) is displayed in the instrument
panel.
th
is memorising of speeds applies to both the speed limiter and the cruise control.
Driving
Page 195 of 364

193
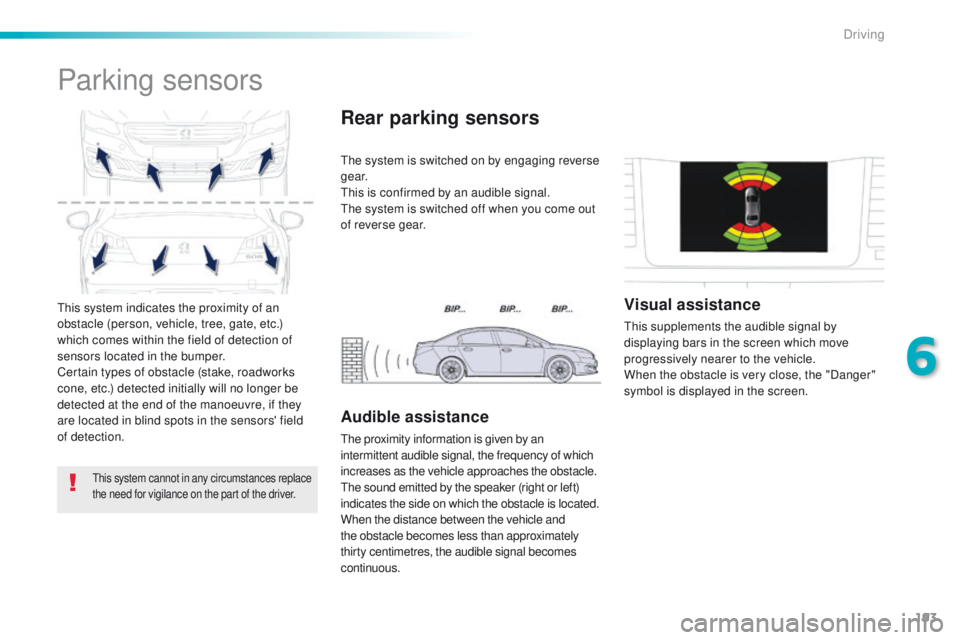
this system indicates the proximity of an
obstacle (person, vehicle, tree, gate, etc.)
which comes within the field of detection of
sensors located in the bumper.
Certain types of obstacle (stake, roadworks
cone, etc.) detected initially will no longer be
detected at the end of the manoeuvre, if they
are located in blind spots in the sensors' field
of detection.
Parking sensors
this system cannot in any circumstances replace
the need for vigilance on the part of the driver.
the system is switched on by engaging reverse
g e a r.
th
is is confirmed by an audible signal.
th
e system is switched off when you come out
of reverse gear.
Rear parking sensors
Audible assistance
the proximity information is given by an
intermittent audible signal, the frequency of which
increases as the vehicle approaches the obstacle.
th
e sound emitted by the speaker (right or left)
indicates the side on which the obstacle is located.
When the distance between the vehicle and
the obstacle becomes less than approximately
thirty centimetres, the audible signal becomes
continuous.
Visual assistance
this supplements the audible signal by
displaying bars in the screen which move
progressively nearer to the vehicle.
When the obstacle is very close, the "Danger"
symbol is displayed in the screen.
6
Driving
Page 197 of 364
195
In bad weather or in winter, ensure
that the sensors are not covered with
mud, ice or snow. When reverse gear is
engaged, an audible signal (long beep)
indicates that the sensors may be dirty.
Certain sound sources (motorcycle,
lorry, pneumatic drill, etc.) may trigger
the audible signals of the parking
sensor system.In the event of a malfunction of
the system, when reverse gear
is engaged this warning lamp is
Operating fault
displayed in the instrument panel and/or a
message appears in the screen, accompanied
by an audible signal (short beep).
Contact a P
e
uge
Ot
dealer or a qualified
workshop.
6
Driving
Page 201 of 364

199
Reversing camera
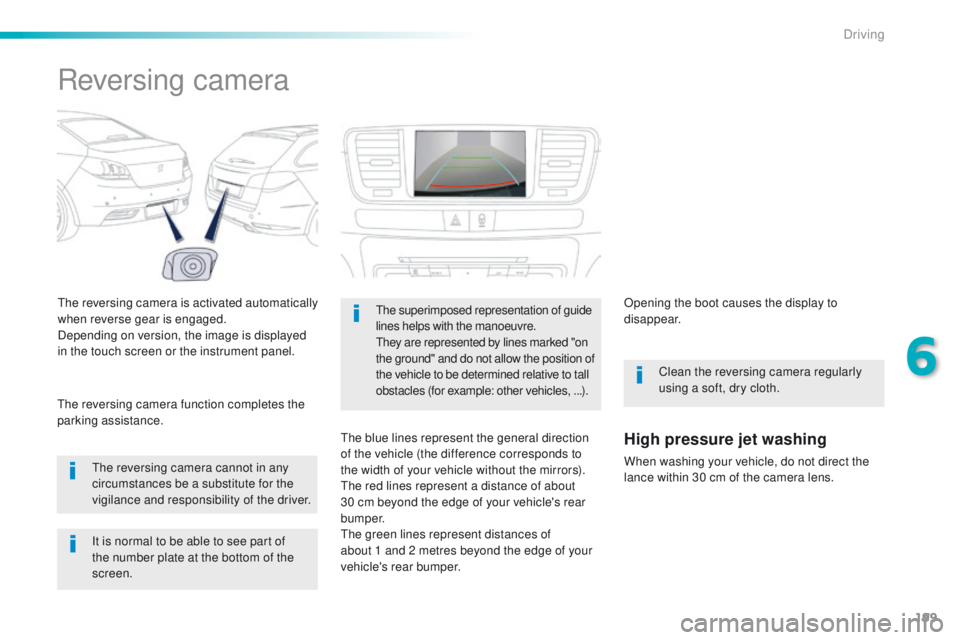
the reversing camera is activated automatically
when reverse gear is engaged.
Depending on version, the image is displayed
in the touch screen or the instrument panel.
th
e reversing camera cannot in any
circumstances be a substitute for the
vigilance and responsibility of the driver.
th
e reversing camera function completes the
parking assistance.the superimposed representation of guide
lines helps with the manoeuvre.
th
ey are represented by lines marked "on
the ground" and do not allow the position of
the vehicle to be determined relative to tall
obstacles (for example: other vehicles,
...).
the blue lines represent the general direction
of the vehicle (the difference corresponds to
the width of your vehicle without the mirrors).
th
e red lines represent a distance of about
30 cm beyond the edge of your vehicle's rear
b u m p e r.
th
e green lines represent distances of
about 1
and 2 metres beyond the edge of your
vehicle's rear bumper. Opening the boot causes the display to
disappear.
Clean the reversing camera regularly
using a soft, dry cloth.High pressure jet washing
When washing your vehicle, do not direct the
lance within 30 cm of the camera lens.
It is normal to be able to see part of
the number plate at the bottom of the
screen.
6
Driving
Page 279 of 364
277
7-inch touch screen
GPS satellite navigation - Multimedia audio - Bluetooth® telephone
Contents
First steps
2 78
Steering mounted controls
2
80
Menus
281
Media
282
Radio
288
DAB (Digital Audio Broadcasting) radio
2
90
Music
292
Navigation
296
Navigation -
g
u
idance
3
04
Traffic
3
08
Configuration
3
10
Connected services
3
18
P
e
uge
Ot
Connect Apps
3
19
te
lephone
320
Frequently asked questions
3
28
th
e system is protected in such a way that it will only operate in
your vehicle. As a safety measure, the driver should only carry out operations
which require prolonged attention while the vehicle is stationary.
th
e display of an energy economy mode message signals that
electrical systems operating are going into standby.
Refer to the energy economy mode section.
.
Audio and telematics
Page 280 of 364
278
First steps
use the buttons below the touch screen for
access to the menus, then press the virtual
buttons in the touch screen.
ea
ch menu is displayed in one or two pages
(primary page and secondary page).
Secondary page
Primary page In very hot conditions, the system may
go into stand-by (screen and sound
completely off) for a minimum period of
5 minutes.
Audio and telematics
Page 282 of 364
280
Steering mounted controls
Press: open the instrument panel
screen menu.
Rotate: navigate in the instrument
panel screen menu.
Increase volume.
Reduce volume.Media: change the multimedia
source.
te
lephone: start call.
Call in progress: open the telephone
men (
en
d call, Secret mode, Hands-
free mode).
te
lephone, press and hold: reject an
incoming call, end a call; other than
call in progress, open the telephone
menu. Radio, rotate: automatic search for
the previous
/ next station.
Media, rotate: previous
/ next track.
Press: confirm a selection.
Mute/ restore sound. Display the carousel of menus.
Radio: display the list of stations.
Media: display the list of tracks.
Radio, press and hold: update the list
of stations received.
Audio and telematics