2016 Peugeot 508 Hybrid engine oil
[x] Cancel search: engine oilPage 221 of 424

219
508_en_Chap07_info-pratiques_ed01-2016
Power steering fluid level
the power steering fluid level should
be close to the "MA X" mark. With
the engine cold, unscrew the cap to
check the level.
th
e brake fluid level should be close
to the "MA X" mark. If it is not, check
the brake pad wear.
Brake fluid level
Changing the fluid
Refer to the manufacturer's service schedule
for details of the interval for this operation.
Fluid specification
the brake fluid must conform to the
manufacturer's recommendations.
Topping-up the engine oil level
the location of the oil filler cap is shown in the
corresponding underbonnet layout view.
F
u
n
screw the oil filler cap to reveal the filler
aperture.
F
A
dd oil in small quantities, avoiding any
spills on engine components (risk of fire).
F
W
ait a few minutes before checking the
level again using the dipstick.
F
A
dd more oil if necessary.
F
A
fter checking the level, carefully refit the
oil filler cap and the dipstick in its tube.
After topping-up the oil, the check when
switching on the ignition with the oil level
indicator in the instrument panel is not valid
during the 30 minutes after topping up.
Engine oil change
Refer to the manufacturer's service schedule
for details of the interval for this operation.
In order to maintain the reliability of the engine
and emission control system, never use
additives in the engine oil.
7
Practical information
Page 222 of 424

220
508_en_Chap07_info-pratiques_ed01-2016
Coolant level
the coolant level should be close
to the "MA X" mark but should never
exceed it.
In addition, as the cooling system is pressurised,
wait at least one hour after switching off the engine
before carrying out any work.
to a
void any risk of scalding, unscrew the cap by
two turns to allow the pressure to drop. When the
pressure has dropped, remove the cap and top up
the level.
Changing the coolant
the coolant does not have to be replaced at routine services.
Fluid specification
the coolant must conform to the
manufacturer's recommendations.
Fluid specification
For optimum cleaning and to avoid freezing,
this fluid must not be topped up with or
replaced with plain water.
Screenwash and headlamp
wash fluid
In the case of vehicles fitted with
headlamp washers, the low fluid level
is indicated by an audible signal and
a message in the instrument panel
screen.
Avoid prolonged contact of used oil or
fluids with the skin.
Most of these fluids are harmful to
health or indeed very corrosive.
Do not discard used oil or fluids into
sewers or onto the ground.
ta
ke used oil to a P
e
uge
Ot
dealer or
a qualified workshop (France) or to an
authorised waste disposal site.
Used products
A low additive level is indicated by illumination
of this warning lamp, accompanied by an
audible warning and a message in the
instrument panel screen.
Diesel additive level (Diesel
engine with particle filter)
When the engine is warm, the temperature of
the coolant is regulated by the fan.
to
p up the reservoir when you next stop
the
vehicle.
In wintry conditions, the use of an
ethyl alcohol or methanol base fluid is
recommended.
The cooling fan may star t after
switching off the engine: take care
with articles and clothing that might
be caught by the fan blades.
To p p i n g u p
this additive must be topped up by a
Pe
ugeOt dealer or a qualified workshop
without delay.
Practical information
Page 223 of 424

221
508_en_Chap07_info-pratiques_ed01-2016
Checks
12 V battery
the battery does not require any
maintenance.
However, check regularly that the
terminals are correctly tightened (versions
without quick release terminals) and that
the connections are clean.Refer to the manufacturer's
service schedule for details of the
replacement intervals for these
components.
Air filter and passenger compartment filter
Replace the oil filter each time the
engine oil is changed.
Refer to the manufacturer's
service schedule for details of
the replacement interval for this
component.
Oil filter
Versions equipped with Stop & Start are
fitted with a 12 V lead-acid battery of specific
technology and specification.
Its replacement should be carried out only by a
P
e
uge
Ot
dealer or a qualified workshop.
Particle filter (Diesel)
the start of saturation of the particle
filter is indicated by the temporary
As soon as the traffic conditions permit,
regenerate the filter by driving at a speed
of at least 40 mph (60 km/h) until the
warning lamp goes off.
If the warning lamp stays on, this
indicates a low additive level.
For more information on checking levels,
refer to the corresponding section.
On a new vehicle, the first particle
filter regeneration operations may be
accompanied by a "burning" smell,
which is per fectly normal.
Following prolonged operation of the
vehicle at very low speed or at idle,
you may, in exceptional circumstances,
notice the emission of water vapour at
the exhaust on acceleration.
t
h
is does
not affect the behaviour of the vehicle
or the environment.
un
less otherwise indicated, check these components in accordance with the manufacturer's service schedule and according to your engine.
Other wise, have them checked by a P
e
uge
Ot
dealer or a qualified workshop.
When carrying out any operation on the 12 V
battery, refer to the corresponding section for
details of the precautions to be taken before
starting work. Depending on the environment (e.g. dusty
atmosphere) and the use of the vehicle
(e.g.
city driving), replace them twice as often
if necessary .
A clogged passenger compartment filter may
have an adverse effect on the per formance
of the air conditioning system and generate
undesirable odours. illumination of this warning lamp accompanied
by a message in the multifunction screen.
7
Practical information
Page 233 of 424

231
508_en_Chap08_en-cas-de-pannes_ed01-2016
Repair procedure
1. SealingF uncoil the white pipe G fully.
F un screw the cap from the white pipe.
F
C
onnect the white pipe to the valve of the
tyre to be repaired. F
C onnect the compressor's electric plug to
the vehicle's 12 V socket.
F
S
tart the vehicle and leave the engine
running.
ta
ke care, this product is harmful if
swallowed and causes irritation to the
eyes.
Keep this product out of the reach of
children.
Avoid removing any foreign bodies
which have penetrated into the tyre.
Do not start the compressor before
connecting the white pipe to the tyre
valve: the sealant product would be
expelled through the pipe.
F
S
witch off the ignition.
F
t
u
rn the selector A to the "sealant"
position.
F
C
heck that the switch B is in
position "O" .
8
In the event of a breakdown
Page 235 of 424

233
508_en_Chap08_en-cas-de-pannes_ed01-2016
2. InflationF Connect the compressor's electric plug to the vehicle's 12 V socket.
F
S
tart the vehicle again and leave the
engine running. F
A djust the pressure using the compressor
(to inflate: switch B in position "I" ; to
deflate: switch B
in position "O" and press
button C ), in accordance with the vehicle's
tyre pressure label (located on the left
hand door aperture).
A l
oss of pressure indicates that the
puncture has not been fully plugged;
contact a P
e
uge
Ot
dealer or qualified
workshop for assistance.
F
R
emove and stow the kit.
F
D
rive at reduced speed (50 mph [80 km/h]
max) limiting the distance travelled to
approximately 120 miles (200 km).
As soon as possible, go to a P
e
uge
Ot
dealer or a qualified workshop.
You must inform the technician that you
have used this kit. After inspection, the
technician will advise you on whether
the tyre can be repaired or if it must be
replaced.
F
t
u
rn the selector A to the "Air"
position.
F
u
n
coil the black pipe H fully.
F
C
onnect the black pipe to the
valve of the wheel.
8
In the event of a breakdown
Page 236 of 424

234
508_en_Chap08_en-cas-de-pannes_ed01-2016
Removing the cartridge
F Stow the black pipe.
F D etach the angled base from the white pipe.
F
S
upport the compressor vertically.
F
u
n
screw the cartridge from the bottom.
Beware of discharges of fluid.
th
e expiry date of the fluid is indicated
on the cartridge.
th
e sealant cartridge is designed for
single use; even if only partly used, it
must be replaced.
After use, do not discard the cartridge
into the environment, take it to an
authorised waste disposal site or a
P
e
uge
Ot d
ealer.
Do not forget to obtain a new sealant
cartridge, available from P
e
uge
Ot
dealers or from a qualified workshop.
Checking tyre pressures / inflating accessories
You can also use the compressor, without
injecting any product, to:
-
c
heck or adjust the pressure of your tyres,
-
i
nflate other accessories (balls, bicycle
tyres...).
F
t
u
rn the selector A to the "Air"
position.
F
u
n
coil the black pipe H fully.
F
C
onnect the black pipe to the
valve of the wheel or accessory.
I
f necessary, fit one of the adaptors
supplied with the kit first. F
C onnect the compressor's electrical
connector to the vehicle's 12 V socket.
F
S
tart the vehicle and let the engine run.
F
A
djust the pressure using the compressor
(to inflate: switch B in position "I" ; to
deflate: switch B in position "O" and press
button C ), according to the vehicle's tyre
pressure label or the accessory's pressure
label.
F
R
emove the kit then stow it.
In the event of a breakdown
Page 266 of 424

264
508_en_Chap09_caracteristiques-techniques_ed01-2016
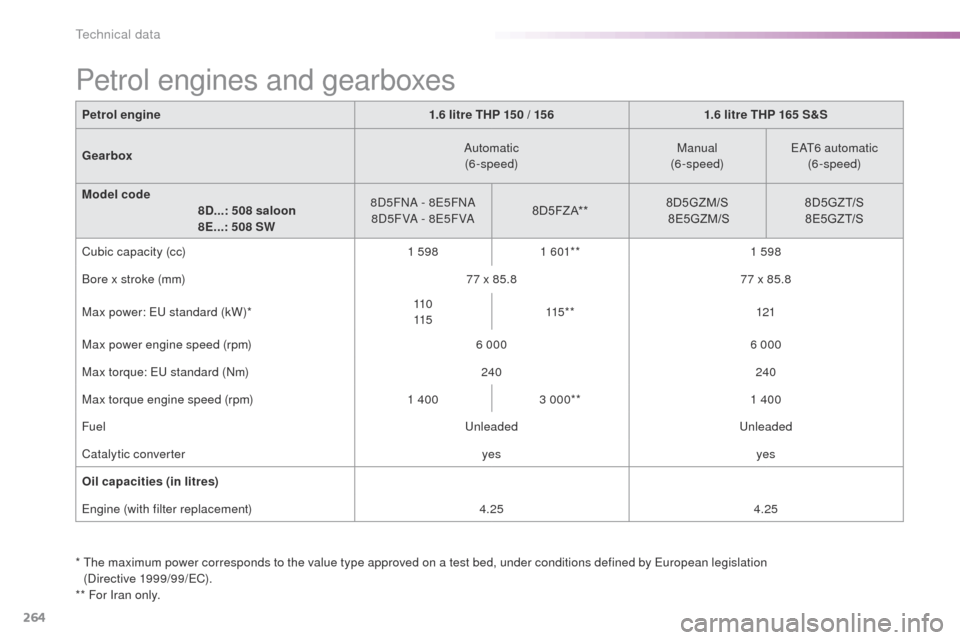
Petrol engine1.6 litre THP 15 0 / 15 61.6 litre THP 165 S&S
Gearbox Automatic
(6-speed) Manual
(6-speed)
eAt6
automatic
(6-speed)
Model code
8D...: 508 saloon
8E...: 508 SW 8D5FNA - 8
e5
FNA
8 D5 F VA - 8
e5
F VA8 D 5 F Z A* * 8D5GZM/S
8E5GZM/S 8 D5G Z T/S
8E5GZT/S
Cubic capacity (cc) 1 5981 6 01* * 1 598
Bore x stroke (mm) 77 x 85.877 x 85.8
Max power:
eu standard (kW)* 11 0
115 115 * *
121
Max power engine speed (rpm) 6 0006 000
Max torque:
eu standard (Nm) 240240
Max torque engine speed (rpm) 1 4003 000** 1 400
Fuel
u
nleaded
u
nleaded
Catalytic converter yesyes
Oil capacities (in litres)
eng
ine (with filter replacement) 4.254.25
Petrol engines and gearboxes
* the maximum power corresponds to the value type approved on a test bed, under conditions defined by eu ropean legislation
(Directive 1999/99/eC ).
** For Iran only.
technical data
Page 268 of 424

266
508_en_Chap09_caracteristiques-techniques_ed01-2016
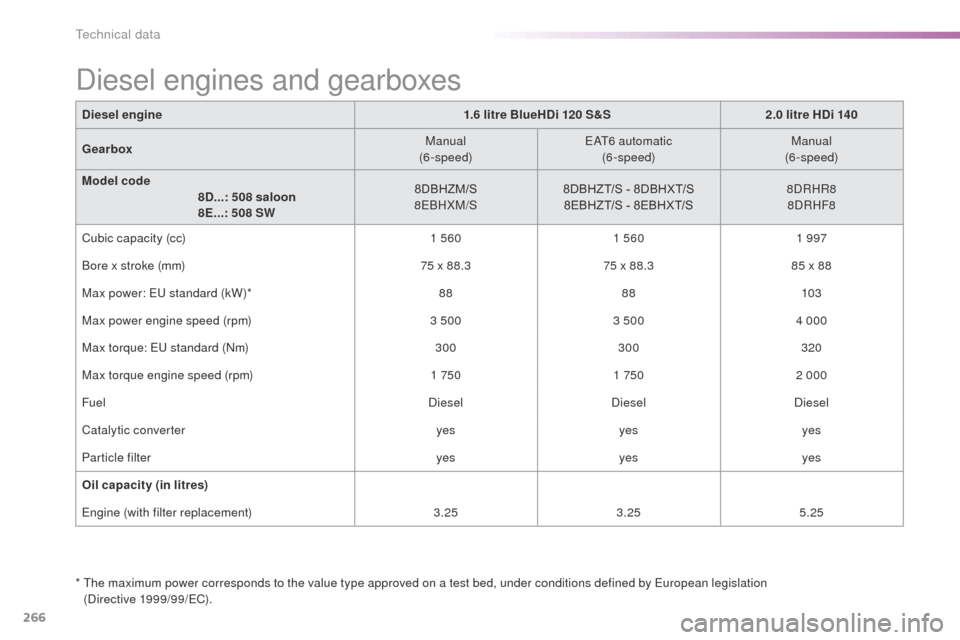
Diesel engine1.6 litre BlueHDi 120 S&S2.0 litre HDi 140
Gearbox Manual
(6-speed)
eAt6
automatic
(6-speed) Manual
(6-speed)
Model code
8D...: 508 saloon
8E...: 508 SW 8DBHZM/S
8
eB
HXM/S8DBHZT/S - 8DBHXT/S
8EBHZT/S - 8EBHXT/S 8DRHR8
8DRHF8
Cubic capacity (cc) 1 5601 560 1 997
Bore x stroke (mm) 75 x 88.375 x 88.3 85 x 88
Max power:
eu standard (kW)* 8888103
Max power engine speed (rpm) 3 5003 5004 000
Max torque:
eu standard (Nm) 300300 320
Max torque engine speed (rpm) 1 7501 7502 000
Fuel DieselDieselDiesel
Catalytic converter yesyesyes
Particle filter yesyesyes
Oil capacity (in litres)
eng
ine (with filter replacement) 3.253.25 5.25
Diesel engines and gearboxes
* the maximum power corresponds to the value type approved on a test bed, under conditions defined by eu ropean legislation
(Directive 1999/99/eC ).
technical data