Page 64 of 364
62
5008_en_Chap03_confort_ed01-2015
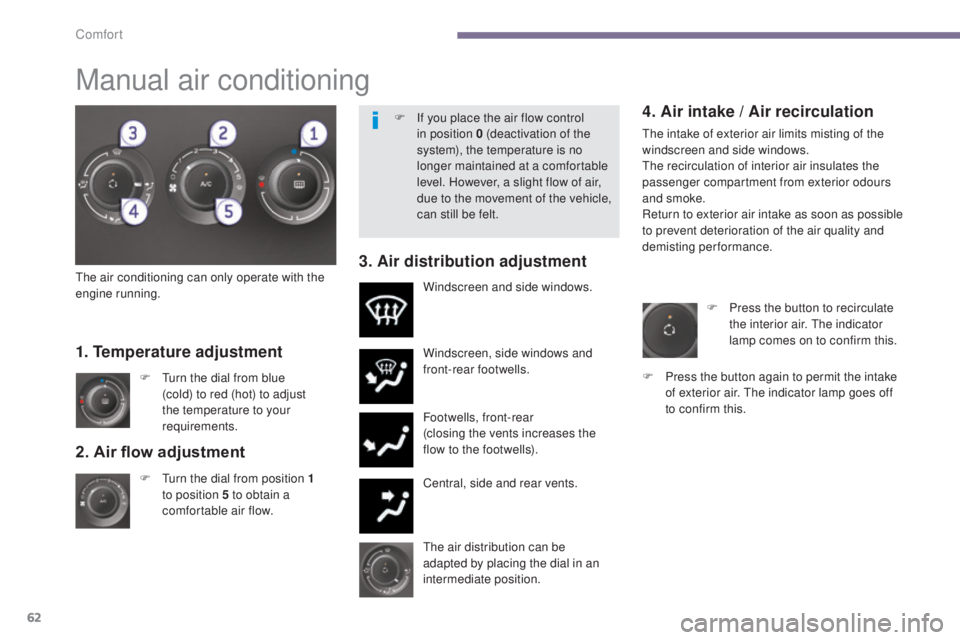
2. Air flow adjustment
F Turn the dial from position 1
to position 5 to obtain a
comfortable air flow. Windscreen, side windows and
front-rear footwells.
Footwells, front-rear
(closing the vents increases the
flow to the footwells).
Central, side and rear vents.
F
T
urn the dial from blue
(cold) to red (hot) to adjust
the temperature to your
requirements. Windscreen and side windows.
1. Temperature adjustment
The air distribution can be
adapted by placing the dial in an
intermediate position.
The air conditioning can only operate with the
engine running.
4. Air intake / Air recirculation
The intake of exterior air limits misting of the
windscreen and side windows.
The recirculation of interior air insulates the
passenger compartment from exterior odours
and smoke.
Return to exterior air intake as soon as possible
to prevent deterioration of the air quality and
demisting performance.
3. Air distribution adjustment
F Press the button to recirculate
the interior air. The indicator
lamp comes on to confirm this.
F
P
ress the button again to permit the intake
of exterior air. The indicator lamp goes off
to confirm this.
Manual air conditioning
F If you place the air flow control in position 0 (deactivation of the
system), the temperature is no
longer maintained at a comfortable
level. However, a slight flow of air,
due to the movement of the vehicle,
can still be felt.
Comfort
Page 69 of 364
67
5008_en_Chap03_confort_ed01-2015
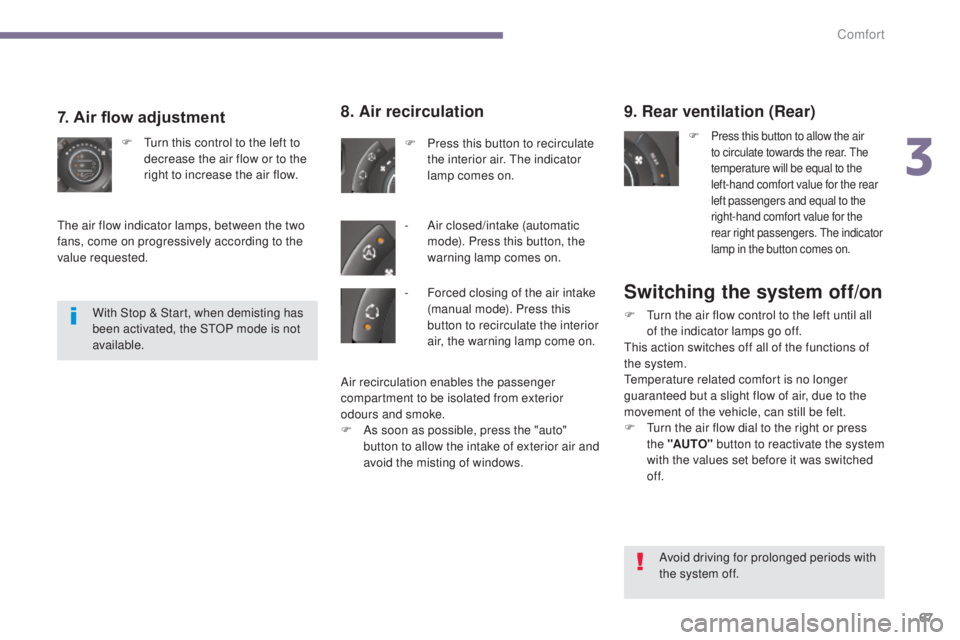
Switching the system off/on
F Turn the air flow control to the left until all of the indicator lamps go off.
This action switches off all of the functions of
the system.
Temperature related comfort is no longer
guaranteed but a slight flow of air, due to the
movement of the vehicle, can still be felt.
F
T
urn the air flow dial to the right or press
the "AUTO" button to reactivate the system
with the values set before it was switched
of f.
9. Rear ventilation (Rear)
F Press this button to allow the air
to circulate towards the rear. The
temperature will be equal to the
left-hand comfort value for the rear
left passengers and equal to the
right-hand comfort value for the
rear right passengers. The indicator
lamp in the button comes on.
8. Air recirculation
F Press this button to recirculate the interior air. The indicator
lamp comes on.
-
A
ir closed/intake (automatic
mode). Press this button, the
warning lamp comes on.
7. Air flow adjustment
F Turn this control to the left to decrease the air flow or to the
right to increase the air flow.
The air flow indicator lamps, between the two
fans, come on progressively according to the
value requested.
With Stop & Start, when demisting has
been activated, the STOP mode is not
available.
Avoid driving for prolonged periods with
the system off.
-
F
orced closing of the air intake
(manual mode). Press this
button to recirculate the interior
air, the warning lamp come on.
Air recirculation enables the passenger
compartment to be isolated from exterior
odours and smoke.
F
A
s soon as possible, press the "auto"
button to allow the intake of exterior air and
avoid the misting of windows.
3
Comfort
Page 75 of 364
73
5008_en_Chap03_confort_ed01-2015
2nd row seats
Forwards-backwards adjustment
Lift the control A, located at the front of the
seat, then adjust the seat to the position
desired.
"Comfort" position
The three 2nd row seats are independent of
each other and all the same width. They all
have a "comfort" position.
Placing a seat in the "comfort"
position
F Pull on the control B and guide the seat rearwards.
The backrest reclines and the seat base moves
forward slightly.
Returning the seat to the initial
position
F Pull on the control B and allow the seat to come forwards.
Always supervise any movements of
seats by children.
3
Comfort
Page 76 of 364
74
5008_en_Chap03_confort_ed01-2015
Flat floor
Each seat can be folded onto the floor to
enable you to modify your vehicle’s interior
space.
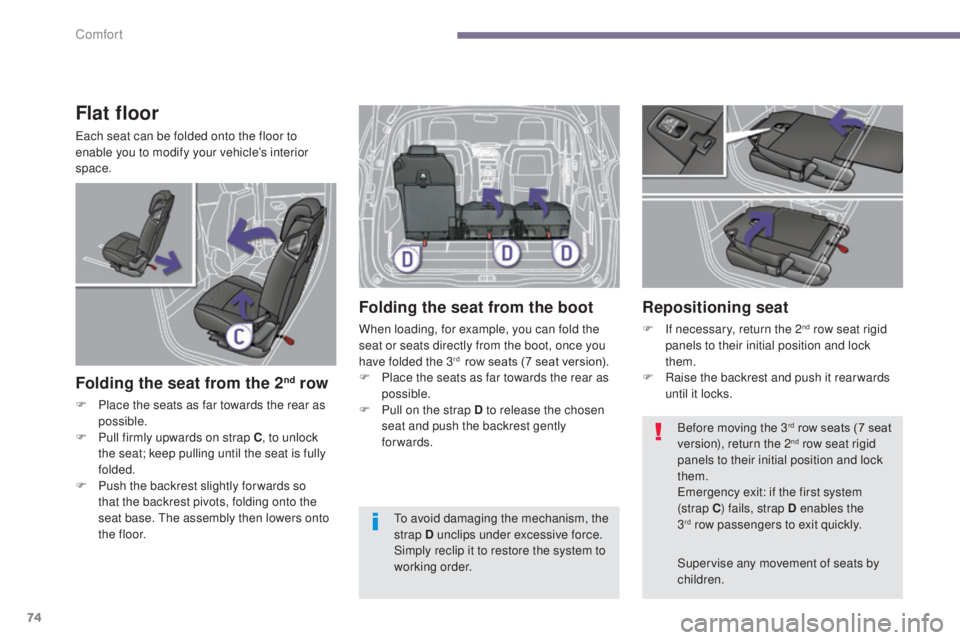
Folding the seat from the 2nd row
F Place the seats as far towards the rear as possible.
F
P
ull firmly upwards on strap C , to unlock
the seat; keep pulling until the seat is fully
folded.
F
P
ush the backrest slightly for wards so
that the backrest pivots, folding onto the
seat base. The assembly then lowers onto
t h e
f l o o r.
Folding the seat from the boot
When loading, for example, you can fold the
seat or seats directly from the boot, once you
have folded the 3
rd row seats (7 seat version).
F
P
lace the seats as far towards the rear as
possible.
F
P
ull on the strap D to release the chosen
seat and push the backrest gently
forwards.
Repositioning seat
F If necessary, return the 2nd row seat rigid
panels to their initial position and lock
them.
F
R
aise the backrest and push it rear wards
until it locks.
Supervise any movement of seats by
children. Before moving the 3
rd row seats (7 seat
version), return the 2nd row seat rigid
panels to their initial position and lock
them.
Emergency exit: if the first system
(strap C ) fails, strap D enables the
3
rd row passengers to exit quickly.
T
o avoid damaging the mechanism, the
strap D unclips under excessive force.
Simply reclip it to restore the system to
working order.
Comfort
Page 82 of 364
80
5008_en_Chap03_confort_ed01-2015
Adjustment
F Adjust the mirror so that the glass is directed correctly in the "day" position.
Manual day/night model
Day / night position
F Pull the lever to change to the "night" anti-dazzle position.
F
P
ush the lever to change to the normal
"day" position.
Rear view mirror
Adjustable mirror providing a central rearward
view.
Equipped with an anti-dazzle system, which
darkens the mirror glass and reduces the
nuisance to the driver caused by the sun,
headlamps from other vehicles...Automatic day/night model
By means of a sensor, which measures the
light from the rear of the vehicle, this system
automatically and progressively changes
between the day and night uses.
In order to ensure optimum visibility
during your manoeuvres, the mirror
lightens automatically when reverse
gear is engaged.
Comfort
Page 84 of 364
82
5008_en_Chap04_visibilite_ed01-2015
Lighting controls
Main lighting
The various front and rear lamps of the vehicle
are designed to adapt the lighting progressively
in relation to the climatic conditions and so
improve the driver's visibility:
-
s
idelamps, to be seen,
-
d
ipped beam headlamps to see without
dazzling other drivers,
-
m
ain beam headlamps to see clearly when
the road is clear,
-
d
irectional headlamps for improved
visibility when cornering.
Additional lighting
Other lamps are installed to fulfil the
requirements of particular driving conditions:
-
a r
ear foglamp to be seen from a distance,
-
f
ront foglamps for even better visibility,
-
d
aytime running lamps to be seen during
t h e d ay.
Function settings
You can activate / deactivate the following
lighting functions:
-
a
utomatic guide-me-home lighting,
-
a
utomatic illumination of headlamps,
-
d
irectional lighting.
Travelling abroad
If using your vehicle in a country that
drives on the other side of the road, the
headlamps must be adjusted to avoid
dazzling on-coming drivers.
Contact an official dealer or a qualified
workshop.
In some weather conditions (e.g. low
temperature or humidity), the presence
of misting on the internal sur face of the
glass of the headlamps and rear lamps
is normal; it disappears after the lamps
have been on for a few minutes.
Visibility
Page 85 of 364
83
5008_en_Chap04_visibilite_ed01-2015
Model without AUTO lighting
Model with AUTO lighting
The lighting is controlled directly by the driver
by means of the ring A and the stalk B.
B.
S
talk for switching headlamps: pull
the stalk towards you to switch the
lighting between dipped and main beam
headlamps.
In the lamps off and sidelamps modes, the
driver can switch on the main beam headlamps
temporarily ("headlamp flash") by maintaining a
pull on the stalk. Automatic illumination of
headlamps. Lighting off (ignition off) /
Daytime running lamps (engine
running).
Sidelamps.
Dipped headlamps or main
beam headlamps.
Displays
Illumination of the corresponding indicator
lamp in the instrument panel confirms that the
lighting selected is on.
Manual controls
A. Main lighting mode selection ring: turn it
to position the symbol required facing the
mark.
4
Visibility
Page 86 of 364
84
5008_en_Chap04_visibilite_ed01-2015
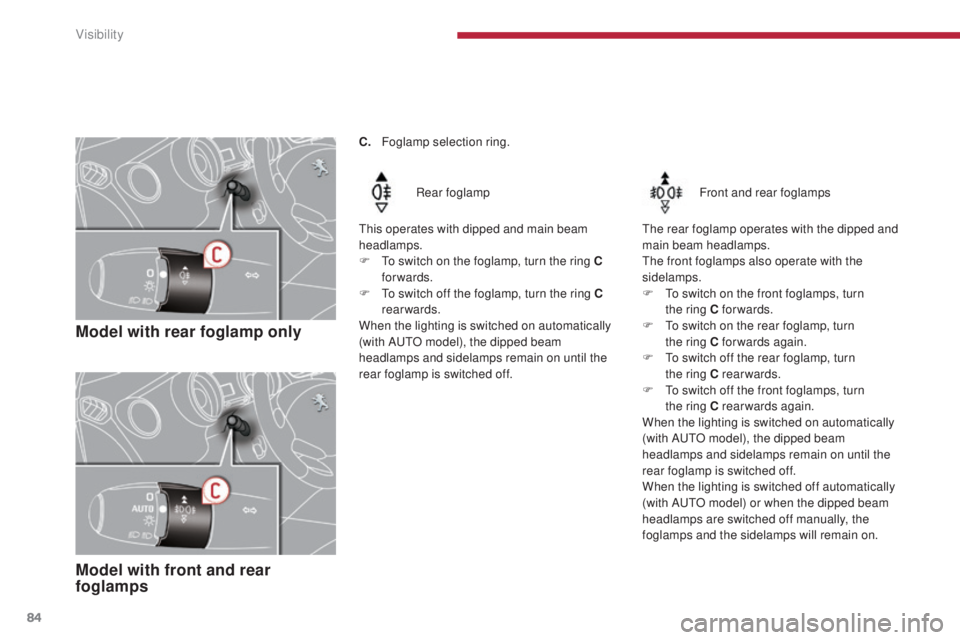
Model with rear foglamp only
Rear foglamp
This operates with dipped and main beam
headlamps.
F
T
o switch on the foglamp, turn the ring C
forwards.
F
T
o switch off the foglamp, turn the ring C
rearwards.
When the lighting is switched on automatically
(with AUTO model), the dipped beam
headlamps and sidelamps remain on until the
rear foglamp is switched off.
Model with front and rear
foglamps
Front and rear foglamps
The rear foglamp operates with the dipped and
main beam headlamps.
The front foglamps also operate with the
sidelamps.
F
T
o switch on the front foglamps, turn
the
ring C forwards.
F
T
o switch on the rear foglamp, turn
the
ring C forwards again.
F
T
o switch off the rear foglamp, turn
the
ring C rearwards.
F
T
o switch off the front foglamps, turn
the
ring C rearwards again.
When the lighting is switched on automatically
(with AUTO model), the dipped beam
headlamps and sidelamps remain on until the
rear foglamp is switched off.
When the lighting is switched off automatically
(with AUTO model) or when the dipped beam
headlamps are switched off manually, the
foglamps and the sidelamps will remain on.
C.
F
oglamp selection ring.
Visibility