2016 PEUGEOT 5008 ESP
[x] Cancel search: ESPPage 67 of 364
65
5008_en_Chap03_confort_ed01-2015
The air conditioning only operates when the engine is running.The driver and front passenger can
each adjust the temperature to their
requirements.
F
T
urn control 2 or 3 to the left or to the right
respectively to decrease or increase this
value.
A setting around the value 21 provides
optimum comfort. However, depending on your
requirements, a setting between 18 and 24 is
normal.
You are advised to avoid a left / right setting
difference of more than 3.
4. Automatic visibility programme
The automatic comfort programme
may not be sufficient to quickly
demist or defrost the windscreen
and side windows (humidity,
several passengers, ice, etc.).
F
I
n this case, select the automatic visibility
programme.
The system automatically controls the air
conditioning, the air flow and the air intake and
provides optimum distribution of the ventilation
to the windscreen and side windows.
Automatic operation
F Press the "AUTO" button. The
indicator lamp on the button
comes on.
Dual-zone digital air conditioning
We recommend the use of this mode: it permits
automatic and optimised adjustment of all
of the functions, passenger compartment
temperature, air flow, air distribution and air
recirculation, in accordance with the comfort
value that you have chosen.
This system is designed to operate effectively
in all seasons, with the windows closed. The value indicated on the display corresponds
to a level of comfort and not to a temperature in
degrees Celsius or Fahrenheit.
F
To switch it off, press the "visibility" button
again or press the "AUTO" button, the indicator
lamp in the button goes off or the indicator lamp
on the "AUTO" button comes on.
1. Automatic comfort programme 2-3.
D
river-passenger side
adjustment
When the engine is cold, to prevent
too great a distribution of cold air, the
air flow will reach its optimum level
gradually.
In cold weather, it favours the
distribution of warm air to the
windscreen, side windows and footwells
o n l y. On entering the vehicle, if the interior
temperature is much colder or warmer
than the comfort value, there is no
need to change the value displayed in
order to obtain the comfort required
more quickly. The system corrects the
difference in temperature automatically
and as quickly as possible.
3
Comfort
Page 81 of 364
79
5008_en_Chap03_confort_ed01-2015
Mirrors
Each fitted with an adjustable mirror glass
permitting the lateral rearward vision necessary
for overtaking or parking. They can also be
folded for parking in confined spaces.
Folding
- Automatic: lock the vehicle using the remote control or the key.
-
M
anual: with the ignition on, pull control A
rearwards.
Unfolding
- Automatic: unlock the vehicle using the remote control or the key.
-
M
anual: with the ignition on, pull control A
rearwards.
Adjustment
F Move control A to the right or to the left to select the corresponding mirror.
F
M
ove control B in all four directions to
adjust.
F
R
eturn control A to the central position.
Demisting - Defrosting
If your vehicle is fitted with heated mirrors, the
demisting-defrosting operates by switching on
the heated rear screen.
Refer to the "Rear screen demist-defrost"
section. The rear screen demist - defrost
can only operate when the engine is
running. As a safety measure, the mirrors should
be adjusted to reduce the blind spots.
The objects observed are, in reality,
closer than they appear.
Take this into account in order to
correctly judge the distance of vehicles
approaching from behind.If the mirrors are folded using control A
,
they will not unfold when the vehicle is
unlocked. Pull again on control A .
The folding and unfolding of the door
mirrors using the remote control can be
deactivated by a PEUGEOT dealer or a
qualified workshop.
Fold the mirrors when putting your
vehicle through an automatic car wash.
Door mirrors
If necessary, it is possible to fold the
mirrors manually.
3
Comfort
Page 85 of 364
83
5008_en_Chap04_visibilite_ed01-2015
Model without AUTO lighting
Model with AUTO lighting
The lighting is controlled directly by the driver
by means of the ring A and the stalk B.
B.
S
talk for switching headlamps: pull
the stalk towards you to switch the
lighting between dipped and main beam
headlamps.
In the lamps off and sidelamps modes, the
driver can switch on the main beam headlamps
temporarily ("headlamp flash") by maintaining a
pull on the stalk. Automatic illumination of
headlamps. Lighting off (ignition off) /
Daytime running lamps (engine
running).
Sidelamps.
Dipped headlamps or main
beam headlamps.
Displays
Illumination of the corresponding indicator
lamp in the instrument panel confirms that the
lighting selected is on.
Manual controls
A. Main lighting mode selection ring: turn it
to position the symbol required facing the
mark.
4
Visibility
Page 93 of 364
91
5008_en_Chap04_visibilite_ed01-2015
Wiper controls
Model with intermittent
wiping
Model with AUTO wipingProgramming
You can modify the settings for the following
functions:
-
a
utomatic rain sensitive windscreen wipers,
-
r
ear wiping on engaging reverse gear.
The vehicle's front and rear wipers are
designed to improve the driver's visibility
progressively according to the weather
conditions.
Manual controls
Windscreen wipers
A.
Wiping speed selection stalk.
Fast (heavy rain).
Normal (moderate rain).
Intermittent (proportional to the
speed of the vehicle).
Automatic, then single wipe.
Refer to the corresponding
section.
Of f.
Single wipe (press down and
release).
or
4
Visibility
Page 98 of 364
96
5008_en_Chap04_visibilite_ed01-2015
Courtesy lamps
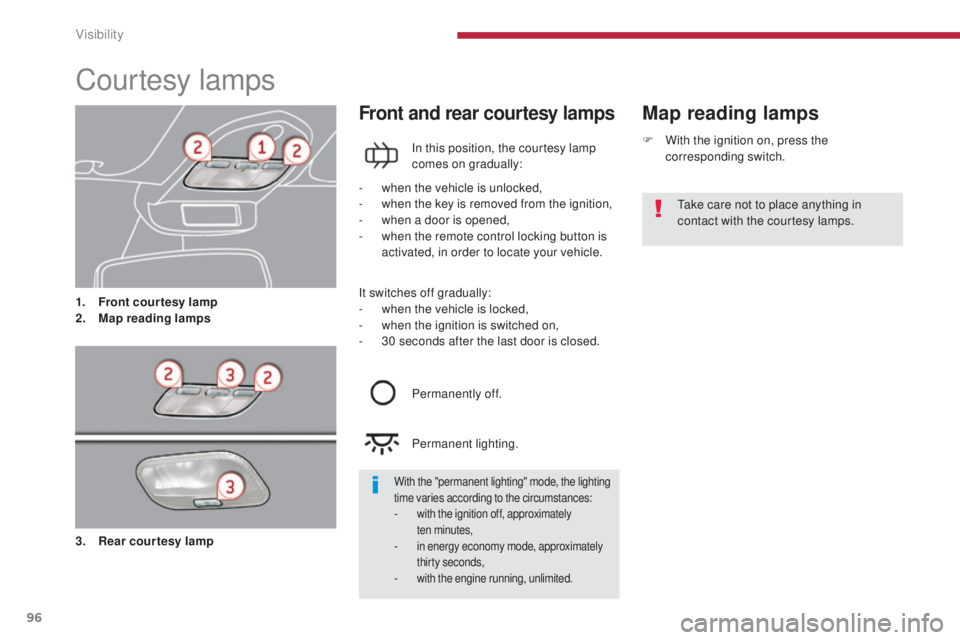
1. Front courtesy lamp
2. Map reading lamps
Map reading lampsFront and rear courtesy lamps
In this position, the courtesy lamp
comes on gradually:
-
w
hen the vehicle is unlocked,
-
w
hen the key is removed from the ignition,
-
w
hen a door is opened,
-
w
hen the remote control locking button is
activated, in order to locate your vehicle.
Permanently off.
Permanent lighting.
It switches off gradually:
-
w
hen the vehicle is locked,
-
w
hen the ignition is switched on,
-
3
0 seconds after the last door is closed.
3.
R
ear courtesy lamp Take care not to place anything in
contact with the courtesy lamps.
With the "permanent lighting" mode, the lighting
time varies according to the circumstances:
- with the ignition off, approximately
ten minutes,
- in energy economy mode, approximately thirty seconds,
- with the engine running, unlimited.
F With the ignition on, press the corresponding switch.
Visibility
Page 113 of 364
111
5008_en_Chap05_amenagements_ed01-2015
High load retaining
net*
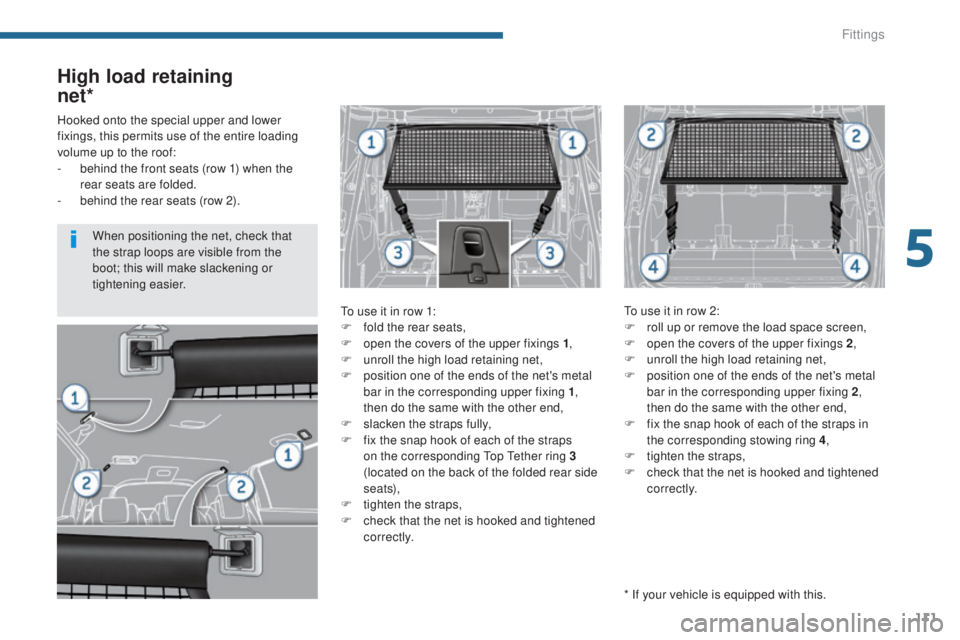
To use it in row 1:
F
f old the rear seats,
F
o
pen the covers of the upper fixings 1 ,
F
u
nroll the high load retaining net,
F
p
osition one of the ends of the net's metal
bar in the corresponding upper fixing 1 ,
then do the same with the other end,
F
s
lacken the straps fully,
F
f
ix the snap hook of each of the straps
on the corresponding Top Tether ring 3
(located on the back of the folded rear side
seats),
F
t
ighten the straps,
F
c
heck that the net is hooked and tightened
c o r r e c t l y. To use it in row 2:
F
r oll up or remove the load space screen,
F
o
pen the covers of the upper fixings 2,
F
u
nroll the high load retaining net,
F
p
osition one of the ends of the net's metal
bar in the corresponding upper fixing 2 ,
then do the same with the other end,
F
f
ix the snap hook of each of the straps in
the corresponding stowing ring 4 ,
F
t
ighten the straps,
F
c
heck that the net is hooked and tightened
c o r r e c t l y.
Hooked onto the special upper and lower
fixings, this permits use of the entire loading
volume up to the roof:
-
b
ehind the front seats (row 1) when the
rear seats are folded.
-
b
ehind the rear seats (row 2).
* If your vehicle is equipped with this.
When positioning the net, check that
the strap loops are visible from the
boot; this will make slackening or
tightening easier.
5
Fittings
Page 120 of 364

AR
BG
НИКОГА НЕ инсталирайте детско столче на седалка с АКТИВИРАНА предна ВЪЗДУШНА ВЪЗГЛАВНИЦ А. Това може да причини
СМЪРТ или СЕРИОЗНО НАРАНЯВАНЕ на детето.
CSNIKDY neumisťujte dětské zádržné zařízení orientované směrem dozadu na sedadlo chráněné AKTIVOVANÝM čelním AIRBAGEM. Hrozí
nebezpečí SMRTI DÍTĚTE nebo VÁ ŽNÉHO ZR ANĚNÍ.
DABrug ALDRIG en bagudvendt barnestol på et sæde, der er beskyttet af en AKTIV AIRBAG. BARNET risikerer at blive ALVORLIGT
K VÆSTET eller DR ÆBT.
DEMontieren Sie auf einem Sitz mit AKTIVIERTEM Front-Airbag NIEMALS einen Kindersitz oder eine Babyschale entgegen der
Fahrtrichtung, das Kind könnte schwere oder sogar tödliche Verletzungen erleiden.
ELΜη χρησιμοποιείτε ΠΟΤΕ παιδικό κάθισμα με την πλάτη του προς το εμπρός μέρος του αυτοκινήτου, σε μια θέση που προστατεύεται από
ΜΕΤΩΠΙΚΟ αερόσακο που είναι ΕΝΕΡΓΟΣ. Αυτό μπορεί να έχει σαν συνέπεια το ΘΑΝΑΤΟ ή το ΣΟΒΑΡΟ ΤΡΑΥΜΑΤΙΣΜΟ του ΠΑΙΔΙΟΥ
ENNEVER use a rear ward facing child restraint on a seat protected by an ACTIVE AIRBAG in front of it, DEATH or SERIOUS INJURY to the
CHILD can occur
ESNO INSTALAR NUNCA un sistema de retención para niños de espaldas al sentido de la marcha en un asiento protegido mediante un
AIRBAG frontal ACTIVADO, ya que podría causar lesiones GR AVES o incluso la MUERTE del niño.
ETÄrge MITTE KUNAGI paigaldage “seljaga sõidusuunas“ lapseistet juhi kõrvalistmele, mille ESITURVAPADI on AKTIVEERITUD.
Tur vapadja avanemine võib last TÕSISELT või ELUOHTLIKULT vigastada.
FIÄLÄ KOSK A AN aseta lapsen tur vaistuinta selkä ajosuuntaan istuimelle, jonka edessä suojana on käyttöön aktivoitu TURVAT Y YNY. Sen
laukeaminen voi aiheuttaa LAPSEN KUOLEMAN tai VAK AVAN LOUKK A ANTUMISEN.
FRNE JAMAIS installer de système de retenue pour enfants faisant face vers l’arrière sur un siège protégé par un COUSSIN GONFLABLE
frontal ACTIVÉ.
Cela peut provoquer la MORT de l’ENFANT ou le BLESSER GR AVEMENT
HRNIK ADA ne postavljati dječju sjedalicu leđima u smjeru vožnje na sjedalo zaštićeno UKLJUČENIM prednjim ZR AČNIM JASTUKOM. To bi
moglo uzrokovati SMRT ili TEŠKU OZLJEDU djeteta.
HUSOHA ne használjon menetiránynak háttal beszerelt gyermekülést AKTIVÁLT (BEK APCSOLT) FRONTLÉGZSÁKK AL védett ülésen. Ez a
gyermek HALÁLÁT vagy SÚLYOS SÉRÜLÉSÉT okozhatja.
ITNON installare MAI seggiolini per bambini posizionati in senso contrario a quello di marcia su un sedile protetto da un AIRBAG frontale
ATTIVATO. Ciò potrebbe provocare la MORTE o FERITE GR AVI al bambino.
118
5008_en_Chap06_securite-enfants_ed01-2015
Child safety
Page 136 of 364
134
5008_en_Chap06_securite-enfants_ed01-2015
Manual child lock
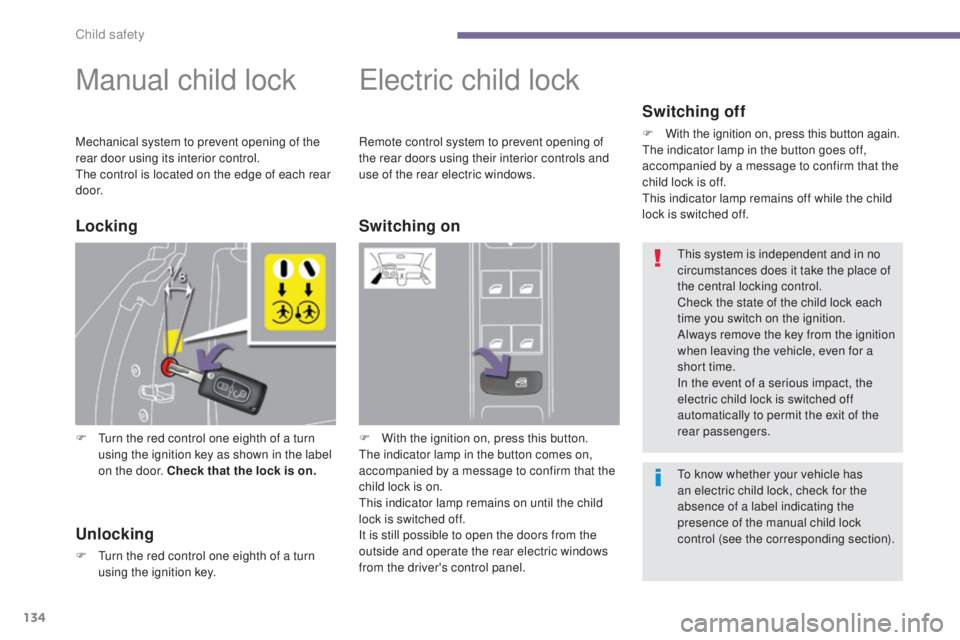
F Turn the red control one eighth of a turn using the ignition key as shown in the label
on the door. Check that the lock is on.
Electric child lock
F With the ignition on, press this button.
The indicator lamp in the button comes on,
accompanied by a message to confirm that the
child lock is on.
This indicator lamp remains on until the child
lock is switched off.
It is still possible to open the doors from the
outside and operate the rear electric windows
from the driver's control panel.
Locking
Unlocking
F Turn the red control one eighth of a turn using the ignition key.
Switching on Switching off
F With the ignition on, press this button again.
The indicator lamp in the button goes off,
accompanied by a message to confirm that the
child lock is off.
This indicator lamp remains off while the child
lock is switched off.
This system is independent and in no
circumstances does it take the place of
the central locking control.
Check the state of the child lock each
time you switch on the ignition.
Always remove the key from the ignition
when leaving the vehicle, even for a
short time.
In the event of a serious impact, the
electric child lock is switched off
automatically to permit the exit of the
rear passengers.
Remote control system to prevent opening of
the rear doors using their interior controls and
use of the rear electric windows.
Mechanical system to prevent opening of the
rear door using its interior control.
The control is located on the edge of each rear
d o o r.
To know whether your vehicle has
an electric child lock, check for the
absence of a label indicating the
presence of the manual child lock
control (see the corresponding section).
Child safety