2016 PEUGEOT 5008 spare wheel
[x] Cancel search: spare wheelPage 227 of 364
225
5008_en_Chap10_infos-pratiques_ed01-2015
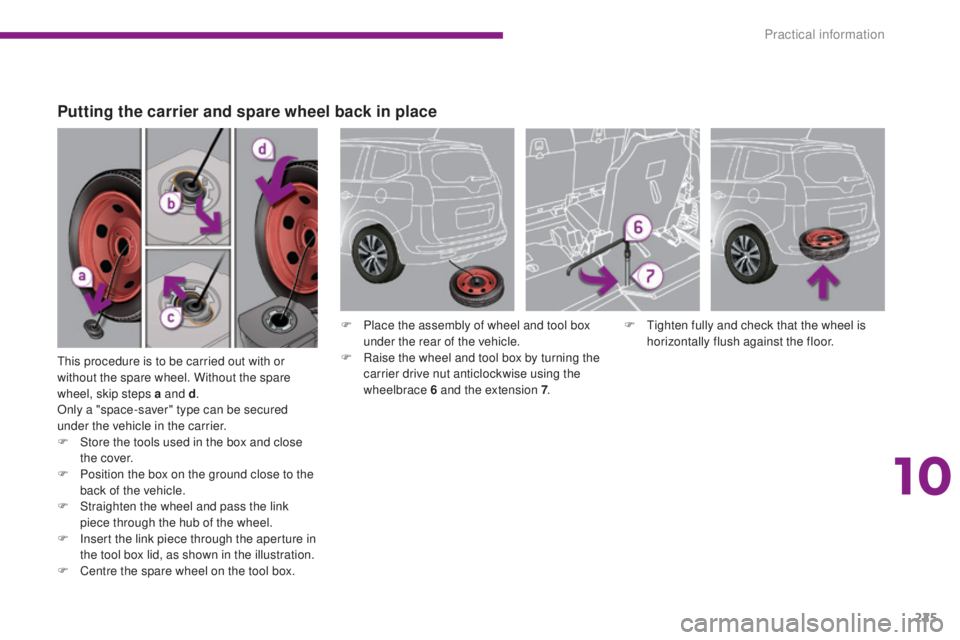
This procedure is to be carried out with or
without the spare wheel. Without the spare
wheel, skip steps a and d.
Only a "space-saver" type can be secured
under the vehicle in the carrier.
F
S
tore the tools used in the box and close
the cover.
F
P
osition the box on the ground close to the
back of the vehicle.
F
S
traighten the wheel and pass the link
piece through the hub of the wheel.
F
I
nsert the link piece through the aperture in
the tool box lid, as shown in the illustration.
F
C
entre the spare wheel on the tool box. F
T
ighten fully and check that the wheel is
horizontally flush against the floor.
F
P
lace the assembly of wheel and tool box
under the rear of the vehicle.
F R aise the wheel and tool box by turning the
carrier drive nut anticlockwise using the
wheelbrace 6 and the extension 7 .
Putting the carrier and spare wheel back in place
10
Practical information
Page 229 of 364
227
5008_en_Chap10_infos-pratiques_ed01-2015
Do not use:
- t he jack for any purpose other than
lifting the vehicle,
-
a j
ack other than the one supplied
by the manufacturer.
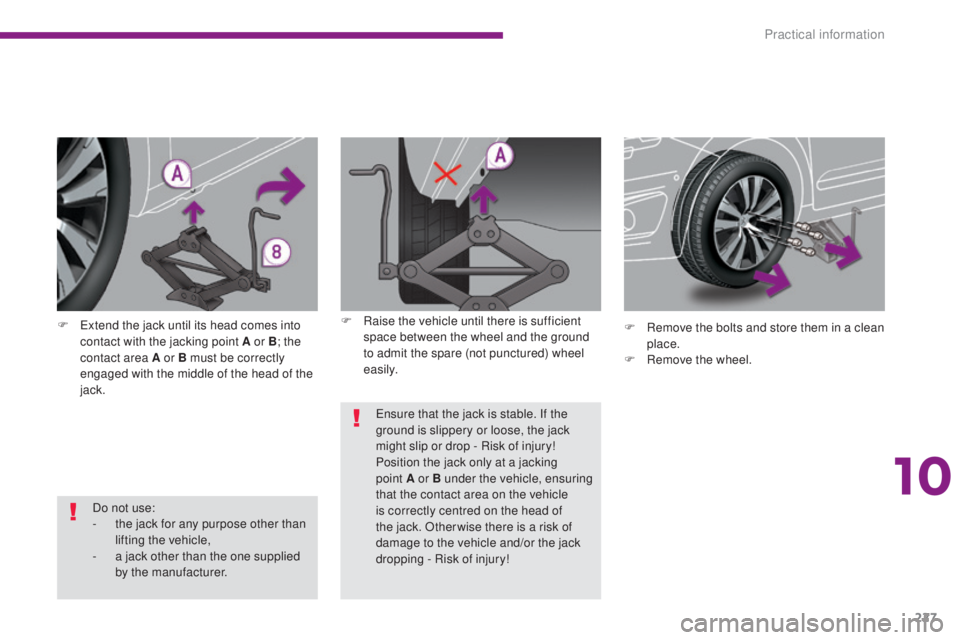
F
E
xtend the jack until its head comes into
contact with the jacking point A or B ; the
contact area A or B must be correctly
engaged with the middle of the head of the
jack. F
R
emove the bolts and store them in a clean
place.
F
R
emove the wheel.
Ensure that the jack is stable. If the
ground is slippery or loose, the jack
might slip or drop - Risk of injury!
Position the jack only at a jacking
point A or B under the vehicle, ensuring
that the contact area on the vehicle
is correctly centred on the head of
the jack. Otherwise there is a risk of
damage to the vehicle and/or the jack
dropping - Risk of injury!
F
Ra
ise the vehicle until there is sufficient
space between the wheel and the ground
to admit the spare (not punctured) wheel
easily.
10
Practical information
Page 230 of 364
228
5008_en_Chap10_infos-pratiques_ed01-2015
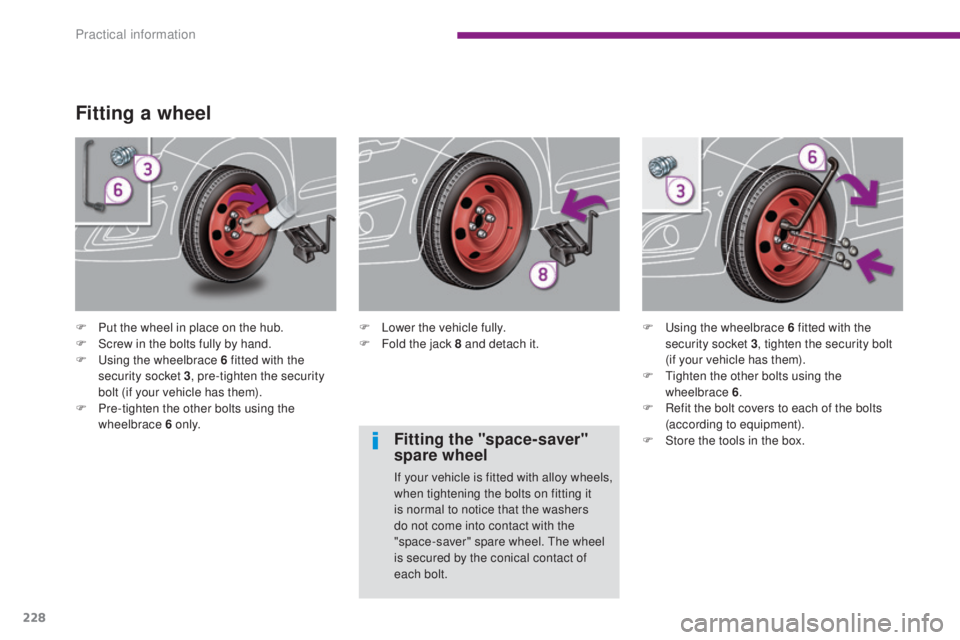
Fitting a wheel
F Put the wheel in place on the hub.
F S crew in the bolts fully by hand.
F
U
sing the wheelbrace 6 fitted with the
security socket 3 , pre-tighten the security
bolt (if your vehicle has them).
F
P
re-tighten the other bolts using the
wheelbrace 6 o n l y. F
L ower the vehicle fully.
F F old the jack 8 and detach it.F
U sing the wheelbrace 6 fitted with the
security socket 3 , tighten the security bolt
(if your vehicle has them).
F
T
ighten the other bolts using the
wheelbrace 6 .
F
R
efit the bolt covers to each of the bolts
(according to equipment).
F
S
tore the tools in the box.
Fitting the "space-saver"
spare wheel
If your vehicle is fitted with alloy wheels,
when tightening the bolts on fitting it
is normal to notice that the washers
do not come into contact with the
"space-saver" spare wheel. The wheel
is secured by the conical contact of
each bolt.
Practical information
Page 231 of 364
229
5008_en_Chap10_infos-pratiques_ed01-2015
Following a puncture
The punctured wheel cannot be stowed
under the vehicle. It must be stowed
in the boot. Use a cover to protect the
inside of the boot.
When driving with the "space-saver"
type spare wheel fitted, do not exceed
50 mph (80 km/h).
Have the tightening of the bolts and the
pressure of the spare wheel checked
by a PEUGEOT dealer or a qualified
workshop without delay.
Have the punctured wheel repaired and
replace it on the vehicle as soon as
possible.
Tyre under-inflation detection
The space-saver type or steel spare
wheel does not have a sensor.
The punctured wheel must be repaired
by a PEUGEOT dealer or a qualified
workshop.
Snow chains must only be fitted to the
front wheels. Further, they must never
be fitted to a "space-saver" spare
wheel.
Before fitting the snow chains,
interchange the "space-saver" spare
wheel fitted at the front with the wheel
at the rear on the same side.
10
Practical information
Page 232 of 364
230
5008_en_Chap10_infos-pratiques_ed01-2015
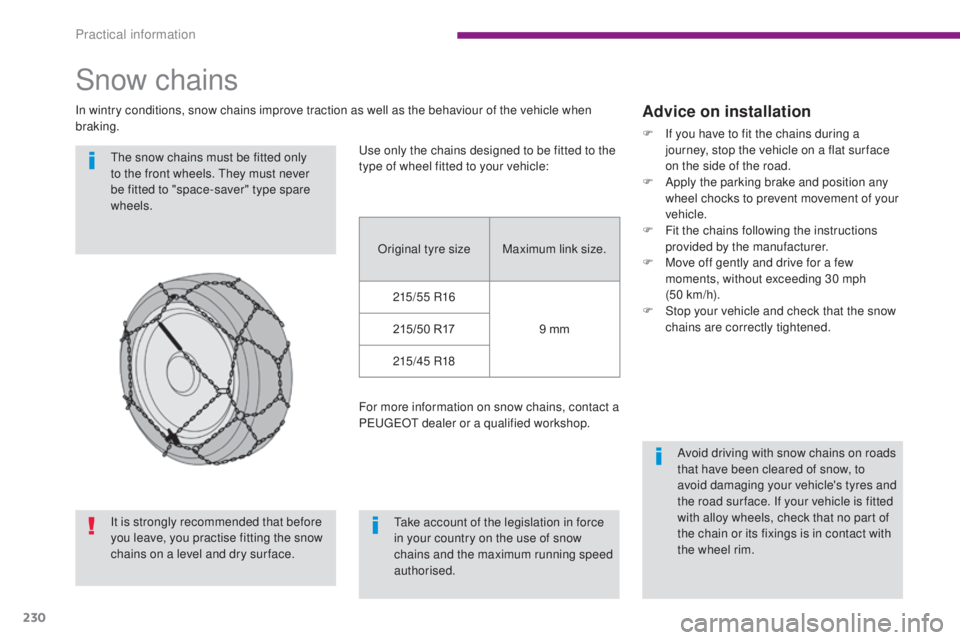
Snow chains
In wintry conditions, snow chains improve traction as well as the behaviour of the vehicle when
braking.The snow chains must be fitted only
to the front wheels. They must never
be fitted to "space-saver" type spare
wheels.
Take account of the legislation in force
in your country on the use of snow
chains and the maximum running speed
authorised.Advice on installation
F If you have to fit the chains during a journey, stop the vehicle on a flat sur face
on the side of the road.
F
A
pply the parking brake and position any
wheel chocks to prevent movement of your
vehicle.
F
F
it the chains following the instructions
provided by the manufacturer.
F
M
ove off gently and drive for a few
moments, without exceeding 30 mph
(50 km/h).
F
S
top your vehicle and check that the snow
chains are correctly tightened.
Avoid driving with snow chains on roads
that have been cleared of snow, to
avoid damaging your vehicle's tyres and
the road sur face. If your vehicle is fitted
with alloy wheels, check that no part of
the chain or its fixings is in contact with
the wheel rim.
Use only the chains designed to be fitted to the
type of wheel fitted to your vehicle:
Original tyre size Maximum link size.
215/55 R16 9 mm
215/50 R17
215/45 R18
For more information on snow chains, contact a
PEUGEOT dealer or a qualified workshop.
It is strongly recommended that before
you leave, you practise fitting the snow
chains on a level and dry sur face.
Practical information
Page 270 of 364
268
5008_en_Chap11_caracteristiques_ed01-2015
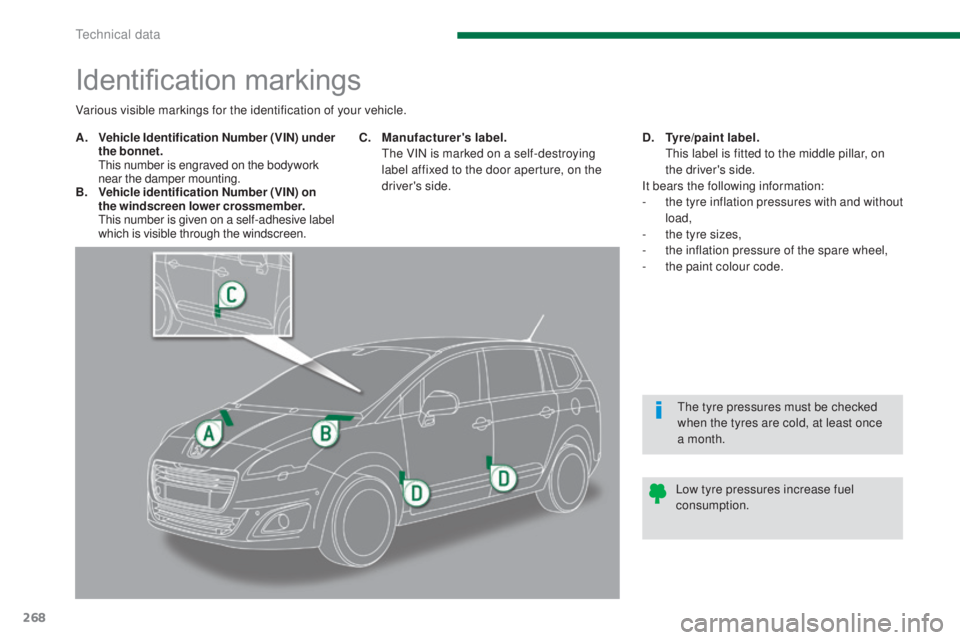
Identification markings
A. Vehicle Identification Number (VIN) under the bonnet.
T
his number is engraved on the bodywork
near the damper mounting.
B.
V
ehicle identification Number (VIN) on
the windscreen lower crossmember.
T
his number is given on a self-adhesive label
which is visible through the windscreen. C. M
anufacturer's label.
T
he VIN is marked on a self-destroying
label affixed to the door aperture, on the
driver's side. D. T
yre/paint label.
T
his label is fitted to the middle pillar, on
the driver's side.
It bears the following information:
-
t
he tyre inflation pressures with and without
load,
-
t
he tyre sizes,
-
t
he inflation pressure of the spare wheel,
-
t
he paint colour code.
Various visible markings for the identification of your vehicle.
Low tyre pressures increase fuel
consumption.The tyre pressures must be checked
when the tyres are cold, at least once
a month.
Technical data
Page 356 of 364

354
5008_en_Chap13_index-alpha_ed01-2015
Screen menu map ........................318, 342 , 344
Screen, monochrome A .............32, 34, 43, 342
Screen, monochrome C
................... 3
6, 44, 344
Screenwash fluid level
............................................................... 93
Screenwash, front
........................................... 93
Screenwash, rear
............................................ 92
Screen-wash reservoir
...................................................... 201
SCR (Selective Catalytic Reduction)
.................................................. 20
4
Seat adjustment
...............................
...68 , 69 , 73
Seat belts
.............................. 10
9, 13 9 , 141, 142
Seat configurations
......................................... 78
Se
ats, electric
................................................. 69
Seats, rear
........................................... 73, 75 , 76
Serial number, vehicle
......................................................... 268
Service indicator
............................................. 28
Servicing
...............................
..........................12
Settings, equipment
.......32, 34 , 36, 39, 40, 344
Short-cut menus
........................................... 278
Sidelamps
............................... 82, 231 , 232 , 234
Side repeater
..............................
..................233
Snow chains
.................................................. 23
0
Socket, 12 volt accessory
..................... 99, 102, 113, 108 , 109
Sockets, audio
.............................. 101, 315, 336
Spare wheel
...............................
...................229
Speed limiter
................................................. 163
Speedometer
.................................................. 14
Spotlamps, side
............................................................... 97
Starting the engine
....................................... 148
Starting using another battery
......................................................... 24
5Table of weights
...................25
9, 260 , 263, 266
Tables, aircraft
..............................................103
Tables of engines
..................................258, 261
Tables of fuses
..............................................237
Tank, AdBlue
®
additive
.............................................. 204, 209
Ta n k , f u e l
....................................................... 19 4
Technical data
....................................... 258-266
Telephone
............................................ 295, 339
Temperature control for heated seats
............................................ 71
Temperature, coolant
...................................... 27Under floor storage
.......................................
113
Under-inflation
(detection) ....................................26, 183, 229
Unlocking ..............................
..........................46
Unlocking from the inside
...............................56
U
nlocking the boot ..........................................46
Unlocking the doors
........................................46
Updating risk areas
....................................... 28
4
UREA
...................................................204, 205
USB
...............................................101, 315, 338
Three flashes function
(direction indicators)
...................................
13 5
Third brake lamp
..................................
235, 236
Time (setting)
..............................
.
33, 35, 38, 40
TMC (Traffic info)
..........................................
2
93
To o l s
......................................................
212, 223
Total distance
recorder
........................................................
31
To w b a r
...........................................................
252
Towed loads
.........................
259, 260 , 263, 266
Towing another vehicle
................................. 24
9
Traction control (ASR)
............................
22, 137
Traffic information (TA)
.................
294, 307 , 334
Traffic information (TMC)
..................... 2
93
, 294
Tr a i l e r
............................................................
252
Trip computer
............................................
42- 44
Trip distance recorder
.....................................
31
Tyre pressures
..............................................
268
Ty r e s
................................................................
12
Tyre under-inflation detection
........
26, 183 , 229
T
U
Steering mounted controls,
audio ................................................... 276, 331
Stop & Start
........................................ 18, 42 , 63 ,
67 , 180 , 192, 19 6 , 202 , 244
Storage
............................ 99, 101 , 103 , 108 , 109
Storage box
................................................... 10
0
Storage drawer
............................................. 103
Storage wells
........................................ 108, 109
Stowing rings
........................................ 108, 109
Sun visor
................................................. 99, 10 0
Switching off the engine
................................................... 148
Synchronising the remote control
........................................................... 49
S
ynthesiser,
voice ............................................................ 290
System, navigation ........................................ 279
Alphabetical index
Page 357 of 364
355
5008_en_Chap13_index-alpha_ed01-2015
Xenon headlamps .........................................231
X
W
V
Warning lamps .......................................... 16 -26
Warning lamp, SCR emissions control system
........................................................... 24
Warning lamp, Service ....................................20
Washing (advice) ........................................... 187
Weights
................................ 259, 260 , 263, 266
Wheel, spare
......................................... 212, 223
Window controls
............................................. 53
Wiper control stalk
.......................................... 94
Wiper, rear ....................................................... 92
Wipers
....................................................... 91, 94
Wipers, automatic rain sensitive
.....................91
Vehicle identification
.....................................
268
Vanity mirror
.................................................. 10
0
Ventilation
..............................
.......
60, 61, 62, 67
.
Alphabetical index