Page 4 of 398

.
.
308_en_Chap00a_sommaire_ed02-2015
Over view
Instrument panel 12
I ndicator and warning lamps
13
gau
ges and indicators
28
D
istance recorders
32
tri
p computer
34
tou
ch screen
37
S
etting the date and time
44 R
emote control key
48
"
Keyless
ent
ry and Starting" with
remote
c
ontrol
54
"
Keyless
ent
ry and Starting"
on your person
56
Boo
t
59
A
larm
6
5
ele
ctric windows
69
P
eu
ge
Ot i
- Cockpit
71
S
teering wheel adjustment
71
F
ront seats
72
R
ear seats (hatchback)
77
R
ear seats (SW)
78
I
nterior fittings
80
F
ront armrest 82
B oot fittings (hatchback)
86
B
oot fittings (SW)
87
Hea
ting and Ventilation
90
H
eating
92
M
anual air conditioning
92
M
anual air conditioning (
touc
h screen)
94
D
ual-zone digital air conditioning (
tou
ch screen)
96
F
ront demist - defrost
10
1
Rear screen demist - defrost
10
2
Panoramic sunroof
10
3
Courtesy lamps
10
4
Interior mood lighting
10
5Mirrors
10
6
Lighting control stalk
10
8
Direction indicators
11
1
Daytime running lamps
11
2
Automatic illumination of headlamps
11
2
Side spotlamps
11
4
Headlamp beam height adjustment
11
4
Wiper controls
11
5
Automatic rain sensitive wipers
11
7
Hazard warning lamps 11 9
eme
rgency or assistance call
11
9
H or n
120
eS
C system
12
0
Seat belts
123
A
irbags
12
6
Child seats
13
0
Deactivating the passenger's front airbag
13
3
ISOFIX mountings and child seats
13
9
Child lock
14
5
eco-driving
Ins truments Access
eas
e of use and comfort Lighting and visibility
Safety
Contents
Page 7 of 398
5
308_en_Chap00b_vue-ensemble_ed02-2015
Interior
Boot fittings 86
W arning triangle (stowing) 24 3
AdBlue tank
23
5 -242
Seat belts
123
-125
Front seats
72
-76
-
man
ual adjustments
-
ele
ctric adjustments
-
he
ad restraints
-
heat
ed seats
-
el
ectric lumbar adjustment
-
m
assage
P
eu
ge
Ot i
- Cockpit
71
C
hild seats
13
0 -144
ISOFIX child seats
13
9 -143
Manual child lock
145 A
ir bags
12
6 -129
Adjusting the steering wheel
71
I
nterior fittings
80
-84
-
m
ats
-
fr
ont armrest
-
12 V a
ccessory socket
-
u
SB p
ort / Auxiliary socket
-
23
0 V socket
Deactivating the passenger's front airbag
12
7, 133
Rear seats
77
R
ear armrest, ski flap
85
Hatchback
.
Over view
Page 8 of 398
6
308_en_Chap00b_vue-ensemble_ed02-2015
Boot fittings 87
Lu ggage cover 88 - 89
High load retaining net
89
W
arning triangle (stowing)
24
3
AdBlue tank
23
5 -242
Seat belts
123
-125
Front seats
72
-76
-
man
ual adjustments
-
ele
ctric adjustments
-
he
ad restraints
-
heat
ed seats
- el ectric lumbar adjustment
- m assage
P
eu
ge
Ot i
- Cockpit
71
C
hild seats
13
0 -144
ISOFIX child seats
13
9 -143
Manual child lock
145 A
ir bags
12
6 -129
Adjusting the steering wheel
71
I
nterior fittings
80
-84
-
m
ats
-
fr
ont armrest
-
12 V a
ccessory socket
-
u
SB p
ort / Auxiliary socket
-
23
0 V socket
Deactivating the passenger's front airbag
12
7, 133
Rear seats
78
-79
Rear armrest, ski flap
85
SW
Over view
Page 13 of 398

11
308_en_Chap00c_eco-conduite_ed02-2015
Limit the causes of excess consumption
Spread loads throughout the vehicle; place the heaviest items in the
bottom of the boot, as close as possible to the rear seats.
Limit the loads carried in the vehicle and reduce wind resistance (roof
bars, roof rack, bicycle carrier, trailer...).
use a r
oof box in preference.
Remove roof bars and roof racks after use.
At the end of winter, remove snow tyres and refit your summer tyres.
Observe the recommendations on
maintenance
Check the tyre pressures regularly, when cold, referring to the label in
the door aperture, driver's side.
Carry out this check in particular:
-
be
fore a long journey,
-
at e
ach change of season,
-
af
ter a long period out of use.
Don't forget the spare wheel and the tyres on any trailer or caravan.
Have your vehicle serviced regularly (engine oil, oil filter, air filter,
passenger compartment filter...) and observe the schedule of
operations recommended in the manufacturer's service schedule.
With a BlueHDi Diesel engine, if the SCR system is faulty your vehicle
becomes polluting; go to a P
eu
ge
Ot d
ealer or a qualified workshop
without delay to have the emissions of nitrous oxides brought back to
the legal level.
When refuelling, do not continue after the third cut-off of the nozzle to
avoid any over flow.
At the wheel of your new vehicle, it is only after the first 1 800 miles
(3
0
00 kilometres) that you will see the fuel consumption settle down to
a consistent average.
.
eco-driving
Page 62 of 398

60
308_en_Chap02_ouvertures_ed02-2015
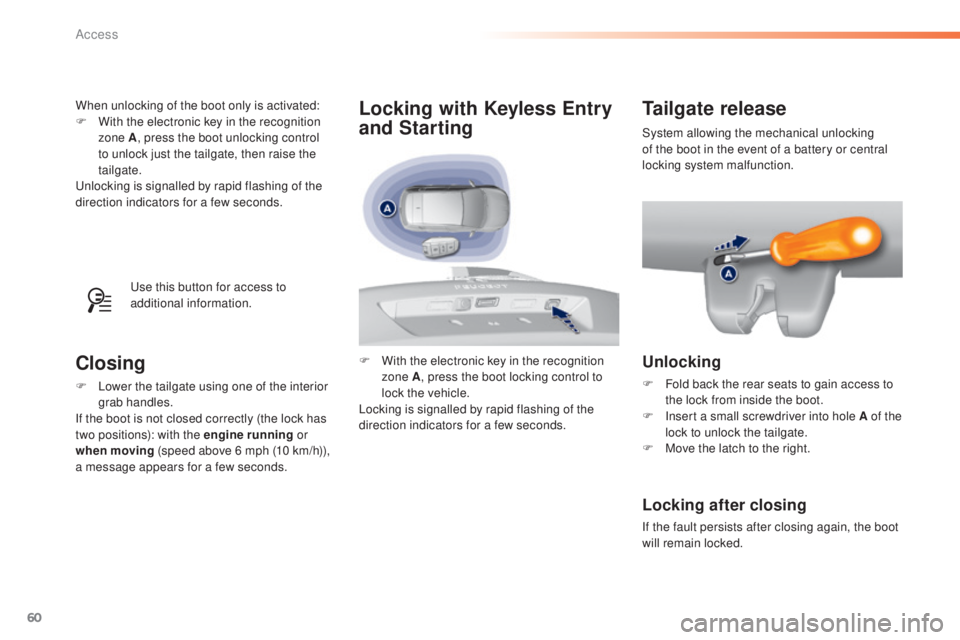
When unlocking of the boot only is activated:
F With the electronic key in the recognition
zone A , press the boot unlocking control
to unlock just the tailgate, then raise the
tailgate.
unl
ocking is signalled by rapid flashing of the
direction indicators for a few seconds.
use t
his button for access to
additional information.
Closing
F Lower the tailgate using one of the interior
g rab handles.
If the boot is not closed correctly (the lock has
two positions): with the engine running or
when moving (speed above 6 mph (10 km/h)),
a message appears for a few seconds.
Tailgate release
Unlocking
F Fold back the rear seats to gain access to
t he lock from inside the boot.
F
In
sert a small screwdriver into hole A of the
lock to unlock the tailgate.
F
Mov
e the latch to the right.
Locking after closing
If the fault persists after closing again, the boot
will remain locked.System allowing the mechanical unlocking
of the boot in the event of a battery or central
locking system malfunction.
F
Wi
th the electronic key in the recognition
zone A , press the boot locking control to
lock the vehicle.
Locking is signalled by rapid flashing of the
direction indicators for a few seconds.
Locking with Keyless Entry
and Starting
Access
Page 74 of 398
72
308_en_Chap03_ergonomie-et-confort_ed02-2015
Front seats with manual adjustments
F Raise the control and slide the seat
forwards or backwards. F Pu
ll the control upwards to raise or push
it downwards to lower, as many times as
required, to obtain the position required. F
tur n the knob to adjust the backrest.
Forwards-backwards
HeightSeat backrest angle
As a safety measure, seat adjustments should only be carried out when stationary.
F
t
ur
n the knob manually to obtain the
desired level of lumbar support.
LumbarBefore moving the seat backwards, ensure that there is nothing that might prevent the full
travel of the seat, so as to avoid the risk of of jamming the seat caused by the presence of
objects on the floor behind the seat or rear passengers. If the seat jams, stop the movement
immediately.
ease of use and comfort
Page 77 of 398

75
308_en_Chap03_ergonomie-et-confort_ed02-2015
Heated seats control
0: Of f.
1 : Low.
2 : Medium.
3 : High.
F
u
se t
he adjustment wheel to switch on and
select the level of heating required:
With the engine running, the front seats can be
heated separately.
F
to ra
ise the head restraint, pull it upwards.
F
t
o re
move the head restraint, press the
lug
A
and pull the head restraint upwards.
F
to put the head restraint back in place, engage
t he head restraint stems in the openings
keeping them in line with the seat back.
F to lower the head restraint, press the lug A
a nd the head restraint at the same time.
the h
ead restraint is fitted with a frame
with notches which prevents it from
lowering; this is a safety device in case
of impact.
The adjustment is correct when the
upper edge of the head restraint is
level with the top of the head.
Never drive with the head restraints
removed; they must be in place and
adjusted correctly.
Head restraint height
Additional adjustments
3
ease of use and comfort
Page 79 of 398

77
308_en_Chap03_ergonomie-et-confort_ed02-2015
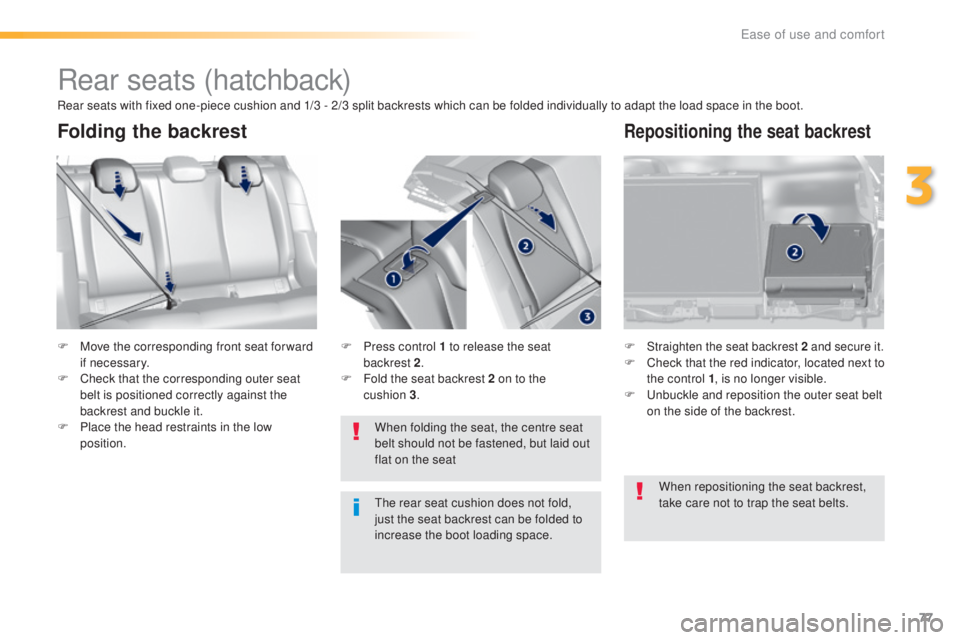
Rear seats (hatchback)
F Move the corresponding front seat for ward
if necessary.
F
Che
ck that the corresponding outer seat
belt is positioned correctly against the
backrest and buckle it.
F
Pl
ace the head restraints in the low
position. F Straighten the seat backrest 2 and secure it.F Check that the red indicator, located next to
t
he control 1 , is no longer visible.
F
u
nb
uckle and reposition the outer seat belt
on the side of the backrest.
When folding the seat, the centre seat
belt should not be fastened, but laid out
flat on the seat
F
Pr
ess control 1 to release the seat
backrest 2 .
F Fo
ld the seat backrest 2 on to the
cushion
3 .
Folding the backrestRepositioning the seat backrest
Rear seats with fixed one-piece cushion and 1/3 - 2/3 split backrests which can be folded individually to adapt the load space in the boot.
the r
ear seat cushion does not fold,
just the seat backrest can be folded to
increase the boot loading space. When repositioning the seat backrest,
take care not to trap the seat belts.
3
ease of use and comfort