Page 68 of 398

66
308_en_Chap02_ouvertures_ed02-2015
Deactivation
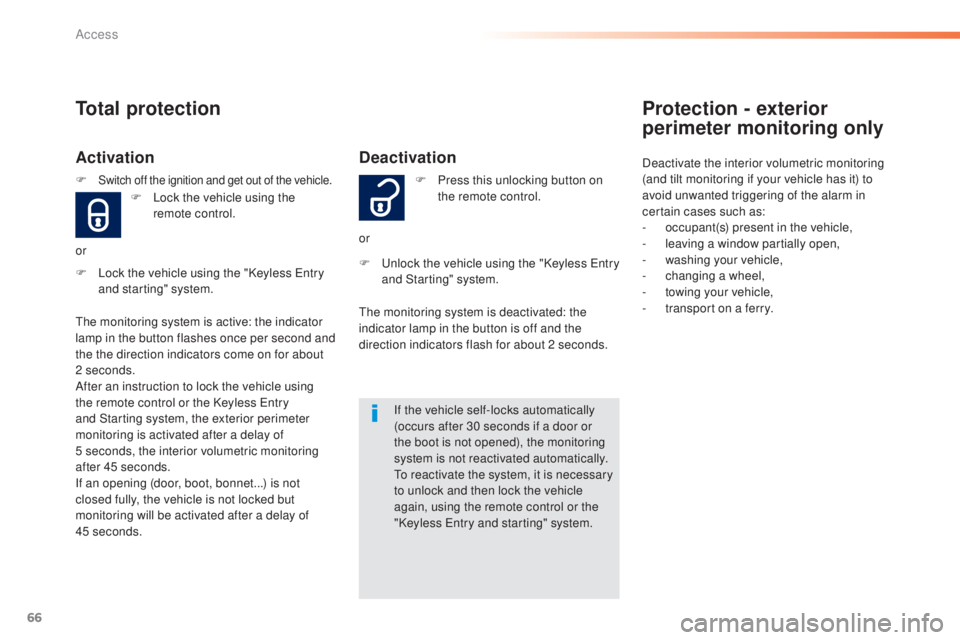
F Lock the vehicle using the "Keyless entry
and starting" system. F
Pr
ess this unlocking button on
the remote control.
or
F unl ock the vehicle using the "Keyless ent ry
and Starting" system.
If the vehicle self-locks automatically
(occurs after 30 seconds if a door or
the boot is not opened), the monitoring
system is not reactivated automatically.
to re
activate the system, it is necessary
to unlock and then lock the vehicle
again, using the remote control or the
"Keyless
ent
ry and starting" system.
the m
onitoring system is deactivated: the
indicator lamp in the button is off and the
direction indicators flash for about 2 seconds.
Total protection
Activation
F Lock the vehicle using the
r emote control.
or
the m
onitoring system is active: the indicator
lamp in the button flashes once per second and
the the direction indicators come on for about
2 seconds.
After an instruction to lock the vehicle using
the remote control or the Keyless
ent
ry
and Starting system, the exterior perimeter
monitoring is activated after a delay of
5
s
econds, the interior volumetric monitoring
after 45 seconds.
If an opening (door, boot, bonnet...) is not
closed fully, the vehicle is not locked but
monitoring will be activated after a delay of
45
se
conds.
F
Switch off the ignition and get out of the vehicle.
Protection - exterior
perimeter monitoring only
Deactivate the interior volumetric monitoring
(and tilt monitoring if your vehicle has it) to
avoid unwanted triggering of the alarm in
certain cases such as:
-
oc
cupant(s) present in the vehicle,
-
le
aving a window partially open,
-
was
hing your vehicle,
-
chan
ging a wheel,
-
to
wing your vehicle,
-
tr
ansport on a ferry.
Access
Page 70 of 398

68
308_en_Chap02_ouvertures_ed02-2015
Failure of the remote control
to deactivate the monitoring functions:
F unl ock the vehicle using the key (integral
with the remote control) in the driver's door
lock.
F
Op
en the door; the alarm is triggered.
F
Sw
itch on the ignition; the alarm stops.
the
i
ndicator lamp in the button goes off.
Locking the vehicle without
activating the alarm
F Lock or deadlock the vehicle using the key
( integral with the remote control) in the
driver's door lock.
Operating fault
When the ignition is switched on,
fixed illumination of the indicator
lamp in the button indicates a fault in
the system.
Have it checked by a P
eu
ge
Ot
d
ealer or a qualified workshop.
Automatic activation
this function is either not available, an option
o r is standard.
2 minutes after the last door or the boot is
closed, the system is activated automatically.
F
t
o av
oid triggering the alarm on entering
the vehicle, first press the unlocking button
on the remote control or unlock the vehicle
using the Keyless
ent
ry and starting
system.
Access
Page 79 of 398

77
308_en_Chap03_ergonomie-et-confort_ed02-2015
Rear seats (hatchback)
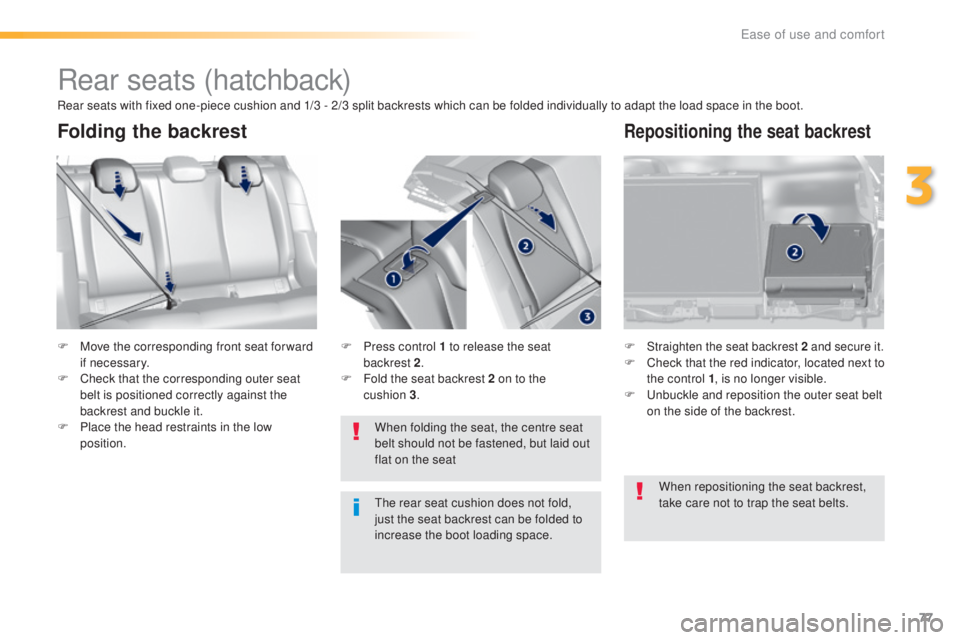
F Move the corresponding front seat for ward
if necessary.
F
Che
ck that the corresponding outer seat
belt is positioned correctly against the
backrest and buckle it.
F
Pl
ace the head restraints in the low
position. F Straighten the seat backrest 2 and secure it.F Check that the red indicator, located next to
t
he control 1 , is no longer visible.
F
u
nb
uckle and reposition the outer seat belt
on the side of the backrest.
When folding the seat, the centre seat
belt should not be fastened, but laid out
flat on the seat
F
Pr
ess control 1 to release the seat
backrest 2 .
F Fo
ld the seat backrest 2 on to the
cushion
3 .
Folding the backrestRepositioning the seat backrest
Rear seats with fixed one-piece cushion and 1/3 - 2/3 split backrests which can be folded individually to adapt the load space in the boot.
the r
ear seat cushion does not fold,
just the seat backrest can be folded to
increase the boot loading space. When repositioning the seat backrest,
take care not to trap the seat belts.
3
ease of use and comfort
Page 80 of 398
78
308_en_Chap03_ergonomie-et-confort_ed02-2015
Rear seats (SW)
1/3 - 2/3 split rear seats which can be folded to vary the boot load space.
eac
h section of the seat (1/3 or 2/3) has its own control to release the seat back from inside the
boot.
Folding the seat from the
boot
F Check that nothing is preventing the seat
b ack from folding (seat belts, . ..) and that
no object might inter fere with the seat
manoeuvre (above as well as below).
F
Pl
ace the head restraints in the low
position. F Pu
ll the control from inside the boot, the
seat backrest folds onto the cushion.
Folding the seat from the
rear
F Check that nothing is preventing the seat
b ackrest folding and that no object might
interfere with the seat manoeuvre
(above as well as below).
F
Mov
e the corresponding front seat
forwards if necessary.
F
Ch
eck that the seat belt is positioned
correctly on the side of the seat back.
F
Pl
ace the head restraints in the low
position.
ease of use and comfort
Page 87 of 398
85
308_en_Chap03_ergonomie-et-confort_ed02-2015
Ski flap
F Lower the armrest.
F Pr ess the flap opening control.
F
Lo
wer the flap.
F
Lo
ad the objects from inside the boot.
F
Lo
wer the rear armrest for a more
comfortable position.
It may be fitted with cup holders and also gives
access to the ski flap.
Rear armrest
Do not leave the flap open when not
carrying long objects in the vehicle.
It allows long objects to be carried in the
vehicle.
3
ease of use and comfort
Page 88 of 398
86
308_en_Chap03_ergonomie-et-confort_ed02-2015
Boot fittings (hatchback)
1. Rear parcel shelf
2. Boot floor
Ra
ise the floor for access to the storage.
3.
Sto
rage wells
in w
hich are stowed:
-
th
e towing eye,
-
th
e temporary puncture repair kit,
-
th
e spare wheel, depending on trim
level, an option or standard.
4.
St
owing rings
5.
St
rap (depending on version)
ease of use and comfort
Page 89 of 398
87
308_en_Chap03_ergonomie-et-confort_ed02-2015
Boot fittings (SW)
1. Boot lamp
2. Rea r seat folding controls
3.
12 V a
ccessory socket (120 W max)
4.
Re
movable storage boxes
Pu
ll up to unclip them.
5.
Sto
rage wells
wh
ere are stowed:
-
th
e towing eye,
-
th
e temporary puncture repair kit,
-
th
e spare wheel, depending on trim
level, an option or standard.
6.
St
rap
7.
Lo
ad space cover
(se
e corresponding section)
8.
eyes f
or fixing a net (to restrain luggage)
(d
epending on version)
F
e
xt
ract the eyes one at a time then slide
them into the oblong housing.
F
Wh
ile pressing the button, move the eye to
the desired position.
F
Ob
serve the direction of fitting (eyes in the
vertical position towards the outside of the
vehicle).
3
ease of use and comfort
Page 90 of 398
88
308_en_Chap03_ergonomie-et-confort_ed02-2015
Load space cover, roller blind (SW)
To reel inTo removeStorage
F Remove the roller guide from the rails in
t
he boot pillars.
F
Re
lease the roller blind, it reels in
automatically. F Pl
ace a hand on the left under
the luggage
c ove r.
F
t
ur
n the end of the reel towards the front
(clockwise) to release it.
F
Re
peat the operation on the right (anti-
clockwise). A recess in the floor well, under the boot
carpet, allows the luggage cover to be stowed
diagonally.
thi
s recess is not available with the
bass woofer unit.
ease of use and comfort