2016 NISSAN SENTRA seat adjustment
[x] Cancel search: seat adjustmentPage 35 of 478
WARNING
●After adjustment, release the adjust-
ment button and try to move the shoul-
der belt anchor up and down to make
sure it is securely fixed in position.
● The shoulder belt anchor height should
be adjusted to the position best for you.
Failure to do so may reduce the effec-
tiveness of the entire restraint system
and increase the chance or severity of
injury in an accident.
SEAT BELT EXTENDERS
If, because of body size or driving position, it is
not possible to properly fit the lap/shoulder belt
and fasten it, an extender that is compatible with
the installed seat belts is available for purchase.
The extender adds approximately 8 in (200 mm)
of length and may be used for either the driver or
front passenger seating position. It is recom-
mended that you visit a NISSAN dealer for assis-
tance with purchasing an extender if an extender
is required.
WARNING
● Only NISSAN seat belt extenders, made
by the same company which made the
original equipment seat belts, should
be used with NISSAN seat belts.
● Adults and children who can use the
standard seat belt should not use an
extender. Such unnecessary use could
result in serious personal injury in the
event of an accident.
● Never use seat belt extenders to install
child restraints. If the child restraint is
not secured properly, the child could be
seriously injured or killed in a collision
or a sudden stop.
SEAT BELT MAINTENANCE
● To clean the seat belt webbing, apply a
mild soap solution or any solution recom-
mended for cleaning upholstery or carpet.
Then wipe with a cloth and allow the seat
belts to dry in the shade. Do not allow the
seat belts to retract until they are completely
dry.
● If dirt builds up in the shoulder belt
guide of the seat belt anchors, the seat
belts may retract slowly. Wipe the shoulder
belt guide with a clean, dry cloth. ●
Periodically check to see that the seat
belt and the metal components, such as
buckles, tongues, retractors, flexible wires
and anchors, work properly. If loose parts,
deterioration, cuts or other damage on the
webbing is found, the entire seat belt as-
sembly should be replaced.
1-18Safety—Seats, seat belts and supplemental restraint system
Page 40 of 478
CAUTION
A child restraint in a closed vehicle can
become very hot. Check the seating sur-
face and buckles before placing a child in
the child restraint.
This vehicle is equipped with a universal child
restraint anchor system, referred to as the LATCH
(Lower Anchors and Tethers for CHildren) sys-
tem. Some child restraints include rigid or
webbing-mounted attachments that can be con-
nected to these anchors. For additional informa-
tion, refer to “LATCH (Lower Anchors and Teth-
ers for CHildren) system” in this section.
If you do not have a LATCH compatible child
restraint, the vehicle seat belts can be used.
Several manufacturers offer child restraints for
infants and children of various sizes. When se-
lecting any child restraint, keep the following
points in mind: ● Choose only a restraint with a label certifying
that it complies with Federal Motor Vehicle
Safety Standard 213 or Canadian Motor
Vehicle Safety Standard 213.
● Check the child restraint in your vehicle to be
sure it is compatible with the vehicle’s seat
and seat belt system. ●
If the child restraint is compatible with your
vehicle, place your child in the child restraint
and check the various adjustments to be
sure the child restraint is compatible with
your child. Choose a child restraint that is
designed for your child’s height and weight.
Always follow all recommended procedures.
● If the combined weight of the child and child
restraint is less than 65 lbs (29.5 kg) , you
may use either the LATCH anchors or the
seat belt to install the child restraint (not both
at the same time) .
● If the combined weight of the child and child
restraint is greater than 65 lbs (29.5 kg) , use
the vehicle’s seat belt (not the lower an-
chors) to install the child restraint.
● Be sure to follow the child restraint manufac-
turer’s instructions for installation.
All U.S. states and Canadian provinces or
territories require that infants and small
children be restrained in an approved child
restraint at all times while the vehicle is
being operated. Canadian law requires the
top tether strap on forward-facing child re-
straints be secured to the designated an-
chor point on the vehicle.
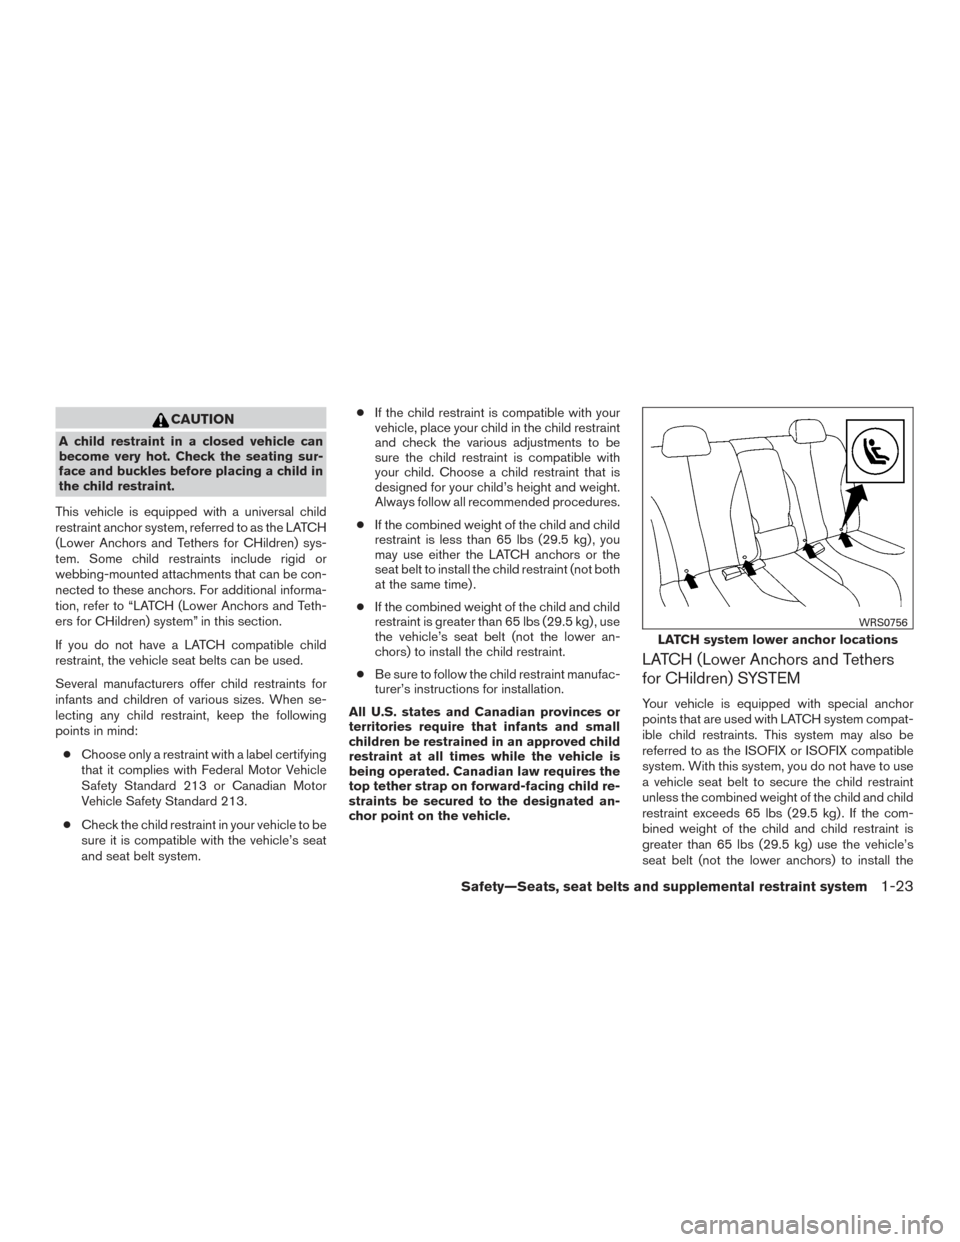
LATCH (Lower Anchors and Tethers
for CHildren) SYSTEM
Your vehicle is equipped with special anchor
points that are used with LATCH system compat-
ible child restraints. This system may also be
referred to as the ISOFIX or ISOFIX compatible
system. With this system, you do not have to use
a vehicle seat belt to secure the child restraint
unless the combined weight of the child and child
restraint exceeds 65 lbs (29.5 kg) . If the com-
bined weight of the child and child restraint is
greater than 65 lbs (29.5 kg) use the vehicle’s
seat belt (not the lower anchors) to install the
LATCH system lower anchor locations
WRS0756
Safety—Seats, seat belts and supplemental restraint system1-23
Page 48 of 478
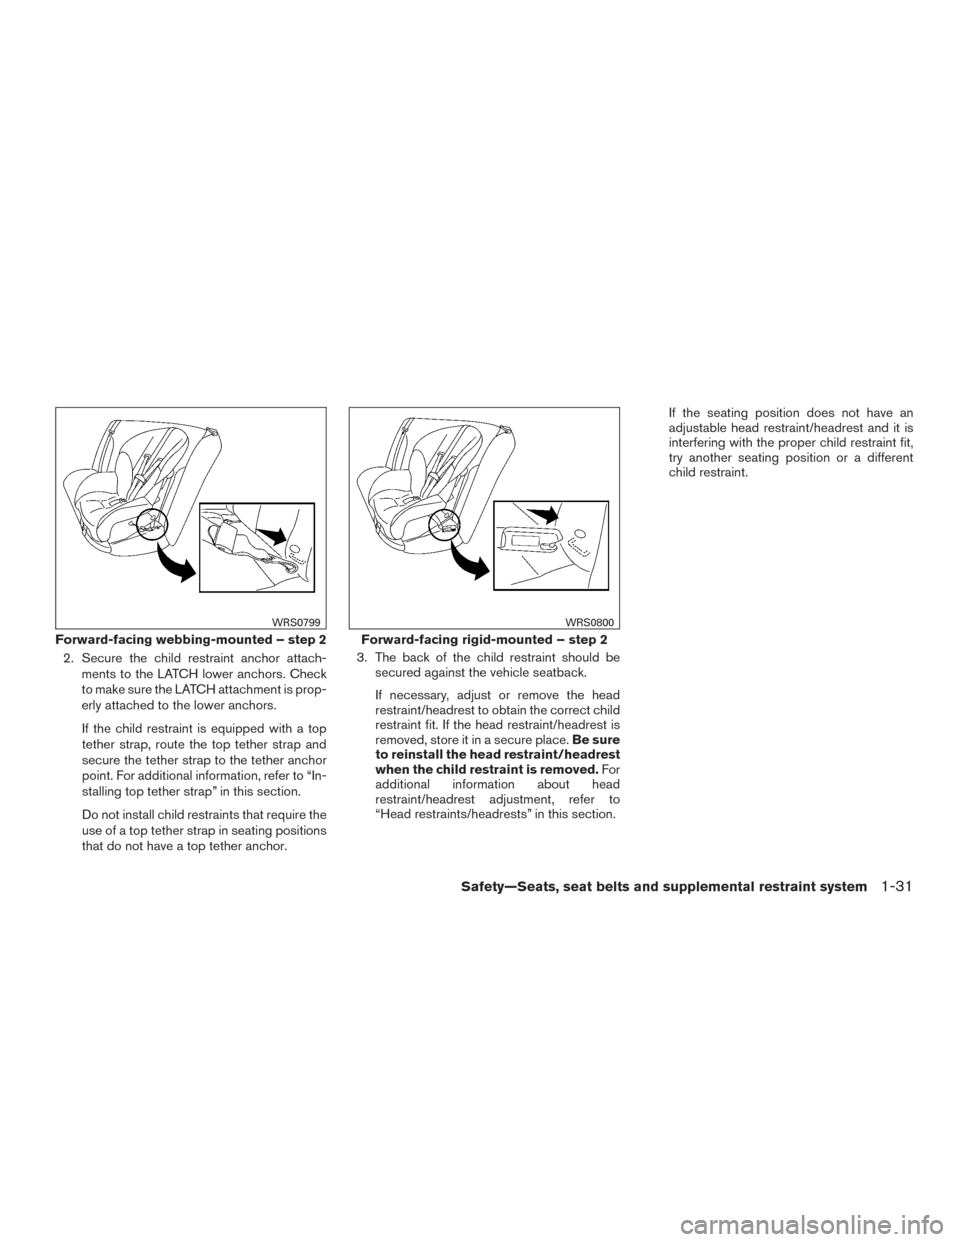
2. Secure the child restraint anchor attach-ments to the LATCH lower anchors. Check
to make sure the LATCH attachment is prop-
erly attached to the lower anchors.
If the child restraint is equipped with a top
tether strap, route the top tether strap and
secure the tether strap to the tether anchor
point. For additional information, refer to “In-
stalling top tether strap” in this section.
Do not install child restraints that require the
use of a top tether strap in seating positions
that do not have a top tether anchor. 3. The back of the child restraint should be
secured against the vehicle seatback.
If necessary, adjust or remove the head
restraint/headrest to obtain the correct child
restraint fit. If the head restraint/headrest is
removed, store it in a secure place. Be sure
to reinstall the head restraint/headrest
when the child restraint is removed. For
additional information about head
restraint/headrest adjustment, refer to
“Head restraints/headrests” in this section. If the seating position does not have an
adjustable head restraint/headrest and it is
interfering with the proper child restraint fit,
try another seating position or a different
child restraint.
Forward-facing webbing-mounted – step 2
WRS0799
Forward-facing rigid-mounted – step 2
WRS0800
Safety—Seats, seat belts and supplemental restraint system1-31
Page 51 of 478
For additional information, refer to all Warnings
and Cautions in the “Child safety” and “Child
restraints” sections of this manual before install-
ing a child restraint.
Do not use the lower anchors if the combined
weight of the child and the child restraint exceeds
65 lbs (29.5 kg) . If the combined weight of the
child and the child restraint is greater than 65 lbs
(29.5 kg) , use the vehicle’s seat belt (not the
lower anchors) to install the child restraint. Be
sure to follow the child restraint manufacturer’s
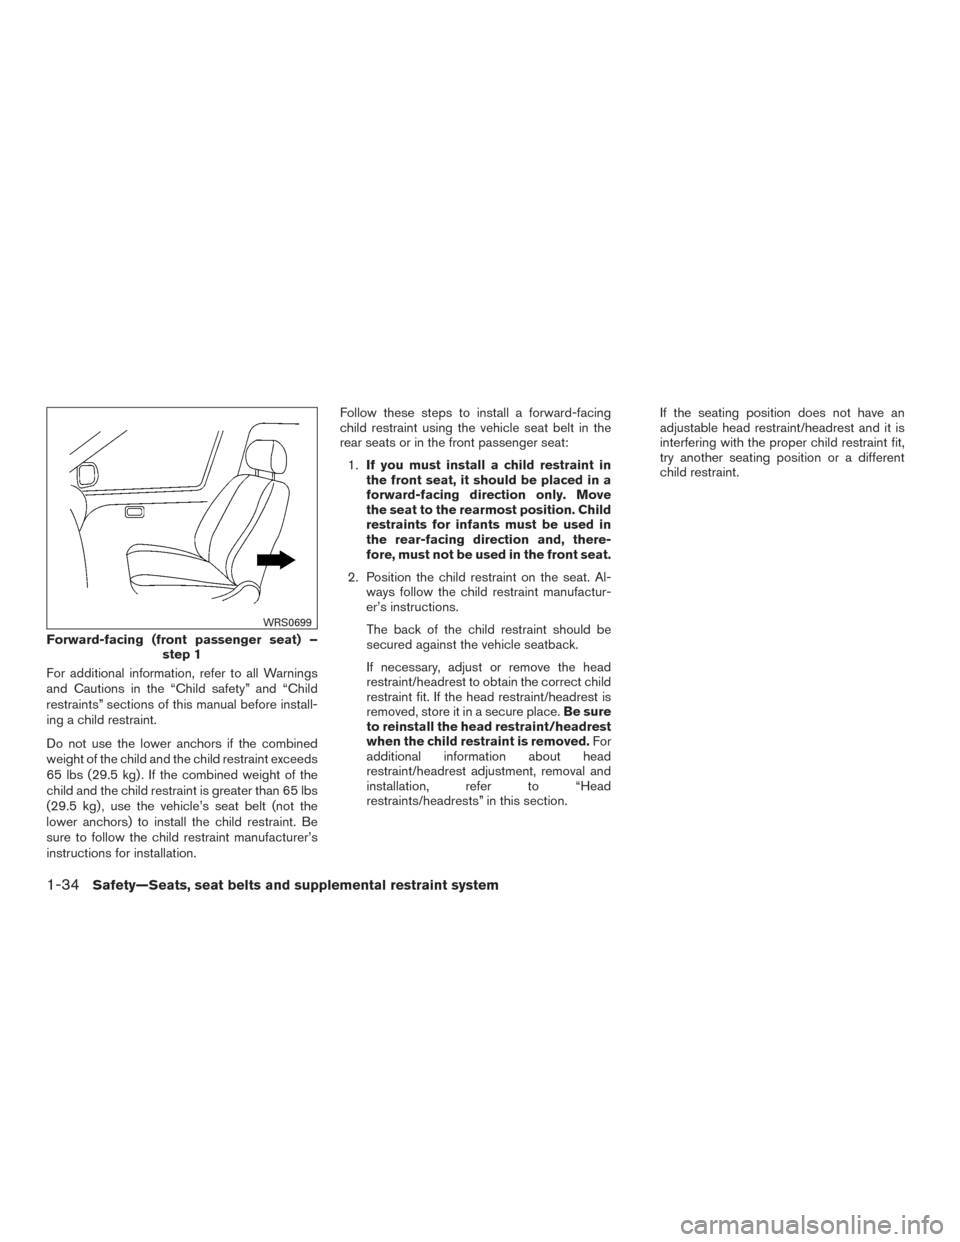
instructions for installation.Follow these steps to install a forward-facing
child restraint using the vehicle seat belt in the
rear seats or in the front passenger seat:
1. If you must install a child restraint in
the front seat, it should be placed in a
forward-facing direction only. Move
the seat to the rearmost position. Child
restraints for infants must be used in
the rear-facing direction and, there-
fore, must not be used in the front seat.
2. Position the child restraint on the seat. Al- ways follow the child restraint manufactur-
er’s instructions.
The back of the child restraint should be
secured against the vehicle seatback.
If necessary, adjust or remove the head
restraint/headrest to obtain the correct child
restraint fit. If the head restraint/headrest is
removed, store it in a secure place. Be sure
to reinstall the head restraint/headrest
when the child restraint is removed. For
additional information about head
restraint/headrest adjustment, removal and
installation, refer to “Head
restraints/headrests” in this section. If the seating position does not have an
adjustable head restraint/headrest and it is
interfering with the proper child restraint fit,
try another seating position or a different
child restraint.
Forward-facing (front passenger seat) –
step 1
WRS0699
1-34Safety—Seats, seat belts and supplemental restraint system
Page 56 of 478
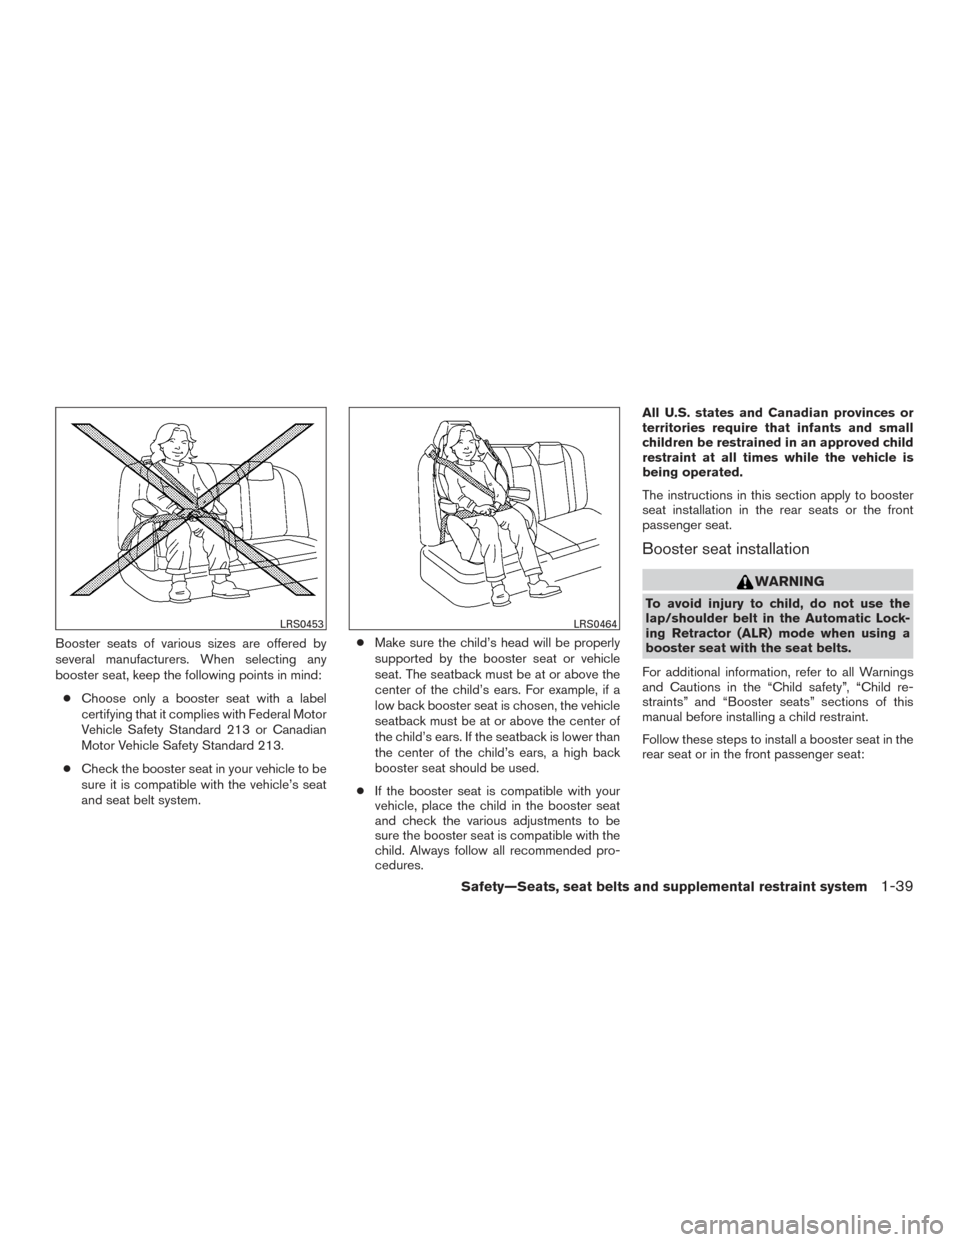
Booster seats of various sizes are offered by
several manufacturers. When selecting any
booster seat, keep the following points in mind:● Choose only a booster seat with a label
certifying that it complies with Federal Motor
Vehicle Safety Standard 213 or Canadian
Motor Vehicle Safety Standard 213.
● Check the booster seat in your vehicle to be
sure it is compatible with the vehicle’s seat
and seat belt system. ●
Make sure the child’s head will be properly
supported by the booster seat or vehicle
seat. The seatback must be at or above the
center of the child’s ears. For example, if a
low back booster seat is chosen, the vehicle
seatback must be at or above the center of
the child’s ears. If the seatback is lower than
the center of the child’s ears, a high back
booster seat should be used.
● If the booster seat is compatible with your
vehicle, place the child in the booster seat
and check the various adjustments to be
sure the booster seat is compatible with the
child. Always follow all recommended pro-
cedures. All U.S. states and Canadian provinces or
territories require that infants and small
children be restrained in an approved child
restraint at all times while the vehicle is
being operated.
The instructions in this section apply to booster
seat installation in the rear seats or the front
passenger seat.
Booster seat installation
WARNING
To avoid injury to child, do not use the
lap/shoulder belt in the Automatic Lock-
ing Retractor (ALR) mode when using a
booster seat with the seat belts.
For additional information, refer to all Warnings
and Cautions in the “Child safety”, “Child re-
straints” and “Booster seats” sections of this
manual before installing a child restraint.
Follow these steps to install a booster seat in the
rear seat or in the front passenger seat:
LRS0453LRS0464
Safety—Seats, seat belts and supplemental restraint system1-39
Page 57 of 478
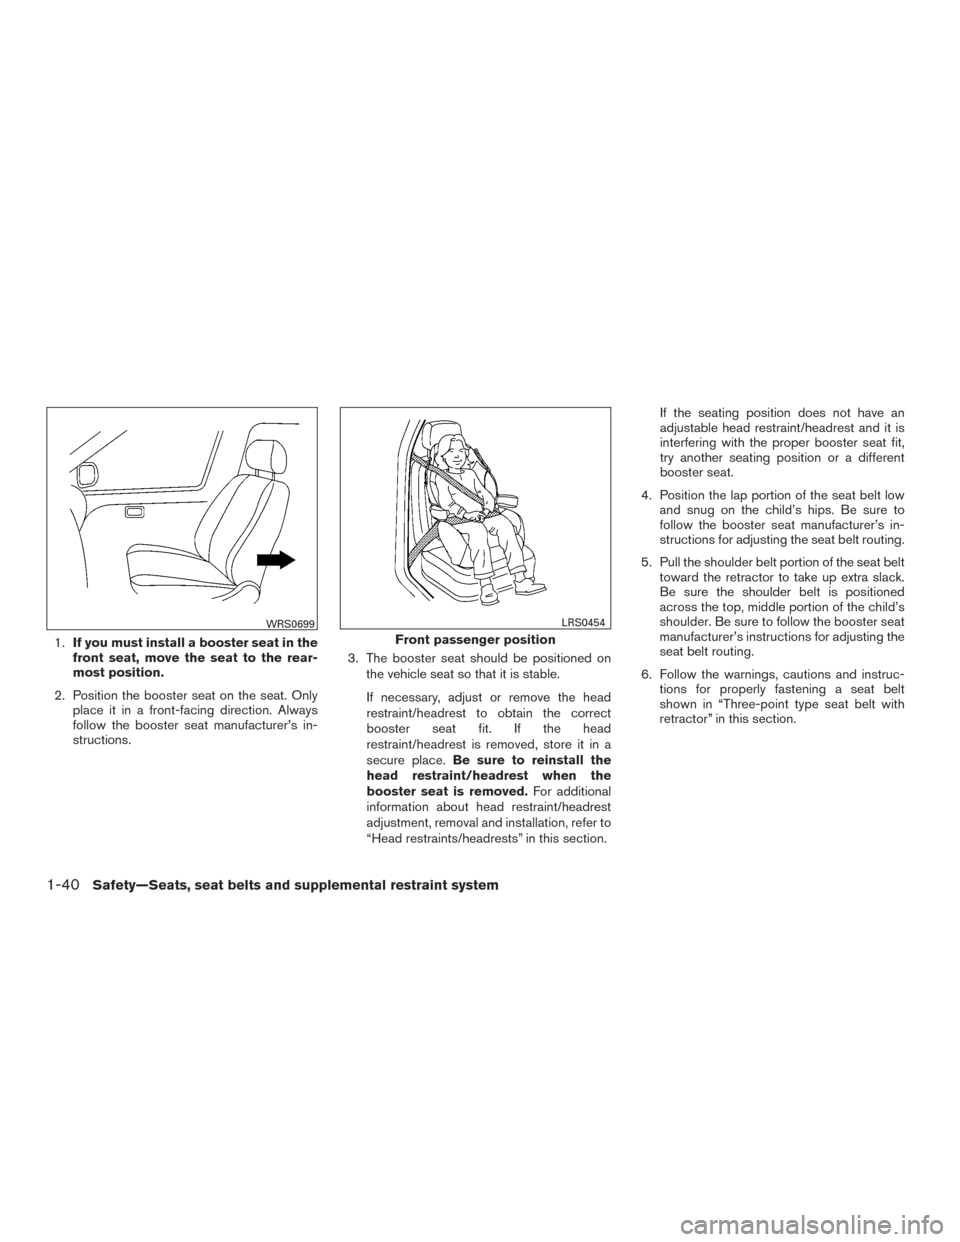
1.If you must install a booster seat in the
front seat, move the seat to the rear-
most position.
2. Position the booster seat on the seat. Only place it in a front-facing direction. Always
follow the booster seat manufacturer’s in-
structions. 3. The booster seat should be positioned on
the vehicle seat so that it is stable.
If necessary, adjust or remove the head
restraint/headrest to obtain the correct
booster seat fit. If the head
restraint/headrest is removed, store it in a
secure place. Be sure to reinstall the
head restraint/headrest when the
booster seat is removed. For additional
information about head restraint/headrest
adjustment, removal and installation, refer to
“Head restraints/headrests” in this section. If the seating position does not have an
adjustable head restraint/headrest and it is
interfering with the proper booster seat fit,
try another seating position or a different
booster seat.
4. Position the lap portion of the seat belt low and snug on the child’s hips. Be sure to
follow the booster seat manufacturer’s in-
structions for adjusting the seat belt routing.
5. Pull the shoulder belt portion of the seat belt toward the retractor to take up extra slack.
Be sure the shoulder belt is positioned
across the top, middle portion of the child’s
shoulder. Be sure to follow the booster seat
manufacturer’s instructions for adjusting the
seat belt routing.
6. Follow the warnings, cautions and instruc- tions for properly fastening a seat belt
shown in “Three-point type seat belt with
retractor” in this section.
WRS0699
Front passenger position
LRS0454
1-40Safety—Seats, seat belts and supplemental restraint system
Page 166 of 478
TRUNK LID RELEASE SWITCH
WARNING
●Do not drive with the trunk lid open. This
could allow dangerous exhaust gases
to be drawn into the vehicle. For addi-
tional information, refer to “Exhaust
gas (carbon monoxide)” in the “Starting
and driving” section of this manual. ●
Closely supervise children when they
are around cars to prevent them from
playing and becoming locked in the
trunk where they could be seriously in-
jured. Keep the car locked, with the rear
seatback and trunk lid securely latched
when not in use, and prevent children’s
access to car keys.
To open the trunk lid, push the opener switch
down.
To close the trunk lid, lower and push the trunk lid
down securely.
NOTE:
You can open the trunk lid with the Intelli-
gent Key. For additional information, refer
to “NISSAN Intelligent Key®” in this sec-
tion.
INTERIOR TRUNK LID RELEASE
WARNING
Closely supervise children when they are
around cars to prevent them from playing
and becoming locked in the trunk where
they could be seriously injured. Keep the
car locked, with the rear seatback and
trunk lid securely latched when not in use,
and prevent children’s access to car keys.
The interior trunk lid release mechanism provides
a means of escape for children and adults in the
event they become locked inside the trunk.
LPD2119LPD2081
TRUNK LID
Pre-driving checks and adjustments3-25
Page 390 of 478
When driving in areas using road salt or other
corrosive materials, check lubrication frequently.
Lights*Clean the headlights on a regular basis.
Make sure that the headlights, stop lights, tail
lights, turn signal lights, and other lights are all
operating properly and installed securely. Also
check headlight aim.
Road wheel nuts (lug nuts)* When checking
the tires, make sure no wheel nuts are missing,
and check for any loose wheel nuts. Tighten if
necessary.
Tire rotation* Tires should be rotated every
5,000 miles (8,000 km).
Tires* Check the pressure with a gauge often
and always prior to long distance trips. If neces-
sary, adjust the pressure in all tires, including the
spare, to the pressure specified. Check carefully
for damage, cuts or excessive wear.
Tire Pressure Monitoring System (TPMS)
transmitter components Replace the TPMS
transmitter grommet seal, valve core and cap
when the tires are replaced due to wear or age.
Wheel alignment and balance If the vehicle
should pull to either side while driving on a
straight and level road, or if you detect uneven or
abnormal tire wear, there may be a need for wheel alignment. If the steering wheel or seat vibrates at
normal highway speeds, wheel balancing may be
needed.
● For additional information regarding tires,
refer to “Important Tire Safety Information”
(US) or “Tire Safety Information” (Canada) in
the Warranty Information Booklet.
Windshield Clean the windshield on a regular
basis. Check the windshield at least every six
months for cracks or other damage. Have a dam-
aged windshield repaired by a qualified repair
facility.
Windshield wiper blades* Check for cracks or
wear if they do not wipe properly.
Inside the vehicle
The maintenance items listed here should be
checked on a regular basis, such as when per-
forming periodic maintenance, cleaning the ve-
hicle, etc.
Additional information on the following
items with an “*” is found in this section.
Accelerator pedal Check the pedal for smooth
operation and make sure the pedal does not bind
or require uneven effort. Keep the floor mat away
from the pedal. Brake pedal
Check the pedal for smooth opera-
tion. If the brake pedal suddenly goes down fur-
ther than normal, the pedal feels spongy or the
vehicle seems to take longer to stop, have your
vehicle checked immediately. It is recommended
that you visit a NISSAN dealer for this service.
Keep the floor mat away from the pedal.
Brakes Check that the brakes do not pull the
vehicle to one side when applied.
Continuously Variable Transmission (CVT)
P (Park) position mechanism On a fairly
steep hill, check that the vehicle is held securely
with the shift lever in the P (Park) position without
applying any brakes.
Parking brake Check the parking brake opera-
tion regularly. The vehicle should be securely held
on a fairly steep hill with only the parking brake
applied. If the parking brake needs adjustment, it
is recommended that you visit a NISSAN dealer
for this service.
Seats Check seat position controls such as seat
adjusters, seatback recliner, etc., to ensure they
operate smoothly and all latches lock securely in
every position. Check that the head
restraints/headrests move up and down
smoothly and the locks (if so equipped) hold
securely in all latched positions.
Maintenance and do-it-yourself8-3