2016 NISSAN SENTRA climate settings
[x] Cancel search: climate settingsPage 189 of 478
4. Turn the TUNE/SCROLL knob to adjust thesetting up or down.
5. Press the ENTER/SETTING button again to display the Contrast settings.
6. Turn the TUNE/SCROLL knob to adjust the setting up or down.
7. Press the ENTER/SETTING button to com- plete the adjustment.
Models with navigation:
1. Firmly apply the brake and place the shift lever in R (Reverse) .
2. Press the
button on the control panel. 3. The screen will display the Night settings.
4. Turn the TUNE knob to adjust the setting up
or down.
5. Press the
button again to access the
Auto settings.
6. Turn the TUNE knob to adjust the setting up or down.
NOTE:
Do not adjust any of the display settings of
the RearView Monitor while the vehicle is
moving. Make sure the parking brake is
firmly applied.
REARVIEW MONITOR SYSTEM
LIMITATIONS
WARNING
Listed below are the system limitations for
RearView Monitor. Failure to operate the
vehicle in accordance with these system
limitations could result in serious injury or
death.
● The system cannot completely elimi-
nate blind spots and may not show ev-
ery object. ●
Underneath the bumper and the corner
areas of the bumper cannot be viewed
on the RearView Monitor because of its
monitoring range limitation. The system
will not show small objects below the
bumper, and may not show objects
close to the bumper or on the ground.
● Objects viewed in the RearView Moni-
tor differ from actual distance because
a wide-angle lens is used.
● Objects in the RearView Monitor will
appear visually opposite compared to
when viewed in the rearview and out-
side mirrors.
● Use the displayed lines as a reference.
The lines are highly affected by the
number of occupants, fuel level, vehicle
position, road conditions and road
grade.
● Make sure that the trunk is securely
closed when backing up.
● Do not put anything on the rearview
camera. The rearview camera is in-
stalled above the license plate.
Models with navigation
LHA3679
4-14Monitor, climate, audio, phone and voice recognition systems
Page 212 of 478
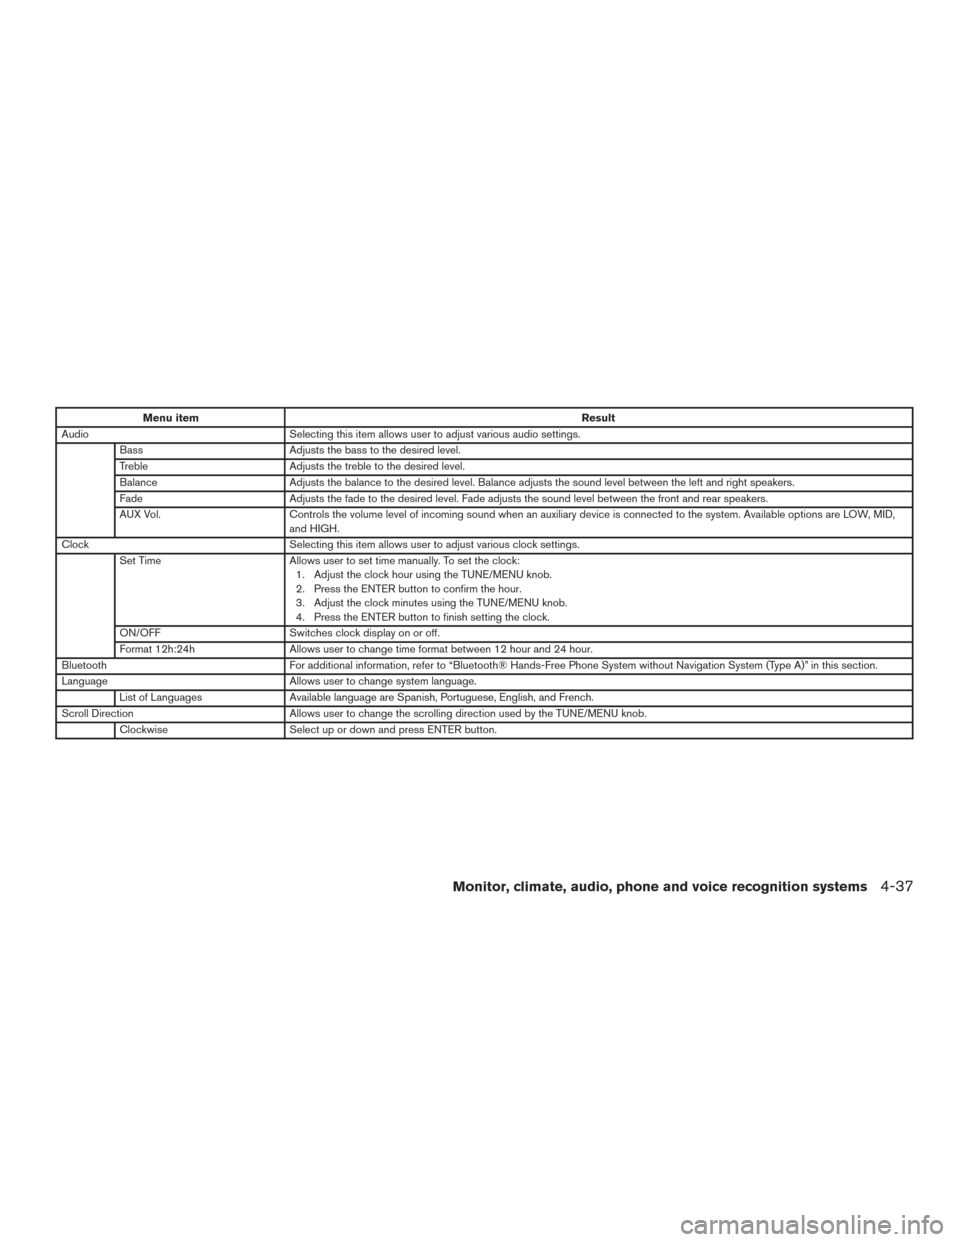
Menu itemResult
Audio Selecting this item allows user to adjust various audio settings.
Bass Adjusts the bass to the desired level.
Treble Adjusts the treble to the desired level.
Balance Adjusts the balance to the desired level. Balance adjusts the sound level between the left and right speakers.
Fade Adjusts the fade to the desired level. Fade adjusts the sound level between the front and rear speakers.
AUX Vol. Controls the volume level of incoming sound when an auxiliary device is connected to the system. Available options are LOW, MID,
and HIGH.
Clock Selecting this item allows user to adjust various clock settings.
Set Time Allows user to set time manually. To set the clock:
1. Adjust the clock hour using the TUNE/MENU knob.
2. Press the ENTER button to confirm the hour.
3. Adjust the clock minutes using the TUNE/MENU knob.
4. Press the ENTER button to finish setting the clock.
ON/OFF Switches clock display on or off.
Format 12h:24h Allows user to change time format between 12 hour and 24 hour.
Bluetooth For additional information, refer to “Bluetooth® Hands-Free Phone System without Navigation System (Type A)” in this section.
Language Allows user to change system language.
List of Languages Available language are Spanish, Portuguese, English, and French.
Scroll Direction Allows user to change the scrolling direction used by the TUNE/MENU knob.
Clockwise Select up or down and press ENTER button.
Monitor, climate, audio, phone and voice recognition systems4-37
Page 216 of 478
To turn the system off, press the(power)
button.
Turn the VOL (volume) control knob to adjust the
volume. This vehicle may be equipped with Speed Sen-
sitive Volume. When this feature is active, the
audio volume changes as the driving speed
changes.
ENTER/SETTING button
Press the ENTER/SETTING button to show the
Settings screen on the display. Turn the
TUNE/SCROLL knob to navigate the options
and then press the ENTER/SETTING button to
make a selection.
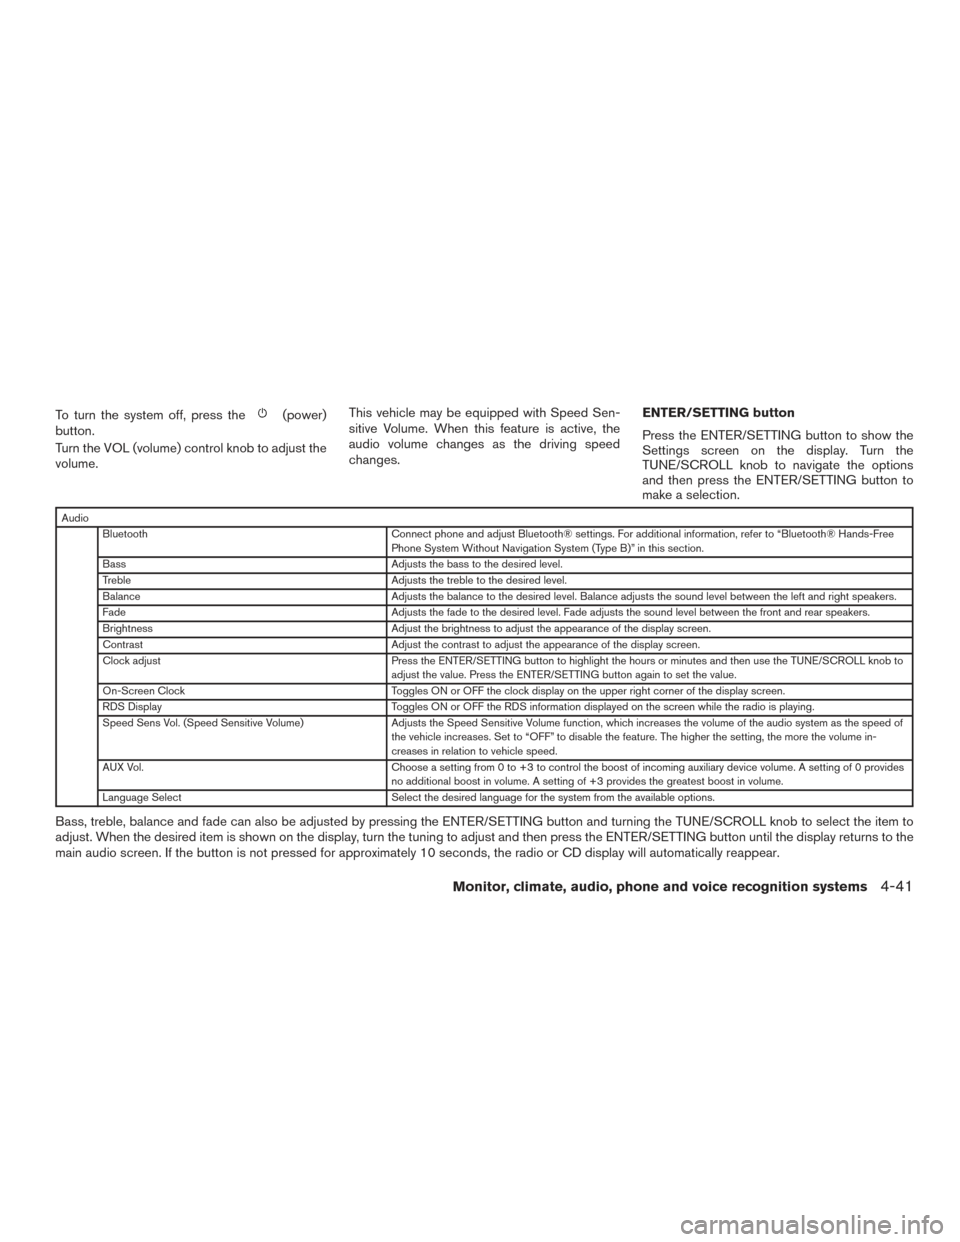
Audio
Bluetooth Connect phone and adjust Bluetooth® settings. For additional information, refer to “Bluetooth® Hands-Free
Phone System Without Navigation System (Type B)” in this section.
Bass Adjusts the bass to the desired level.
Treble Adjusts the treble to the desired level.
Balance Adjusts the balance to the desired level. Balance adjusts the sound level between the left and right speakers.
Fade Adjusts the fade to the desired level. Fade adjusts the sound level between the front and rear speakers.
Brightness Adjust the brightness to adjust the appearance of the display screen.
Contrast Adjust the contrast to adjust the appearance of the display screen.
Clock adjust Press the ENTER/SETTING button to highlight the hours or minutes and then use the TUNE/SCROLL knob to
adjust the value. Press the ENTER/SETTING button again to set the value.
On-Screen Clock Toggles ON or OFF the clock display on the upper right corner of the display screen.
RDS Display Toggles ON or OFF the RDS information displayed on the screen while the radio is playing.
Speed Sens Vol. (Speed Sensitive Volume) Adjusts the Speed Sensitive Volume function, which increases the volume of the audio system as the speed of
the vehicle increases. Set to “OFF” to disable the feature. The higher the setting, the more the volume in-
creases in relation to vehicle speed.
AUX Vol. Choose a setting from 0 to +3 to control the boost of incoming auxiliary device volume. A setting of 0 provides
no additional boost in volume. A setting of +3 provides the greatest boost in volume.
Language Select Select the desired language for the system from the available options.
Bass, treble, balance and fade can also be adjusted by pressing the ENTER/SETTING button and turning the TUNE/SCROLL knob to select the item to
adjust. When the desired item is shown on the display, turn the tuning to adjust and then press the ENTER/SETTING button until the display returns to the
main audio screen. If the button is not pressed for approximately 10 seconds, the radio or CD display will automatically reappear.
Monitor, climate, audio, phone and voice recognition systems4-41
Page 221 of 478
To turn the system off, press the ON-OFF button.
Turn the VOL (volume) control knob to adjust the
volume.
This vehicle may be equipped with Speed Sen-
sitive Volume. When this feature is active, the
audio volume changes as the driving speed
changes.AUDIO button
Press the AUDIO button to show the Settings
screen on the display. Turn the TUNE knob to
navigate the options and then press the AUDIO
button to make a selection.
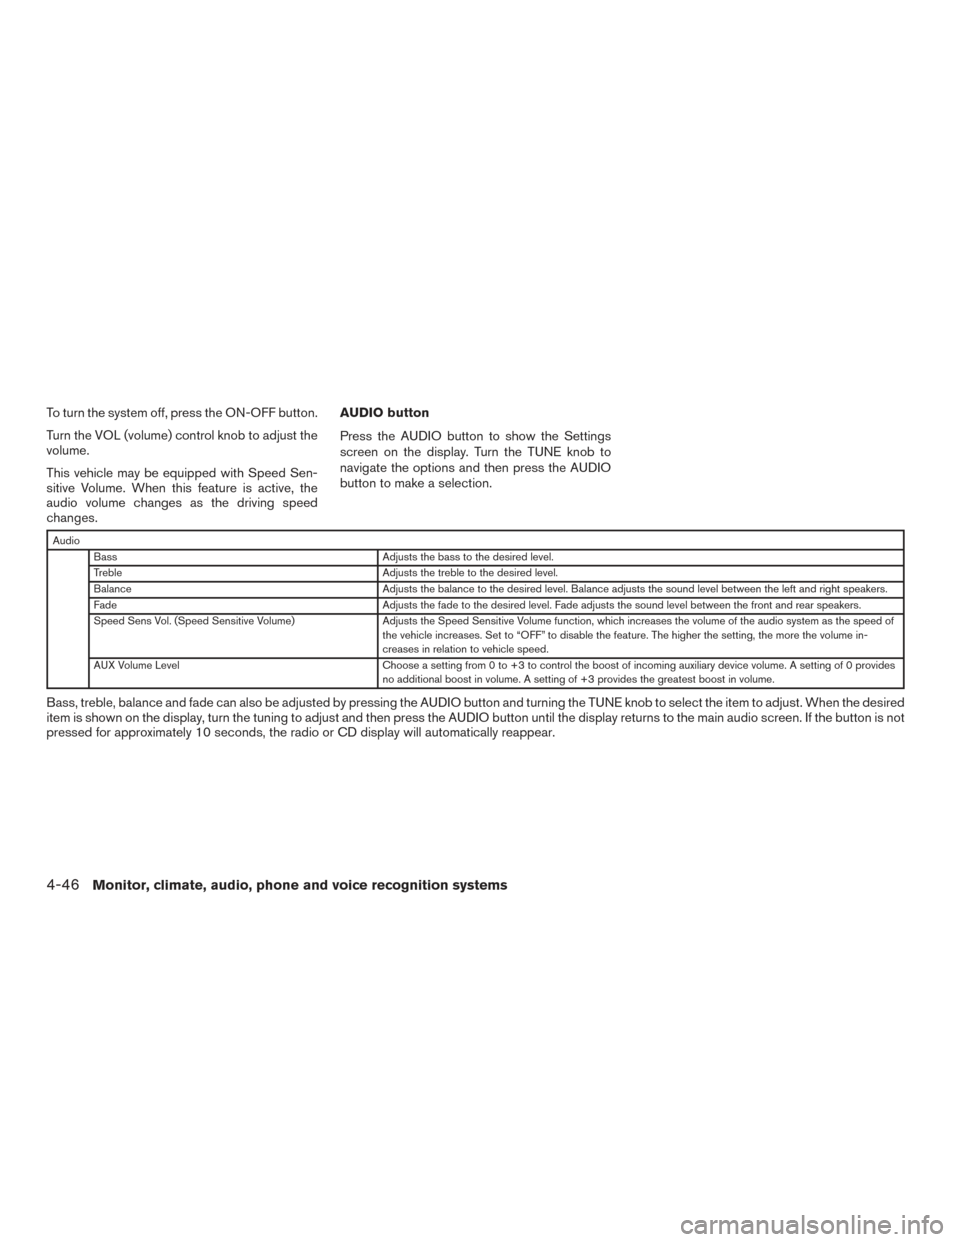
Audio
Bass Adjusts the bass to the desired level.
Treble Adjusts the treble to the desired level.
Balance Adjusts the balance to the desired level. Balance adjusts the sound level between the left and right speakers.
Fade Adjusts the fade to the desired level. Fade adjusts the sound level between the front and rear speakers.
Speed Sens Vol. (Speed Sensitive Volume) Adjusts the Speed Sensitive Volume function, which increases the volume of the audio system as the speed of
the vehicle increases. Set to “OFF” to disable the feature. The higher the setting, the more the volume in-
creases in relation to vehicle speed.
AUX Volume Level Choose a setting from 0 to +3 to control the boost of incoming auxiliary device volume. A setting of 0 provides
no additional boost in volume. A setting of +3 provides the greatest boost in volume.
Bass, treble, balance and fade can also be adjusted by pressing the AUDIO button and turning the TUNE knob to select the item to adjust. When the desired
item is shown on the display, turn the tuning to adjust and then press the AUDIO button until the display returns to the main audio screen. If the button is not
pressed for approximately 10 seconds, the radio or CD display will automatically reappear.
4-46Monitor, climate, audio, phone and voice recognition systems
Page 222 of 478
![NISSAN SENTRA 2016 B17 / 7.G Owners Manual BACK button
Pressing the BACK button will return the user to
the previous menu.
SXM settings
To view the SXM settings:1. Press the [
] button.
2. Touch the “Settings” key.
3. Touch the “SXM” k NISSAN SENTRA 2016 B17 / 7.G Owners Manual BACK button
Pressing the BACK button will return the user to
the previous menu.
SXM settings
To view the SXM settings:1. Press the [
] button.
2. Touch the “Settings” key.
3. Touch the “SXM” k](/manual-img/5/501/w960_501-221.png)
BACK button
Pressing the BACK button will return the user to
the previous menu.
SXM settings
To view the SXM settings:1. Press the [
] button.
2. Touch the “Settings” key.
3. Touch the “SXM” key.
The signal strength, activation status and other
information are displayed on the screen.
FM/AM/SAT radio operation
FM·AM button
Press the FM·AM button to change the band as
follows:
AM →FM1 →FM2 →AM
If another audio source is playing when the
FM·AM button is pressed, the audio source play-
ing will automatically be turned off and the last
radio station played will begin playing.
The FM stereo indicator (ST) is shown on the
screen during FM stereo reception. When the
stereo broadcast signal is weak, the radio auto-
matically changes from stereo to monaural re-
ception. SXM band select
Pressing the SXM button will change the band as
follows:
SXM1*
→SXM2* →SXM3* →SXM1* (satellite,
if so equipped)
When the SXM button is pressed while the igni-
tion switch is in the ACC or ON position, the
radio will come on at the last station played.
The last station played will also come on when
the ON-OFF button is pressed to turn the radio
on.
*When the SXM button is pressed, the satellite
radio mode will be skipped unless an optional
satellite receiver and antenna are installed and a
SiriusXM® Satellite Radio service subscription is
active. Satellite radio is not available in Alaska,
Hawaii and Guam.
If a compact disc is playing when the SXM button
is pressed, the compact disc will automatically be
turned off and the last radio station played will
come on.
While the radio is in SXM mode, the operation can
be controlled through the touch-screen. Touch the
“Channels” key to display a list of channels. Touch
a channel displayed on the list to change to that
channel. Touch the “Categories” key to display a list of categories. Touch a category displayed on
the list to display options within that category.
Tuning with the touch-screen
When in AM or FM mode, the radio can be tuned
using the touch-screen. To bring up the visual
tuner, touch the “Tune” key on the lower right
corner of the screen. A screen appears with a bar
running from low frequencies on the left to high
frequencies on the right. Touch the screen at the
location of the frequency you wish to tune and the
station will change to that frequency. To return to
the regular radio display screen, touch the “OK”
key.
Tuning with the TUNE knob
The radio can also be manually tuned using the
TUNE knob. When in FM or AM mode, turn the
TUNE knob to the left for lower frequencies or to
the right for higher frequencies. When in SXM
mode, turn the TUNE knob to change the chan-
nel.
SEEK tuning
When in FM or AM mode, press the seek
buttons
orto tune from low to high
or high to low frequencies and to stop at the next
broadcasting station.
When in SXM mode, press the seek
buttons
orto change the category.
Monitor, climate, audio, phone and voice recognition systems4-47
Page 236 of 478
BLUETOOTH® STREAMING AUDIO
WITHOUT NAVIGATION SYSTEM (if
so equipped)
If you have a compatible Bluetooth® audio de-
vice that is capable of playing audio files, the
device can be connected to the vehicle’s audio
system so that the audio files on the device play
through the vehicle’s speakers.
Connecting Bluetooth® audio
To connect your Bluetooth® audio device to the
vehicle, follow the procedure below:1. Press the
button. The system an-
nounces the available commands.
2. Say “Add Phone”. The system acknowl- edges the command and asks you to initiate
connecting from the phone handset. The
connecting procedure of the cellular phone
varies according to each cellular phone
model. For additional information, refer to
the cellular phone Owner’s Manual. You can
also visit www.nissanusa.com/bluetooth or
www.nissan.ca/bluetooth for instructions on
connecting NISSAN recommended cellular
phones. 3. When prompted for a Passkey code, enter
“1234” from the handset. The Passkey code
“1234” has been assigned by NISSAN and
cannot be changed.
Audio main operation
To switch to the Bluetooth® audio mode, press
the MEDIA button repeatedly until the
Bluetooth® audio mode is displayed on the
screen.
You can use the vehicle audio controls or the
Bluetooth® device’s controls to play, pause, skip
or reverse tracks.
BLUETOOTH® STREAMING AUDIO
WITH NAVIGATION SYSTEM
If you have a compatible Bluetooth® audio de-
vice that is capable of playing audio files, the
device can be connected to the vehicle’s audio
system so that the audio files on the device play
through the vehicle’s speakers.
Connecting Bluetooth® audio
To connect your Bluetooth® audio device to the
vehicle, follow the procedure below:
1. Press the [
] button.
2. Touch the “Settings” key.
3. Touch the “Phone & Bluetooth” key.
4. Touch the “Connect New Device” key.
LHA3747
Monitor, climate, audio, phone and voice recognition systems4-61
Page 241 of 478
NissanConnectSMServices is a suite of telemat-
ics tools that provide emergency preparedness,
remote access, customizable alerts and conve-
nience services. This feature is an option on
Navigation equipped vehicles. For additional in-
formation, refer to the separate Navigation Sys-
tem Owner’s Manual. Apple Siri® Eyes Free personal assistant can be
accessed from the vehicle. Siri Eyes Free can be
accessed in Siri Eyes Free mode to reduce user
distraction. In this mode, Siri Eyes Free is avail-
able for interaction by voice control. After con-
necting a compatible Apple device by using
Bluetooth®, Siri Eyes Free can be activated from
the
TALK switch on the steering wheel.
Siri® is a trademark of Apple Inc., registered in
the U.S. and other countries.
● Some Siri Eyes Free functions, such as dis-
playing pictures or opening apps, may not
be available while driving.
● For best results, always update your device
to the latest software version.
● Keep the interior of the vehicle as quiet as
possible. Close the windows to eliminate the
surrounding noises (traffic noises, vibration
sounds, etc.) , which may prevent the system
from recognizing the voice commands cor-
rectly.
● For functions that can be used in Siri Eyes
Free, please refer to the Apple website.
REQUIREMENTS
Siri is only available on the iPhone® 4S or later.
Devices released before iPhone® 4S are not
supported by the Siri Eyes Free system. Visit
www.apple.com/ios/siri for details about device
compatibility.
Siri must be enabled on the phone. Please check
phone settings.
If the device has a lock screen, Siri must be
accessible from the lock screen. Please check
phone settings.
For best results, always update your device to the
latest software version.
NISSANCONNECTSMSERVICES (if so
equipped) SIRI® EYES FREE (if so equipped)
4-66Monitor, climate, audio, phone and voice recognition systems
Page 242 of 478
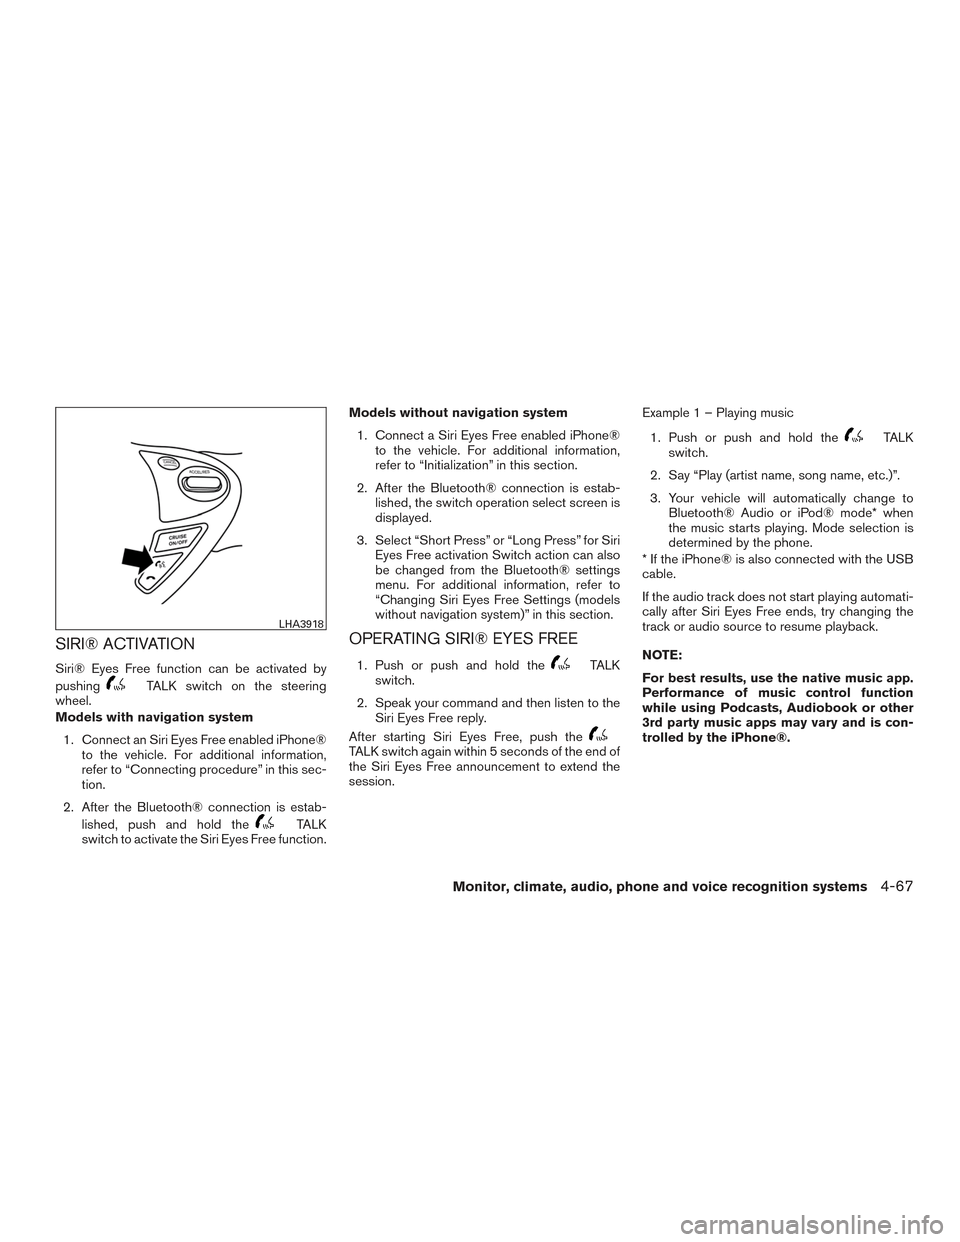
SIRI® ACTIVATION
Siri® Eyes Free function can be activated by
pushing
TALK switch on the steering
wheel.
Models with navigation system
1. Connect an Siri Eyes Free enabled iPhone® to the vehicle. For additional information,
refer to “Connecting procedure” in this sec-
tion.
2. After the Bluetooth® connection is estab- lished, push and hold the
TALK
switch to activate the Siri Eyes Free function. Models without navigation system
1. Connect a Siri Eyes Free enabled iPhone® to the vehicle. For additional information,
refer to “Initialization” in this section.
2. After the Bluetooth® connection is estab- lished, the switch operation select screen is
displayed.
3. Select “Short Press” or “Long Press” for Siri Eyes Free activation Switch action can also
be changed from the Bluetooth® settings
menu. For additional information, refer to
“Changing Siri Eyes Free Settings (models
without navigation system)” in this section.
OPERATING SIRI® EYES FREE
1. Push or push and hold theTALK
switch.
2. Speak your command and then listen to the Siri Eyes Free reply.
After starting Siri Eyes Free, push the
TALK switch again within 5 seconds of the end of
the Siri Eyes Free announcement to extend the
session. Example 1 – Playing music
1. Push or push and hold the
TALK
switch.
2. Say “Play (artist name, song name, etc.)”.
3. Your vehicle will automatically change to Bluetooth® Audio or iPod® mode* when
the music starts playing. Mode selection is
determined by the phone.
* If the iPhone® is also connected with the USB
cable.
If the audio track does not start playing automati-
cally after Siri Eyes Free ends, try changing the
track or audio source to resume playback.
NOTE:
For best results, use the native music app.
Performance of music control function
while using Podcasts, Audiobook or other
3rd party music apps may vary and is con-
trolled by the iPhone®.
LHA3918
Monitor, climate, audio, phone and voice recognition systems4-67