Page 156 of 558
MAP LIGHTS
Press the button to turn the map lights on. To turn
them off, press the button again.
Page 157 of 558

CAUTION
Do not use for extended periods of time
with the engine stopped. This could result
in a discharged battery.The HomeLink® Universal Transceiver provides
a convenient way to consolidate the functions of
up to three individual hand-held transmitters into
one built-in device.
HomeLink® Universal Transceiver:
● Will operate most radio frequency devices
such as garage doors, gates, home and of-
fice lighting, entry door locks and security
systems.
● Is powered by your vehicle’s battery. No
separate batteries are required. If the vehi-
cle’s battery is discharged or is discon-
nected, HomeLink® will retain all program-
ming.
When the HomeLink® Universal Trans-
ceiver is programmed, retain the original
transmitter for future programming proce-
dures (Example: new vehicle purchases) .
Upon sale of the vehicle, the programmed
HomeLink® Universal Transceiver buttons
should be erased for security purposes. For
additional information, refer to “Program-
ming HomeLink®” in this section.
Page 229 of 558

●When washing the vehicle with high
pressure water, be sure not to spray it
around the camera. Otherwise, water
may enter the camera unit causing wa-
ter condensation on the lens, a mal-
function, fire or an electric shock.
● Do not strike the camera. It is a preci-
sion instrument. Otherwise, it may mal-
function or cause damage resulting in a
fire or an electric shock.
The following are operating limitations and do not
represent a system malfunction: ● When the temperature is extremely high or
low, the screen may not clearly display ob-
jects.
● When strong light directly shines on the
camera, objects may not be displayed
clearly.
● Vertical lines may be seen in objects on the
screen. This is due to strong reflected light
from the bumper.
● The screen may flicker under fluorescent
light.
● The colors of objects on the RearView Moni-
tor may differ somewhat from the actual
color of objects. ●
Objects on the monitor may not be clear in a
dark environment.
● There may be a delay when switching be-
tween views.
● If dirt, rain or snow accumulate on the cam-
era, the RearView Monitor may not display
objects clearly. Clean the camera.
● Do not use wax on the camera lens. Wipe off
any wax with a clean cloth dampened with a
diluted mild cleaning agent, then wipe with a
dry cloth.
SYSTEM MAINTENANCE
Page 234 of 558
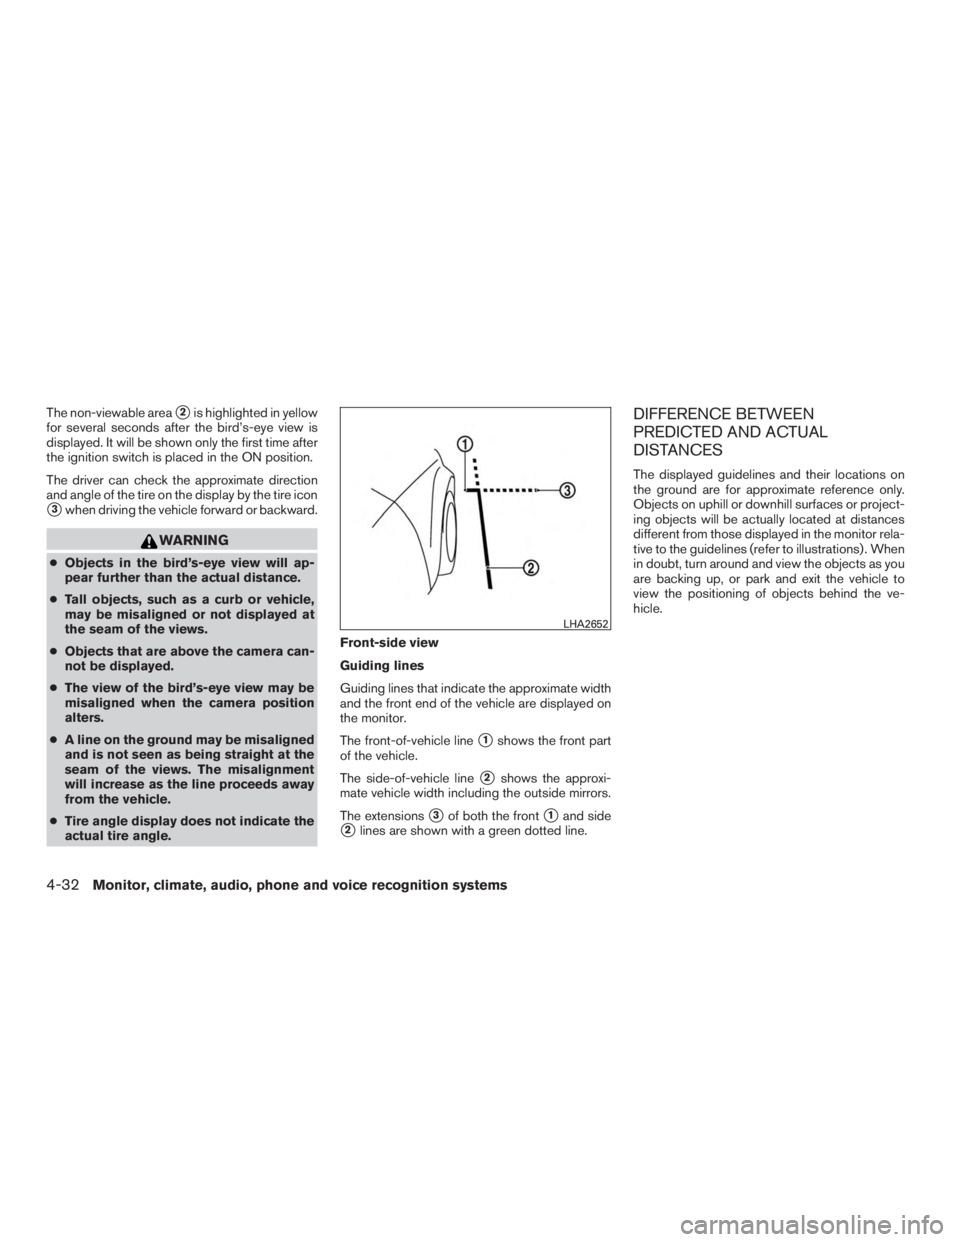
The non-viewable area�2is highlighted in yellow
for several seconds after the bird’s-eye view is
displayed. It will be shown only the first time after
the ignition switch is placed in the ON position.
The driver can check the approximate direction
and angle of the tire on the display by the tire icon
�3when driving the vehicle forward or backward.
Page 239 of 558

WARNING
Listed below are the system limitations for
Around View® Monitor. Failure to operate
the vehicle in accordance with these sys-
tem limitations could result in serious in-
jury or death.
●
Do not use the Around View® Monitor
with the outside mirrors in the stored
position, and make sure that the liftgate
is securely closed when operating the
vehicle using the Around View® Monitor.
●The apparent distance between objects
viewed on the Around View® Monitor
differs from the actual distance.
● The cameras are installed on the front
grille, the outside mirrors and above the
rear license plate. Do not put anything
on the vehicle that covers the cameras.
● When washing the vehicle with high
pressure water, be sure not to spray it
around the cameras. Otherwise, water
may enter the camera unit causing wa-
ter condensation on the lens, a mal-
function, fire or an electric shock.
● Do not strike the cameras. They are
precision instruments. Doing so could
cause a malfunction or cause damage
resulting in a fire or an electric shock. There are some areas where the system will not
show objects and the system does not warn of
moving objects. When in the front or rear view
display, an object below the bumper or on the
ground may not be viewed
�1. When in the
bird’s-eye view, a tall object near the seam
�2of
the camera viewing areas will not appear in the
monitor.
The following are operating limitations and do not
represent a system malfunction:
● There may be a delay when switching be-
tween views.
● When the temperature is extremely high or
low, the screen may not display objects
clearly.
● When strong light directly shines on the
camera, objects may not be displayed
clearly.
● The screen may flicker under fluorescent
light.
● The colors of objects on the Around View®
Monitor may differ somewhat from the actual
color of objects.
● Objects on the Around View® Monitor may
not be clear and the color of the object may
differ in a dark environment. ●
There may be differences in sharpness be-
tween each camera view of the bird’s-eye
view.
● Do not use wax on the camera lens. Wipe off
any wax with a clean cloth that has been
dampened with a diluted mild cleaning
agent, then wipe with a dry cloth.
Monitor, climate, audio, phone and voice recognition systems4-37
Page 247 of 558

will interfere with the chime sound, and
it may not be heard.
● The MOD system performance will be
limited according to e")
●Excessive noise (for example, audio
system volume or open vehicle window)
will interfere with the chime sound, and
it may not be heard.
● The MOD system performance will be
limited according to environmental con-
ditions and surrounding objects such
as:
– When there is low contrast between background and the moving objects.
– When there is a blinking source of light.
– When strong light such as another vehicle’s headlight or sunlight is
present.
– When camera orientation is not in its usual position, such as when a mirror
is folded.
– When there is dirt, water drops or snow on the camera lens.
– When the position of the moving ob- jects in the display is not changed.
● The MOD system might detect flowing
water droplets on the camera lens,
white smoke from the muffler, moving
shadows, etc. ●
The MOD system may not function
properly depending on the speed, direc-
tion, distance or shape of the moving
objects.
● If your vehicle sustains damage to the
parts where the camera is installed,
leaving it misaligned or bent, the sens-
ing zone may be altered and the MOD
system may not detect objects properly.
● When the temperature is extremely
high or low, the screen may not display
objects clearly. This is not a
malfunction.
NOTE:
The blue MOD icon will change to orange if
one of the following has occurred ● When the system is malfunctioning.
● When the component temperature reaches
a high level (icon will blink) .
● When the Rear View camera has detected a
blockage (icon will blink) . :
SYSTEM MAINTENANCE
Page 368 of 558
.
Also, this system may not detect a sudden
drop in tire pressure (for example, a flat tire
while driving) .
�")
●The TPMS will activate only when the vehicle
is driven at speeds above 16 mph (25 km/h).
Also, this system may not detect a sudden
drop in tire pressure (for example, a flat tire
while driving) .
● The low tire pressure warning light does not
automatically turn off when the tire pressure
is adjusted. After the tire is inflated to the
recommended pressure, the vehicle must be
driven at speeds above 16 mph (25 km/h) to
activate the TPMS and turn off the low tire
pressure warning light. Use a tire pressure
gauge to check the tire pressure.
● The “Tire Pressure Low - Add Air” warning
appears in the vehicle information display
when the low tire pressure warning light is
illuminated and low tire pressure is detected.
The “Tire Pressure Low - Add Air” warning
turns off when the low tire pressure warning
light turns off.
● The “Tire Pressure Low - Add Air” warning
appears each time the ignition switch is
placed in the on position as long as the low
tire pressure warning light remains illumi-
nated.
● The “Tire Pressure Low - Add Air” warning
does not appear if the low tire pressure
warning light illuminates to indicate a TPMS
malfunction. ●
Tire pressure rises and falls depending on
the heat caused by the vehicle’s operation
and the outside temperature. Do not reduce
the tire pressure after driving because the
tire pressure rises after driving. Low outside
temperature can lower the temperature of
the air inside the tire which can cause a
lower tire inflation pressure. This may cause
the low tire pressure warning light to illumi-
nate. If the warning light illuminates, check
the tire pressure for all four tires.
● The Tire and Loading Information label is
located in the driver’s door opening.
● You can also check the pressure of all tires
(except the spare tire) on the vehicle infor-
mation display screen. The order of the tire
pressure figures displayed on the screen
corresponds with the actual order of the tire
position.
For additional information, refer to “Low tire pres-
sure warning light” in the “Instruments and con-
trols” section and “Tire Pressure Monitoring Sys-
tem (TPMS)” in the “In case of emergency”
section of this manual.
Page 369 of 558
●Since the spare tire is not equipped with
the TPMS, when a spare tire is mounted
or a wheel is replaced, tire pressure will
not be indicated, the TPMS will not
function and the low tire pressure warn-
ing light will flash for approximately
1 minute. The light will remain on after
1 minute. Have your tires replaced
and/or TPMS system reset as soon as
possible. It is recommended that you
visit a NISSAN dealer for this service.
● Replacing tires with those not originally
specified by NISSAN could affect the
proper operation of the TPMS.
● Do not inject any tire liquid or aerosol
tire sealant into the tires, as this may
cause a malfunction of the tire pressure
sensors.