Page 126 of 540

The autolight system allows the headlights to turn
on and off automatically. The autolight system
can:● Turn on the headlights, front parking, tail,
license plate a")
Autolight system (if so equipped)
The autolight system allows the headlights to turn
on and off automatically. The autolight system
can:● Turn on the headlights, front parking, tail,
license plate and instrument panel lights au-
tomatically when it is dark.
● Turn off all the lights when it is light.
● Keep all the lights on for a period of time after
you place the ignition switch in the OFF
position and all doors are closed. ●
Turn on the headlights if the windshield wip-
ers make four continuous passes within one
minute of the first pass. The headlights re-
main on until the wipers are turned off for
longer that 3 seconds.
NOTE:
Autolight activation sensitivity and the time
delay for autolight shutoff can be adjusted.
For additional information, refer to “Ve-
hicle information display” in this section.
To turn on the autolight system: ● Turn the headlight switch to the AUTO posi-
tion
�1.
● Turn the ignition switch to ON.
● The autolight system automatically turns the
headlights on and off.
Initially, if the ignition switch is turned OFF and a
door is opened and left open, the headlights
remain ON for a period of time. If another door is
opened while the headlights are on, then the
timer is reset.
To turn the autolight system off, turn the switch to
the OFF,
,orposition. Be sure you do not put anything on top of
the autolight sensor located in the top side
of the instrument panel
�1. The autolight
sensor controls the autolight; if it is cov-
ered, the autolight sensor reacts as if it is
dark out and the headlights will illuminate.
If this occurs while parked with the engine
off and the ignition switch placed in the ON
position, your vehicle’s battery could be-
come discharged.
LIC3188LIC2237
Instruments and controls2-37
Page 128 of 540
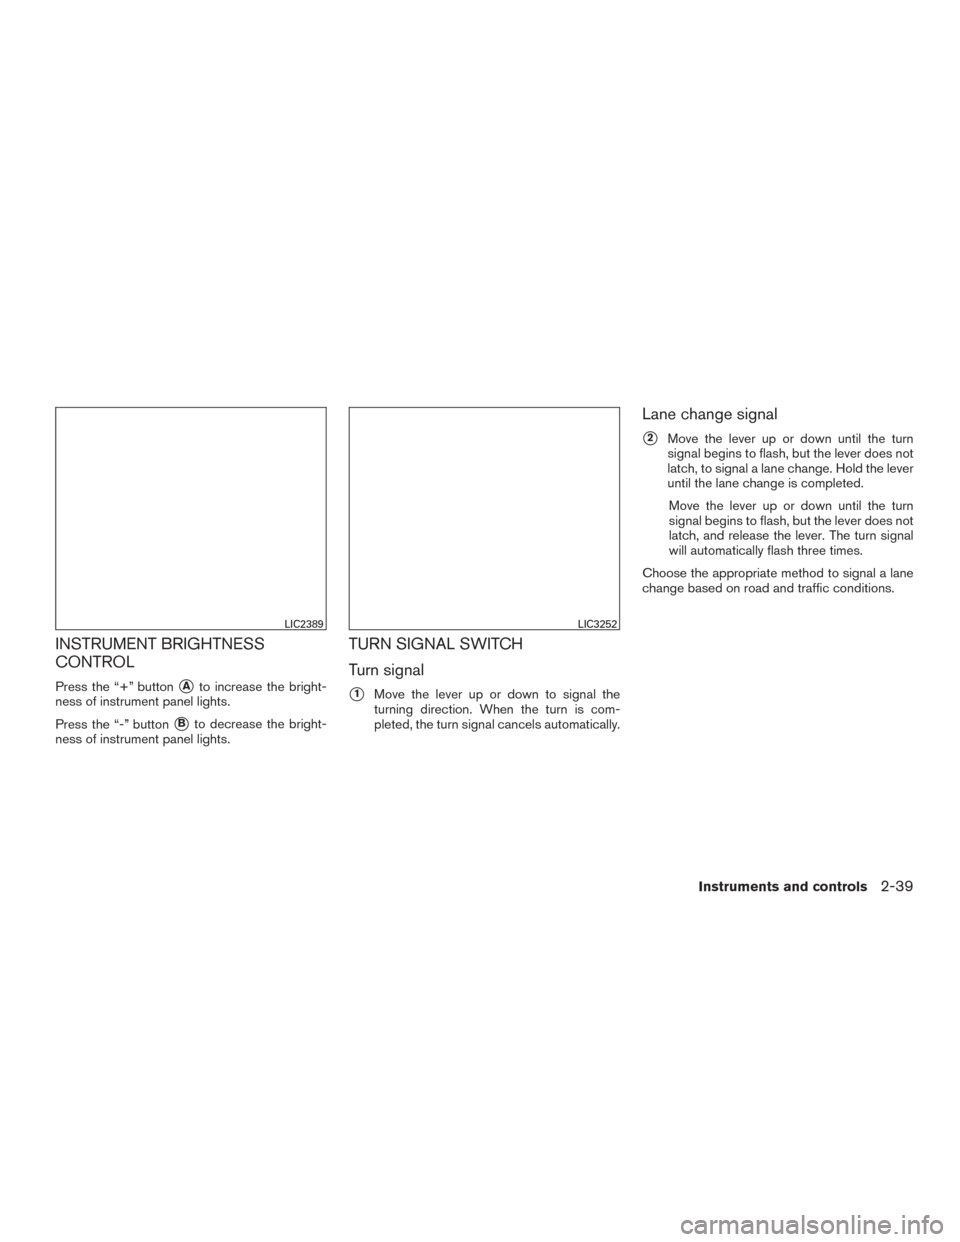
INSTRUMENT BRIGHTNESS
CONTROL
Press the “+” button�Ato increase the bright-
ness of instrument panel lights.
Press the “-” button
�Bto decrease the bright-
ness of instrument panel lights.
TURN SIGNAL SWITCH
Turn signal
�1Move the lever up or down to signal the
turning direction. When the turn is com-
pleted, the turn signal cancels automatically.
Lane change signal
�2Move the lever up or down until the turn
signal begins to flash, but the lever does not
latch, to signal a lane change. Hold the lever
until the lane change is completed.
Move the lever up or down until the turn
signal begins to flash, but the lever does not
latch, and release the lever. The turn signal
will automatically flash three times.
Choose the appropriate method to signal a lane
change based on road and traffic conditions.
LIC2389LIC3252
Instruments and controls2-39
Page 135 of 540
 system
that is activated using the settings menu on the
vehicle information display.
When the warning systems switch")
The warning systems switch is used to turn on
and off the Blind Spot Warning (BSW) system
that is activated using the settings menu on the
vehicle information display.
When the warning systems switch is turned off,
the indicator
�1on the switch is off. The indicator
will also be off if the warning system is deacti-
vated using the settings menu.
The BSW system will turn on the BSW/RCTA
indicator light, located next to the outside mirrors,
if the radar detects a vehicle in the detection
zone. If the turn signal is activated in the direction
of the detected vehicle, a chime sounds twice
and the BSW/RCTA indicator light will flash. For additional information, refer to “Blind Spot Warn-
ing (BSW)” in the “Starting and driving” section
of this manual.
Tow mode should be used when pulling a heavy
trailer or hauling a heavy load. Driving the vehicle
in the tow mode with no trailer/load or light
trailer/light load will not cause any damage. How-
ever, fuel economy may be reduced, and the
transmission/engine driving characteristics may
feel unusual.
Push the tow mode switch to activate tow mode.
The indicator light on the instrument panel illumi-
nates when tow mode is selected. Push the tow
mode switch again to turn tow mode OFF.
Tow mode is automatically canceled when the
ignition switch is placed in the OFF position.
LIC2225LIC3343
WARNING SYSTEMS SWITCH (if so
equipped) TOW MODE SWITCH
2-46Instruments and controls
Page 136 of 540
 maximum.
The instrument panel and center console power
outlets")
12V OUTLETS
The power outlets are for powering electrical
accessories such as cellular telephones. They
are rated at 12 volt, 120W (10A) maximum.
The instrument panel and center console power
outlets are powered only when the ignition switch
is in the ACC or ON position.
CAUTION
●The outlet and plug may be hot during
or immediately after use.
● Only certain power outlets are designed
for use with a cigarette lighter unit. Do
not use any other power outlet for an
accessory lighter. It is recommended
you visit a NISSAN dealer for additional
information.
● Do not use with accessories that exceed
a 12 volt, 120W (10A) power draw. ●
Do not use double adapters or more
than one electrical accessory.
● Use power outlets with the engine run-
ning to avoid discharging the vehicle
battery.
● Avoid using power outlets when the air
conditioner, headlights, or rear window
defroster is on.
● Before inserting or disconnecting a
plug, be sure the electrical accessory
being used is turned off.
Instrument Panel
LIC3345
Center Console
LIC3461
Cargo Area
LIC2236
POWER OUTLETS
Instruments and controls2-47
Page 138 of 540
The extended storage switch is used when ship-
ping the vehicle. It is located in the fuse panel to
the left of the steering wheel on the instrument
panel. If any electrical equipment does not oper-
ate, ensure the extended storage switch is
pushed fully in place, as shown.
LDI2758
OFF position
LIC3266
ON position
LIC3268
EXTENDED STORAGE SWITCH
Instruments and controls2-49
Page 146 of 540

1. Window lock button
2. Power door lock switch
3. Front passenger side switch
4. Right rear passenger side switch
5. Left rear passenger side switch
6. Driver’s side automatic switch
Driver’s side power window switch
The driver’s side control panel is equipped with
switches to open or close all of the windows.
To open a window, push the switch to the detent
and continue to hold down until the desired win-
dow position is reached. To close a window, pull
the switch to the detent and continue to hold up
until the desired window position is reached.
Locking passengers’ windows
When the window lock switch is depressed, only
the driver’s side window can be opened or
closed. Push it again to cancel the window lock
function.
Front passenger’s power window
switch
The passenger’s window switch operates only
the corresponding passenger’s window. To open
the window partially, push the switch down
�1
lightly until the desired window position is
reached. To close the window partially, pull the
switch up
�2until the desired window position is
reached.
LIC3208LIC2309
Instruments and controls2-57
Page 148 of 540
 does not operate properly, perform the fol-
lowing procedure to initialize the power window
system:1. Pl")
When power window switch does not
operate
If the power window automatic function (closing
only) does not operate properly, perform the fol-
lowing procedure to initialize the power window
system:1. Place the ignition switch in the ON position.
2. Open the window more than halfway by operating the power window switch.
3. Pull the power window switch and hold it to close the window, and then hold the switch
more than 3 seconds after the window is
closed.
4. Release the power window switch. Operate the window by the automatic function to
confirm the initialization is complete. The
power window automatically opens or
closes depending on if the automatic down
or up function is selected.
5. Perform steps 2 through 4 above for other windows.
If the power window function does not operate
properly after performing the above procedure
have the system checked and repaired. It is rec-
ommended you visit a NISSAN dealer for this
service.
POWER MOONROOF
The moonroof will only operate when the ignition
switch is in the ON position. The power moonroof
is operational for a period of time, even if the
ignition switch is placed in the ACC or OFF
position. If the driver’s door or the front passen-
ger’s door is opened during this period of time,
the power to the moonroof is canceled.
Sliding the moonroof
To slide the moonroof:
● To fully open the moonroof, push the switch
toward the open position
�2until it reaches
the second detent. If the switch is pushed to
the first detent, only the sunshade will open.
● To fully close the moonroof, push the switch
toward the close position
�1until it reaches
the second detent. If the switch is pushed to
the first detent, the moonroof will close but
the sunshade will remain open.
● To open or close the moonroof part way,
release the switch while the moonroof is
sliding open or closed. The moonroof will
stop at the desired position.
Tilting the moonroof
To tilt the moonroof:
● To tilt the moonroof up, push and release the
tilt switch. When the moonroof is open, it will
automatically close and then tilt up.
● To tilt the moonroof down, push and release
the tilt switch or push the switch
�1toward
the close position until it reaches the first
detent.
LIC2313
DUAL PANEL MOONROOF (if so
equipped)
Instruments and controls2-59
Page 168 of 540

NOTE:● Request switches for all doors and lift-
gate can be deactivated when the I-Key
Door Lock setting is switched to OFF in
the Vehicle Settings of the vehicle in-
formation display. For additional infor-
mation, refer to “Vehicle information
display” in the “Instruments and con-
trols” section of this manual.
● Doors lock with the door handle re-
quest switch while the ignition switch
is not in the LOCK position. ●
Doors do not lock by pushing the door
handle request switch while any door is
open. However, doors lock with the
mechanical key even if any door is
open.
● Doors do not lock with the door handle
request switch with the Intelligent Key
inside the vehicle and a beep sounds to
warn you. However, when an Intelligent
Key is inside the vehicle, doors can be
locked with another Intelligent Key.
CAUTION
● After locking the doors using the re-
quest switch, make sure that the doors
have been securely locked by operating
the door handles or the rear liftgate
opener switch.
● When locking the doors using the re-
quest switch, make sure to have the
Intelligent Key in your possession be-
fore operating the request switch to
prevent the Intelligent Key from being
left in the vehicle.
● The request switch is operational only
when the Intelligent Key has been de-
tected by the Intelligent Key system. Lockout protection
To prevent the Intelligent Key from being acci-
dentally locked in the vehicle, lockout protection
is equipped with the Intelligent Key system.
When the driver’s side door is open, the doors are
locked, and then the Intelligent Key is put inside the
vehicle and all the doors are closed; the lock will
automatically unlock and the door buzzer sounds.
NOTE:
The doors may not lock when the Intelli-
gent Key is in the same hand that is oper-
ating the request switch to lock the door.
Put the Intelligent Key in a purse, pocket or
your other hand.
CAUTION
The lockout protection may not function
under the following conditions:
●
When the Intelligent Key is placed on
top of the instrument panel.
● When the Intelligent Key is placed in-
side the glove box or a storage bin.
● When the Intelligent Key is placed in-
side the door pockets.
● When the Intelligent Key is placed in-
side or near metallic materials.
LPD2106
Pre-driving checks and adjustments3-11