Page 140 of 380
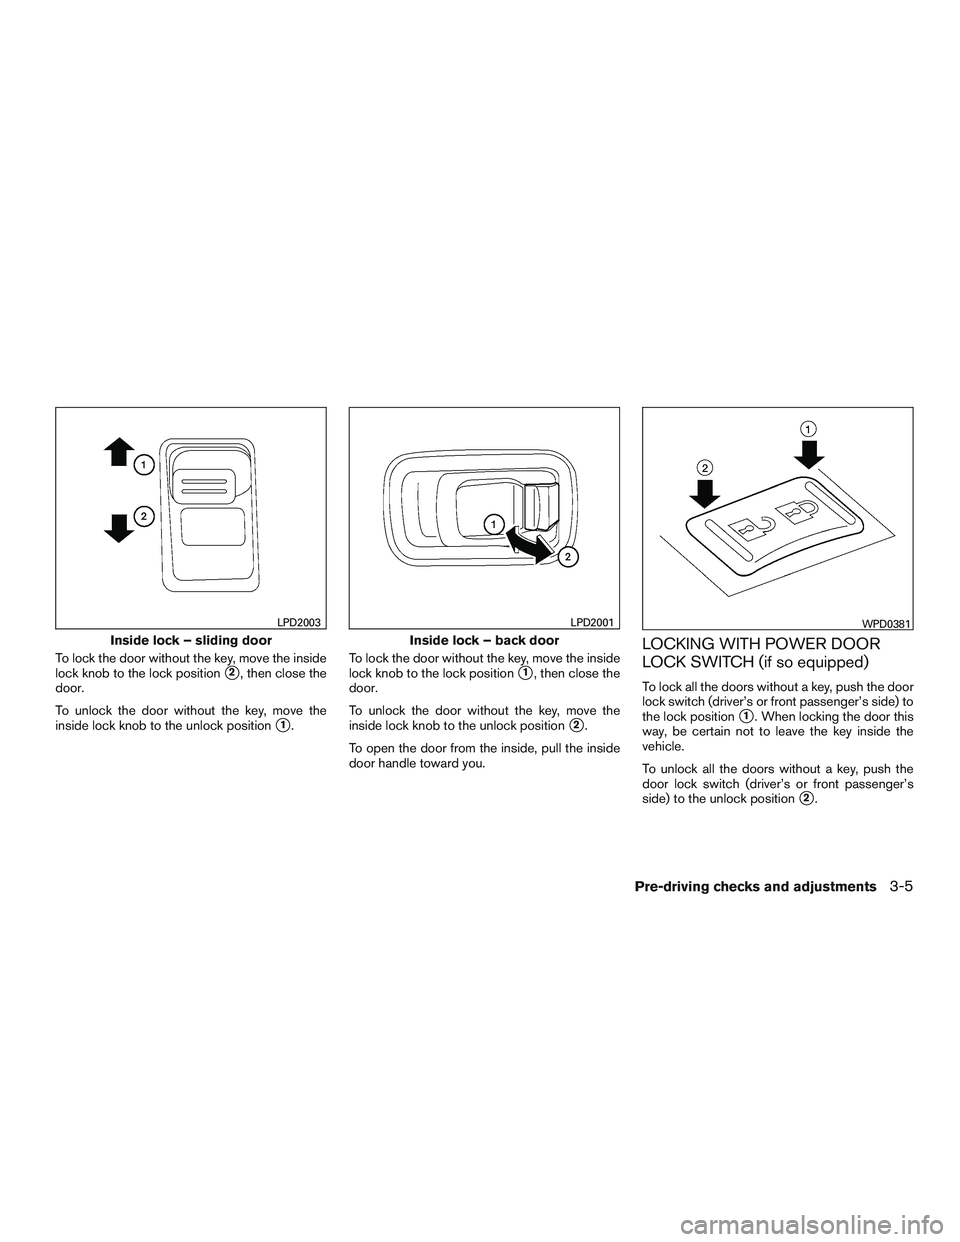
To lock the door without the key, move the inside
lock knob to the lock position
�2, then close the
door.
To unlock the door without the key, move the
inside lock knob to the unlock position
�1. To lock the door without the key, move the inside
lock knob to the lock position
�1, then close the
door.
To unlock the door without the key, move the
inside lock knob to the unlock position
�2.
To open the door from the inside, pull the inside
door handle toward you.
LOCKING WITH POWER DOOR
LOCK SWITCH (if so equipped)
To lock all the doors without a key, push the door
lock switch (driver’s or front passenger’s side) to
the lock position
�1. When locking the door this
way, be certain not to leave the key inside the
vehicle.
To unlock all the doors without a key, push the
door lock switch (driver’s or front passenger’s
side) to the unlock position
�2.
Inside lock – sliding door
LPD2003
Inside lock – back door
LPD2001WPD0381
Pre-driving checks and adjustments3-5
Page 141 of 380
 is moved to the lock
position with the key in the ignition switch and any
door opens, all doors will lock an")
Lockout protection
When the power door lock switch (driver’s or
front passenger’s side) is moved to the lock
position with the key in the ignition switch and any
door opens, all doors will lock and then unlock
automatically. This helps to prevent the keys from
being accidently locked inside the vehicle.
OPERATING THE SLIDING DOOR
The sliding door can be opened from the inside or
the outside.
To open the sliding door from the inside, pull the
release lever
�1down and pull the handle�2
toward the rear of the vehicle until the door clicks.
This will lock the door into an open position.
To close the sliding door from the inside pull the
release lever
�1down. The door will release from
the open position. Slide the door forward to
close. To open a sliding door from the outside, pull out
the outside handle and slide the door toward the
rear of the vehicle until the door clicks. The door
will lock into an open position.
To close the sliding door from the outside, pull the
outside handle again. The door will release from
the open position and slide closed.
LPD2002
3-6Pre-driving checks and adjustments
Page 142 of 380
BACK DOORS
CAUTION
Do not operate the 243° release lever until
the door has been fully opened. Doing so
can result in damage to the vehicle and/or
malfunction of the mechanism.Open the back doors by performing the follow-
ing:
1. From the outside of the vehicle, pull the door handle on the right side door toward you and
open door until it stops.
2. Lift the lever
�Aon the side of the left back
door and pull the door to open until the door
stops
�1.
The back doors open approximately 243° to allow
access to the rear of the vehicle.3. To open either door to the wide open posi- tion
�2pull the release lever�Btoward the
back door and release the check link arm
�C.
4. Open the door slowly until the magnetic door stopper connects to the stop pad on
the outside of the vehicle. Do not use the
stopper as a step.
LPD2051LPD2009
Pre-driving checks and adjustments3-7
Page 151 of 380

●Do not adjust the steering wheel any
closer to you than is necessary for
proper steering operation and comfort.
The driver’s air bag inflates with great
force. If you are unrestrained, leaning
forward, sitting sideways or out of posi-
tion in any way, you are at greater risk of
injury or death in a crash. You may also
receive serious or fatal injuries from the
air bag if you are up against it when it
inflates. Always sit back against the
seatback and as far away as practical
from the steering wheel. Always use the
seat belts.
Pull the lock lever toward the driver and hold it to
adjust the steering wheel up or down to the
desired position.
Release the lock lever to lock the steering wheel
in place.
�1To block out glare from the front, swing down
the sun visor.
�2To block glare from the side, disconnect the
sun visor from the center mount and swing it to
the side.
STORAGE CLIP
To access the storage clip, pull the sun visor
down. Insert items such as business cards, direc-
tions, etc. under the clip. Do not view information
while operating the vehicle.
LPD2021
LPD2007
SUN VISORS
3-16Pre-driving checks and adjustments
Page 153 of 380
OUTSIDE MIRRORS
WARNING
Objects viewed in the convex portion of
the mirror are closer than they appear. Be
careful when changing lanes or turning.
Using only the convex mirror could cause
an accident. Use the other mirrors or
glance over your shoulder to properly
judge distances to other objects.
Use the outside mirror remote control to adjust
the top portion of the mirror. The lower portion of the mirror can be moved
manually in any direction for a better rear view.
Pull the trailer tow mirror outward to extend it to
the desired position for better visibility while tow-
ing a trailer.WARNING
Do not extend or retract mirrors while driv-
ing. You may lose control of your vehicle
and cause an accident.
CAUTION
Driving in tight spaces with mirrors ex-
tended may cause damage to the vehicle.
Type A (if so equipped)
LPD2017
Type B (Trailer tow) (if so equipped)
LPD0279
Trailer tow
LPD0268
3-18Pre-driving checks and adjustments
Page 154 of 380
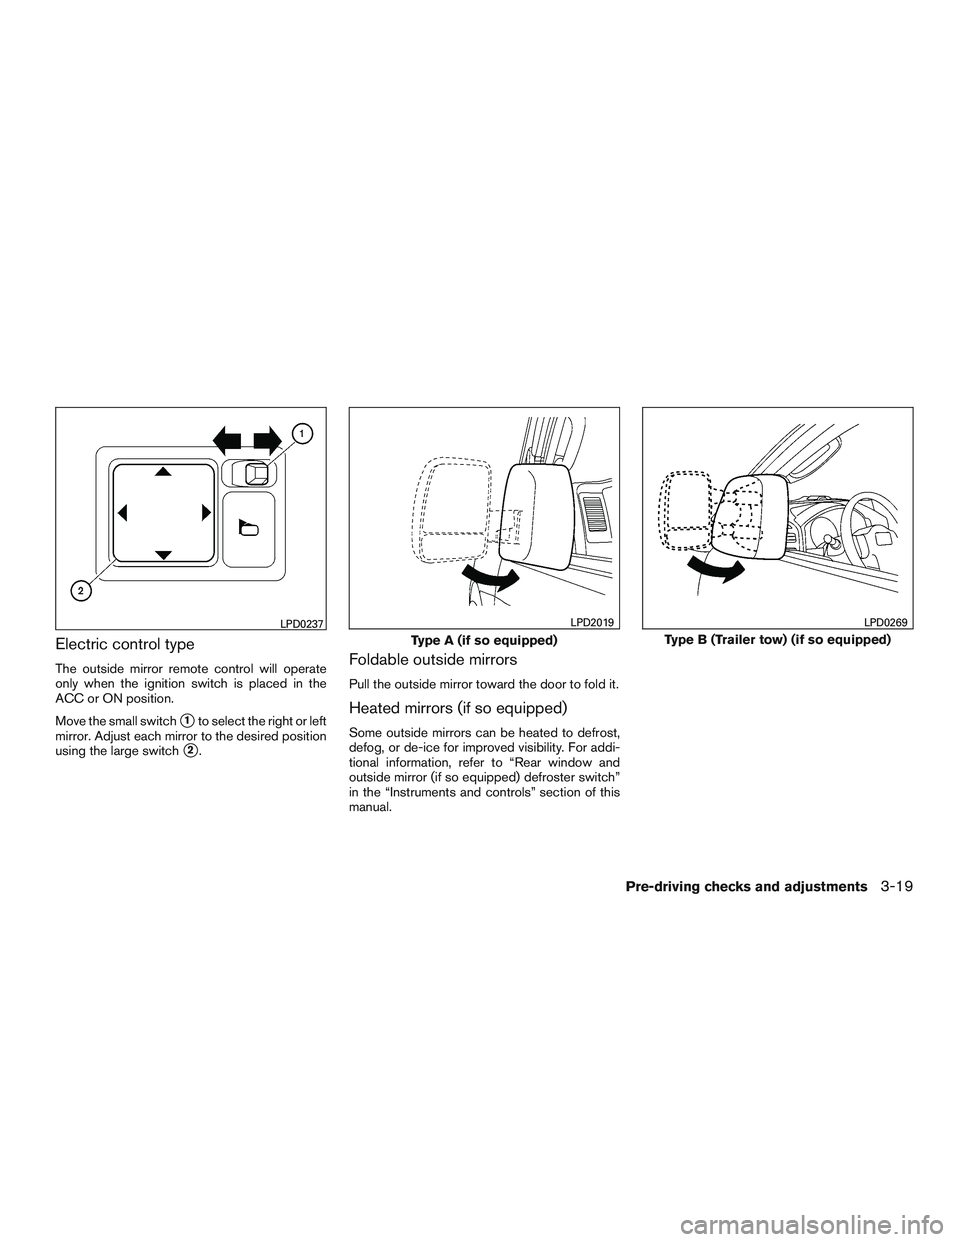
Electric control type
The outside mirror remote control will operate
only when the ignition switch is placed in the
ACC or ON position.
Move the small switch
�1to select the right or left
mirror. Adjust each mirror to the desired position
using the large switch
�2.
Foldable outside mirrors
Pull the outside mirror toward the door to fold it.
Heated mirrors (if so equipped)
Some outside mirrors can be heated to defrost,
defog, or de-ice for improved visibility. For addi-
tional information, refer to “Rear window and
outside mirror (if so equipped) defroster switch”
in the “Instruments and controls” section of this
manual.
LPD0237
Type A (if so equipped)
LPD2019
Type B (Trailer tow) (if so equipped)
LPD0269
Pre-driving checks and adjustments3-19
Page 160 of 380

9. CAMERA button
10. NAV button*
* For additional information, refer to the separate
Navigation System Owner’s Manual regarding
the Navigation system control buttons.
** For additional information, refer to the
“Bluetooth® Hands-Free Phone System with
navigation system” or “Bluetooth® Hands-Free
Phone System without navigation system” in this
section.
When you use this system, make sure the engine
is running.
If you use the system with the engine not
running (ignition ON or ACC) for a long
time, it will discharge the battery, and the
engine will not start.
Reference symbols:
“Example” — Words marked in quotes refer to a
key shown only on the display. These keys can be
selected by touching the screen.HOW TO USE THE TOUCH-
SCREEN
CAUTION
● The glass display screen may break if it
is hit with a hard or sharp object. If the
glass screen breaks, do not touch it.
Doing so could result in an injury.
● To clean the display, never use a rough
cloth, alcohol, benzine, thinner or any
kind of solvent or paper towel with a
chemical cleaning agent. They will
scratch or deteriorate the panel.
● Do not splash any liquid such as water
or car fragrance on the display. Contact
with liquid will cause the system to
malfunction.
To help ensure safe driving, some functions can-
not be operated while driving.
The on-screen functions that are not available
while driving will be grayed out or muted.
Park the vehicle in a safe location and then oper-
ate the navigation system.
WARNING
● ALWAYS give your full attention to
driving.
● Avoid using vehicle features that could
distract you. If distracted, you could
lose control of your vehicle and cause
an accident.
Monitor, climate, audio, phone and voice recognition systems4-5
Page 172 of 380
Adjust air flow direction by moving the vent
slides.
Open or close the vents by using the dial. Move
the dial toward the
to open the vents or
toward the
to close them. Adjust the air flow direction of the vents by open-
ing, closing or rotating.
These vents are only operational when the rear
fan speed control dial is at a setting other than 0
and the rear temperature control dial is at a
setting other than hot.
For additional information, refer to “Rear seat air
conditioner” in this section. The air flow from the floor vents located beneath
the driver’s and front passenger’s seats cannot
be adjusted or closed. These vents are only op-
erational when theair flow control button
is selected.
For additional information, refer to “Air flow con-
trol buttons” in this section.
Front (side and center)
LHA2065
Rear (ceiling)
LHA2130
Floor (beneath driver’s and front passen- ger’s seats)
LHA2128
VENTS
Monitor, climate, audio, phone and voice recognition systems4-17