2016 NISSAN NV PASSENGER VAN fuse
[x] Cancel search: fusePage 16 of 380
17. Rear sonar system OFF switch(if so equipped) (P. 2-32)
Tow mode ON switch (if so equipped)
(P. 2-33)
Front and rear sonar system OFF
switch (if so equipped) (P. 2-33)
Heated seat switch (if so equipped)
(P. 2-30)
Power inverter switch (if so equipped)
(P. 2-31)
18. 12v power outlet (P. 2-34)
19. Ignition switch (P. 5-8)
20. Tilt steering wheel control (P. 3-15)
21. Hood release switch (P. 3-12)
22. Fuse box (P. 8-24)
23. Outside power mirror switch (P. 3-18) Vehicle Dynamic Control (VDC) OFF
switch (P. 2-31)
*: Refer to the separate Navigation System Own-
er’s Manual (if so equipped) .
Refer to the page number indicated in pa-
rentheses for operating details.
Illustrated table of contents0-7
Page 17 of 380
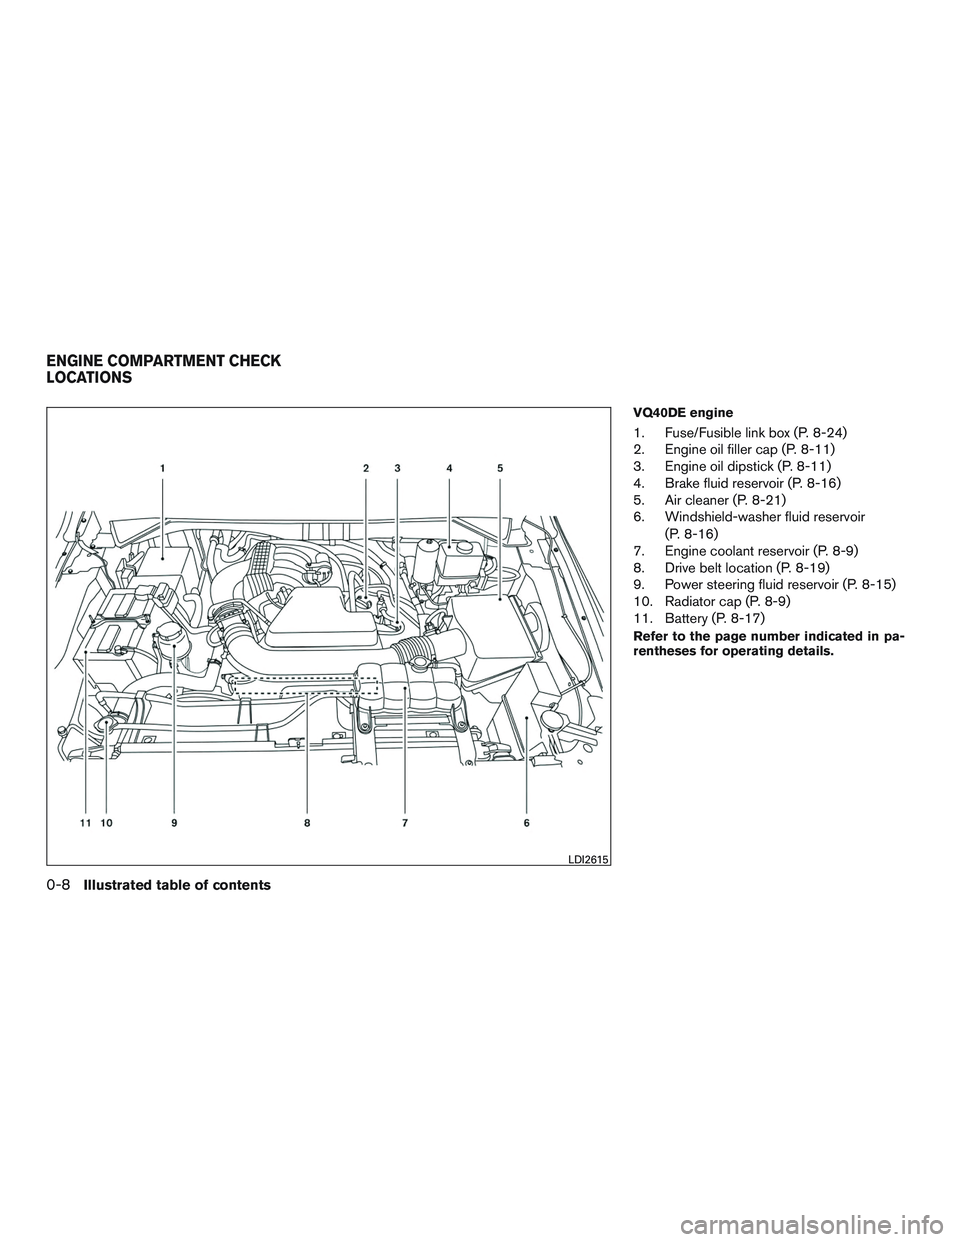
VQ40DE engine
1. Fuse/Fusible link box (P. 8-24)
2. Engine oil filler cap (P. 8-11)
3. Engine oil dipstick (P. 8-11)
4. Brake fluid reservoir (P. 8-16)
5. Air cleaner (P. 8-21)
6. Windshield-washer fluid reservoir(P. 8-16)
7. Engine coolant reservoir (P. 8-9)
8. Drive belt location (P. 8-19)
9. Power steering fluid reservoir (P. 8-15)
10. Radiator cap (P. 8-9)
11. Battery (P. 8-17)
Refer to the page number indicated in pa-
rentheses for operating details.
LDI2615
ENGINE COMPARTMENT CHECK
LOCATIONS
0-8Illustrated table of contents
Page 18 of 380
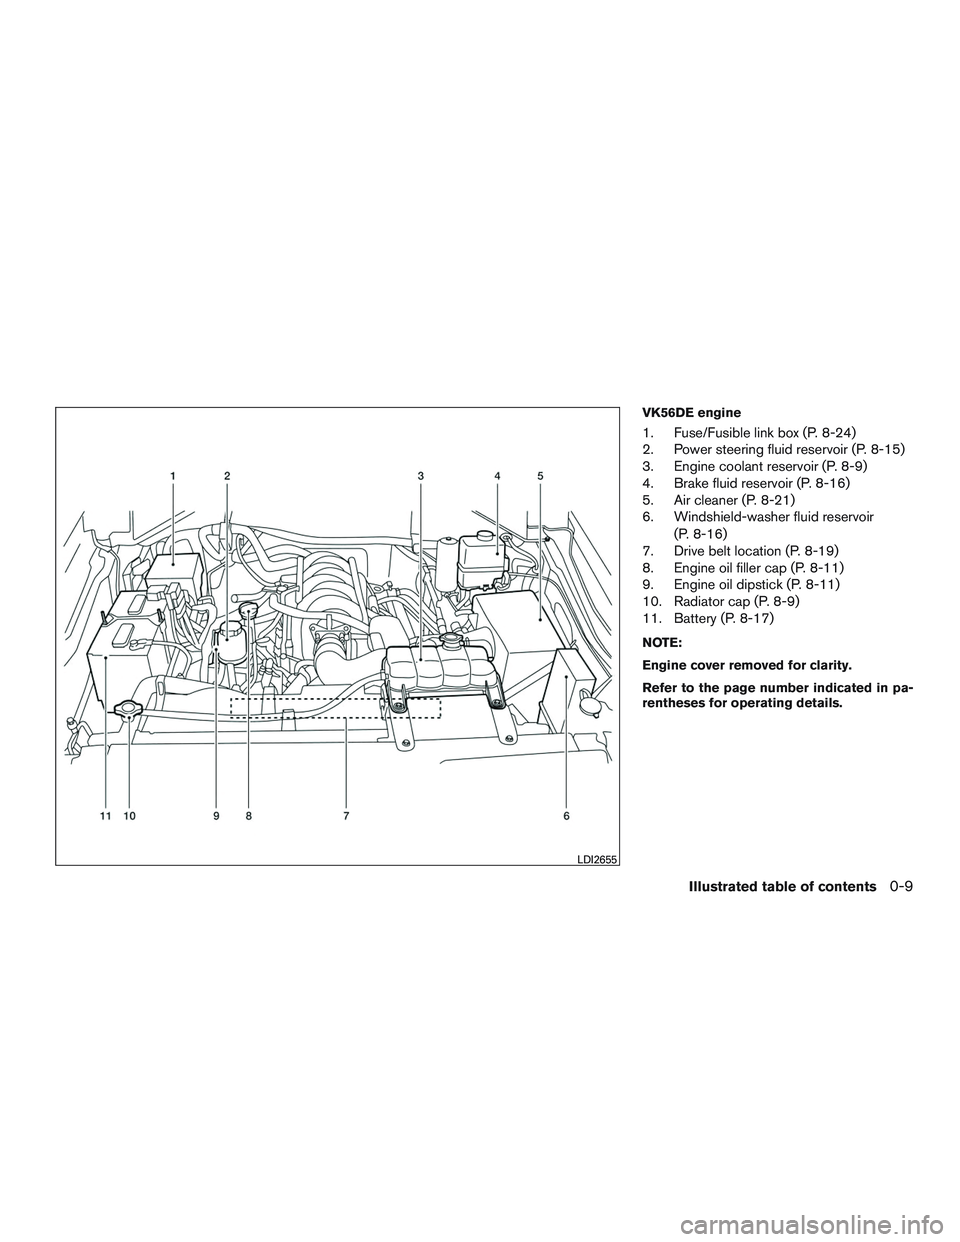
VK56DE engine
1. Fuse/Fusible link box (P. 8-24)
2. Power steering fluid reservoir (P. 8-15)
3. Engine coolant reservoir (P. 8-9)
4. Brake fluid reservoir (P. 8-16)
5. Air cleaner (P. 8-21)
6. Windshield-washer fluid reservoir(P. 8-16)
7. Drive belt location (P. 8-19)
8. Engine oil filler cap (P. 8-11)
9. Engine oil dipstick (P. 8-11)
10. Radiator cap (P. 8-9)
11. Battery (P. 8-17)
NOTE:
Engine cover removed for clarity.
Refer to the page number indicated in pa-
rentheses for operating details.
LDI2655
Illustrated table of contents0-9
Page 88 of 380
17. Rear sonar system OFF switch(if so equipped) (P. 2-32)
Tow mode ON switch (if so equipped)
(P. 2-33)
Front and rear sonar system OFF
switch (if so equipped) (P. 2-33)
Heated seat switch (if so equipped)
(P. 2-30)
Power inverter switch (if so equipped)
(P. 2-31)
18. 12v power outlet (P. 2-34)
19. Ignition switch (P. 5-8)
20. Tilt steering wheel control (P. 3-15)
21. Hood release switch (P. 3-12)
22. Fuse box (P. 8-24)
23. Outside power mirror switch (P. 3-18) Vehicle Dynamic Control (VDC) OFF
switch (P. 2-31)
*: Refer to the separate Navigation System Own-
er’s Manual (if so equipped) .
Refer to the page number indicated in pa-
rentheses for operating details.
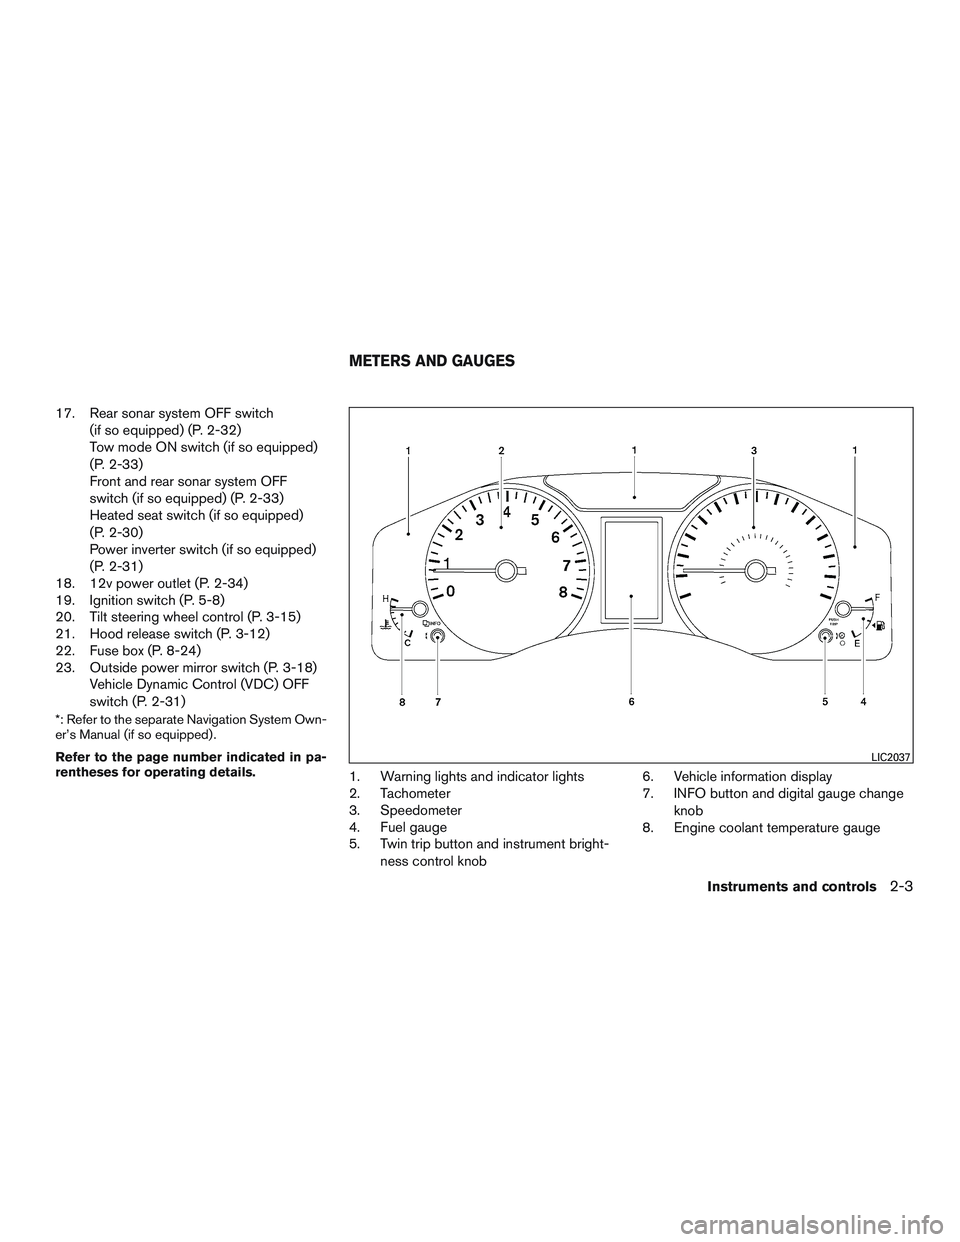
1. Warning lights and indicator lights
2. Tachometer
3. Speedometer
4. Fuel gauge
5. Twin trip button and instrument bright-
ness control knob 6. Vehicle information display
7. INFO button and digital gauge change
knob
8. Engine coolant temperature gauge
LIC2037
METERS AND GAUGES
Instruments and controls2-3
Page 120 of 380
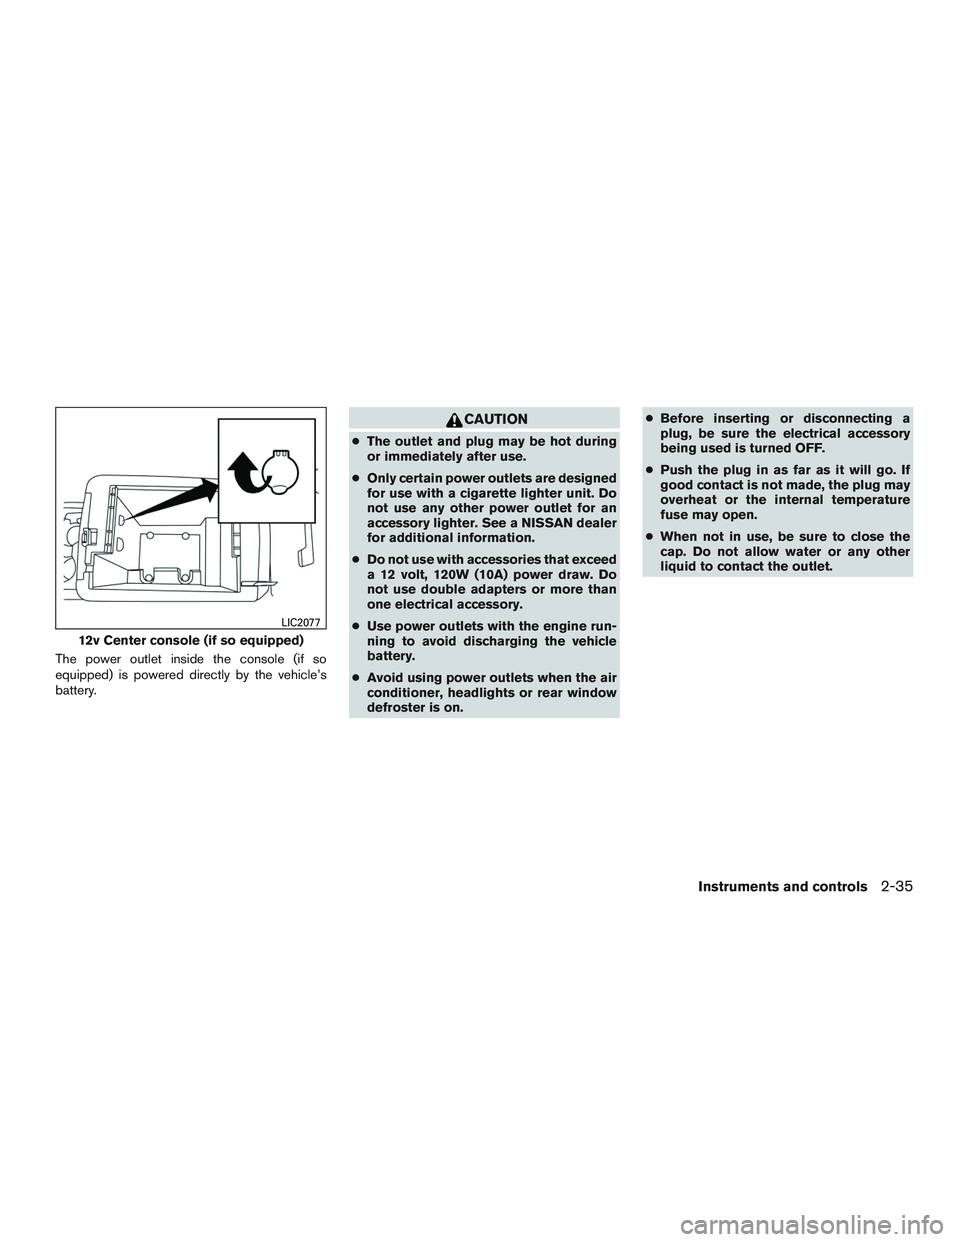
The power outlet inside the console (if so
equipped) is powered directly by the vehicle’s
battery.
CAUTION
●The outlet and plug may be hot during
or immediately after use.
● Only certain power outlets are designed
for use with a cigarette lighter unit. Do
not use any other power outlet for an
accessory lighter. See a NISSAN dealer
for additional information.
● Do not use with accessories that exceed
a 12 volt, 120W (10A) power draw. Do
not use double adapters or more than
one electrical accessory.
● Use power outlets with the engine run-
ning to avoid discharging the vehicle
battery.
● Avoid using power outlets when the air
conditioner, headlights or rear window
defroster is on. ●
Before inserting or disconnecting a
plug, be sure the electrical accessory
being used is turned OFF.
● Push the plug in as far as it will go. If
good contact is not made, the plug may
overheat or the internal temperature
fuse may open.
● When not in use, be sure to close the
cap. Do not allow water or any other
liquid to contact the outlet.
12v Center console (if so equipped)
LIC2077
Instruments and controls2-35
Page 122 of 380
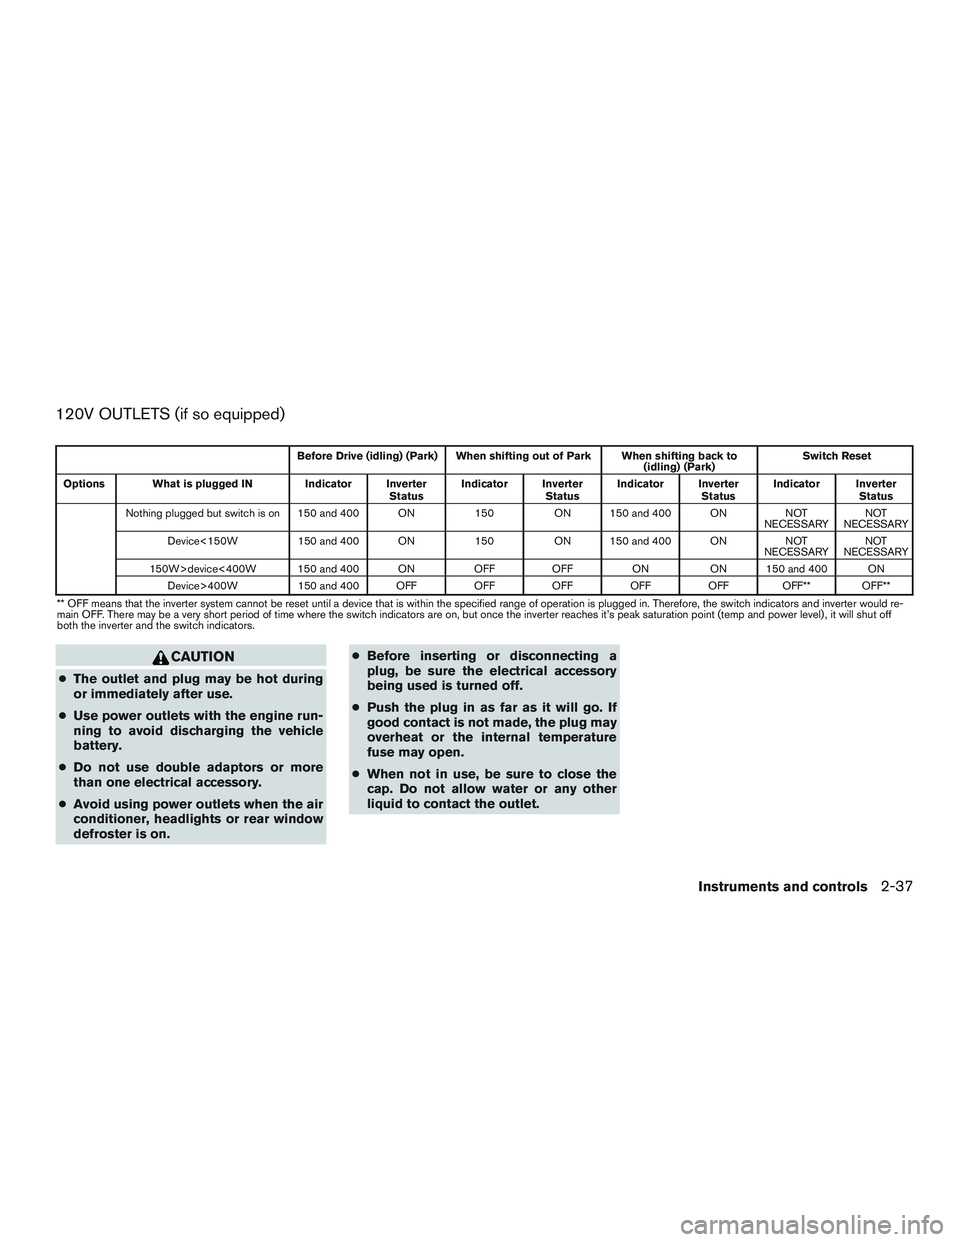
120V OUTLETS (if so equipped)
Before Drive (idling) (Park) When shifting out of Park When shifting back to(idling) (Park)Switch Reset
Options What is plugged IN Indicator Inverter StatusIndicator Inverter
StatusIndicator Inverter
StatusIndicator Inverter
Status
Nothing plugged but switch is on 150 and 400 ON 150ON 150 and 400 ON NOT
NECESSARY NOT
NECESSARY
Device<150W 150 and 400 ON 150ON 150 and 400 ON NOT
NECESSARY NOT
NECESSARY
150W>device<400W 150 and 400 ON OFFOFF ONON 150 and 400 ON
Device>400W 150 and 400 OFF OFFOFFOFFOFF OFF** OFF**
** OFF means that the inverter system cannot be reset until a device that is within the specified range of operation is plugged in. Therefore, the switch indicators and inverter would re-
main OFF. There may be a very short period of time where the switch indicators are on, but once the inverter reaches it’s peak saturation point (temp and power level) , it will shut off
both the inverter and the switch indicators.
CAUTION
● The outlet and plug may be hot during
or immediately after use.
● Use power outlets with the engine run-
ning to avoid discharging the vehicle
battery.
● Do not use double adaptors or more
than one electrical accessory.
● Avoid using power outlets when the air
conditioner, headlights or rear window
defroster is on. ●
Before inserting or disconnecting a
plug, be sure the electrical accessory
being used is turned off.
● Push the plug in as far as it will go. If
good contact is not made, the plug may
overheat or the internal temperature
fuse may open.
● When not in use, be sure to close the
cap. Do not allow water or any other
liquid to contact the outlet.
Instruments and controls2-37
Page 194 of 380
display will be reset to 9:00. At the same time the
display will return to the audio.
FM/AM radio operation
FM·AM button
Press the FM·AM button to change the band as
follows:
FM1→FM2 →AM →FM1
The FM stereo indicator, ST (STEREO) , illumi-
nates during FM stereo reception. When the
stereo broadcast signal is weak, the radio auto-
matically changes from stereo to monaural re-
ception.
TUNE buttons
Manual tuning
Press the TUNE
orbutton for less
than 0.5 seconds for manual tuning.
To move quickly through the channels, press and
hold either TUNE
orbutton down
for more than 1.5 seconds.
SEEK buttons
SEEK tuning
Press the SEEK
orbutton to seek
through the frequencies. Seek tuning begins from low to high frequencies, or high to low
frequencies, depending on which button is
pressed, and stops at the next broadcasting sta-
tion. Once the highest broadcasting station is
reached, the radio continues in the seek mode at
the lowest broadcasting station.
Station memory operations
Twelve stations can be set for the FM band (6 for
FM1 and 6 for FM2) and 6 stations can be set for
the AM band to the preset buttons.
1. Press the FM-AM button to change to the desired band.
2. Tune to the desired station using manual TUNE or SEEK tuning. Press and hold any of
the desired station memory buttons (1 – 6)
until a beep sound is heard. (The radio mutes
when the select button is pressed.)
3. The channel indicator will then come on and the sound will resume. Programming is now
complete.
4. Other buttons can be set in the same man- ner.
If the battery cable is disconnected, or if the fuse
opens, the radio memory will be canceled. In that
case, reset the desired stations.
Compact disc (CD) player operation
If the radio is already operating, it automatically
turns off and the compact disc begins to play.
CD button
When the CD button is pressed with a compact
disc loaded and the radio playing, the radio turns
off and the last used compact disc starts to play.
TUNE (rewind and fast forward) buttons
When the TUNE
orbutton is
pressed while the compact disc is playing, the
compact disc plays at an increased speed while
rewinding or fast forwarding. When the button is
released, the compact disc returns to normal play
speed.
SEEK buttons
When
is pressed while the compact disc
is playing, the next track following the present
one starts to play from the beginning.
Press
several times to skip several tracks.
Each time the button is pressed, the CD ad-
vances 1 additional track. The track number ap-
pears in the display window. (When the last track
on the compact disc is skipped, the first track is
played.)
Monitor, climate, audio, phone and voice recognition systems4-39
Page 198 of 380
The FM stereo indicator (ST) illuminates during
FM stereo reception. When the stereo broadcast
signal is weak, the radio automatically changes
from stereo to monaural reception.
TUNE button (Tuning)
Press the TUNE/FF-REW/FOLDER
button
orfor manual tuning.
SEEK tuning
Press the SEEK/TRACK button
orto tune from low to high or high to low frequen-
cies and to stop at the next broadcasting station.
SCAN tuning
Press the SCAN button to stop at each broad-
casting station for 5 seconds. Pressing the but-
ton again during this 5 second period will stop
SCAN tuning and the radio will remain tuned to
that station. If the SCAN button is not pressed
within 5 seconds, SCAN tuning moves to the next
station.
1 to 6 Station memory operations
Twelve stations can be set for the FM band (6 for
FM1, 6 for FM2) and six stations can be set for
the AM band. 1. Choose the radio band AM, FM1 or FM2 using the AM or FM button. 2. Tune to the desired station using manual,
SEEK or SCAN tuning. Press and hold any
of the desired station memory buttons (1 –
6) until a beep sound is heard.
3. The channel indicator will then come on and the sound will resume. Programming is now
complete.
4. Other buttons can be set in the same man- ner.
If the battery cable is disconnected or if the fuse
opens, the radio memory will be canceled. In that
case, reset the desired stations.Compact disc (CD) player operation
If the radio is already operating, it automatically
turns off and the compact disc begins to play.
CD button
When the CD button is pressed with the system
off and the compact disc loaded, the system will
turn on and the compact disc will start to play.
When the CD button is pressed with a compact
disc loaded and the radio playing, the radio will
automatically be turned off and the compact disc
will start to play. DISP/TEXT button
When the DISP/TEXT button is pressed while a
CD is playing, the display will change as follows:
CD:
Track number
→Disc title →Song title →Track
number
CD with MP3 or WMA:
Track number →Folder title →Album title →
Artist →Song title →Track number
TUNE/FF-REW/FOLDER
(Reverse or Fast Forward)
button
CD:
When the TUNE/FF-REW/FOLDER button
(fast forward) or(reverse) is pressed while
the compact disc is playing, the compact disc
plays at an increased speed while reversing or fast
forwarding. When the button is released, the com-
pact disc returns to normal play speed.
CD with MP3 or WMA:
When the TUNE/FF-REW/FOLDER button
(fast forward) or(reverse) is pressed for less
than 1.5 seconds while the compact disc is play-
ing, the folders in the CD will change.
Monitor, climate, audio, phone and voice recognition systems4-43