2016 NISSAN MURANO HYBRID mirror controls
[x] Cancel search: mirror controlsPage 7 of 36

5
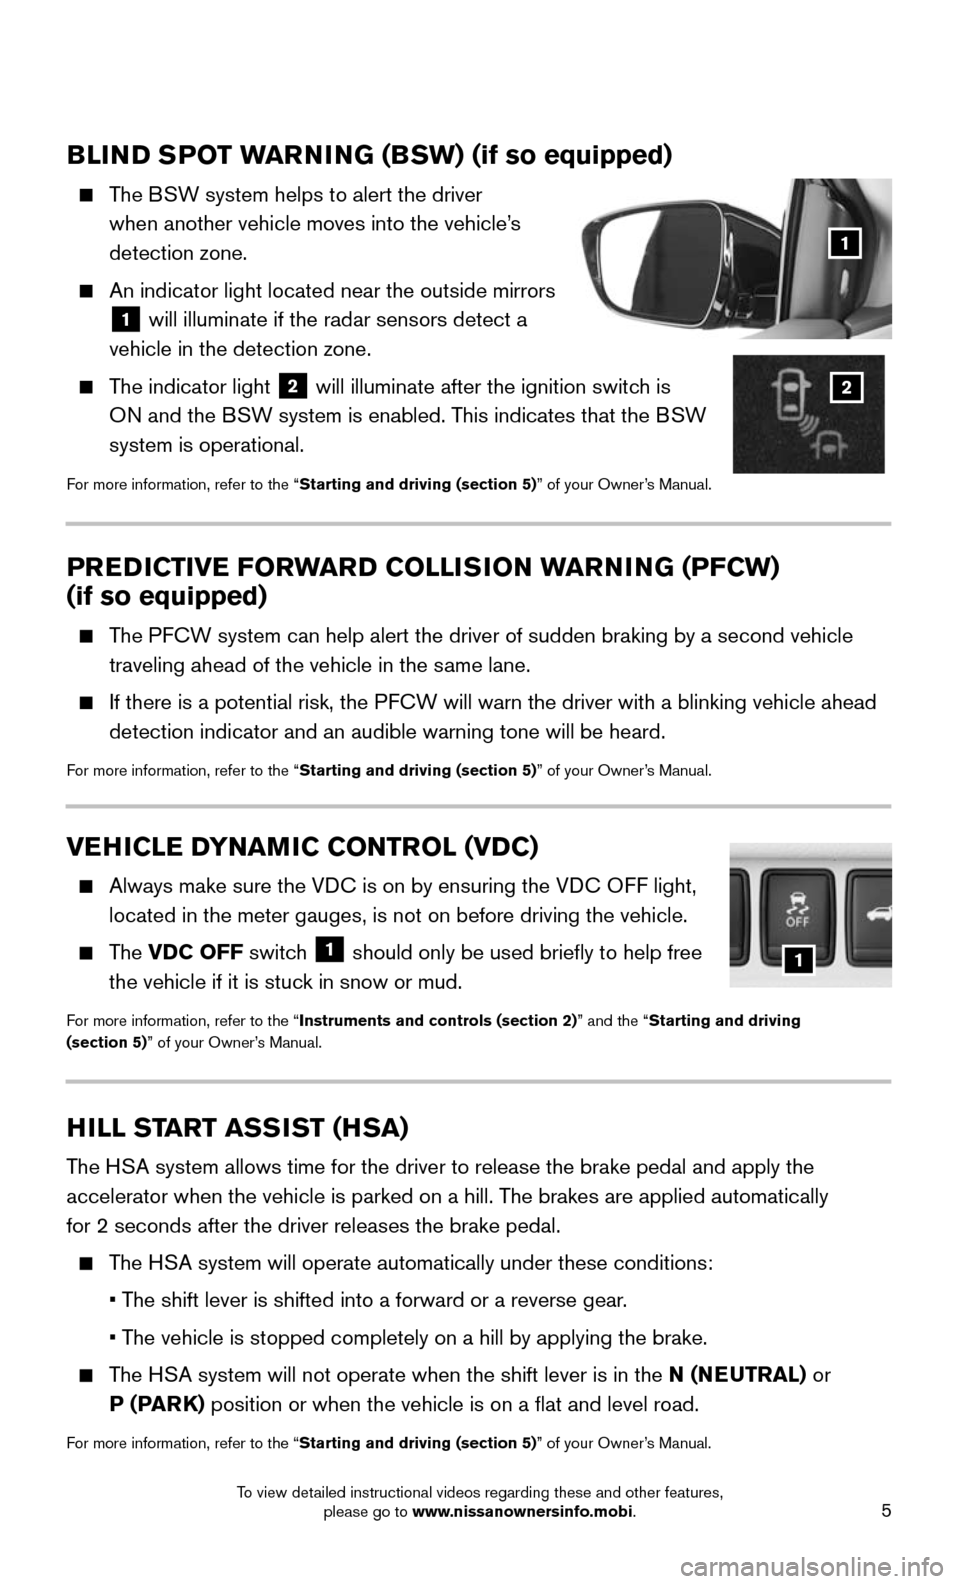
BLIND SPOT WARNING (BSW) (if so equipped)
The BSW system helps to alert the driver
when another vehicle moves into the vehicle’s
detection zone.
An indicator light located near the outside mirrors
1 will illuminate if the radar sensors detect a
vehicle in the detection zone.
The indicator light 2 will illuminate after the ignition switch is
ON and the BSW system is enabled. This indicates that the BSW
system is operational.
For more information, refer to the “Starting and driving (section 5)” of your Owner’s Manual.
VEHICLE DYNAMIC CONTROL (VDC)
Always make sure the VD C is on by ensuring the VDC OFF light,
located in the meter gauges, is not on before driving the vehicle.
The VDC OFF switch 1 should only be used briefly to help free
the vehicle if it is stuck in snow or mud.
For more information, refer to the “Instruments and controls (section 2)” and the “Starting and driving
(section 5)” of your Owner’s Manual.
PREDICTIVE FORWARD COLLISION WARNING (PFCW)
(if so equipped)
The PFCW system can help alert the driver of sudden braking by a second vehic\
le
traveling ahead of the vehicle in the same lane.
If there is a potential risk, the P FCW will warn the driver with a blinking vehicle ahead
detection indicator and an audible warning tone will be heard.
For more information, refer to the “Starting and driving (section 5)” of your Owner’s Manual.
1
HILL START ASSIST (HSA)
The HSA system allows time for the driver to release the brake pedal and appl\
y the
accelerator when the vehicle is parked on a hill. The brakes are applied automatically
for 2 seconds after the driver releases the brake pedal.
The HSA system will operate automatically under these conditions:
• The shift lever is shifted into a forward or a reverse gear.
• The vehicle is stopped completely on a hill by applying the brake.
The HSA system will not operate when the shift lever is in the N (NEUTRAL ) or
P ( PA R K ) position or when the vehicle is on a flat and level road.
For more information, refer to the “Starting and driving (section 5)” of your Owner’s Manual.
1
2
To view detailed instructional videos regarding these and other features, please go to www.nissanownersinfo.mobi.
Page 15 of 36

13
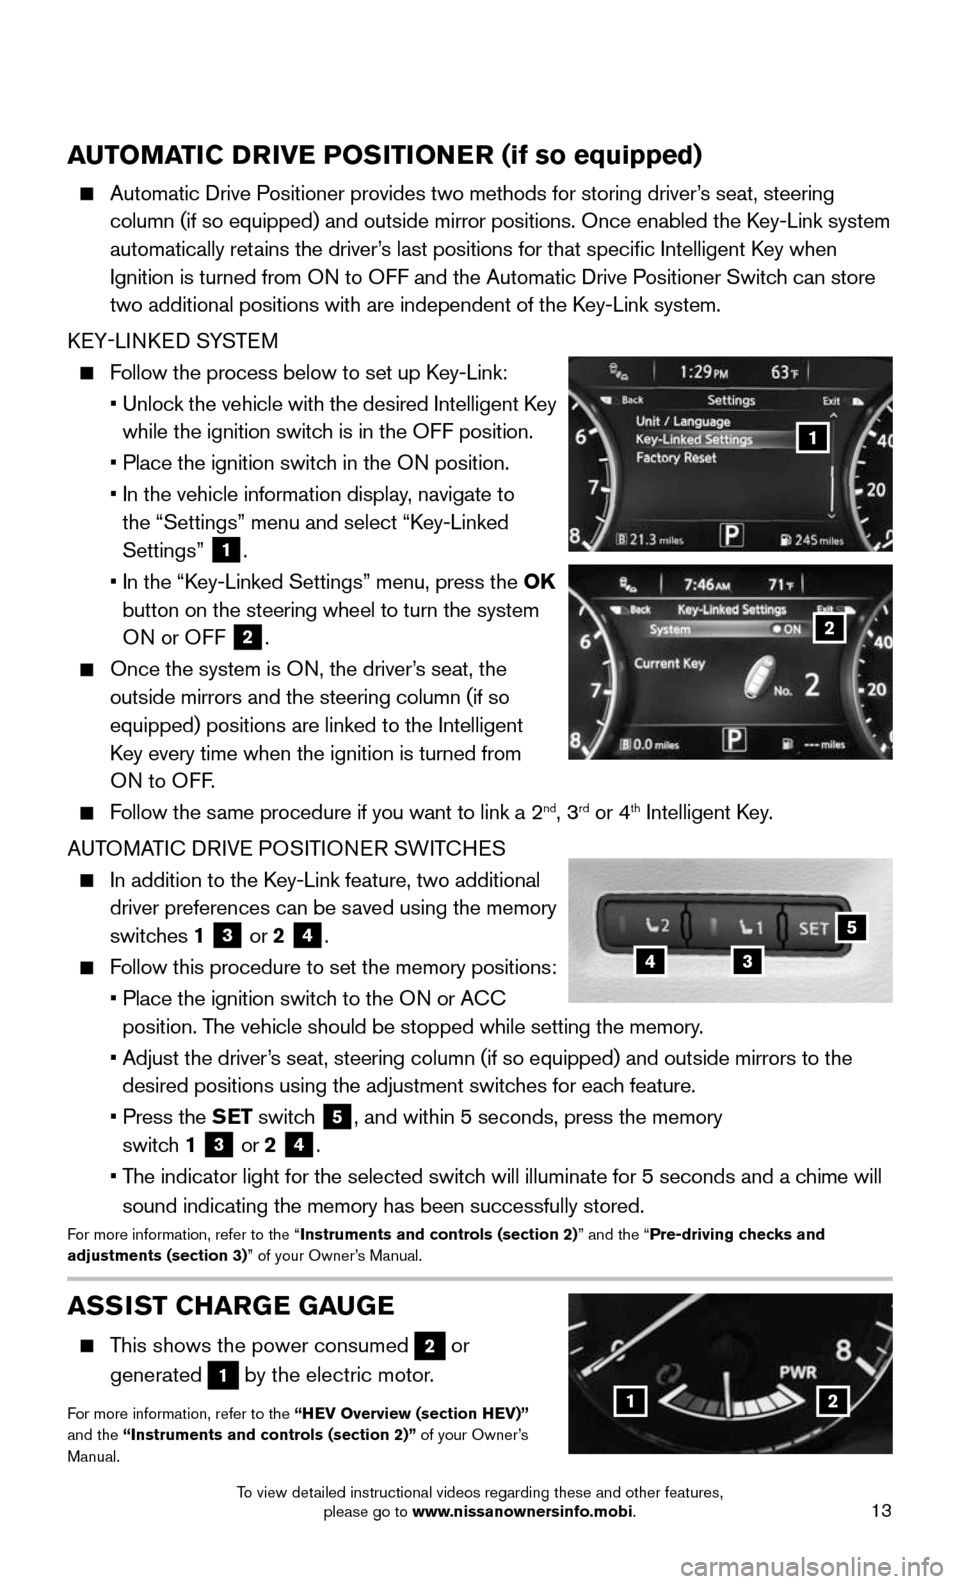
AUTOMATIC DRIVE POSITIONER (if so equipped)
Automatic Drive Positioner provides two methods for storing driver’s seat, steering
column (if so equipped) and outside mirror positions. Once enabled the\
Key-Link system
automatically retains the driver’s last positions for that specific Intelligent Key when
Ignition is turned from ON to OFF and the Automatic Drive Positioner Switch can store
two additional positions with are independent of the Key-Link system.
KEY-LINKED SYSTEM
Follow the process below to set up Key-Link:
• Unlock the vehicle with the desired Intelligent Key
while the ignition switch is in the OFF position.
• Place the ignition switc h in the ON position.
• In the vehicle information display , navigate to
the “Settings” menu and select “Key-Linked
Settings”
1.
• In the “K ey-Linked Settings” menu, press the OK
button on the steering wheel to turn the system ON or OFF
2.
Once the system is ON, the driver’s seat, the
outside mirrors and the steering column (if so
equipped) positions are linked to the Intelligent
Key every time when the ignition is turned from
ON to OFF .
Follow the same procedure if you want to link a 2nd, 3rd or 4th Intelligent Key.
AUTOMATIC DRIVE POSITIONER SWITCHES
In addition to the K ey-Link feature, two additional
driver preferences can be saved using the memory
switches 1
3 or 2 4.
Follow this procedure to set the memory positions:
• Place the ignition switc h to the ON or ACC
position. The vehicle should be stopped while setting the memory.
• Adjust the driver ’s seat, steering column (if so equipped) and outside mirrors to the
desired positions using the adjustment switches for each feature.
• Press the SET switch 5, and within 5 seconds, press the memory
switch 1
3 or 2 4.
• The indicator light for the selected switch will illuminate for 5 seconds and a chime will
sound indicating the memory has been successfully stored.For more information, refer to the “Instruments and controls (section 2)” and the “Pre-driving checks and
adjustments (section 3)” of your Owner’s Manual.
ASSIST CHARGE GAUGE
This shows the power consumed 2 or
generated
1 by the electric motor.
For more information, refer to the “HEV Overview (section HEV)”
and the “Instruments and controls (section 2)” of your Owner’s
Manual.12
2
1
34
5
To view detailed instructional videos regarding these and other features, please go to www.nissanownersinfo.mobi.
Page 20 of 36

18
FIRST DRIVE FEATURES
4
6789
10
2
3
1
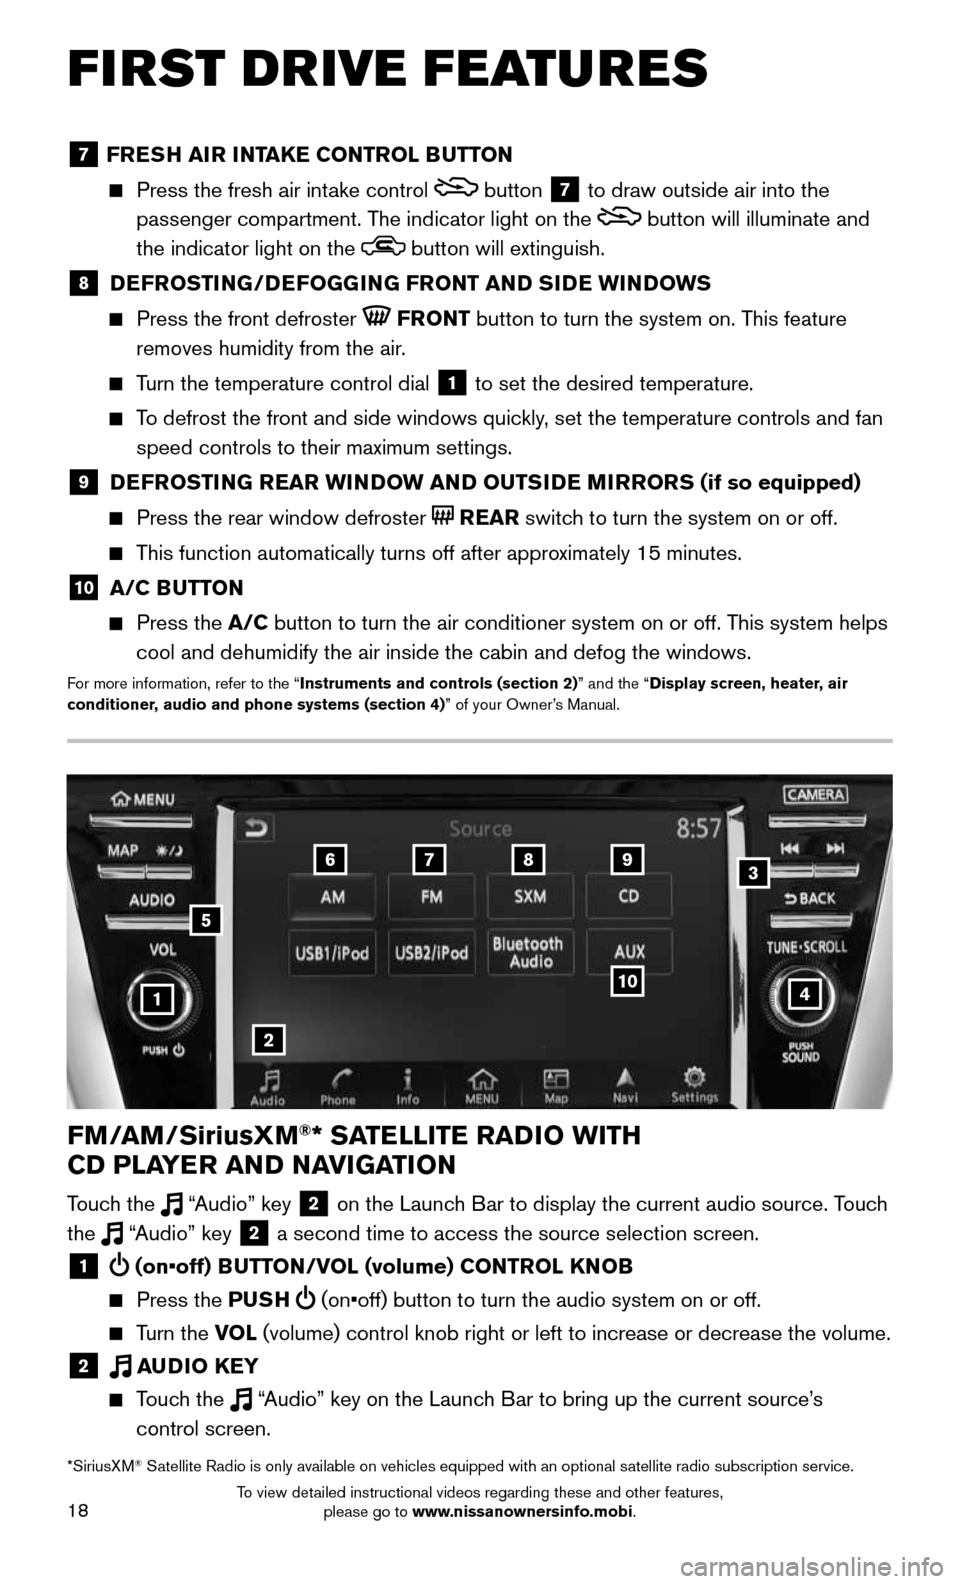
FM/AM/SiriusXM®* SATELLITE RADIO WITH
CD PLAYER AND NAVIGATION
Touch the “Audio” key 2 on the Launch Bar to display the current audio source. Touch
the “Audio” key 2 a second time to access the source selection screen.
1 (on•off) BUTTON/VOL (volume) CONTROL KNOB
Press the PUSH (on•off) button to turn the audio system on or off.
Turn the VOL (volume) control knob right or left to increase or decrease the volum\
e.
2 AUDIO KEY
Touch the “Audio” key on the Launch Bar to bring up the current source’s
control screen.
5
*SiriusXM® Satellite Radio is only available on vehicles equipped with an optional s\
atellite radio subscription service.
7 FRESH AIR INTAKE CONTROL BUTTON
Press the fresh air int ake control button 7 to draw outside air into the
passenger compartment. The indicator light on the
button will illuminate and
the indicator light on the
button will extinguish.
8 DEFROSTING/DEFOGGING FRONT AND SIDE WINDOWS
Press the front defroster FRONT button to turn the system on. This feature
removes humidity from the air.
Turn the temperature control dial 1 to set the desired temperature.
To defrost the front and side windows quickly, set the temperature controls and fan
speed controls to their maximum settings.
9 DEFROSTING REAR WINDOW AND OUTSIDE MIRRORS (if so equipped)
Press the rear window defroster REAR switch to turn the system on or off.
This function automatically turns off after approximately 15 minutes.
10 A/C BUTTON
Press the A/C button to turn the air conditioner system on or off. This system helps
cool and dehumidify the air inside the cabin and defog the windows.
For more information, refer to the “Instruments and controls (section 2)” and the “Display screen, heater, air
conditioner, audio and phone systems (section 4)” of your Owner’s Manual.
To view detailed instructional videos regarding these and other features, please go to www.nissanownersinfo.mobi.