2016 NISSAN MURANO HYBRID change wheel
[x] Cancel search: change wheelPage 23 of 36

21
INTELLIGENT CRUISE CONTROL (ICC) (if so equipped)
VEHICLE-TO-VEHICLE DISTANCE CONTROL MODE
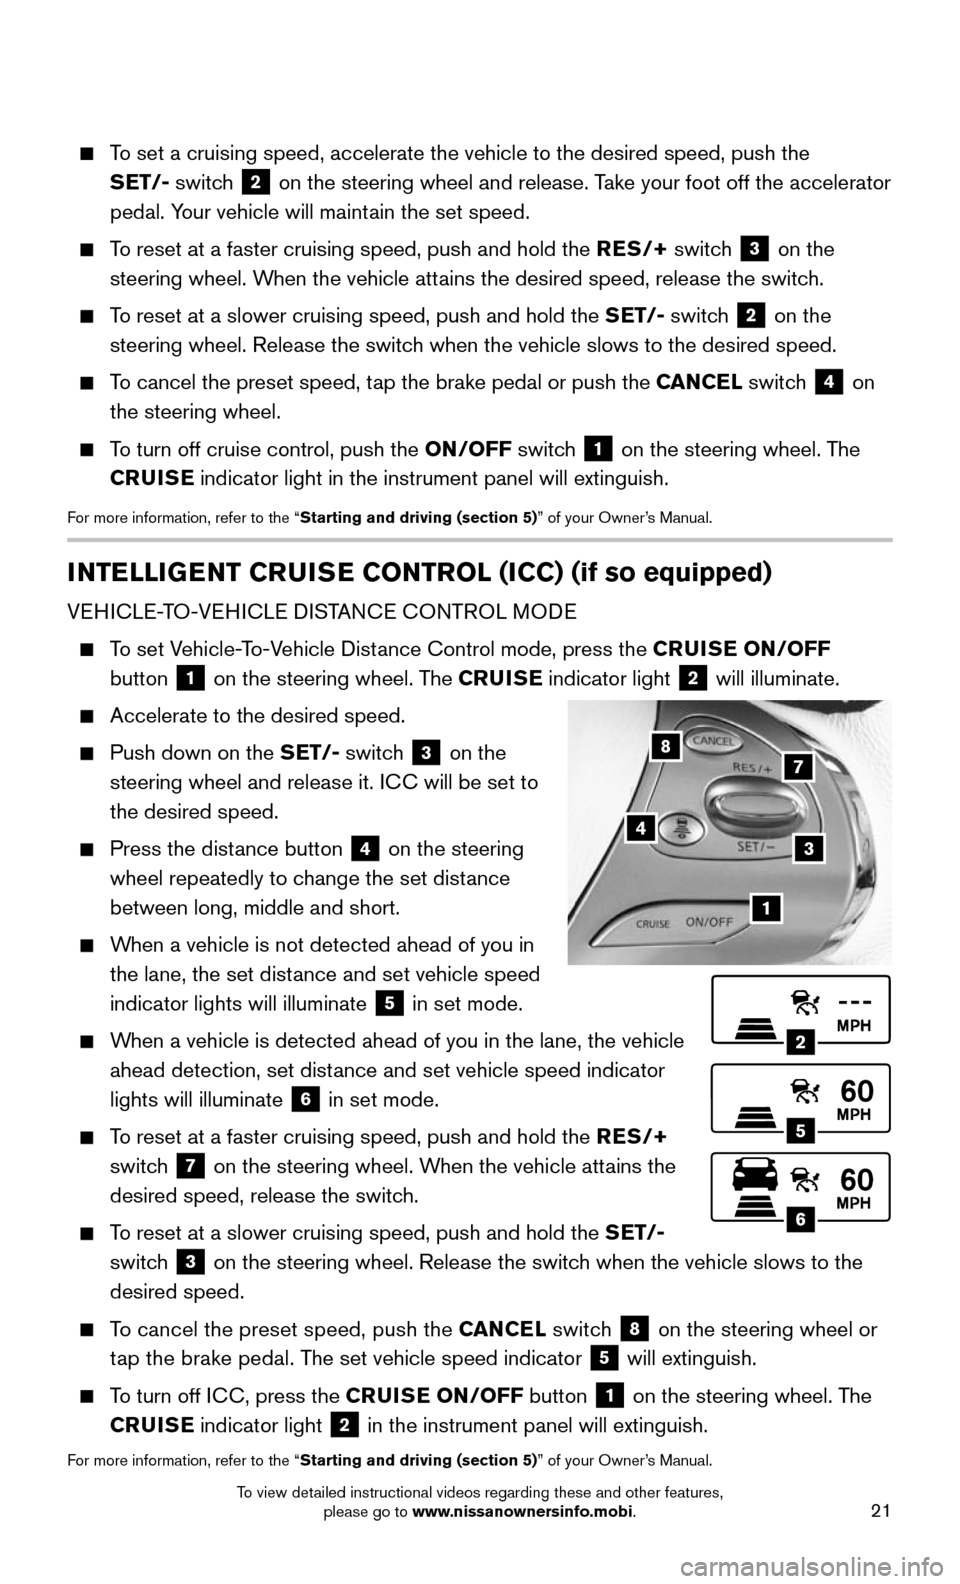
To set Vehicle-To-Vehicle Distance Control mode, press the CRUISE ON/OFF
button
1 on the steering wheel. The CRUISE
indicator light 2 will illuminate.
Accelerate to the desired speed.
Push down on the SET/- switch 3 on the
steering wheel and release it. ICC will be set to
the desired speed.
Press the dist ance button 4 on the steering
wheel repeatedly to change the set distance
between long, middle and short.
When a vehicle is not detected ahead of you in
the lane, the set distance and set vehicle speed
indicator lights will illuminate
5 in set mode.
When a vehicle is detected ahead of you in the lane, the vehicle
ahead detection, set distance and set vehicle speed indicator
lights will illuminate
6 in set mode.
To reset at a faster cruising speed, push and hold the RES/+
switch
7 on the steering wheel. When the vehicle attains the
desired speed, release the switch.
To reset at a slower cruising speed, push and hold the SET/-
switch
3 on the steering wheel. Release the switch when the vehicle slows to the
desired speed.
To cancel the preset speed, push the CANCEL switch 8 on the steering wheel or
tap the brake pedal. The set vehicle speed indicator 5 will extinguish.
To turn off ICC, press the CRUISE ON/OFF button 1 on the steering wheel. The
CRUISE indicator light 2 in the instrument panel will extinguish.
For more information, refer to the “Starting and driving (section 5)” of your Owner’s Manual.
2
5
6
1
4
87
3
To set a cruising speed, accelerate the vehicle to the desired speed, pus\
h the
SET/- switch
2 on the steering wheel and release. Take your foot off the accelerator
pedal. Your vehicle will maintain the set speed.
To reset at a faster cruising speed, push and hold the RES/+ switch 3 on the
steering wheel. When the vehicle attains the desired speed, release the switch.
To reset at a slower cruising speed, push and hold the SET/- switch 2 on the
steering wheel. Release the switch when the vehicle slows to the desired speed.
To cancel the preset speed, tap the brake pedal or push the CANCEL switch 4 on
the steering wheel.
To turn off cruise control, push the ON/OFF switch 1 on the steering wheel. The
CRUISE indicator light in the instrument panel will extinguish.
For more information, refer to the “Starting and driving (section 5)” of your Owner’s Manual.
To view detailed instructional videos regarding these and other features, please go to www.nissanownersinfo.mobi.
Page 24 of 36

22
SYSTEM GUIDE
TRIP COMPUTER
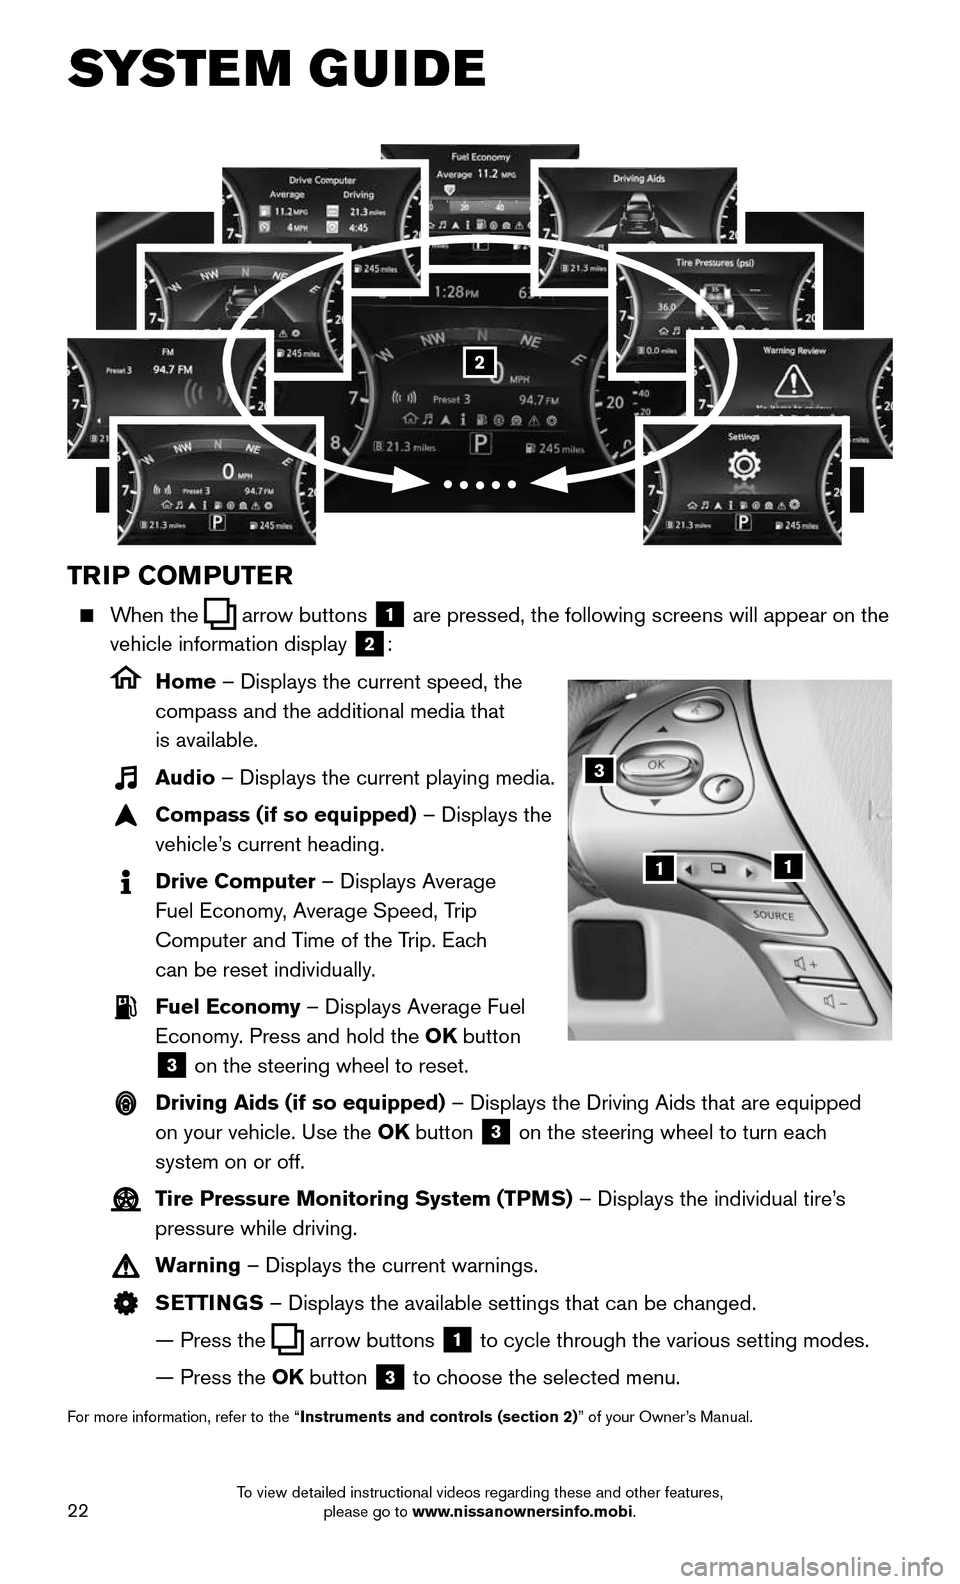
When the arrow buttons 1 are pressed, the following screens will appear on the
vehicle information display
2:
Home – Displays the current speed, the
compass and the additional media that
is available.
Audio – Displays the current playing media.
Compass (if so equipped) – Displays the
vehicle’s current heading.
Drive Computer – Displays Average
Fuel Economy, Average Speed, Trip
Computer and Time of the Trip. Each
can be reset individually.
Fuel Economy – Displays Average Fuel
Economy. Press and hold the OK button
3 on the steering wheel to reset.
Driving Aids (if so equipped) – Displays the Driving Aids that are equipped
on your vehicle. Use the OK button
3 on the steering wheel to turn each
system on or off.
Tire Pressure Monitoring System (TPMS) – Displays the individual tire’s
pressure while driving.
Warning – Displays the current warnings.
SETTINGS – Displays the available settings that can be changed.
— Press the arrow buttons 1 to cycle through the various setting modes.
— Press the OK button 3 to choose the selected menu.
For more information, refer to the “Instruments and controls (section 2)” of your Owner’s Manual.
3
11
2
To view detailed instructional videos regarding these and other features, please go to www.nissanownersinfo.mobi.
Page 28 of 36

26
SYSTEM GUIDE
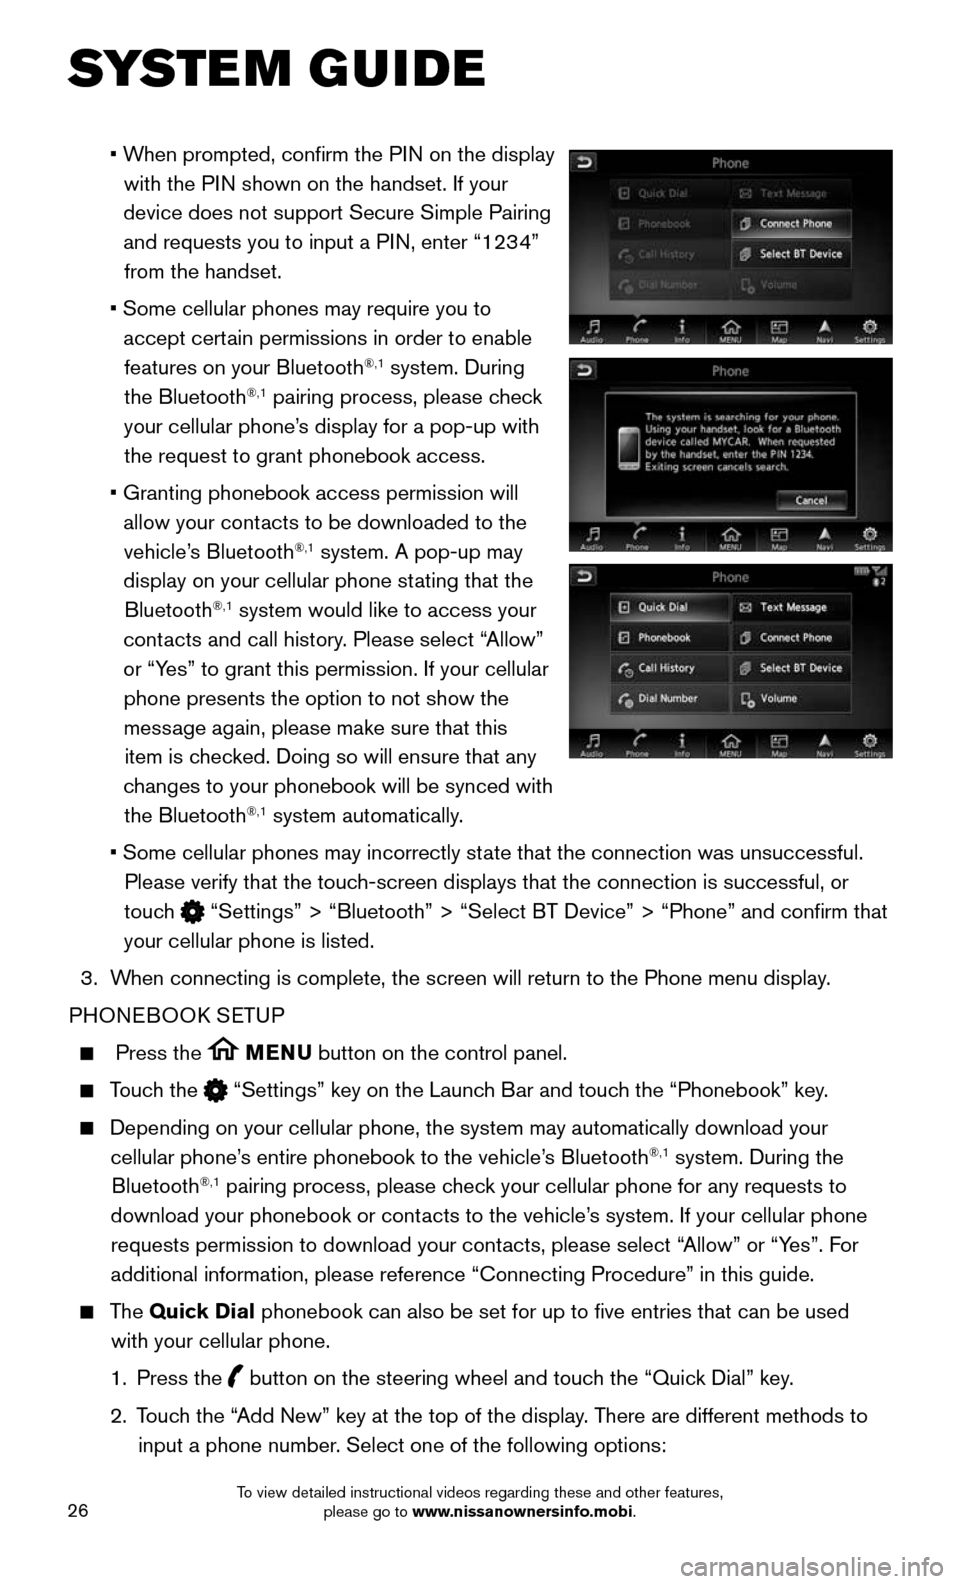
• When prompted, confirm the PIN on the display
with the PIN shown on the handset. If your
device does not support Secure Simple Pairing and requests you to input a PIN, enter “1234” from the handset.
• Some cellular phones may require you to
accept certain permissions in order to enable
features on your Bluetooth®,1 system. During
the Bluetooth®,1 pairing process, please check
your cellular phone’s display for a pop-up with the request to grant phonebook access.
• Granting phonebook access permission will
allow your contacts to be downloaded to the
vehicle’s Bluetooth®,1 system. A pop-up may
display on your cellular phone stating that the Bluetooth
®,1 system would like to access your
contacts and call history. Please select “Allow”
or “Yes” to grant this permission. If your cellular phone presents the option to not show the message again, please make sure that this item is checked. Doing so will ensure that any
changes to your phonebook will be synced with the Bluetooth
®,1 system automatically.
• Some cellular phones may incorrectly st ate that the connection was unsuccessful.
Please verify that the touch-screen displays that the connection is successful, or
touch
“Settings” > “Bluetooth” > “Select BT Device” > “P\
hone” and confirm that
your cellular phone is listed.
3. When connecting is complete, the screen will return to the Phone menu dis\
play.
PHONEBOOK SETUP
Press the MENU button on the control panel.
Touch the “Settings” key on the Launch Bar and touch the “Phonebook” key.
Depending on your cellular phone, the system may automatically download \
your
cellular phone’s entire phonebook to the vehicle’s Bluetooth®,1 system. During the
Bluetooth®,1 pairing process, please check your cellular phone for any requests to
download your phonebook or contacts to the vehicle’s system. If your cellular phone requests permission to download your contacts, please select “Allow” or “Yes”. For
additional information, please reference “Connecting Procedure” in\
this guide.
The Quick Dial phonebook can also be set for up to five entries that can be used
with your cellular phone.
1. Press the button on the steering wheel and touch the “Quick Dial” key.
2. Touch the “Add New” key at the top of the display. There are different methods to
input a phone number. Select one of the following options:
To view detailed instructional videos regarding these and other features, please go to www.nissanownersinfo.mobi.
Page 32 of 36

30
SYSTEM GUIDE
10 Compass - Map view can be changed by touching the compass when on the
main map screen.
SETTING DESTINATION
You can set a destination with your Navigation System using the touch-screen display or
Voice Recognition.
Touch-screen Display
• Touch the “Navi” key on the Launch Bar.
Voice Recognition
• Press the button on the steering wheel, and after the tone, say “Navigation”. From
here, the system will give you the options available for setting a desti\
nation.
The fastest route is set as default; to change this to a minimized freeway or shortest
distance route, go to “Settings” > “Navigation” > “Route Sett\
ings”.
SETTING A DESTINATION USING POINTS OF INTEREST (POI)
Touch-screen Display
• Touch the “Navi” key on the Launch Bar.
• Touch the “Points of Interest” key and then select one of the displayed options f\
or
choosing your destination.
Voice Recognition
• Press the button on the steering wheel, and after the tone, say “Navigation” then
say “Points of Interest”. From here, the system will give you the options a\
vailable for
setting a POI.
For more information, refer to your Navigation System Owner’s Manual.
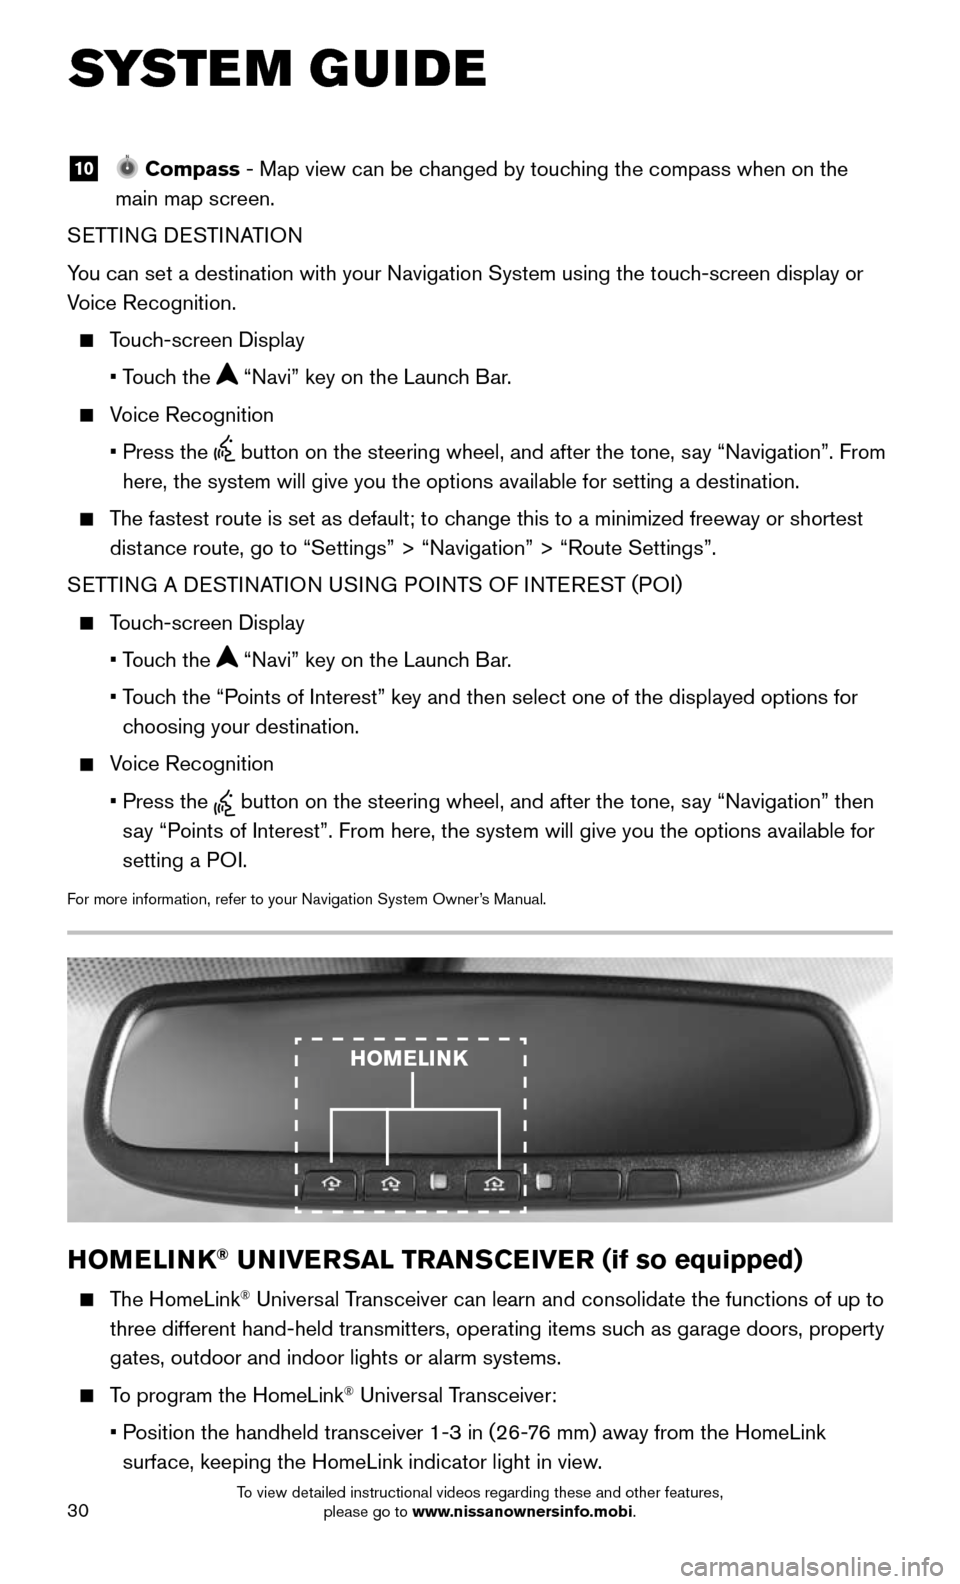
HOMELINK® UNIVERSAL TRANSCEIVER (if so equipped)
The HomeLink® Universal Transceiver can learn and consolidate the functions of up to
three different hand-held transmitters, operating items such as garage doors, property
gates, outdoor and indoor lights or alarm systems.
To program the HomeLink® Universal Transceiver:
• Position the handheld transceiver 1-3 in (26-76 mm) away from the HomeLink
surface, keeping the HomeLink indicator light in view.
HOMELINK
To view detailed instructional videos regarding these and other features, please go to www.nissanownersinfo.mobi.