2016 NISSAN MURANO HYBRID instrument panel
[x] Cancel search: instrument panelPage 2 of 36
*See your Owner’s Manual for information.
19
20
16
12
5
6
18
8
3
10
9
211
1
47
17
21
Behind
steering
wheel
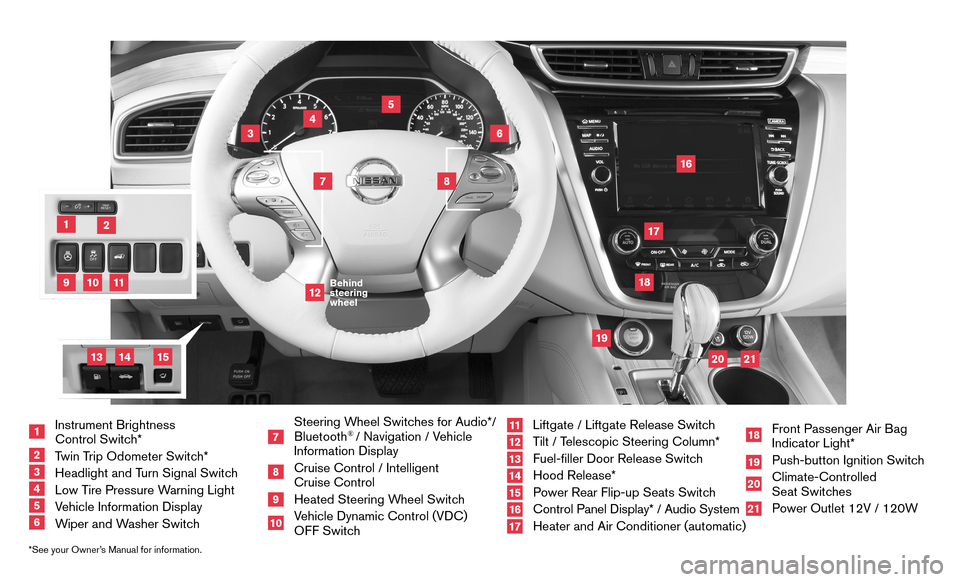
1 Instrument Brightness
Control Switch*
2 Twin Trip Odometer Switch*3 Headlight and T urn Signal Switch4 Low Tire Pressure Warning Light5 Vehicle Information Display6 Wiper and Washer Switch
7 Steering Wheel Switches for Audio*/ Bluetooth
® / Navigation / Vehicle
Information Display
8 Cruise Control / Intelligent
Cruise Control
9 Heated Steering W heel Switch10 Vehicle Dynamic Control (VDC)
OFF Switch
11 Liftgate / Liftgate Release Switc h12 Tilt / Telescopic Steering Column*13 Fuel-filler Door Release Switch14 Hood Release*
15 Power Rear Flip-up Seats Switch16 Control Panel Display* / Audio System
17 Heater and Air Conditioner (automatic)
18 Front Passenger Air Bag
Indicator Light*
19 Push-button Ignition Switc h20 Climate-Controlled
Seat Switches
21 Power Outlet 12V / 120W
14
15
13
Page 5 of 36
3
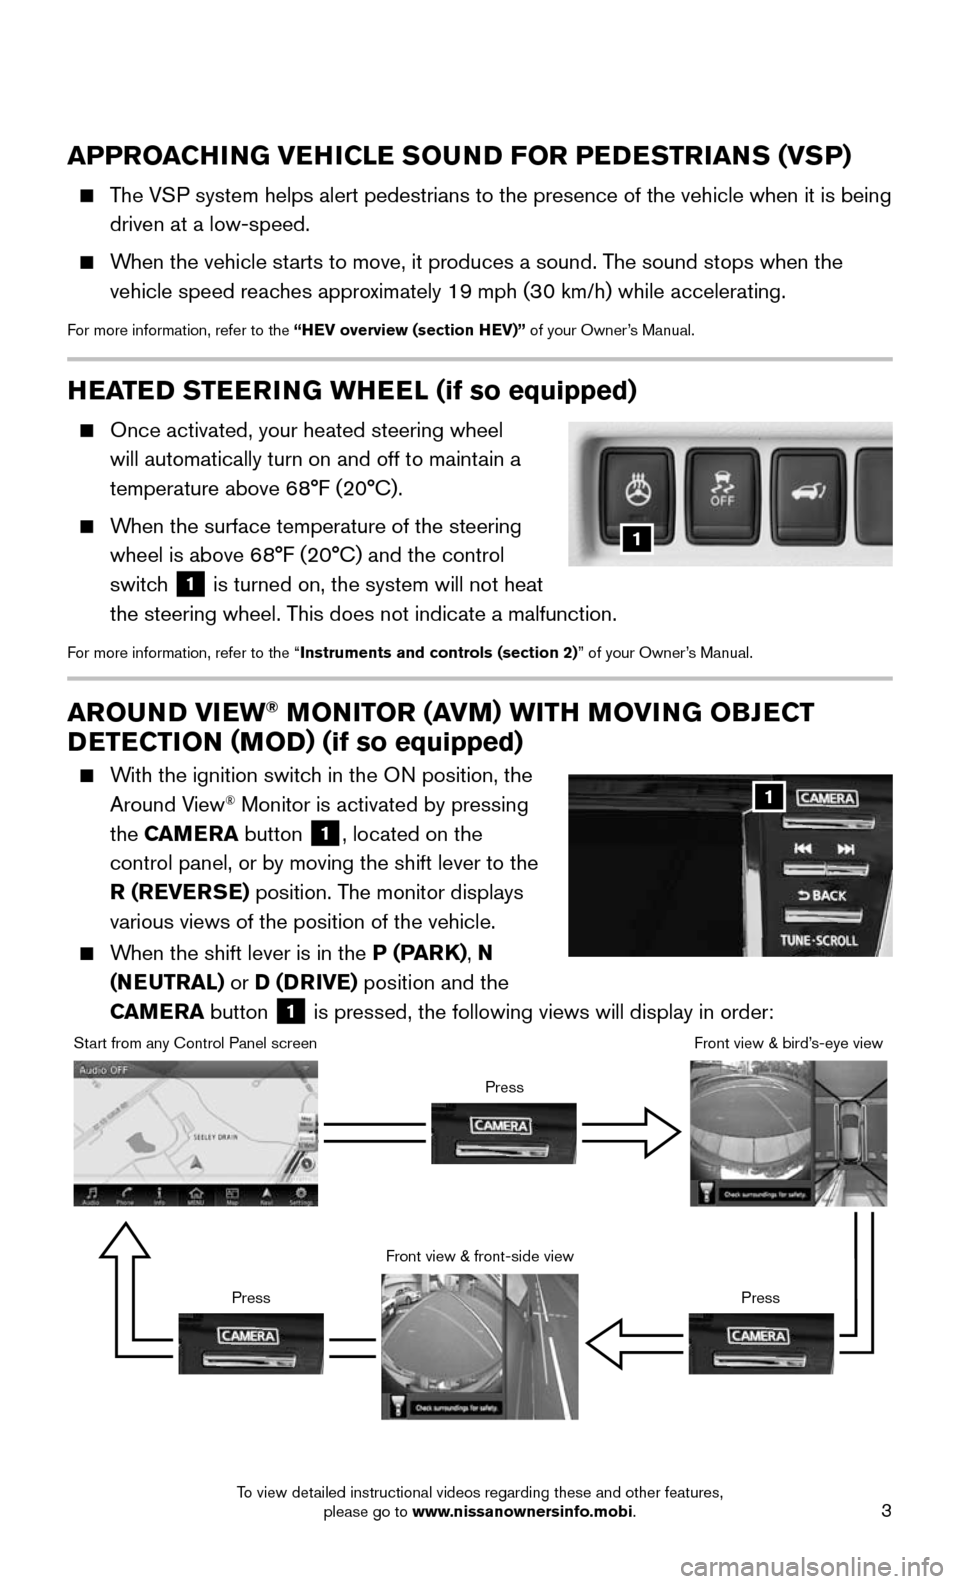
AROUND VIEW® MONITOR (AVM) WITH MOVING OBJECT
DETECTION (MOD) (if so equipped)
With the ignition switch in the ON position, the
Around View® Monitor is activated by pressing
the CAMERA button
1, located on the
control panel, or by moving the shift lever to the
R (REVERSE) position. The monitor displays
various views of the position of the vehicle.
When the shift lever is in the P (PARK), N
(NEUTRAL) or D (DRIVE) position and the
CAMERA button
1 is pressed, the following views will display in order:
1
Start from any Control Panel screen
Front view & front-side view
Press Press
Front view & bird’s-eye view
Press
HEATED STEERING WHEEL (if so equipped)
Once activated, your heated steering wheel
will automatically turn on and off to maintain a
temperature above 68°F (20°C).
When the surface temperature of the steering
wheel is above 68°F (20°C) and the control
switch
1 is turned on, the system will not heat
the steering wheel. This does not indicate a malfunction.
For more information, refer to the “Instruments and controls (section 2)” of your Owner’s Manual.
1
APPROACHING VEHICLE SOUND FOR PEDESTRIANS (VSP)
The VSP system helps alert pedestrians to the presence of the vehicle when it \
is being
driven at a low-speed.
When the vehicle starts to move, it produces a sound. The sound stops when the
vehicle speed reaches approximately 19 mph (30 km/h) while accelerating.
For more information, refer to the “HEV overview (section HEV)” of your Owner’s Manual.
To view detailed instructional videos regarding these and other features, please go to www.nissanownersinfo.mobi.
Page 10 of 36
8
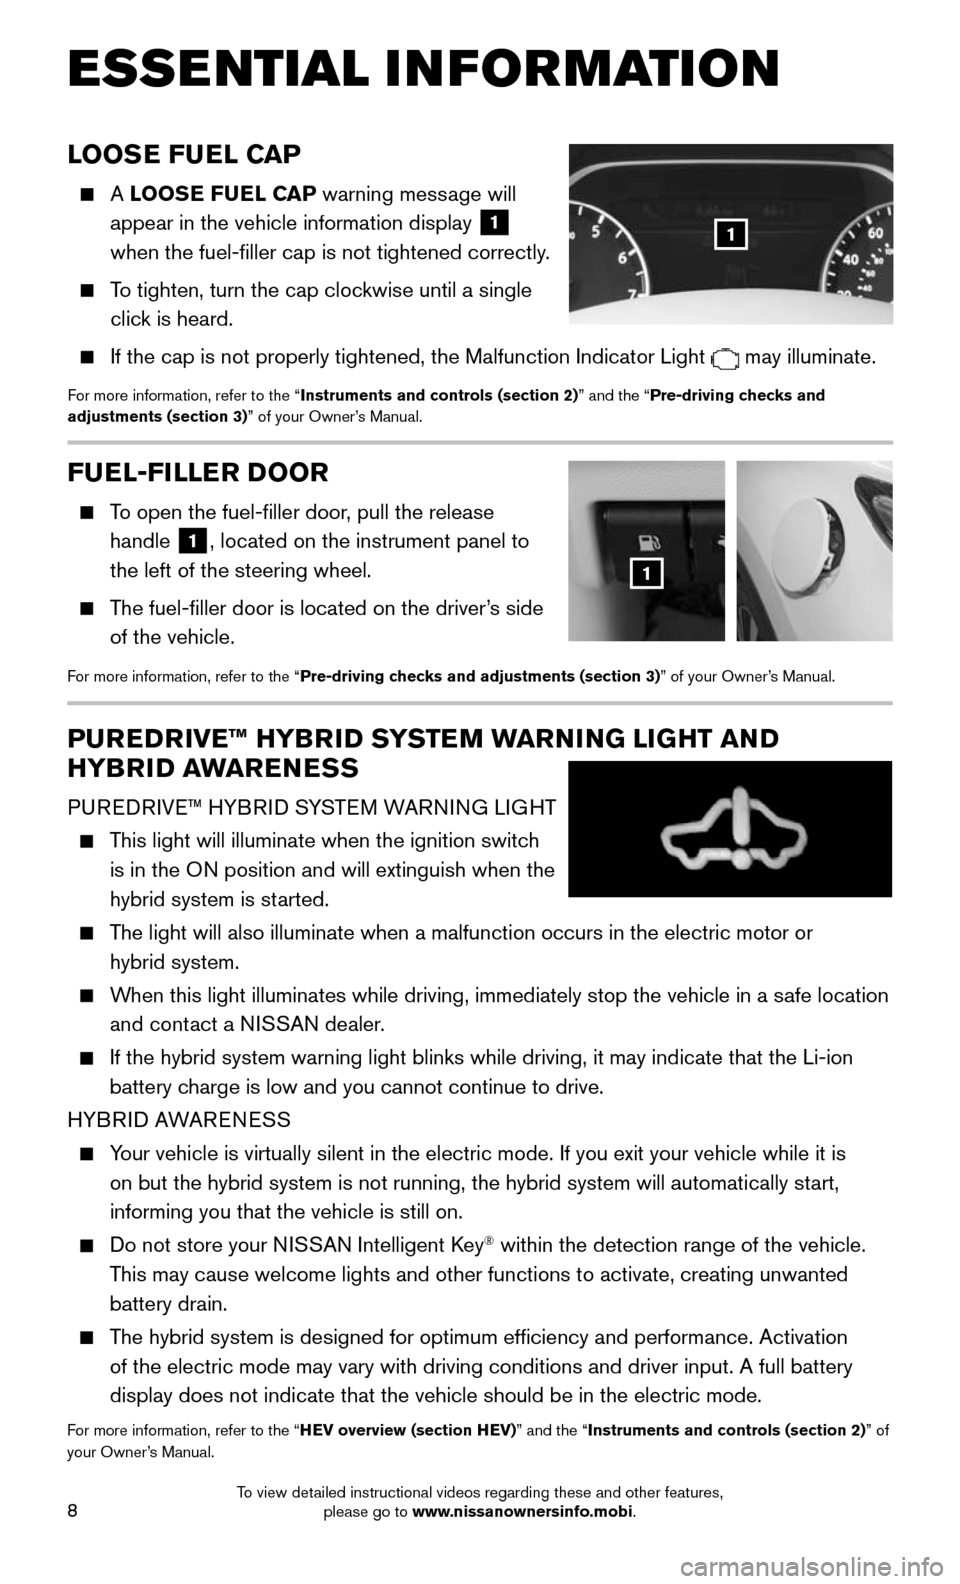
FUEL-FILLER DOOR
To open the fuel-filler door, pull the release
handle 1, located on the instrument panel to
the left of the steering wheel.
The fuel-filler door is located on the driver’s side
of the vehicle.
For more information, refer to the “Pre-driving checks and adjustments (section 3)” of your Owner’s Manual.
1
ESSE NTIAL I N FOR MATION
LOOSE FUEL CAP
A LOOSE FUEL CAP warning message will
appear in the vehicle information display
1
when the fuel-filler cap is not tightened correctly.
To tighten, turn the cap clockwise until a single
click is heard.
If the cap is not properly tightened, the Malfunction Indicator Light may illuminate.
For more information, refer to the “Instruments and controls (section 2)” and the “Pre-driving checks and
adjustments (section 3)” of your Owner’s Manual.
1
PUREDRIVE™ HYBRID SYSTEM WARNING LIGHT AND
HYBRID AWARENESS
PUREDRIVE™ HYBRID SYSTEM WARNING LIGHT
This light will illuminate when the ignition switch
is in the ON position and will extinguish when the
hybrid system is started.
The light will also illuminate when a malfunction occurs in the electric \
motor or
hybrid system.
When this light illuminates while driving, immediately stop the vehicle i\
n a safe location
and contact a NISSAN dealer.
If the hybrid system warning light blinks while driving, it may indicate\
that the Li-ion
battery charge is low and you cannot continue to drive.
HYBRID AWARENESS
Your vehicle is virtually silent in the electric mode. If you exit your v\
ehicle while it is
on but the hybrid system is not running, the hybrid system will automati\
cally start,
informing you that the vehicle is still on.
Do not store your N ISSAN Intelligent Key® within the detection range of the vehicle.
This may cause welcome lights and other functions to activate, creating u\
nwanted
battery drain.
The hybrid system is designed for optimum efficiency and performance. A\
ctivation
of the electric mode may vary with driving conditions and driver input. \
A full battery
display does not indicate that the vehicle should be in the electric mod\
e.
For more information, refer to the “HEV overview (section HEV)” and the “Instruments and controls (section 2)” of
your Owner’s Manual.
To view detailed instructional videos regarding these and other features, please go to www.nissanownersinfo.mobi.
Page 14 of 36
12
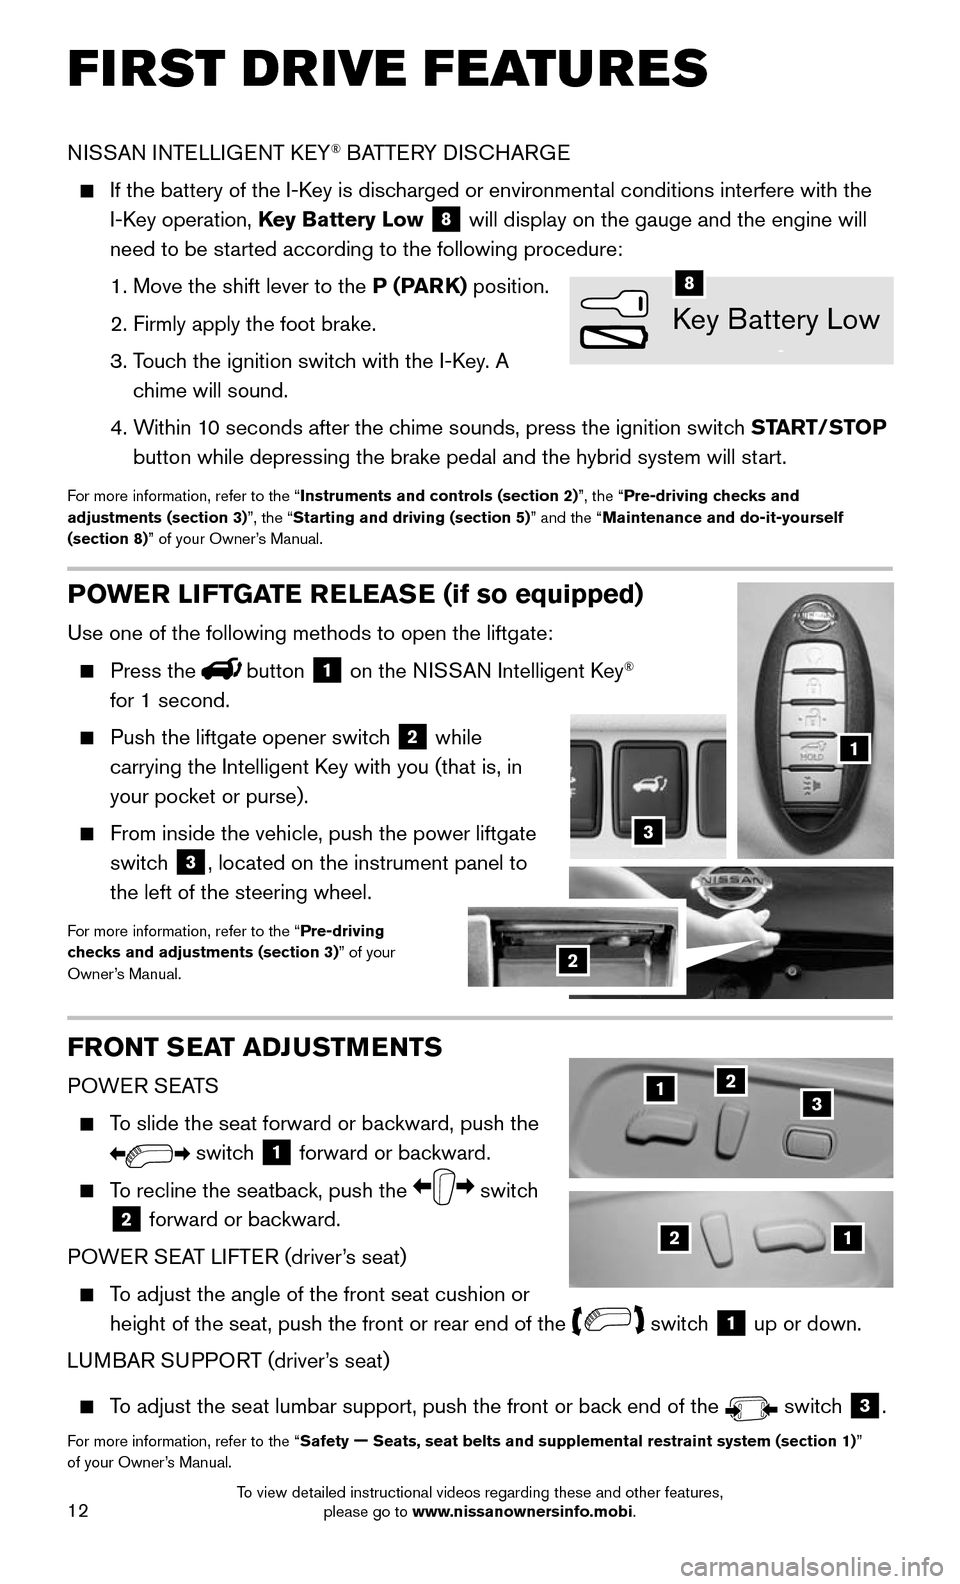
POWER LIFTGATE RELEASE (if so equipped)
Use one of the following methods to open the liftgate:
Press thebutton 1 on the NISSAN Intelligent Key®
for 1 second.
Push the liftgate opener switc h 2 while
carrying the Intelligent Key with you (that is, in
your pocket or purse).
From inside the vehicle, push the power liftgate
switch 3, located on the instrument panel to
the left of the steering wheel.
For more information, refer to the “Pre-driving
checks and adjustments (section 3)” of your
Owner’s Manual.
FRONT SEAT ADJUSTMENTS
POWER SEATS
To slide the seat forward or backward, push the
switch 1 forward or backward.
To recline the seatback, push the switch
2 forward or backward.
POWER SEAT LIFTER (driver’s seat)
To adjust the angle of the front seat cushion or
height of the seat, push the front or rear end of the switch 1 up or down.
LUMBAR SUPPORT (driver’s seat)
To adjust the seat lumbar support, push the front or back end of the switch 3.
For more information, refer to the “Safety — Seats, seat belts and supplemental restraint system (section 1)”
of your Owner’s Manual.
FIRST DRIVE FEATURES
NISSAN INTELLIGENT KEY® BATTERY DISCHARGE
If the battery of the I-K ey is discharged or environmental conditions interfere with the
I-Key operation, Key Battery Low 8 will display on the gauge and the engine will
need to be started according to the following procedure:
1. Move the shift lever to the P (PARK) position.
2. Firmly apply the foot brake.
3. Touch the ignition switch with the I-Key. A
chime will sound.
4. Within 10 seconds after the chime sounds, press the ignition switch START/STOP
button while depressing the brake pedal and the hybrid system will start.
For more information, refer to the “Instruments and controls (section 2)”, the “Pre-driving checks and
adjustments (section 3)”, the “Starting and driving (section 5)” and the “Maintenance and do-it-yourself
(section 8)” of your Owner’s Manual.
21
123
1
2
3
Key Battery Low
8
To view detailed instructional videos regarding these and other features, please go to www.nissanownersinfo.mobi.
Page 16 of 36
14
FIRST DRIVE FEATURES
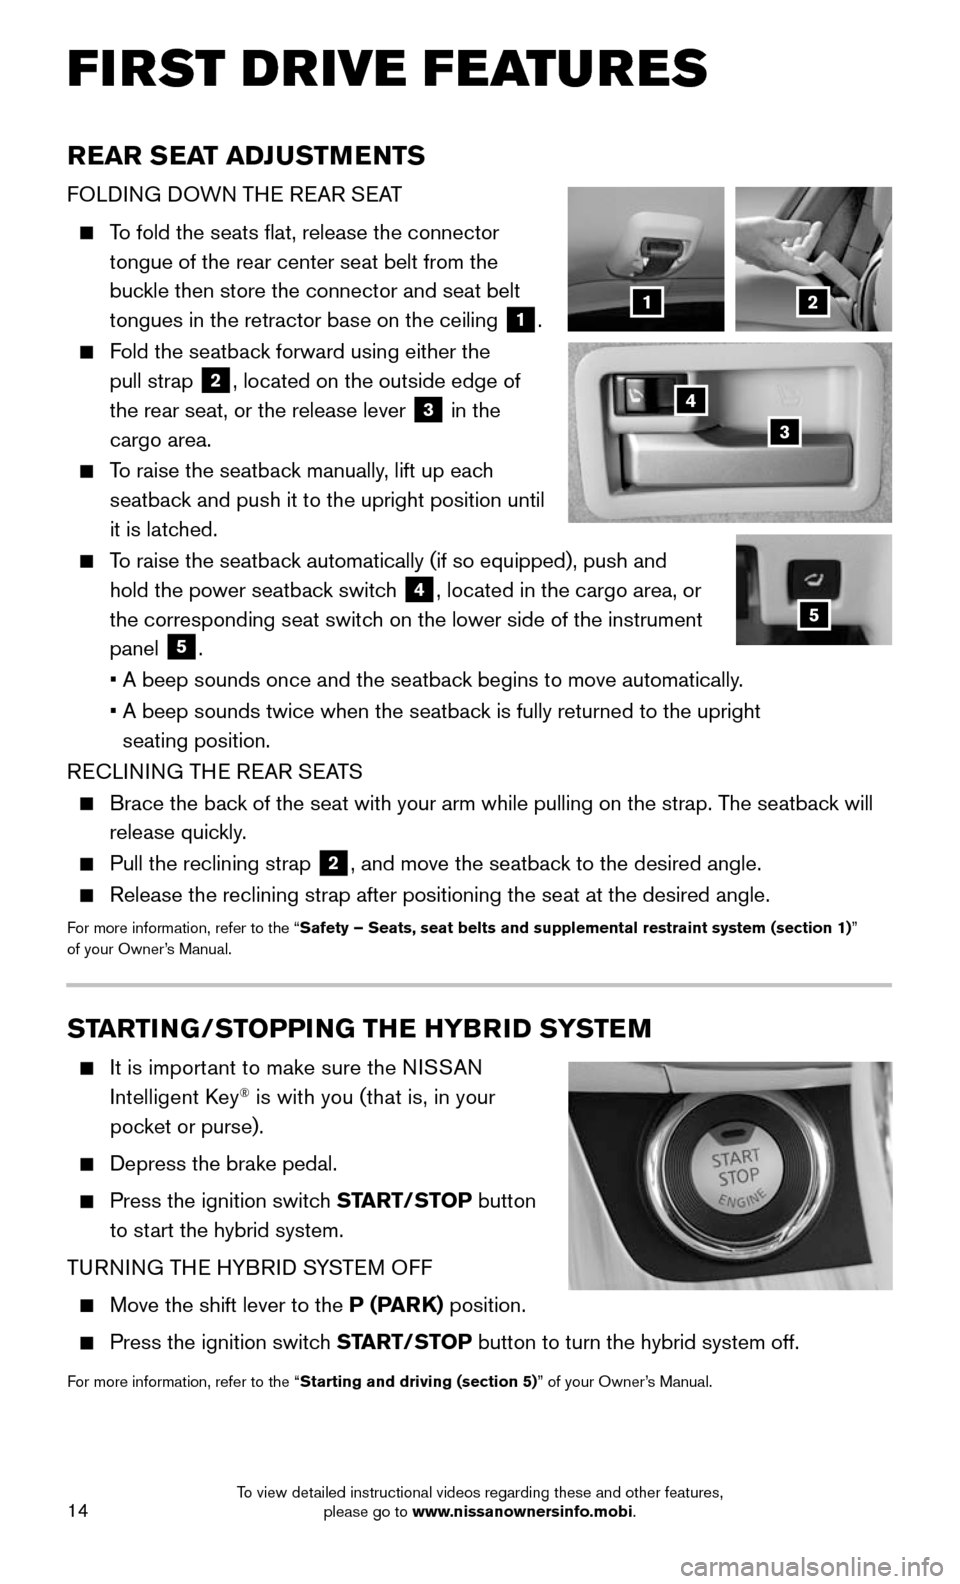
STARTING/STOPPING THE HYBRID SYSTEM
It is important to make sure the NISSAN
Intelligent Key® is with you (that is, in your
pocket or purse).
Depress the brake pedal.
Press the ignition switc h START/STOP button
to start the hybrid system.
TURNING THE HYBRID SYSTEM OFF
Move the shift lever to the P (PARK) position.
Press the ignition switc h START/STOP button to turn the hybrid system off.
For more information, refer to the “Starting and driving (section 5)” of your Owner’s Manual.
REAR SEAT ADJUSTMENTS
FOLDING DOWN THE REAR SEAT
To fold the seats flat, release the connector
tongue of the rear center seat belt from the
buckle then store the connector and seat belt
tongues in the retractor base on the ceiling
1.
Fold the seatback forward using either the
pull strap
2, located on the outside edge of
the rear seat, or the release lever
3 in the
cargo area.
To raise the seatback manually, lift up each
seatback and push it to the upright position until
it is latched.
To raise the seatback automatically (if so equipped), push and
hold the power seatback switch
4, located in the cargo area, or
the corresponding seat switch on the lower side of the instrument
panel
5.
• A beep sounds once and the seatbac k begins to move automatically.
• A beep sounds twice when the seatbac k is fully returned to the upright
seating position.
RECLINING THE REAR SEATS
Brace the bac k of the seat with your arm while pulling on the strap. The seatback will
release quickly.
Pull the reclining strap 2, and move the seatback to the desired angle.
Release the reclining strap after positioning the seat at the desired an\
gle.
For more information, refer to the “Safety – Seats, seat belts and supplemental restraint system (sectio\
n 1) ”
of your Owner’s Manual.
4
21
3
5
To view detailed instructional videos regarding these and other features, please go to www.nissanownersinfo.mobi.
Page 17 of 36
15
HEADLIGHT CONTROL SWITCH
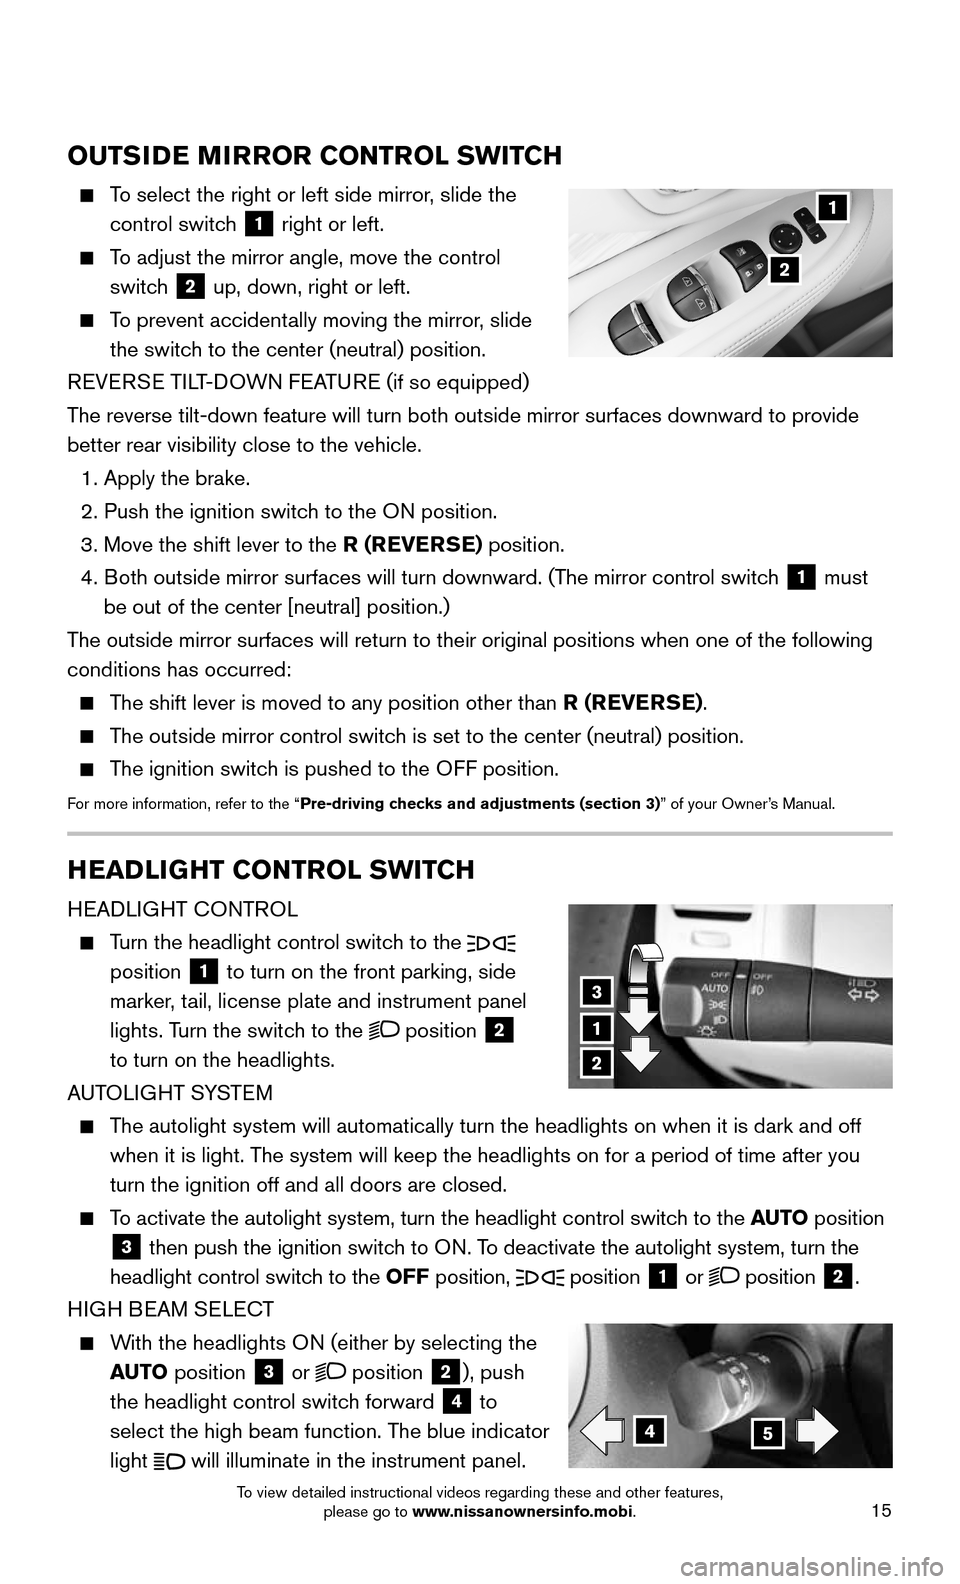
HEADLIGHT CONTROL
Turn the headlight control switch to the
position
1 to turn on the front parking, side
marker, tail, license plate and instrument panel
lights. Turn the switch to the
position 2
to turn on the headlights.
AUTOLIGHT SYSTEM
The autolight system will automatically turn the headlights on when it is\
dark and off
when it is light. The system will keep the headlights on for a period of time after you
turn the ignition off and all doors are closed.
To activate the autolight system, turn the headlight control switch to the AUTO position
3 then push the ignition switch to ON. To deactivate the autolight system, turn the
headlight control switch to the OFF position,
position 1 or position 2.
HIGH BEAM SELECT
With the headlights ON (either by selecting the
AUTO position
3 or position 2), push
the headlight control switch forward
4 to
select the high beam function. The blue indicator
light
will illuminate in the instrument panel.
1
3
2
45
OUTSIDE MIRROR CONTROL SWITCH
To select the right or left side mirror, slide the
control switch 1 right or left.
To adjust the mirror angle, move the control
switch 2 up, down, right or left.
To prevent accidentally moving the mirror, slide
the switch to the center (neutral) position.
REVERSE TILT-DOWN FEATURE (if so equipped)
The reverse tilt-down feature will turn both outside mirror surfaces down\
ward to provide
better rear visibility close to the vehicle.
1. Apply the brake.
2. Push the ignition switc h to the ON position.
3. Move the shift lever to the R (REVERSE) position.
4. Both outside mirror surfaces will turn downward. (The mirror control switch 1 must
be out of the center [neutral] position.)
The outside mirror surfaces will return to their original positions when \
one of the following
conditions has occurred:
The shift lever is moved to any position other than R (REVERSE).
The outside mirror control switch is set to the center (neutral) position.
The ignition switch is pushed to the OFF position.
For more information, refer to the “Pre-driving checks and adjustments (section 3)” of your Owner’s Manual.
1
2
To view detailed instructional videos regarding these and other features, please go to www.nissanownersinfo.mobi.
Page 22 of 36
20
FIRST DRIVE FEATURES
CRUISE CONTROL
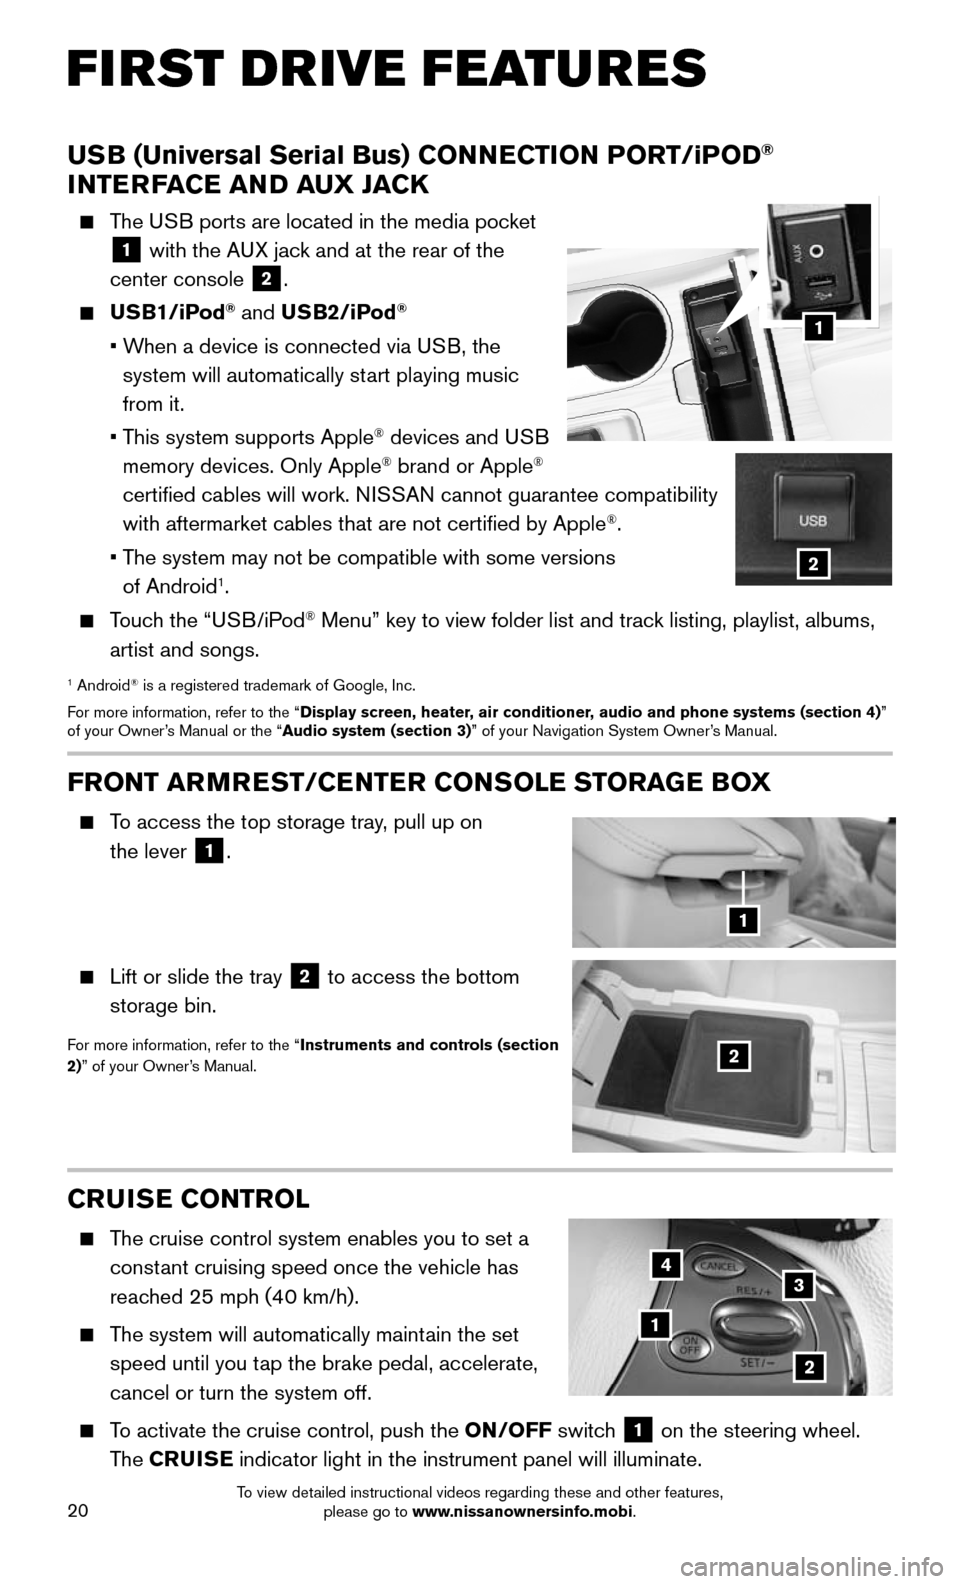
The cruise control system enables you to set a
constant cruising speed once the vehicle has
reached 25 mph (40 km/h).
The system will automatically maintain the set
speed until you tap the brake pedal, accelerate,
cancel or turn the system off.
To activate the cruise control, push the ON/OFF switch 1 on the steering wheel.
The CRUISE indicator light in the instrument panel will illuminate.
1
2
34
FRONT ARMREST /CENTER CONSOLE STORAGE BOX
To access the top storage tray, pull up on
the lever
1.
Lift or slide the tray 2 to access the bottom
storage bin.
For more information, refer to the “Instruments and controls (section
2)” of your Owner’s Manual.2
1
USB (Universal Serial Bus) CONNECTION PORT/iPOD®
INTERFACE AND AUX JACK
The USB ports are located in the media pocket
1 with the AUX jack and at the rear of the
center console
2.
USB1/iPod® and USB2/iPod®
• When a device is connected via USB, the
system will automatically start playing music
from it.
• This system supports Apple® devices and USB
memory devices. Only Apple® brand or Apple®
certified cables will work. NISSAN cannot guarantee compatibility
with aftermarket cables that are not certified by Apple
®.
• The system may not be compatible with some versions
of Android1.
Touch the “USB/iPod® Menu” key to view folder list and track listing, playlist, albums,
artist and songs.
1 Android® is a registered trademark of Google, Inc.
For more information, refer to the “Display screen, heater, air conditioner, audio and phone systems (section 4)”
of your Owner’s Manual or the “Audio system (section 3)” of your Navigation System Owner’s Manual.
1
2
To view detailed instructional videos regarding these and other features, please go to www.nissanownersinfo.mobi.
Page 23 of 36
21
INTELLIGENT CRUISE CONTROL (ICC) (if so equipped)
VEHICLE-TO-VEHICLE DISTANCE CONTROL MODE
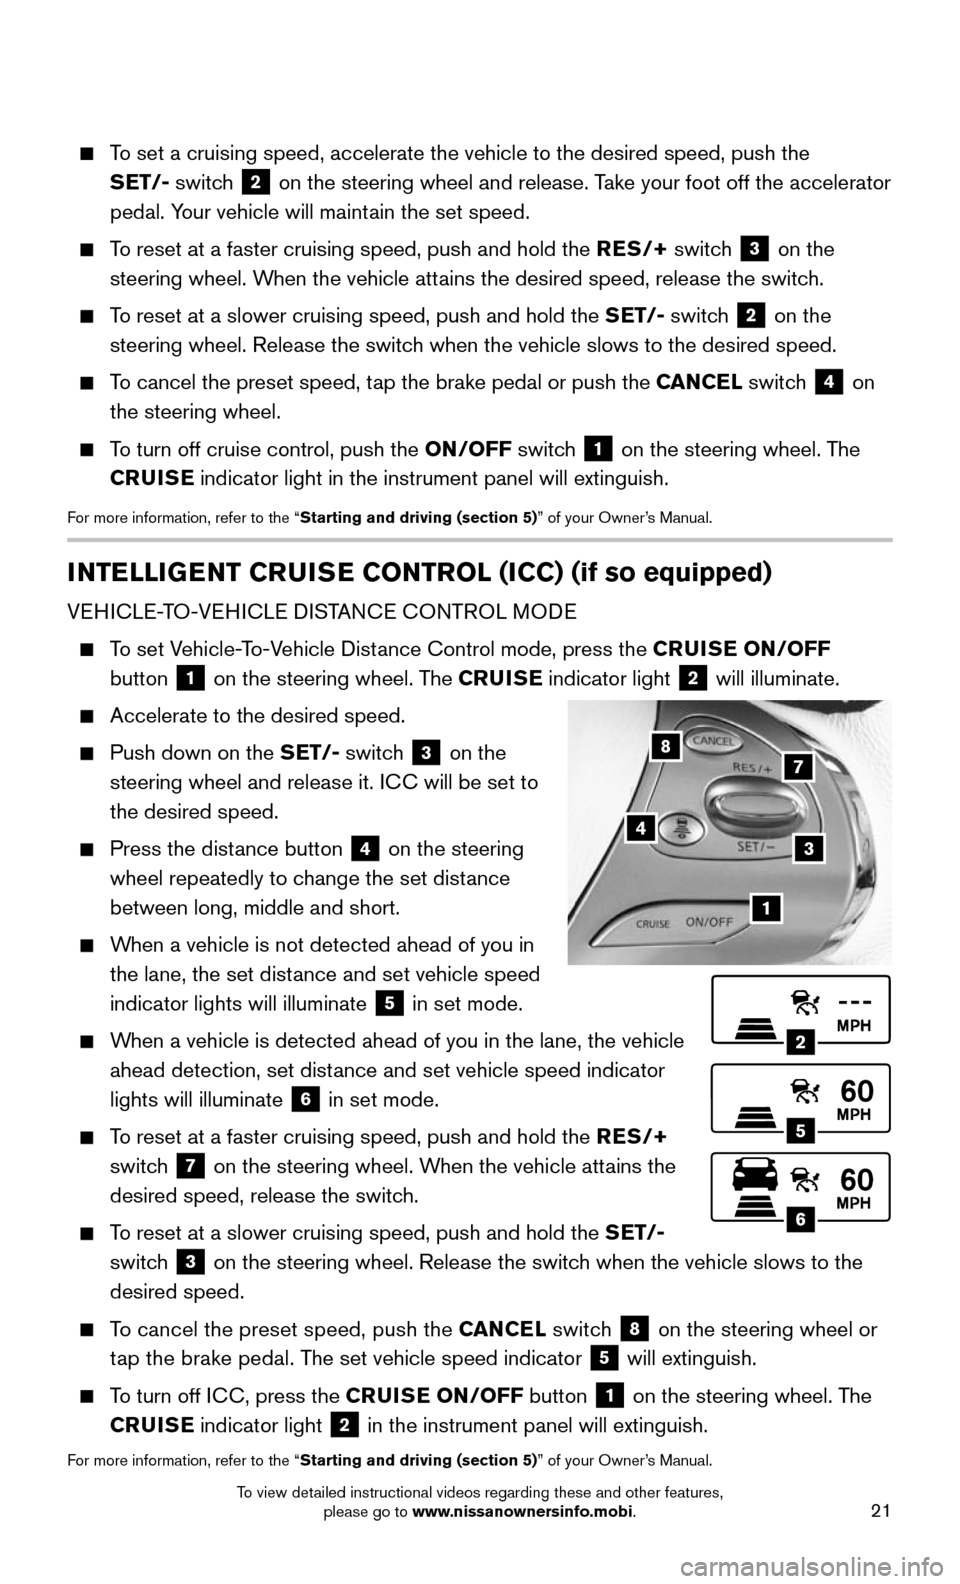
To set Vehicle-To-Vehicle Distance Control mode, press the CRUISE ON/OFF
button
1 on the steering wheel. The CRUISE
indicator light 2 will illuminate.
Accelerate to the desired speed.
Push down on the SET/- switch 3 on the
steering wheel and release it. ICC will be set to
the desired speed.
Press the dist ance button 4 on the steering
wheel repeatedly to change the set distance
between long, middle and short.
When a vehicle is not detected ahead of you in
the lane, the set distance and set vehicle speed
indicator lights will illuminate
5 in set mode.
When a vehicle is detected ahead of you in the lane, the vehicle
ahead detection, set distance and set vehicle speed indicator
lights will illuminate
6 in set mode.
To reset at a faster cruising speed, push and hold the RES/+
switch
7 on the steering wheel. When the vehicle attains the
desired speed, release the switch.
To reset at a slower cruising speed, push and hold the SET/-
switch
3 on the steering wheel. Release the switch when the vehicle slows to the
desired speed.
To cancel the preset speed, push the CANCEL switch 8 on the steering wheel or
tap the brake pedal. The set vehicle speed indicator 5 will extinguish.
To turn off ICC, press the CRUISE ON/OFF button 1 on the steering wheel. The
CRUISE indicator light 2 in the instrument panel will extinguish.
For more information, refer to the “Starting and driving (section 5)” of your Owner’s Manual.
2
5
6
1
4
87
3
To set a cruising speed, accelerate the vehicle to the desired speed, pus\
h the
SET/- switch
2 on the steering wheel and release. Take your foot off the accelerator
pedal. Your vehicle will maintain the set speed.
To reset at a faster cruising speed, push and hold the RES/+ switch 3 on the
steering wheel. When the vehicle attains the desired speed, release the switch.
To reset at a slower cruising speed, push and hold the SET/- switch 2 on the
steering wheel. Release the switch when the vehicle slows to the desired speed.
To cancel the preset speed, tap the brake pedal or push the CANCEL switch 4 on
the steering wheel.
To turn off cruise control, push the ON/OFF switch 1 on the steering wheel. The
CRUISE indicator light in the instrument panel will extinguish.
For more information, refer to the “Starting and driving (section 5)” of your Owner’s Manual.
To view detailed instructional videos regarding these and other features, please go to www.nissanownersinfo.mobi.