2016 NISSAN MAXIMA light
[x] Cancel search: lightPage 13 of 40
11
CLOCK SET/ADJUSTMENT
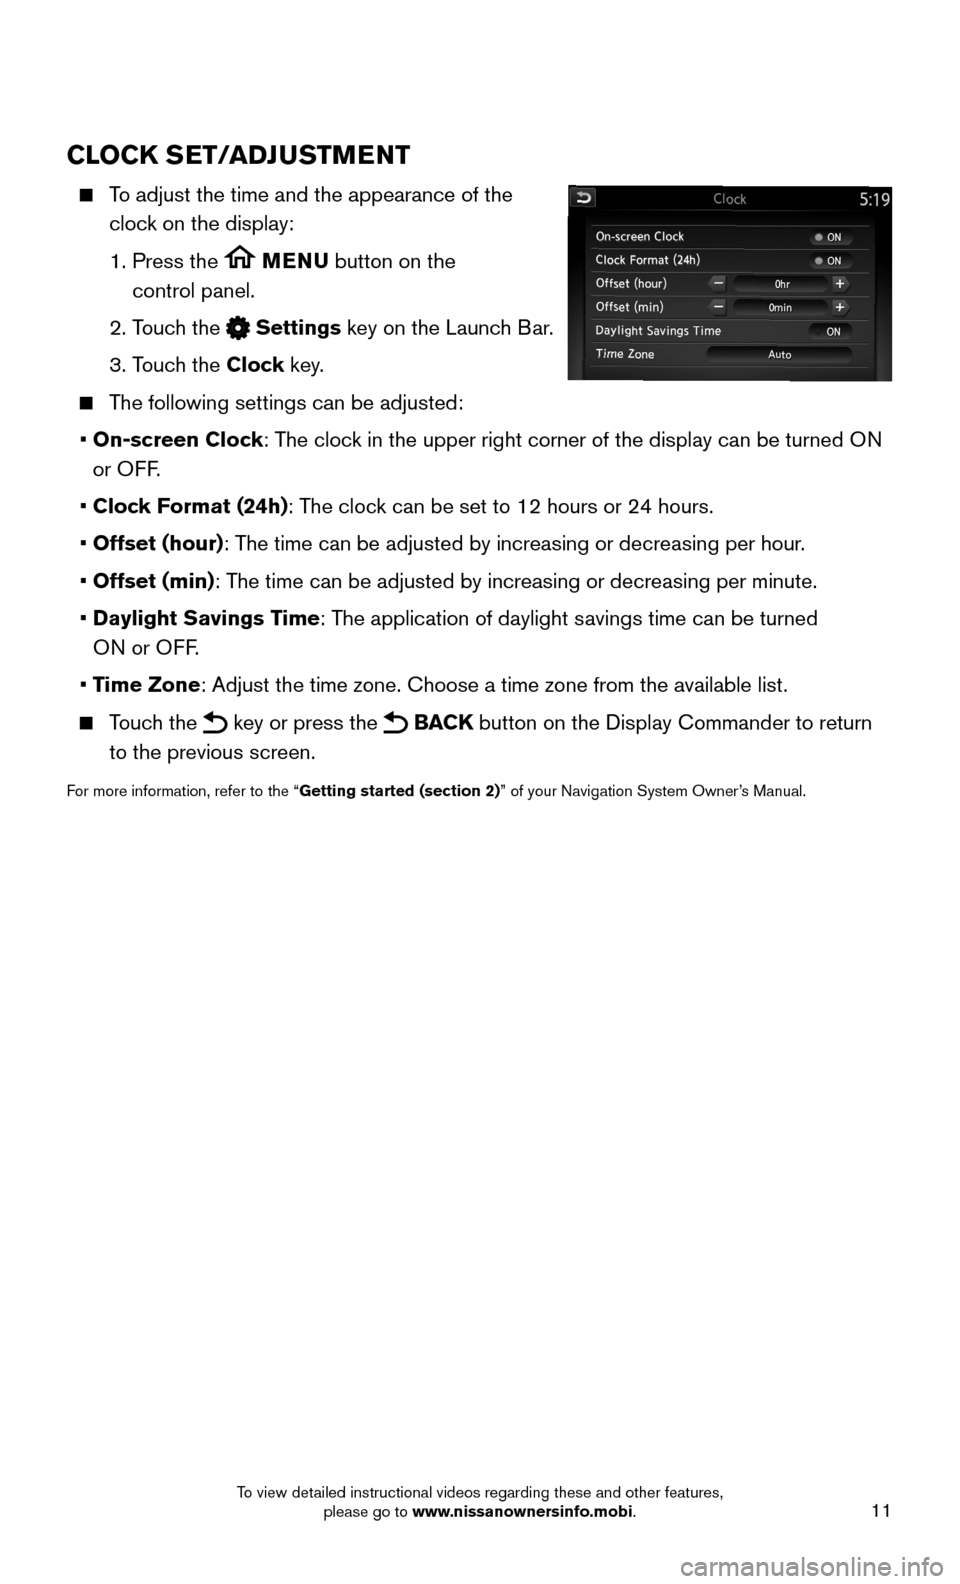
To adjust the time and the appearance of the
clock on the display:
1. Press the MENU button on the
control panel.
2. Touch the Settings key on the Launch Bar.
3. Touch the Clock key.
The following settings can be adjusted:
• On-screen Clock: The clock in the upper right corner of the display can be turned ON
or OFF.
• Clock Format (24h): The clock can be set to 12 hours or 24 hours.
• Offset (hour): The time can be adjusted by increasing or decreasing per hour.
• Offset (min): The time can be adjusted by increasing or decreasing per minute.
• Daylight Savings Time: The application of daylight savings time can be turned
ON or OFF.
• Time Zone: Adjust the time zone. Choose a time zone from the available list.
Touch the key or press the BACK button on the Display Commander to return
to the previous screen.
For more information, refer to the “Getting started (section 2)” of your Navigation System Owner’s Manual.
To view detailed instructional videos regarding these and other features, please go to www.nissanownersinfo.mobi.
Page 15 of 40
13
REMOTE ENGINE START*
The remote start operating range is approximately 200 ft (60 m) from the vehicle. The
effective operating range may be shorter if there are walls, strong radi\
o wave sources
near the operating location or other obstructions between the key and th\
e vehicle.
For the remote start to function, the vehicle must be in the P (PARK) position with the
ignition off and all doors must be closed and locked. Please see your Owner’s Manual
for additional information.
To start your vehicle remotely:
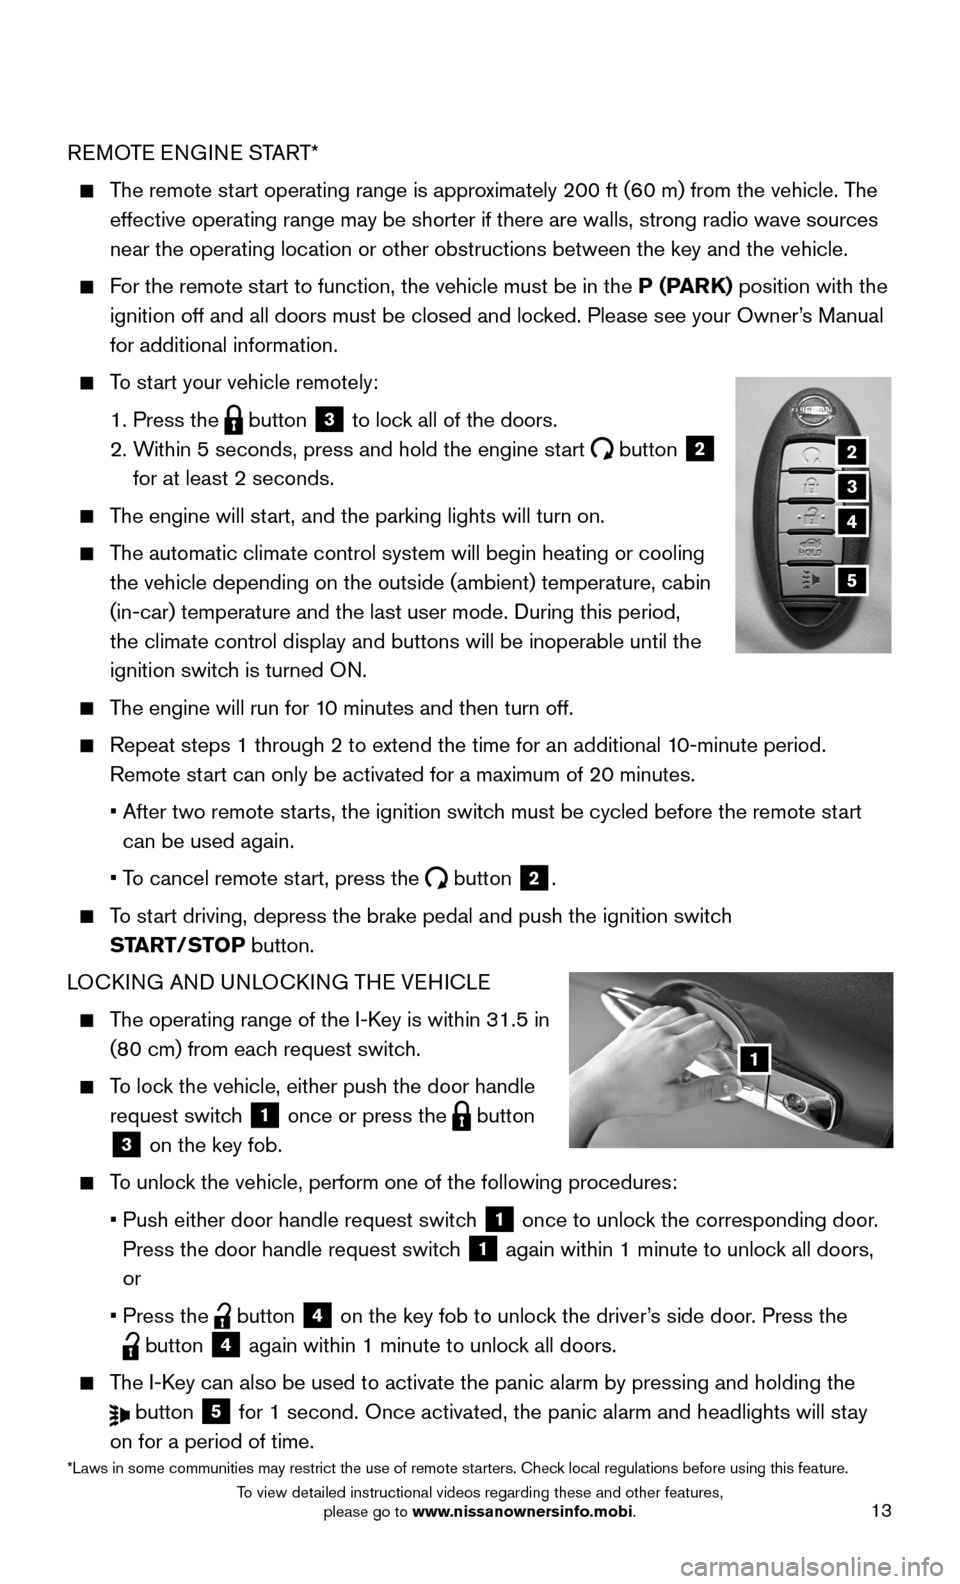
1. Press the button 3 to lock all of the doors.
2. Within 5 seconds, press and hold the engine start button 2
for at least 2 seconds.
The engine will start, and the parking lights will turn on.
The automatic climate control system will begin heating or cooling
the vehicle depending on the outside (ambient) temperature, cabin
(in-car) temperature and the last user mode. During this period,
the climate control display and buttons will be inoperable until the
ignition switch is turned ON.
The engine will run for 10 minutes and then turn off.
Repeat steps 1 through 2 to extend the time for an additional 10-minute period.
Remote start can only be activated for a maximum of 20 minutes.
• After two remote starts, the ignition switch must be cycled before the remote start
can be used again.
• To cancel remote start, press the button 2.
To start driving, depress the brake pedal and push the ignition switch
START/STOP button.
LOCKING AND UNLOCKING THE VEHICLE
The operating range of the I-Key is within 31.5 in
(80 cm) from each request switch.
To lock the vehicle, either push the door handle
request switch 1 once or press the button
3 on the key fob.
To unlock the vehicle, perform one of the following procedures:
• Push either door handle request switch 1 once to unlock the corresponding door.
Press the door handle request switch 1 again within 1 minute to unlock all doors,
or
• Press the button 4 on the key fob to unlock the driver’s side door. Press the
button 4 again within 1 minute to unlock all doors.
The I-Key can also be used to activate the panic alarm by pressing and holding \
the
button 5 for 1 second. Once activated, the panic alarm and headlights will stay
on for a period of time.
1
2
3
5
4
*Laws in some communities may restrict the use of remote starters. Check local regulations before using this feature.
To view detailed instructional videos regarding these and other features, please go to www.nissanownersinfo.mobi.
Page 18 of 40
16
AUTOMATIC DRIVE POSITIONER (if so equipped)
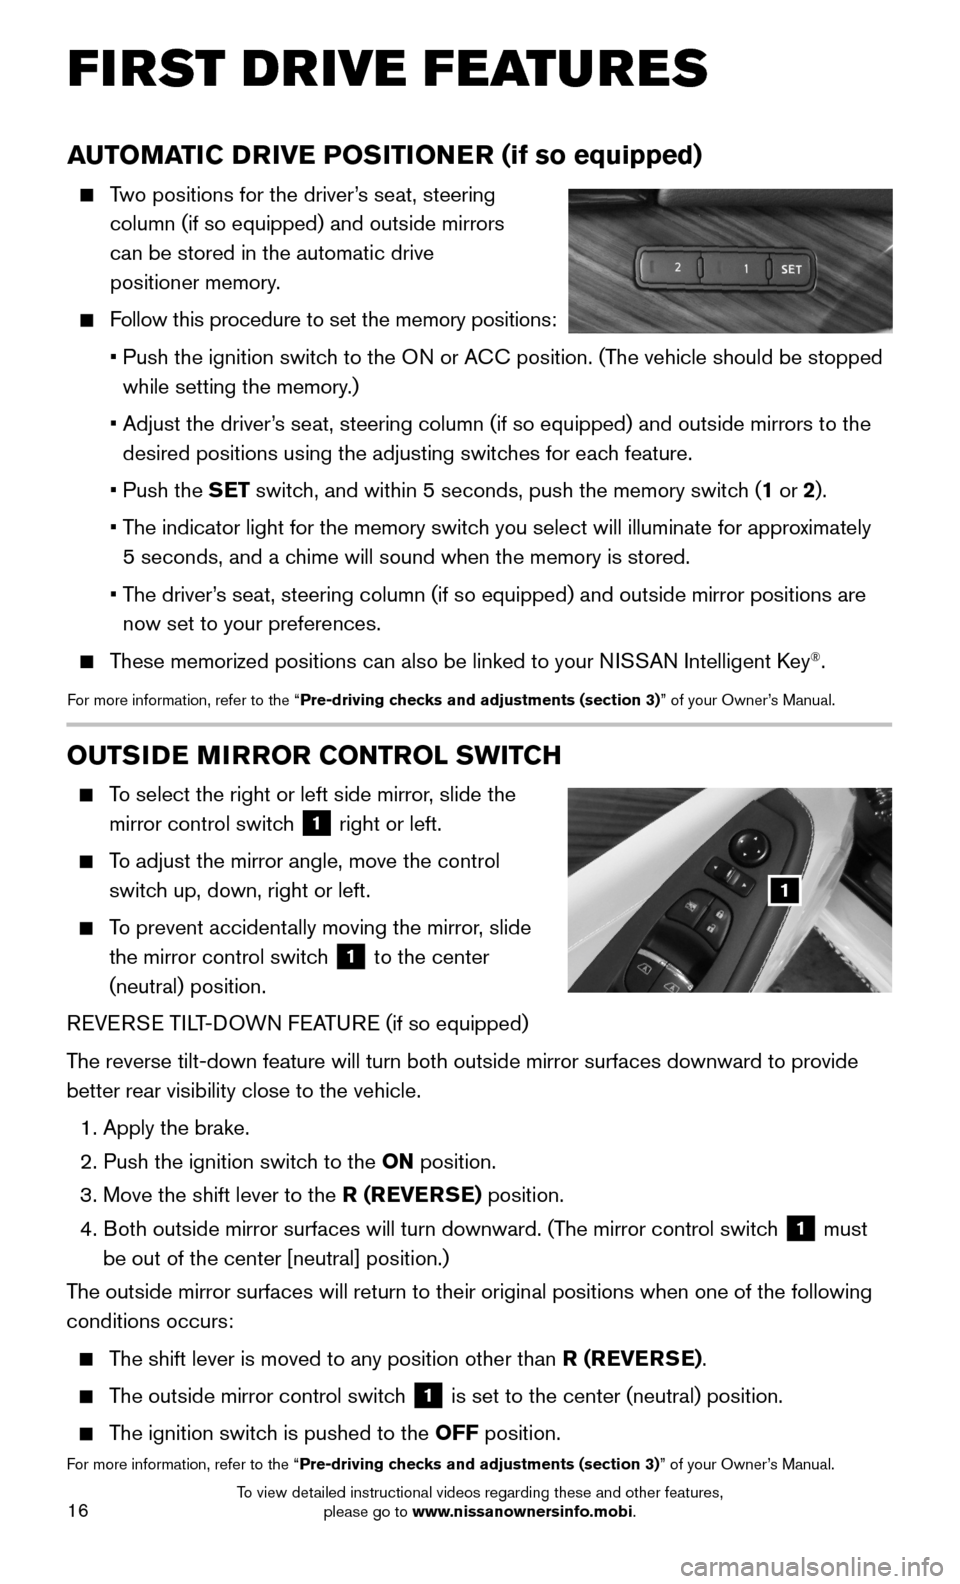
Two positions for the driver’s seat, steering
column (if so equipped) and outside mirrors
can be stored in the automatic drive
positioner memory.
Follow this procedure to set the memory positions:
• Push the ignition switch to the ON or ACC position. (The vehicle should be stopped
while setting the memory.)
• Adjust the driver’s seat, steering column (if so equipped) and outside mirrors to the
desired positions using the adjusting switches for each feature.
• Push the SET switch, and within 5 seconds, push the memory switch (1 or 2).
• The indicator light for the memory switch you select will illuminate for approximately
5 seconds, and a chime will sound when the memory is stored.
• The driver’s seat, steering column (if so equipped) and outside mirror positions \
are
now set to your preferences.
These memorized positions can also be linked to your NISSAN Intelligent Key®.
For more information, refer to the “Pre-driving checks and adjustments (section 3)” of your Owner’s Manual.
OUTSIDE MIRROR CONTROL SWITCH
To select the right or left side mirror, slide the
mirror control switch 1 right or left.
To adjust the mirror angle, move the control
switch up, down, right or left.
To prevent accidentally moving the mirror, slide
the mirror control switch 1 to the center
(neutral) position.
REVERSE TILT-DOWN FEATURE (if so equipped)
The reverse tilt-down feature will turn both outside mirror surfaces down\
ward to provide
better rear visibility close to the vehicle.
1. Apply the brake.
2. Push the ignition switch to the ON position.
3. Move the shift lever to the R (REVERSE) position.
4. Both outside mirror surfaces will turn downward. (The mirror control switch 1 must
be out of the center [neutral] position.)
The outside mirror surfaces will return to their original positions when \
one of the following
conditions occurs:
The shift lever is moved to any position other than R (REVERSE).
The outside mirror control switch 1 is set to the center (neutral) position.
The ignition switch is pushed to the OFF position.
For more information, refer to the “Pre-driving checks and adjustments (section 3)” of your Owner’s Manual.
1
FIRST DRIVE FEATURES
To view detailed instructional videos regarding these and other features, please go to www.nissanownersinfo.mobi.
Page 19 of 40
17
STARTING/STOPPING THE ENGINE
It is important to make sure the NISSAN
Intelligent Key® is with you (that is, in your
pocket or purse).
Depress the brake pedal.
Press the ignition switch START/STOP button
to start the engine.
TURNING THE ENGINE OFF
Move the shift lever to the P (PARK) position.
Press the ignition switch START/STOP button to turn the engine off.
For more information, refer to the “Starting and driving (section 5)” of your Owner’s Manual.
HEADLIGHT CONTROL SWITCH
HEADLIGHT CONTROL
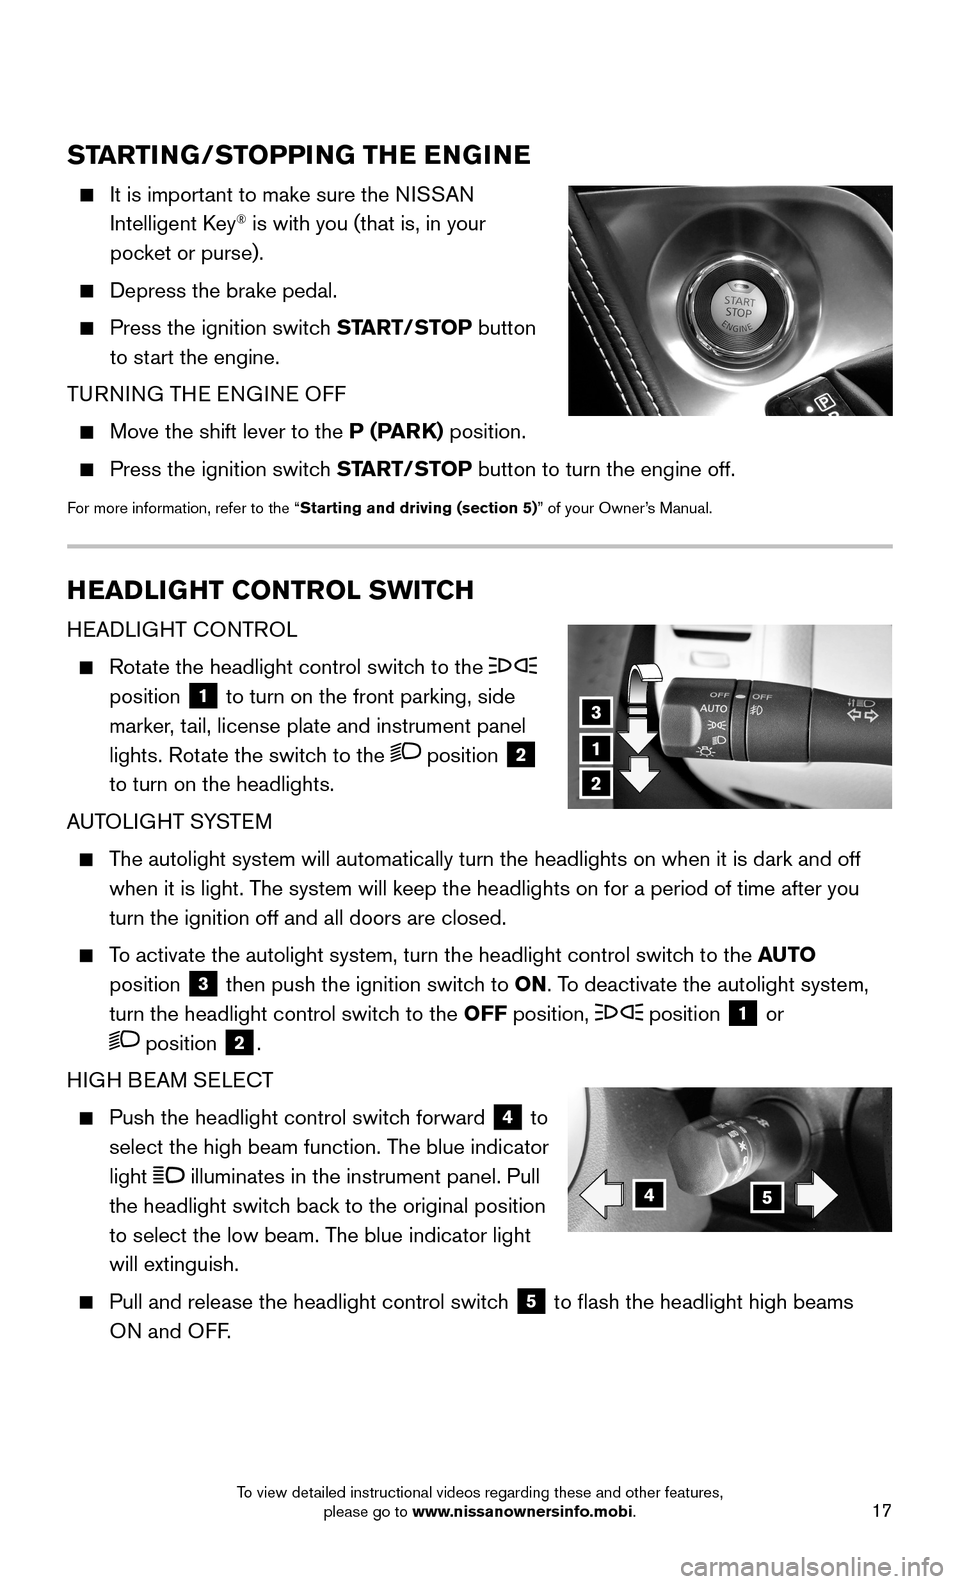
Rotate the headlight control switch to the
position 1 to turn on the front parking, side
marker, tail, license plate and instrument panel
lights. Rotate the switch to the position 2
to turn on the headlights.
AUTOLIGHT SYSTEM
The autolight system will automatically turn the headlights on when it is\
dark and off
when it is light. The system will keep the headlights on for a period of time after you
turn the ignition off and all doors are closed.
To activate the autolight system, turn the headlight control switch to the AUTO
position 3 then push the ignition switch to ON. To deactivate the autolight system,
turn the headlight control switch to the OFF position, position 1 or
position 2.
HIGH BEAM SELECT
Push the headlight control switch forward 4 to
select the high beam function. The blue indicator
light illuminates in the instrument panel. Pull
the headlight switch back to the original position
to select the low beam. The blue indicator light
will extinguish.
Pull and release the headlight control switch 5 to flash the headlight high beams
ON and OFF.
1
3
2
45
To view detailed instructional videos regarding these and other features, please go to www.nissanownersinfo.mobi.
Page 20 of 40
18
6
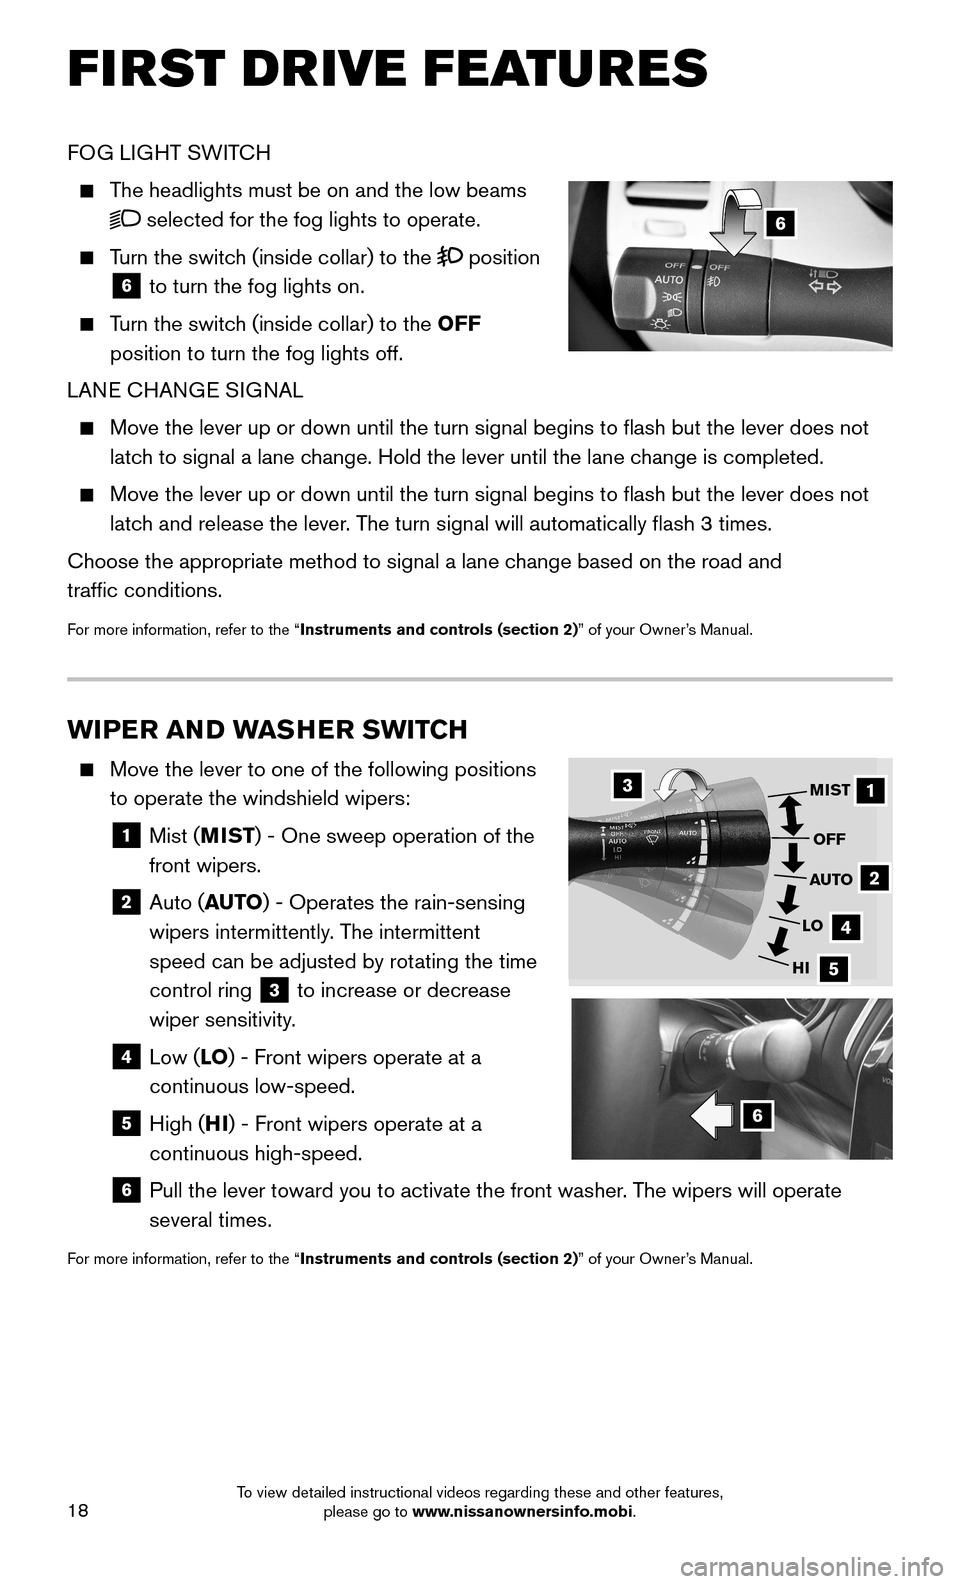
FOG LIGHT SWITCH
The headlights must be on and the low beams
selected for the fog lights to operate.
Turn the switch (inside collar) to the position
6 to turn the fog lights on.
Turn the switch (inside collar) to the OFF
position to turn the fog lights off.
LANE CHANGE SIGNAL
Move the lever up or down until the turn signal begins to flash but th\
e lever does not
latch to signal a lane change. Hold the lever until the lane change is completed.
Move the lever up or down until the turn signal begins to flash but th\
e lever does not
latch and release the lever. The turn signal will automatically flash 3 times.
Choose the appropriate method to signal a lane change based on the road and
traffic conditions.
For more information, refer to the “Instruments and controls (section 2)” of your Owner’s Manual.
WIPER AND WASHER SWITCH
Move the lever to one of the following positions
to operate the windshield wipers:
1 Mist (MIST) - One sweep operation of the
front wipers.
2 Auto (AUTO) - Operates the rain-sensing
wipers intermittently. The intermittent
speed can be adjusted by rotating the time
control ring 3 to increase or decrease
wiper sensitivity.
4 Low (LO) - Front wipers operate at a
continuous low-speed.
5 High (HI) - Front wipers operate at a
continuous high-speed.
6 Pull the lever toward you to activate the front washer. The wipers will operate
several times.
For more information, refer to the “Instruments and controls (section 2)” of your Owner’s Manual.
1
2
4
5
MIST
OFF
AUTO
LO
HI
3
6
FIRST DRIVE FEATURES
To view detailed instructional videos regarding these and other features, please go to www.nissanownersinfo.mobi.
Page 22 of 40
20
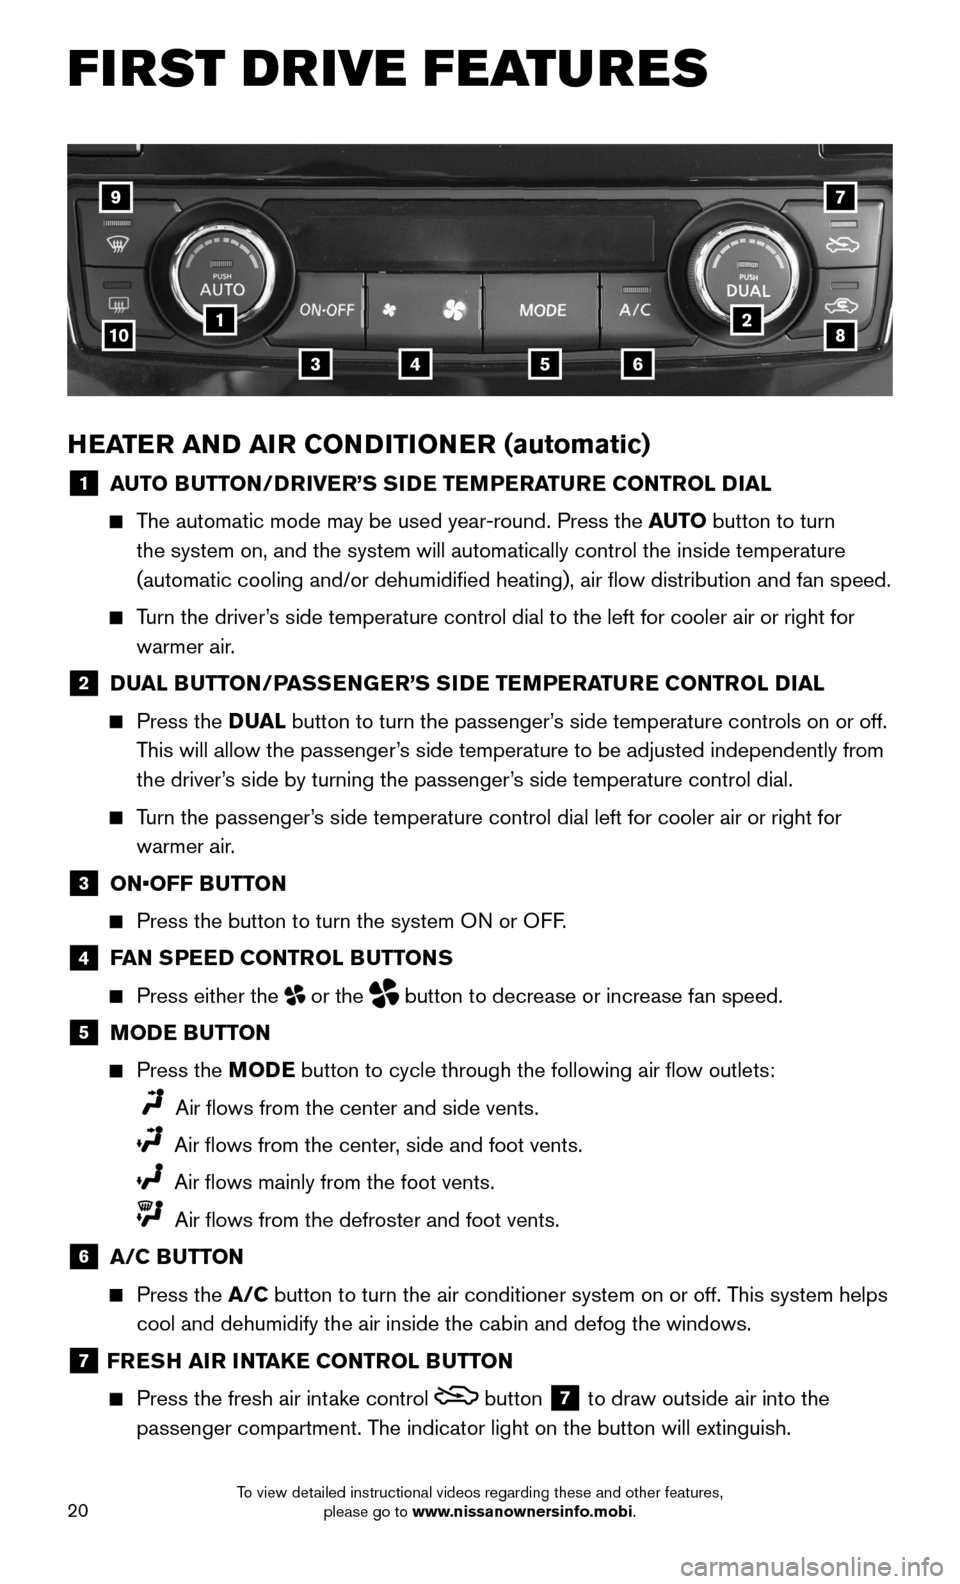
HEATER AND AIR CONDITIONER (automatic)
1 AUTO BUTTON/DRIVER’S SIDE TEMPERATURE CONTROL DIAL
The automatic mode may be used year-round. Press the AUTO button to turn
the system on, and the system will automatically control the inside temp\
erature
(automatic cooling and/or dehumidified heating), air flow distribu\
tion and fan speed.
Turn the driver’s side temperature control dial to the left for cooler air or right for \
warmer air.
2 DUAL BUTTON/PASSENGER’S SIDE TEMPERATURE CONTROL DIAL
Press the D UAL button to turn the passenger’s side temperature controls on or off.
This will allow the passenger’s side temperature to be adjusted independently from
the driver’s side by turning the passenger’s side temperature control dial.
Turn the passenger’s side temperature control dial left for cooler air or right for
warmer air.
3 ON•OFF BUTTON
Press the button to turn the system ON or OFF.
4 FAN SPEED CONTROL BUTTONS
Press either the or the button to decrease or increase fan speed.
5 MODE BUTTON
Press the MODE button to cycle through the following air flow outlets:
Air flows from the center and side vents.
Air flows from the center, side and foot vents.
Air flows mainly from the foot vents.
Air flows from the defroster and foot vents.
6 A/C BUTTON
Press the A/C button to turn the air conditioner system on or off. This system helps
cool and dehumidify the air inside the cabin and defog the windows.
7 FRESH AIR INTAKE CONTROL BUTTON
Press the fresh air intake control button 7 to draw outside air into the
passenger compartment. The indicator light on the button will extinguish.
FIRST DRIVE FEATURES
4
21
35
10
6
9
8
7
To view detailed instructional videos regarding these and other features, please go to www.nissanownersinfo.mobi.
Page 23 of 40
21
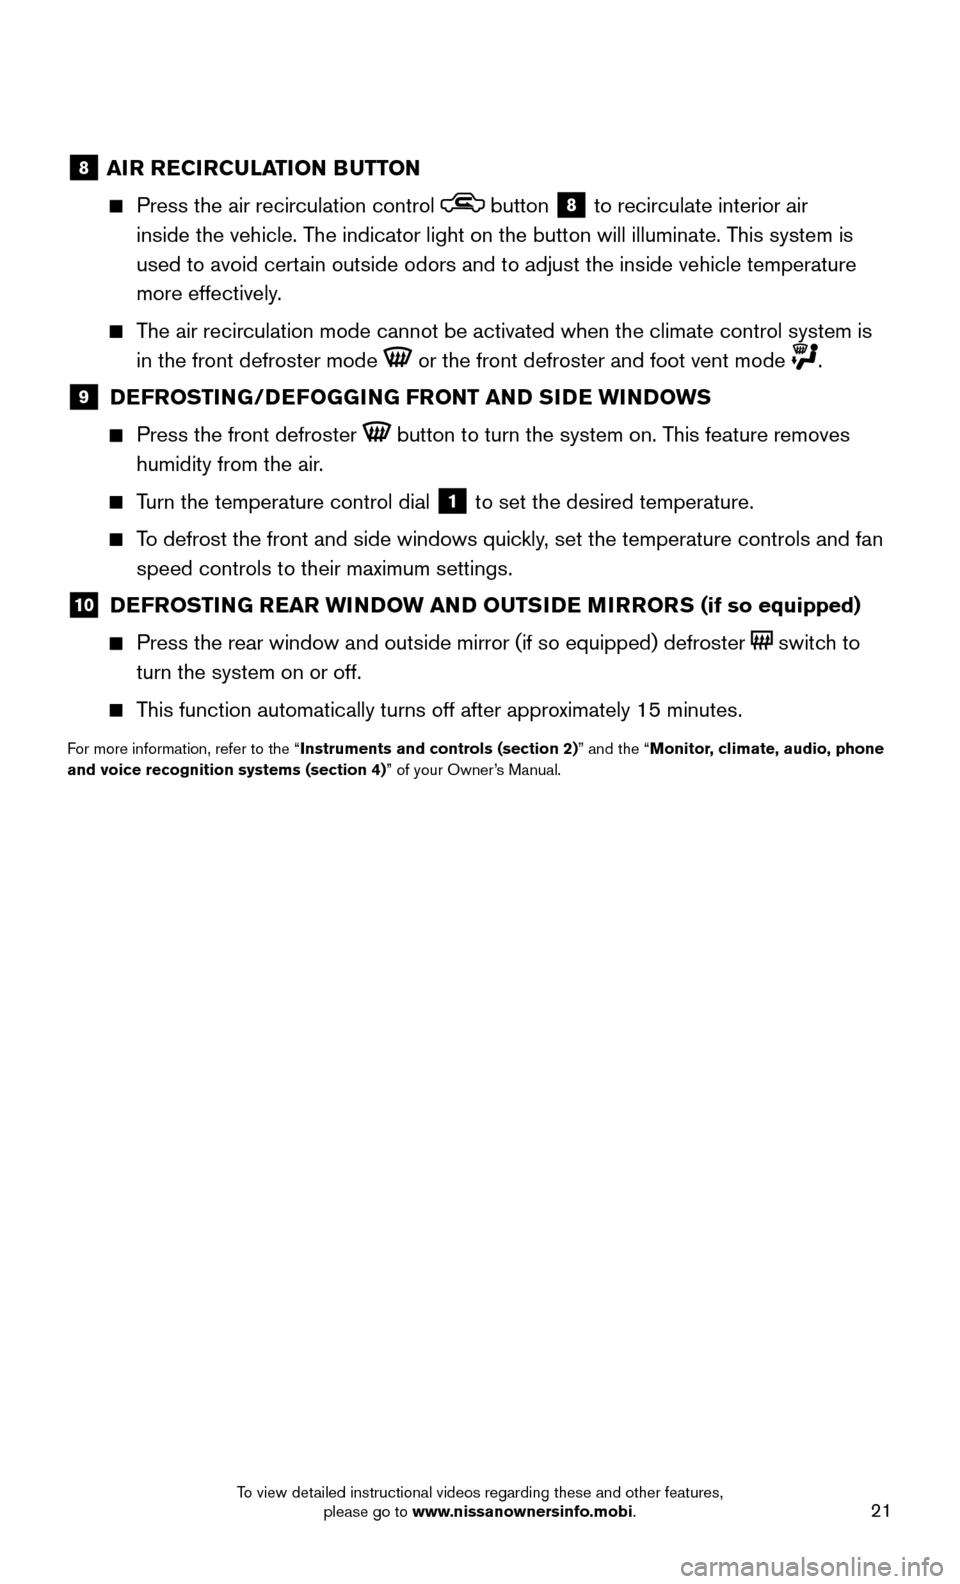
8 AIR RECIRCULATION BUTTON
Press the air recirculation control button 8 to recirculate interior air
inside the vehicle. The indicator light on the button will illuminate. This system is
used to avoid certain outside odors and to adjust the inside vehicle temperature
more effectively.
The air recirculation mode cannot be activated when the climate control s\
ystem is
in the front defroster mode or the front defroster and foot vent mode .
9 DEFROSTING/DEFOGGING FRONT AND SIDE WINDOWS
Press the front defroster button to turn the system on. This feature removes
humidity from the air.
Turn the temperature control dial 1 to set the desired temperature.
To defrost the front and side windows quickly, set the temperature controls and fan
speed controls to their maximum settings.
10 DEFROSTING REAR WINDOW AND OUTSIDE MIRRORS (if so equipped)
Press the rear window and outside mirror (if so equipped) defroster switch to
turn the system on or off.
This function automatically turns off after approximately 15 minutes.
For more information, refer to the “Instruments and controls (section 2)” and the “Monitor, climate, audio, phone and voice recognition systems (section 4)” of your Owner’s Manual.
To view detailed instructional videos regarding these and other features, please go to www.nissanownersinfo.mobi.
Page 26 of 40
24
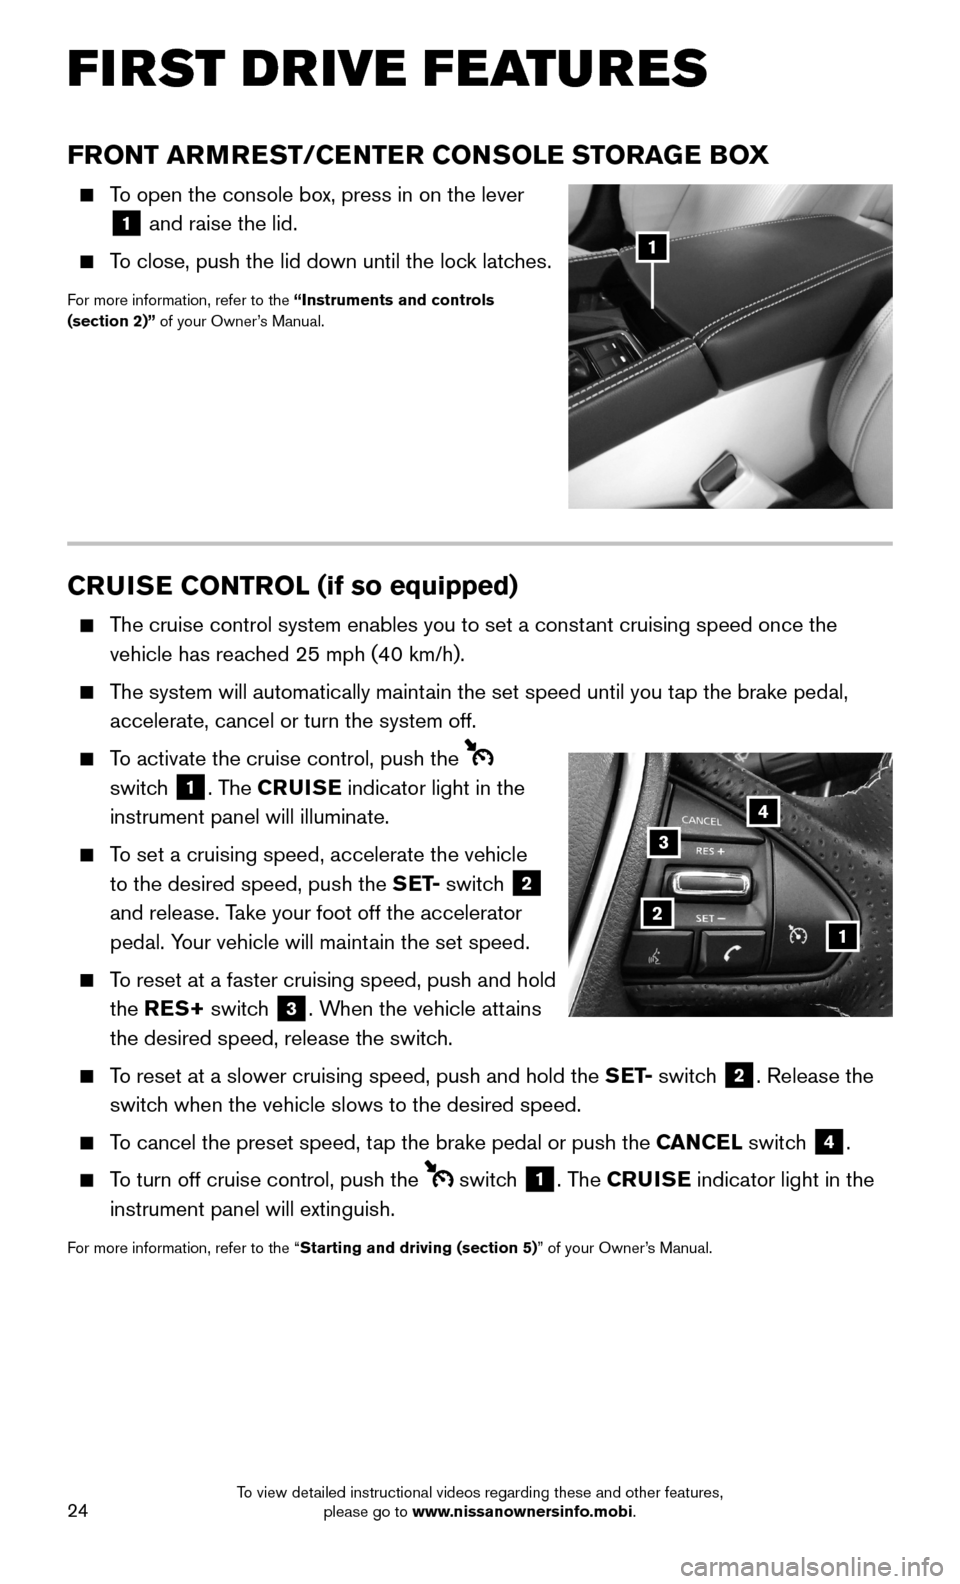
CRUISE CONTROL (if so equipped)
The cruise control system enables you to set a constant cruising speed once the
vehicle has reached 25 mph (40 km/h).
The system will automatically maintain the set speed until you tap the brake pedal,
accelerate, cancel or turn the system off.
To activate the cruise control, push the
switch 1. The CRUISE indicator light in the
instrument panel will illuminate.
To set a cruising speed, accelerate the vehicle
to the desired speed, push the S E T- switch 2
and release. Take your foot off the accelerator
pedal. Your vehicle will maintain the set speed.
To reset at a faster cruising speed, push and hold
the RES+ switch 3. When the vehicle attains
the desired speed, release the switch.
To reset at a slower cruising speed, push and hold the S E T- switch 2. Release the
switch when the vehicle slows to the desired speed.
To cancel the preset speed, tap the brake pedal or push the CANCEL switch 4.
To turn off cruise control, push the switch 1. The CRUISE indicator light in the
instrument panel will extinguish.
For more information, refer to the “Starting and driving (section 5)” of your Owner’s Manual.
12
3
4
FRONT ARMREST/CENTER CONSOLE STORAGE BOX
To open the console box, press in on the lever
1 and raise the lid.
To close, push the lid down until the lock latches.
For more information, refer to the “Instruments and controls (section 2)” of your Owner’s Manual.
1
FIRST DRIVE FEATURES
To view detailed instructional videos regarding these and other features, please go to www.nissanownersinfo.mobi.