Page 166 of 437
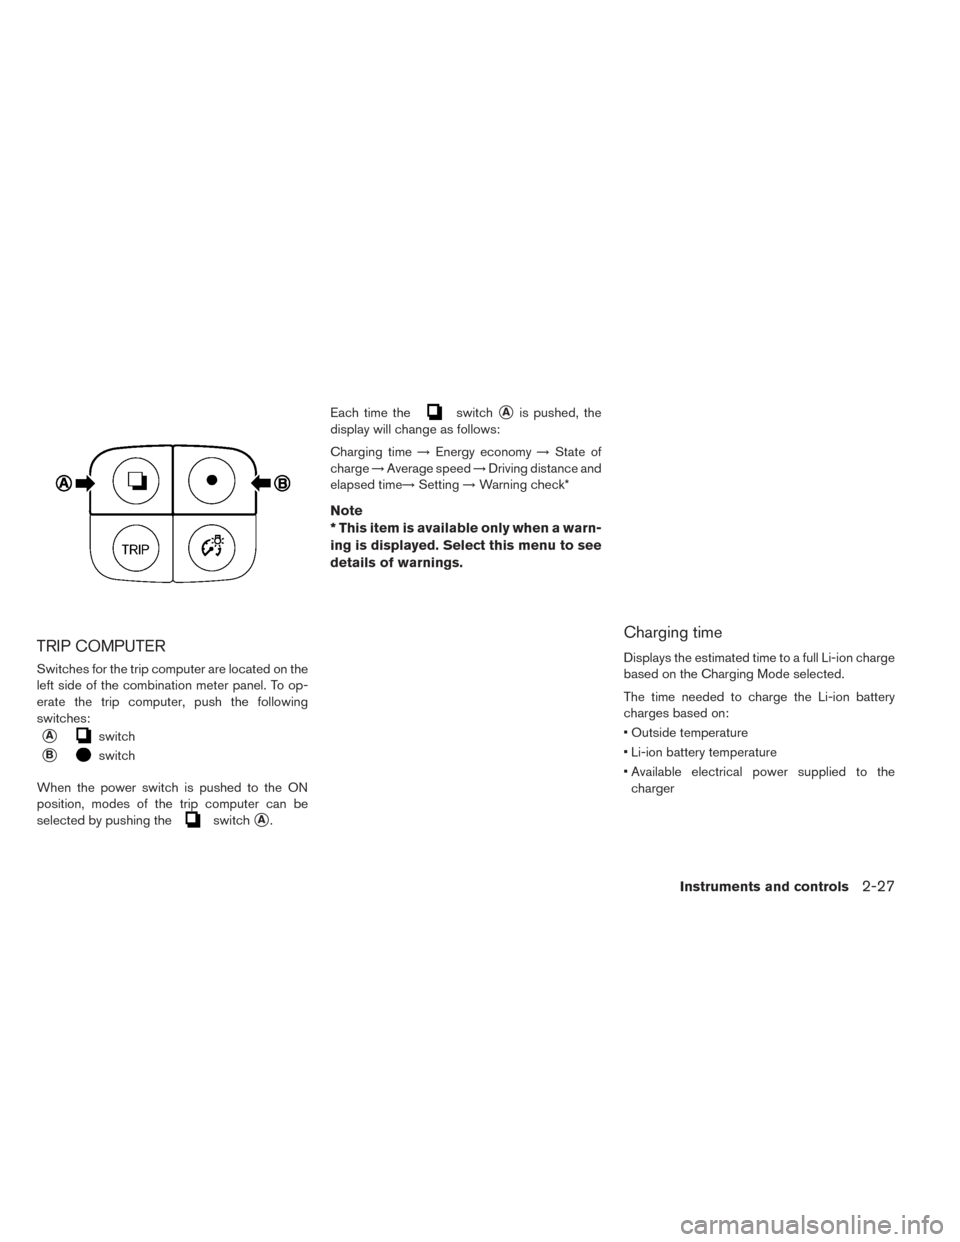
TRIP COMPUTER
Switches for the trip computer are located on the
left side of the combination meter panel. To op-
erate the trip computer, push the following
switches:
�Aswitch
�Bswitch
When the power switch is pushed to the ON
position, modes of the trip computer can be
selected by pushing the
switch�A. Each time the
switch�Ais pushed, the
display will change as follows:
Charging time →Energy economy →State of
charge →Average speed →Driving distance and
elapsed time→ Setting→Warning check*
Note
* This item is available only when a warn-
ing is displayed. Select this menu to see
details of warnings.
Charging time
Displays the estimated time to a full Li-ion charge
based on the Charging Mode selected.
The time needed to charge the Li-ion battery
charges based on:
• Outside temperature
• Li-ion battery temperature
• Available electrical power supplied to the
charger
Instruments and controls2-27
Page 183 of 437

Battery saver system
• When the headlight switch is in theor
position while the power switch is in the
ON position, the lights will automatically turn off
45 seconds after the power switch has been
placed in the OFF position.
• When the headlight switch remains in the
orposition after the lights automatically
turn off, the lights will turn on when the power
switch is placed in the ON position.
CAUTION
• When you turn on the headlight switch again after the lights automatically
turn off, the lights will not turn off
automatically. Be sure to turn the light
switch to the OFF position when you
leave the vehicle for extended periods
of time, otherwise the battery will be
discharged.
• Never leave the light switch on when the power switch is in the OFF, ACC or
ON position for extended periods of
time even if the headlights turn off
automatically.
Daytime running light system (for
Canada)
The daytime running lights automatically illumi-
nate when the power switch is in the READY to
drive position with the parking brake released.
The daytime running lights operate with the head-
light switch in the OFF position. Turn headlight
switch to the
position for full illumination
when driving at night.
If the parking brake is applied before the power
switch is in the READY to drive position, daytime
running lights do not operate. The daytime run-
ning lights illuminate once the parking brake is
released. The daytime running lights will remain
on until the power switch is pushed to the OFF
position.
TURN SIGNAL SWITCH
Turn signal
�1Move the lever up or down until it latches to
signal the turning direction. When the turn is
completed, the turn signal cancels automatically.
Lane change signal
�2Move the lever up or down until the turn signal
begins to flash, but the lever does not latch, to
signal a lane change. Hold the lever until the lane
change is completed.
2-44Instruments and controls
Page 184 of 437
Move the lever up or down until the turn signal
begins to flash, but the lever does not latch, and
release the lever. The turn signal will automati-
cally flash three times.
Choose the appropriate method to signal a lane
change based on road and traffic conditions.To turn the fog lights on, rotate the headlight
switch to the
position, then rotate the
switch to the
position. To turn them off,
rotate the switch to the OFF position.
The headlights must be on for the fog lights to
operate. The heated steering wheel system is designed to
operate only when the surface temperature of the
steering wheel is below approximately 68°F
(20°C) .
Push the heated steering wheel switch to warm
the steering wheel when the power switch is in
the ON position. The indicator light
�1on the
switch will illuminate.
FOG LIGHT SWITCH (IF SO
EQUIPPED) HEATED STEERING WHEEL SWITCH
(IF SO EQUIPPED)
Instruments and controls2-45
Page 253 of 437

Press the STATUS button to display the climate
control system status on the navigation system
screen. For additional i")
DISPLAYING CLIMATE CONTROL SYSTEM
STATUS SCREEN (MODELS WITH NAVIGA-
TION SYSTEM)
Press the STATUS button to display the climate
control system status on the navigation system
screen. For additional information, refer to the
separate Navigation Owner’s Manual.
NOTE:
•If the READY to drive indicator light is illumi-
nated and the EVSE (Electric Vehicle Supply
Equipment) is connected to the vehicle, the
power switch will change to the ON position.
At the same time, the climate control system
will stop operating. However, the fan will
continue to operate. If you want to turn on
climate control again, place the power
switch in the OFF position and then place it
in the ON position again after confirming
that the vehicle has started charging.
•When the power switch is in the ON posi-
tion, if the power supply from the EVSE
(Electric Vehicle Supply Equipment) is inter-
rupted due to an electrical outage, etc., the
system will operate in the following ways.
– If it occurs while charging is being per- formed:– The climate control system will stop
once. If the power supply is restored
within approximately 5 minutes, the
climate control system will restart.
However, if more than 5 minutes
have elapsed, the climate control
system will not restart.
– If it occurs after charging has finished: –The climate control system will stop.
OPERATING TIPS
• The automatic climate control is equipped with
sensors as illustrated. The sensors
�Aand�B
help maintain a constant temperature. Do not
put anything on or around these sensors.
• Using the AUTO mode will help reduce the power consumption of the climate control.
• When the AUTO switched is pressed, the AUTO indicator illuminates. The
(HEAT)
button indicator or the A/C button indicator
illuminates according to the operation of the
climate control system.
4-24Display screen, heater, air conditioner, audio and phone systems
Page 254 of 437

• If the charger is connected to the vehicle whenit is in the ready to drive mode and the air
conditioner or heater is on, the power switch
automatically changes to the ON position. The
climate control system automatically turns off
the heater or air conditioner and switches to the
air recirculation mode. Place the power switch
in the off position to begin charging. Turn on the
desired climate control function.
• For normal charge, the climate control system is operative when charging operation is complete.
For quick charge however, the climate control
system stops operating when charging opera-
tion stops. • The climate control timer or remote climate con-
trol (for models with Navigation) may fog up
windows depending on the set temperature (for
models with Navigation) or outside
temperature.
• When turning on the seat heater switch prior to operating the climate control timer or the remote
climate control (for models with Navigation) , the
seat heater will also turn on automatically when
the outside temperature is low.
AIR CONDITIONER FILTER
The climate control system is equipped with an
in-cabin microfilter which collects dirt, dust etc.
To make sure the air conditioner heats defogs,
and ventilates efficiently, replace the filter regu-
larly. To replace the filter, contact a NISSAN
certified LEAF dealer.
The filter should be replaced if the air flow
decreases significantly or if windows fog
up easily when operating the climate con-
trol system.
Display screen, heater, air conditioner, audio and phone systems4-25
Page 259 of 437
3. The “Climate Ctrl. Timer” screen is displayed.To change the time of day and the day of the
week that the climate control timer turns on or
off, or to turn the climate control timer on or
off, push the
switch.
4. To turn the timer on or off, use the
switch to highlight “On” or “Off” and then
push the
switch. If “On” is selected, an
additional screen is displayed that allows you
to change the time or the climate control
timer.
4-30Display screen, heater, air conditioner, audio and phone systems
Page 260 of 437
5. The hour portion of the time is highlighted onthe screen. Push the
switch to change
the hour field in increments of one hour. Push
and hold the
switch to fast forward the
hours. Push the
switch to move to the
minutes field. 6. Push the
switch to change the minute
field in increments of ten minutes. Push and
hold the
switch to fast forward the
minutes. Push the
switch to move to the
day of the week setting. 7. Push the
switch to set the day to on or
off. Push the
switch and then set the
next day with the same procedure. When all
days of the week have been set, push the
switch.
Display screen, heater, air conditioner, audio and phone systems4-31
Page 267 of 437

3. Set the temperature and the touch “OK”.
Note
•The temperature in the passenger com-
partment may not be comfortable if enter-
ing the vehicle too soon before or too long
after the scheduled time of departure.
• Air conditioning is limited to the capacity
of the electric power when the charge
connector is connected. Therefore, the
temperature may not reach the set tem-
perature due to limitations in air condi-
tioning performance, if ambient tempera-
ture is excessively high or low, or if the
charge connector is connected to a 120-
volt plug outlet. •
The Climate Ctrl. Timer operates the cli-
mate control function so that a comfort-
able temperature is provided in the pas-
senger compartment at the scheduled
time of departure. The climate control is
set to stop at the scheduled time of depar-
ture.
SERVICING CLIMATE CONTROL
The climate control system in your NISSAN is
charged with a refrigerant designed with the en-
vironment in mind. This refrigerant will not harm
the earth’s ozone layer. Special charging equip-
ment and lubricant are required when servicing
your NISSAN climate control. Using improper
refrigerants or lubricants will cause severe dam-
age to your climate control system. For additional
information, refer to “Recommended fluids/
lubricants and capacities” in the “Technical and
consumer information” section.
A NISSAN certified LEAF dealer will be able to
service your environmentally friendly climate con-
trol system.
RADIO
Push the power switch to the ACC or ON posi-
tion and press the radio band select button to
turn on the radio. If you listen to the radio while
the READY to drive indicator light is off, the
power switch should be pushed to the ACC
position.
Radio reception is affected by station signal
strength, distance from radio transmitter, build-
ings, bridges, mountains and other external influ-
ences. Intermittent changes in reception quality
normally are caused by these external influences.
Using a cellular phone in or near the vehicle
may influence radio reception quality.
Radio reception
Your NISSAN radio system is equipped with
state-of-the-art electronic circuits to enhance ra-
dio reception. These circuits are designed to
extend reception range, and to enhance the qual-
ity of that reception.
However, there are some general characteristics
of both FM and AM radio signals that can affect
radio reception quality in a moving vehicle, even
AUDIO SYSTEM (MODELS WITHOUT
NAVIGATION SYSTEM)
4-38Display screen, heater, air conditioner, audio and phone systems