2016 NISSAN FRONTIER display
[x] Cancel search: displayPage 4 of 28
2
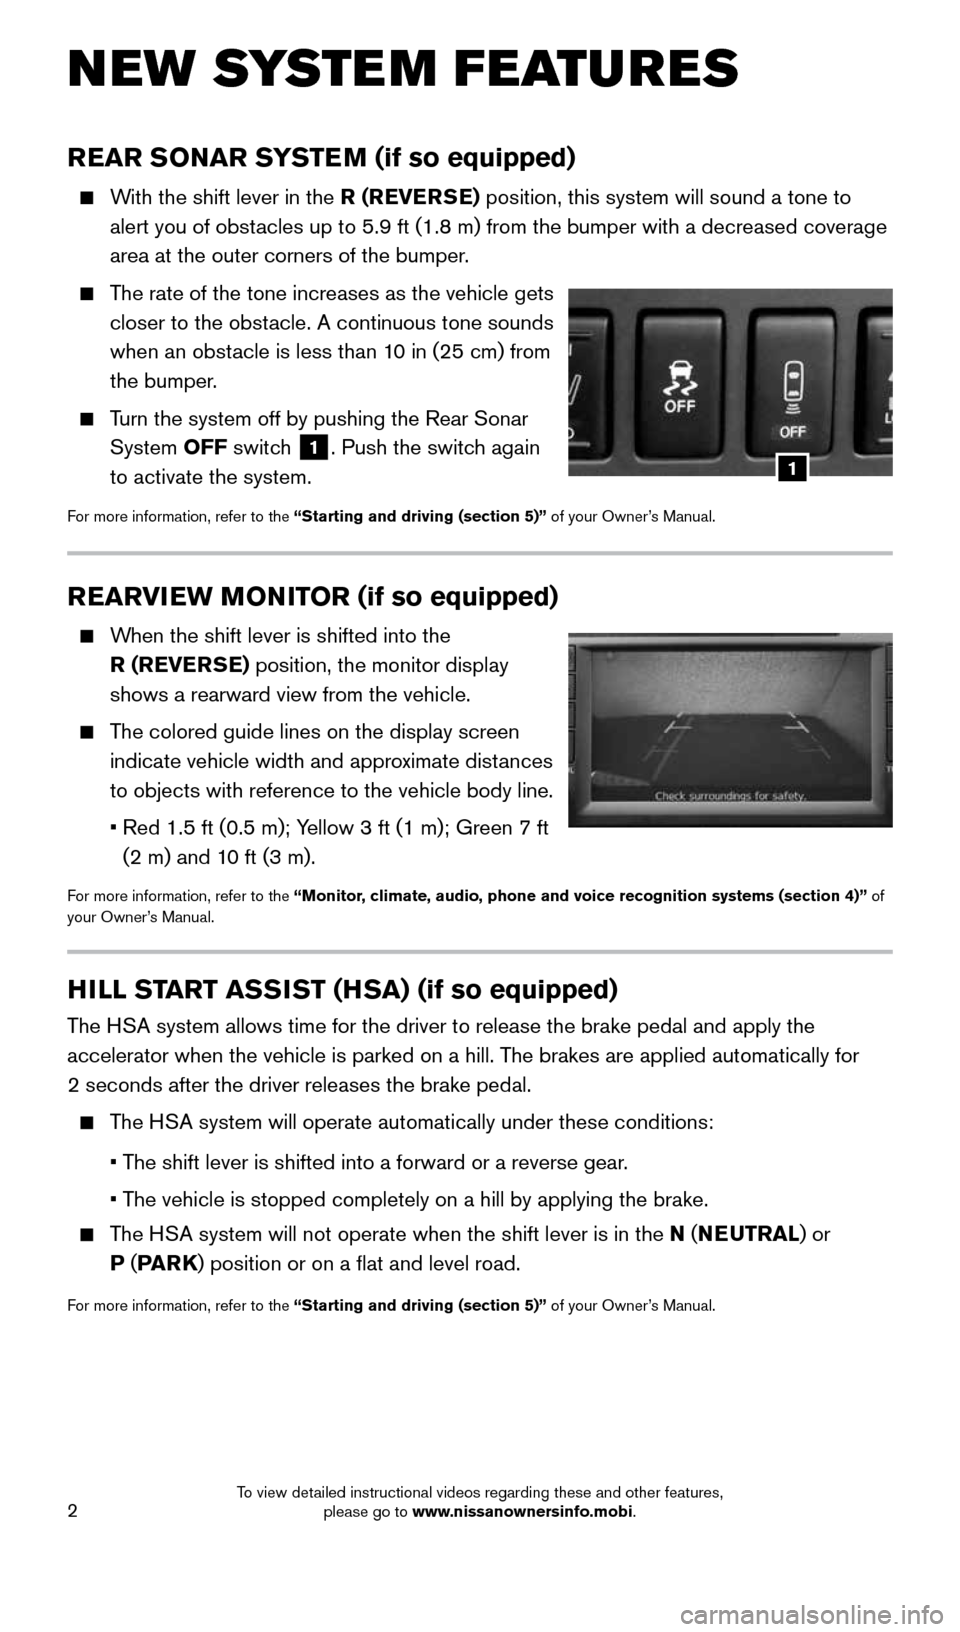
REARVIEW MONITOR (if so equipped)
When the shift lever is shifted into the
R (REVERSE) position, the monitor display
shows a rearward view from the vehicle.
The colored guide lines on the display screen
indicate vehicle width and approximate distances
to objects with reference to the vehicle body line.
• Red 1.5 ft (0.5 m); Yellow 3 ft (1 m); Green 7 ft
(2 m) and 10 ft (3 m).
For more information, refer to the “Monitor, climate, audio, phone and voice recognition systems (section 4)” of
your Owner’s Manual.
REAR SONAR SYSTEM (if so equipped)
With the shift lever in the R (REVERSE) position, this system will sound a tone to
alert you of obstacles up to 5.9 ft (1.8 m) from the bumper with a decreased coverage
area at the outer corners of the bumper.
The rate of the tone increases as the vehicle gets
closer to the obstacle. A continuous tone sounds
when an obstacle is less than 10 in (25 cm) from
the bumper.
Turn the system off by pushing the Rear Sonar
System OFF switch
1. Push the switch again
to activate the system.
For more information, refer to the “Starting and driving (section 5)” of your Owner’s Manual.
NEW SYSTEM FEATURES
HILL START ASSIST (HSA) (if so equipped)
The HSA system allows time for the driver to release the brake pedal and appl\
y the
accelerator when the vehicle is parked on a hill. The brakes are applied automatically for
2 seconds after the driver releases the brake pedal.
The HSA system will operate automatically under these conditions:
• The shift lever is shifted into a forward or a reverse gear.
• The vehicle is stopped completely on a hill by applying the brake.
The HSA system will not operate when the shift lever is in the N ( NEUTRAL) or
P ( PA R K ) position or on a flat and level road.
For more information, refer to the “Starting and driving (section 5)” of your Owner’s Manual.
1
1938136_16b_Frontier_QRG_012016.indd 21/20/16 5:06 PM
To view detailed instructional videos regarding these and other features, please go to www.nissanownersinfo.mobi.
Page 5 of 28
3
HANDS-FREE TEXT MESSAGING ASSISTANT1,2 (if so equipped)
This system allows for sending and receiving text
messages through the vehicle’s interface.
Using predefined or custom messages, send a
text to a name or phone number stored in your
Bluetooth
® Hands-free Phone System.3
Once enabled, the text message, sender and
delivery time are shown on the control panel
display when the vehicle speed is less than 5 mph (8 km/h).
Text messages have the option of being read aloud at all vehicle speeds.
Many cellular phones may require special permission to enable text messaging.
Check the cellular phone’s screen during Bluetooth®,3 pairing. For some cellular
phones, you need to enable “Notifications” in the cellular phone\
’s Bluetooth®,3 menu
for text messages to appear on the touch-screen display. For more information and
instructions, refer to your cellular phone’s Owner’s Manual.
Text message integration requires that the cellular phone support
Message Access Profile (MAP) for both receiving and sending text messages.
Some cellular phones may not support all text messaging features. Please see
www.NissanUSA.com/bluetooth for compatibility information as well as your
device’s Owner’s Manual.
1 Laws in some jurisdictions may restrict the use of “Text-to-Speech”. Some of the applications and features, such as social
networking and texting, may also be restricted. Check local regulations for any requirements before using these features.
2 Compatible smartphone required. Text rates and/or data usage may apply.
3 Availability of specific features is dependent upon the phone’s Bluetooth
® support. Please refer to your phone owner’s
manual for details. Bluetooth® word mark and logos are owned by Bluetooth SIG, Inc., and any use of such marks by
NISSAN is under license. See www.NissanUSA.com/bluetooth for details.
For more information, refer to the “Monitor, climate, audio, phone and voice recognition systems (secti\
on 4)” of your
Owner’s Manual.
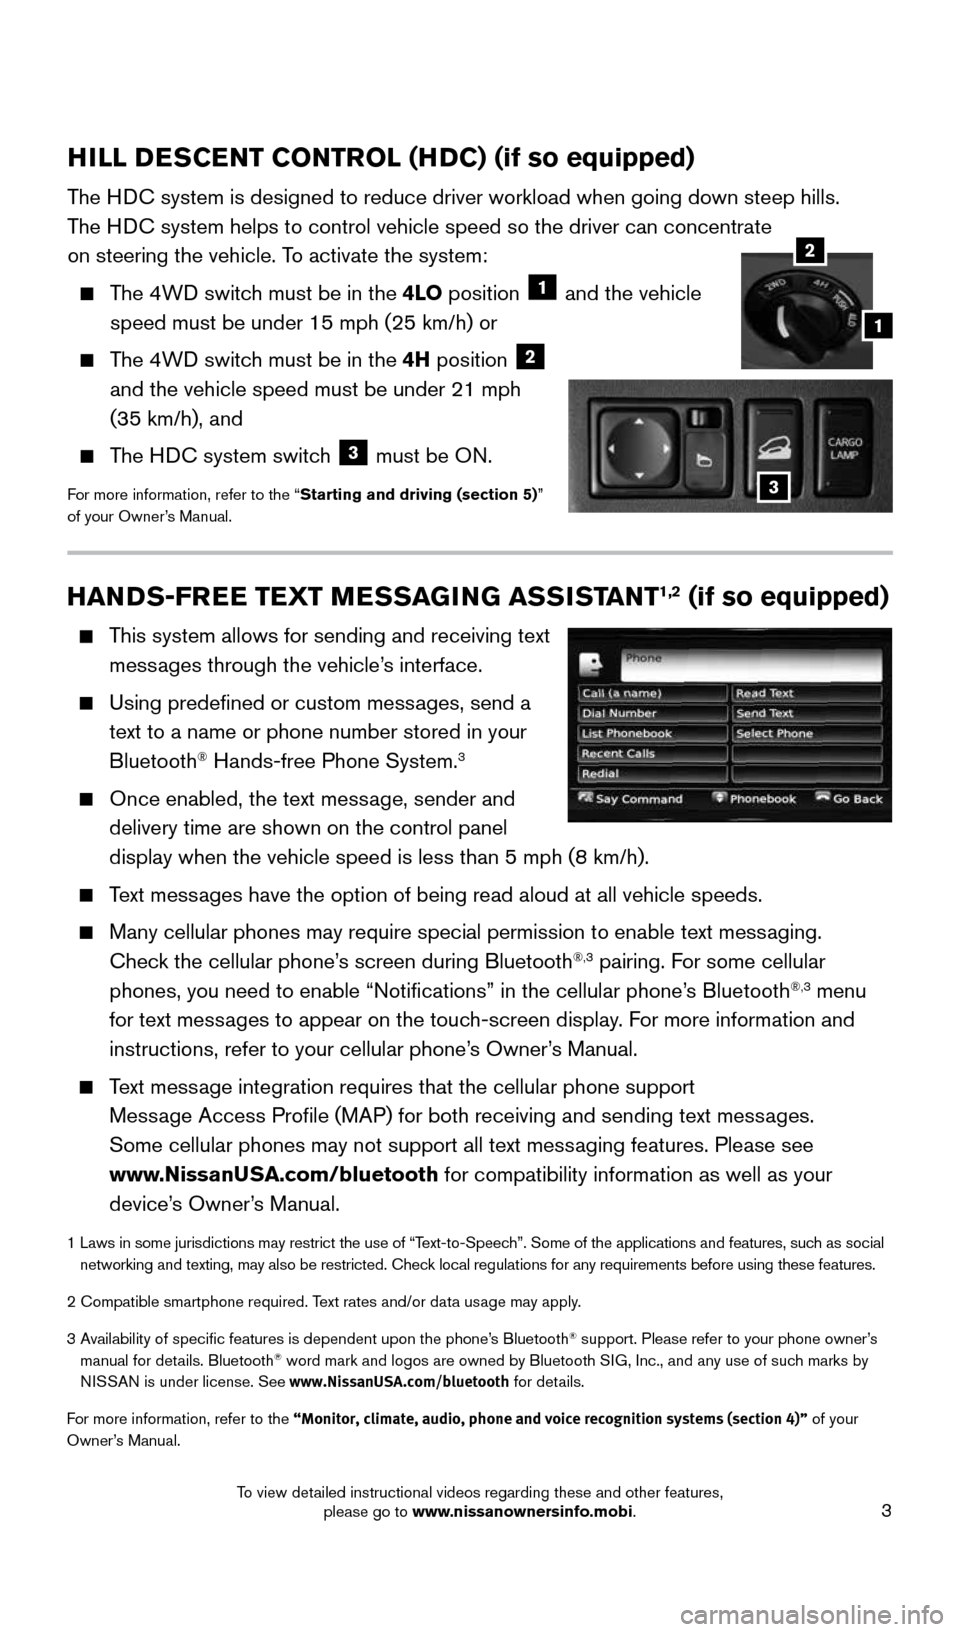
HILL DESCENT CONTROL (HDC) (if so equipped)
The HDC system is designed to reduce driver workload when going down steep hil\
ls.
The HDC system helps to control vehicle speed so the driver can concentrate
on steering the vehicle. To activate the system:
The 4WD switch must be in the 4LO position 1 and the vehicle
speed must be under 15 mph (25 km/h) or
The 4WD switch must be in the 4H position 2
and the vehicle speed must be under 21 mph
(35 km/h), and
The HDC system switch 3 must be ON.
For more information, refer to the “Starting and driving (section 5)”
of your Owner’s Manual.
2
1
3
1938136_16b_Frontier_QRG_012016.indd 31/20/16 5:06 PM
To view detailed instructional videos regarding these and other features, please go to www.nissanownersinfo.mobi.
Page 7 of 28
5
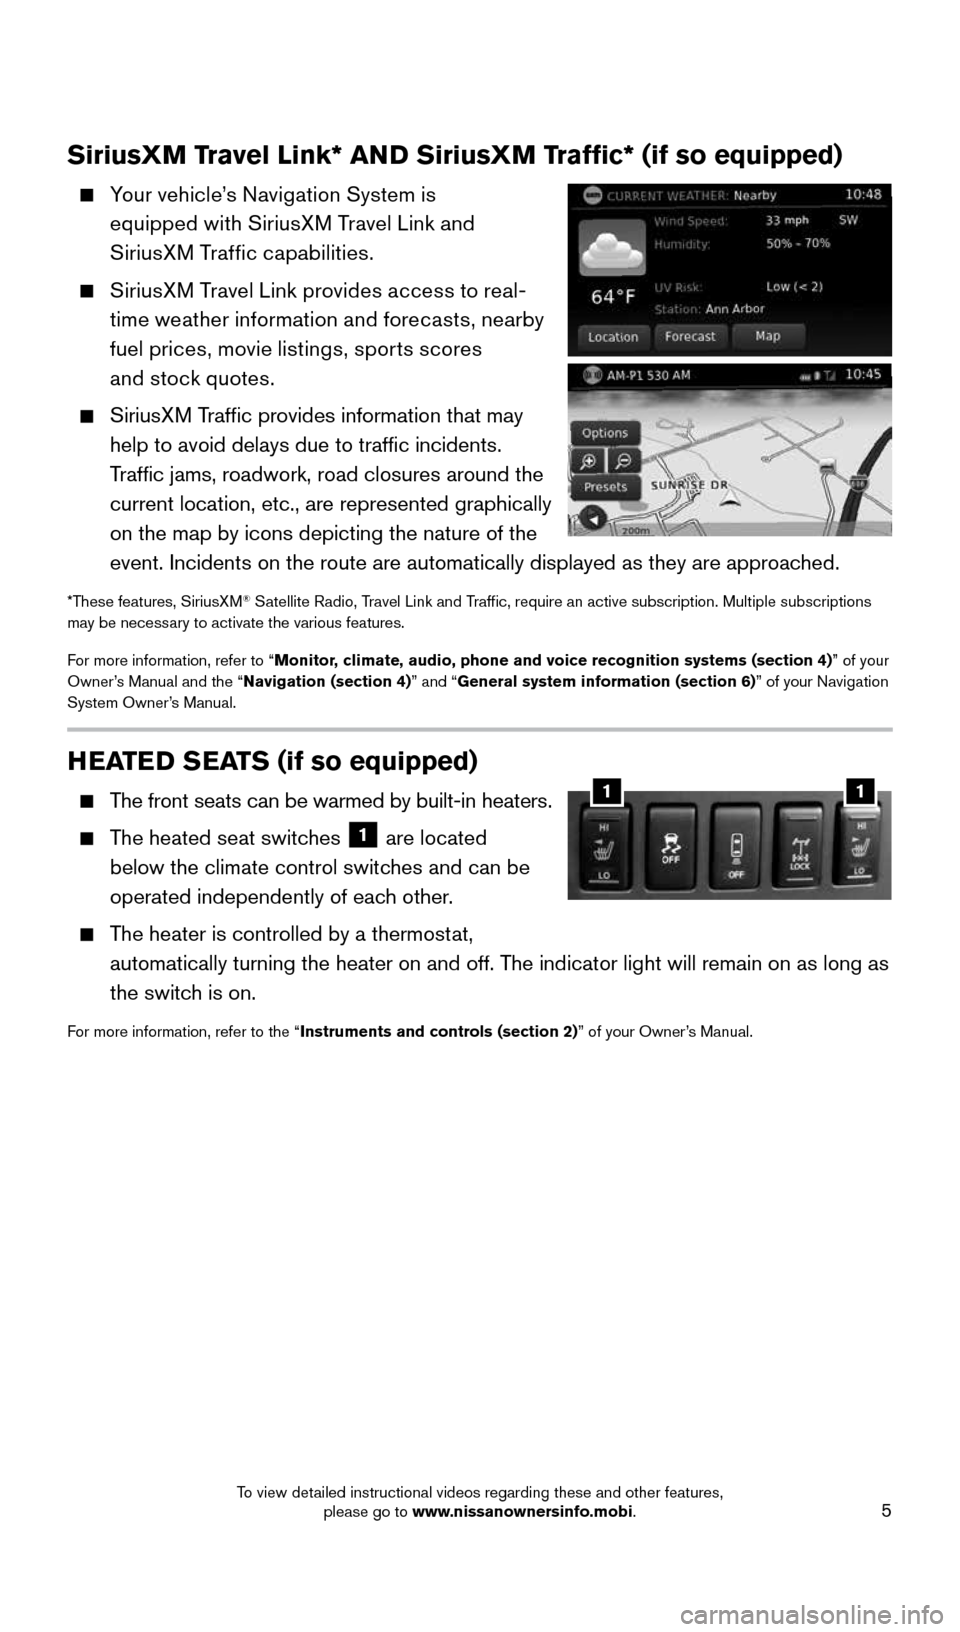
HEATED SEATS (if so equipped)
The front seats can be warmed by built-in heaters.
The heated seat switches 1 are located
below the climate control switches and can be
operated independently of each other.
The heater is controlled by a thermostat,
automatically turning the heater on and off. The indicator light will remain on as long as
the switch is on.
For more information, refer to the “Instruments and controls (section 2)” of your Owner’s Manual.
11
SiriusXM Travel Link* AND SiriusXM Traffic* (if so equipped)
Your vehicle’s Navigation System is
equipped with SiriusXM Travel Link and
SiriusXM Traffic capabilities.
SiriusXM Travel Link provides access to real-
time weather information and forecasts, nearby
fuel prices, movie listings, sports scores
and stock quotes.
SiriusXM Traffic provides information that may
help to avoid delays due to traffic incidents.
Traffic jams, roadwork, road closures around the
current location, etc., are represented graphically
on the map by icons depicting the nature of the
event. Incidents on the route are automatically displayed as they are ap\
proached.
*These features, SiriusXM® Satellite Radio, Travel Link and Traffic, require an active subscription. Multiple subscriptions
may be necessary to activate the various features.
For more information, refer to “Monitor, climate, audio, phone and voice recognition systems (section 4) ” of your
Owner’s Manual and the “Navigation (section 4)” and “General system information (section 6)” of your Navigation
System Owner’s Manual.
1938136_16b_Frontier_QRG_012016.indd 51/20/16 5:06 PM
To view detailed instructional videos regarding these and other features, please go to www.nissanownersinfo.mobi.
Page 8 of 28
6
ESSE NTIAL I N FOR MATION
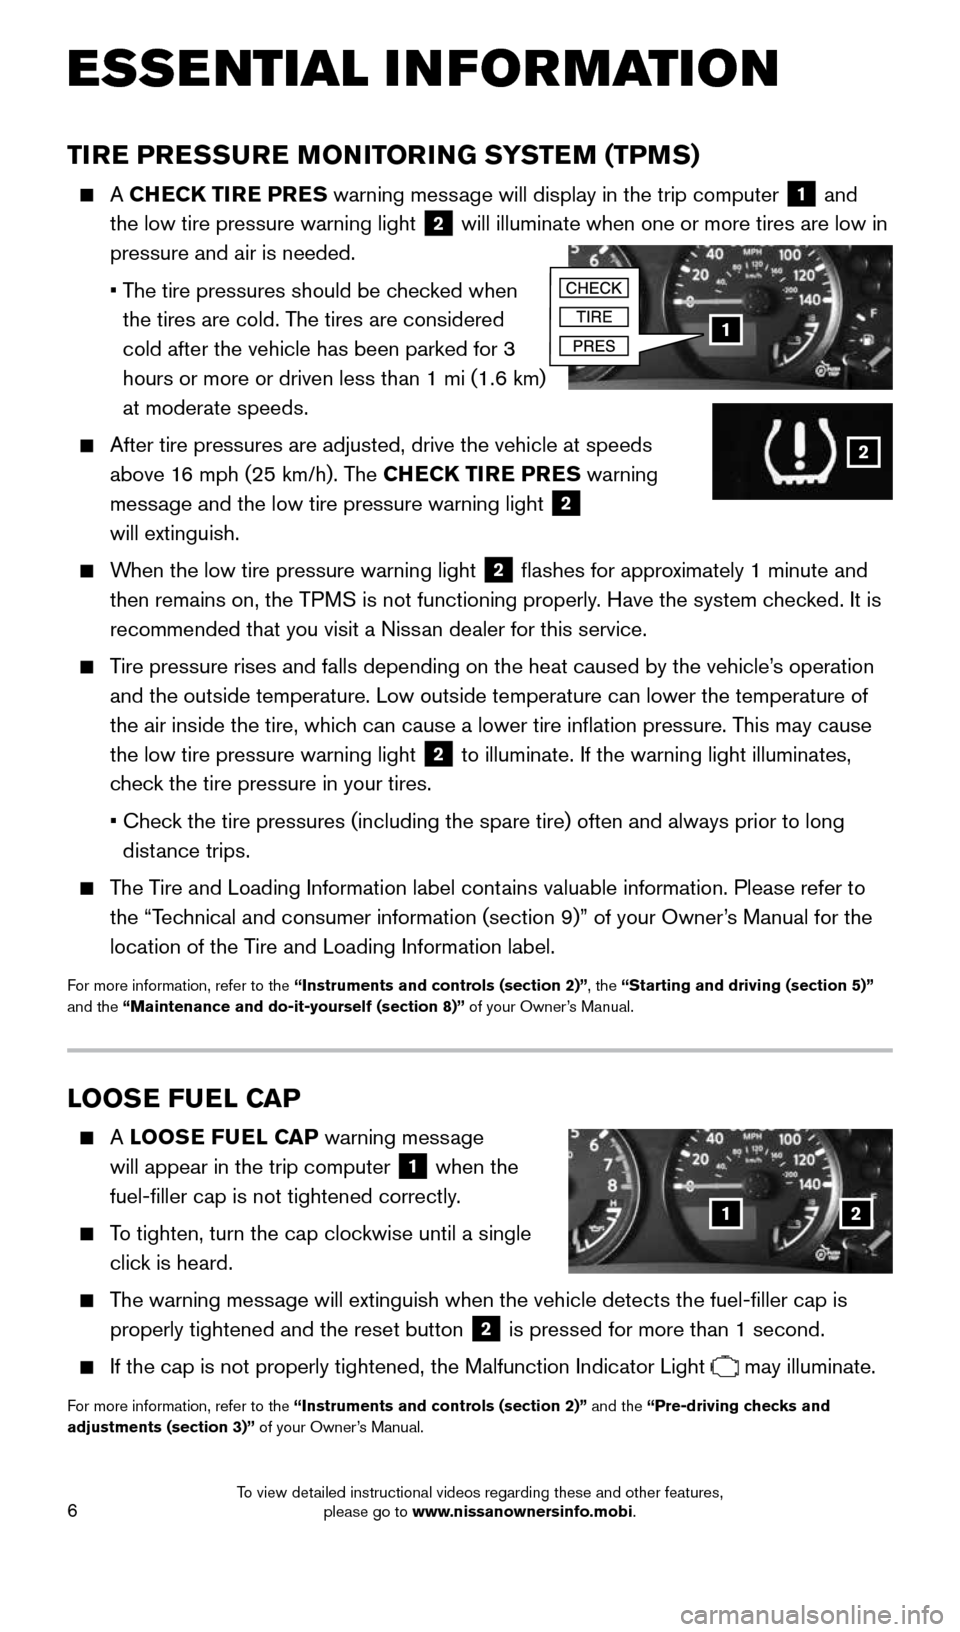
TIRE PRESSURE MONITORING SYSTEM (TPMS)
A CHECK TIRE PRES warning message will display in the trip computer 1 and
the low tire pressure warning light 2 will illuminate when one or more tires are low in
pressure and air is needed.
• The tire pressures should be checked when
the tires are cold. The tires are considered
cold after the vehicle has been parked for 3
hours or more or driven less than 1 mi (1.6 km)
at moderate speeds.
After tire pressures are adjusted, drive the vehicle at speeds
above 16 mph (25 km/h). The CHECK TIRE PRES warning
message and the low tire pressure warning light
2
will extinguish.
When the low tire pressure warning light 2 flashes for approximately 1 minute and
then remains on, the TPMS is not functioning properly. Have the system checked. It is
recommended that you visit a Nissan dealer for this service.
Tire pressure rises and falls depending on the heat caused by the vehicle\
’s operation
and the outside temperature. Low outside temperature can lower the tempe\
rature of
the air inside the tire, which can cause a lower tire inflation pressure. This may cause
the low tire pressure warning light
2 to illuminate. If the warning light illuminates,
check the tire pressure in your tires.
• Check the tire pressures (including the spare tire) often and always prior\
to long
distance trips.
The Tire and Loading Information label contains valuable information. Please refer to
the “Technical and consumer information (section 9)” of your Owner’s Manual for the
location of the Tire and Loading Information label.
For more information, refer to the “Instruments and controls (section 2)”, the “Starting and driving (section 5)”
and the “Maintenance and do-it-yourself (section 8)” of your Owner’s Manual.
1
2
LOOSE FUEL CAP
A LOOSE FUEL CAP warning message
will appear in the trip computer
1 when the
fuel-filler cap is not tightened correctly.
To tighten, turn the cap clockwise until a single
click is heard.
The warning message will extinguish when the vehicle detects the fuel-filler cap is
properly tightened and the reset button
2 is pressed for more than 1 second.
If the cap is not properly tightened, the Malfunction Indicator Light may illuminate.
For more information, refer to the “Instruments and controls (section 2)” and the “Pre-driving checks and
adjustments (section 3)” of your Owner’s Manual.
12
1938136_16b_Frontier_QRG_012016.indd 61/20/16 5:06 PM
To view detailed instructional videos regarding these and other features, please go to www.nissanownersinfo.mobi.
Page 9 of 28
7
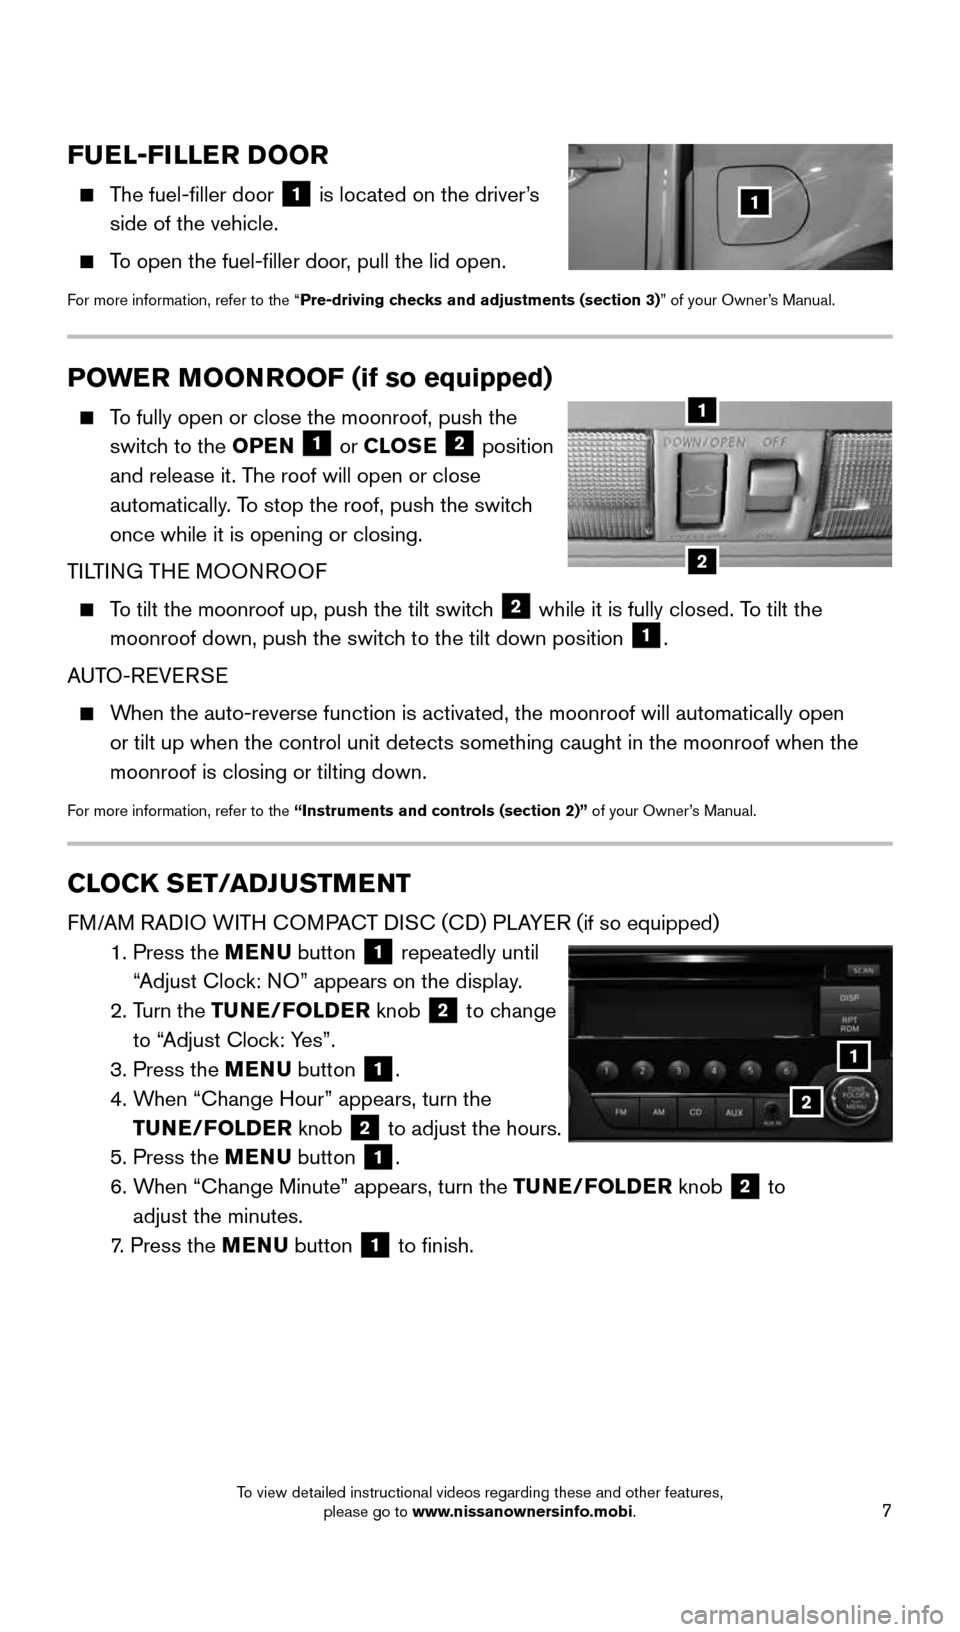
CLOCK SET/ADJUSTMENT
FM/AM RADIO WITH COMPACT DISC (CD) PLAYER (if so equipped)
1. Press the MENU button
1 repeatedly until
“Adjust Clock: NO” appears on the display.
2. Turn the TUNE/FOLDER knob
2 to change
to “Adjust Clock: Yes”.
3. Press the MENU button
1.
4. When “Change Hour” appears, turn the
TUNE/FOLDER knob
2 to adjust the hours.
5. Press the MENU button 1.
6. When “Change Minute” appears, turn the TUNE/FOLDER knob
2 to
adjust the minutes.
7. Press the MENU button
1 to finish.
POWER MOONROOF (if so equipped)
To fully open or close the moonroof, push the
switch to the OPEN 1 or CLOSE 2 position
and release it. The roof will open or close
automatically. To stop the roof, push the switch
once while it is opening or closing.
TILTING THE MOONROOF
To tilt the moonroof up, push the tilt switch 2 while it is fully closed. To tilt the
moonroof down, push the switch to the tilt down position 1.
AUTO-REVERSE
When the auto-reverse function is activated, the moonroof will automatica\
lly open
or tilt up when the control unit detects something caught in the moonroo\
f when the
moonroof is closing or tilting down.
For more information, refer to the “Instruments and controls (section 2)” of your Owner’s Manual.
2
1
FUEL-FILLER DOOR
The fuel-filler door
1 is located on the driver’s
side of the vehicle.
To open the fuel-filler door, pull the lid open.
For more information, refer to the “Pre-driving checks and adjustments (section 3)” of your Owner’s Manual.
1
1
2
1938136_16b_Frontier_QRG_012016.indd 71/20/16 5:06 PM
To view detailed instructional videos regarding these and other features, please go to www.nissanownersinfo.mobi.
Page 10 of 28
8
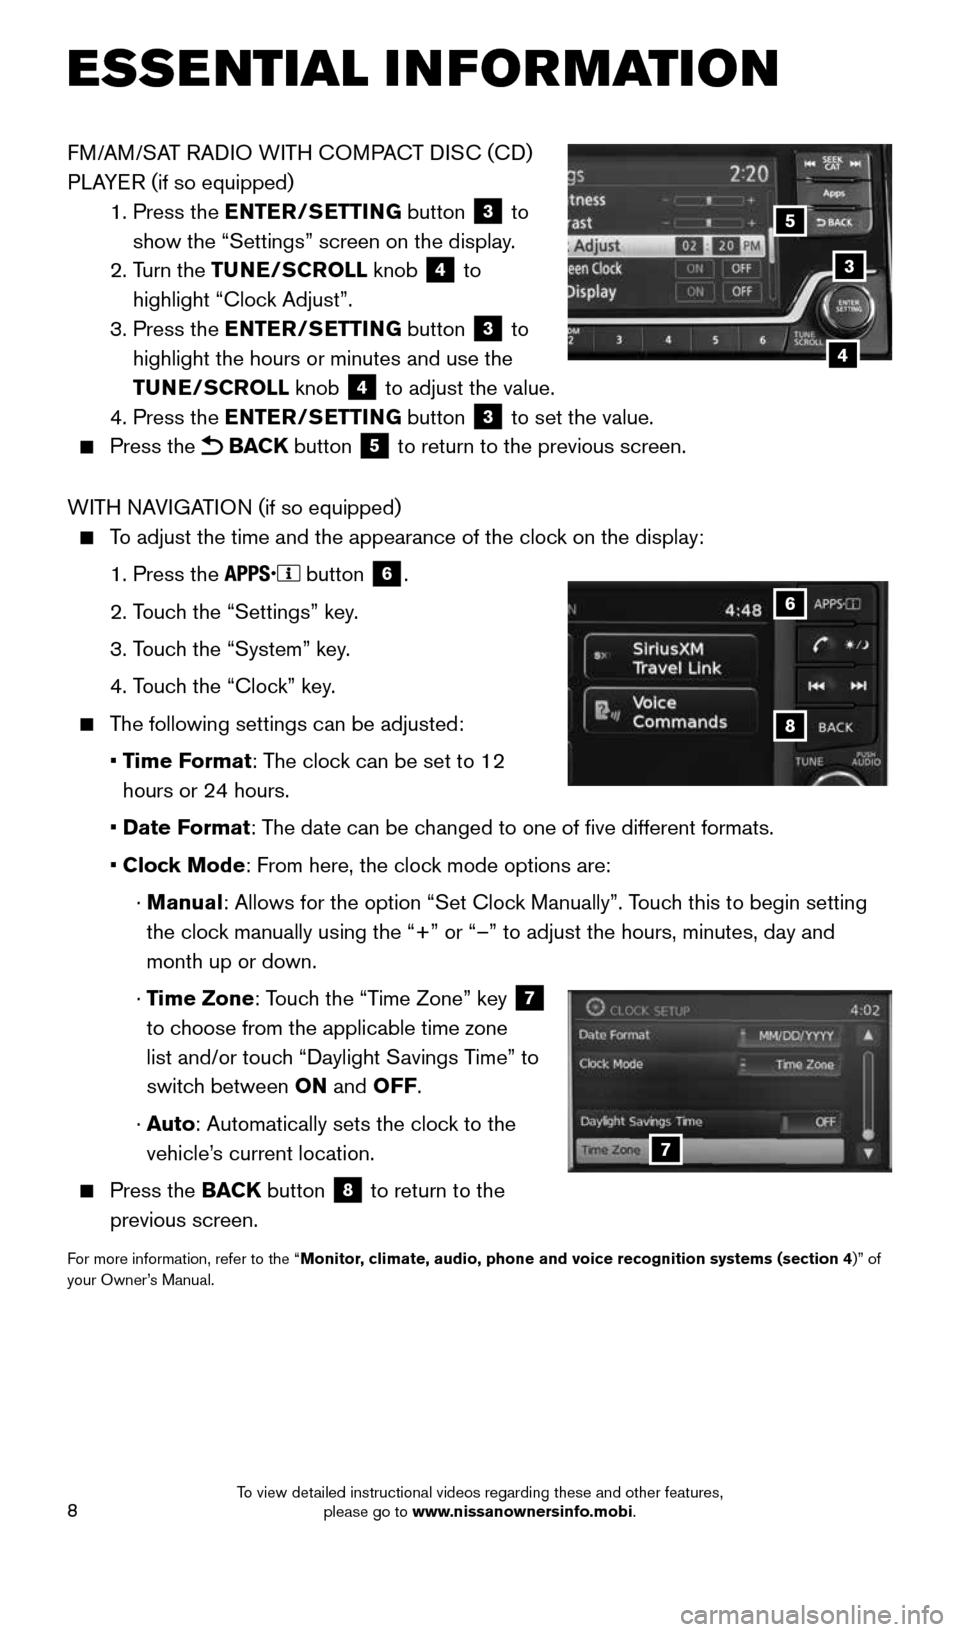
FM/AM/SAT RADIO WITH COMPACT DISC (CD)
PLAYER (if so equipped)
1. Press the ENTER/SETTING button
3 to
show the “Settings” screen on the display.
2. Turn the TUNE/SCROLL knob
4 to
highlight “Clock Adjust”.
3. Press the ENTER/SETTING button
3 to
highlight the hours or minutes and use the
TUNE/SCROLL knob
4 to adjust the value.
4. Press the ENTER/SETTING button 3 to set the value.
Press the BACK button 5 to return to the previous screen.
WITH NAVIGATION (if so equipped)
To adjust the time and the appearance of the clock on the display:
1. Press the
button
6.
2. Touch the “Settings” key.
3. Touch the “System” key.
4. Touch the “Clock” key.
The following settings can be adjusted:
• Time Format: The clock can be set to 12
hours or 24 hours.
• Date Format: The date can be changed to one of five different formats.
• Clock Mode: From here, the clock mode options are:
· Manual: Allows for the option “Set Clock Manually”. Touch this to begin setting
the clock manually using the “+” or “–” to adjust the hours, minu\
tes, day and
month up or down.
· Time Zone: Touch the “Time Zone” key
7
to choose from the applicable time zone
list and/or touch “Daylight Savings Time” to
switch between ON and OFF.
· Auto: Automatically sets the clock to the
vehicle’s current location.
Press the BACK button
8 to return to the
previous screen.
For more information, refer to the “Monitor, climate, audio, phone and voice recognition systems (section 4 )” of
your Owner’s Manual.
8
6
7
3
5
4
ESSE NTIAL I N FOR MATION
1938136_16b_Frontier_QRG_012016.indd 81/20/16 5:06 PM
To view detailed instructional videos regarding these and other features, please go to www.nissanownersinfo.mobi.
Page 15 of 28
13
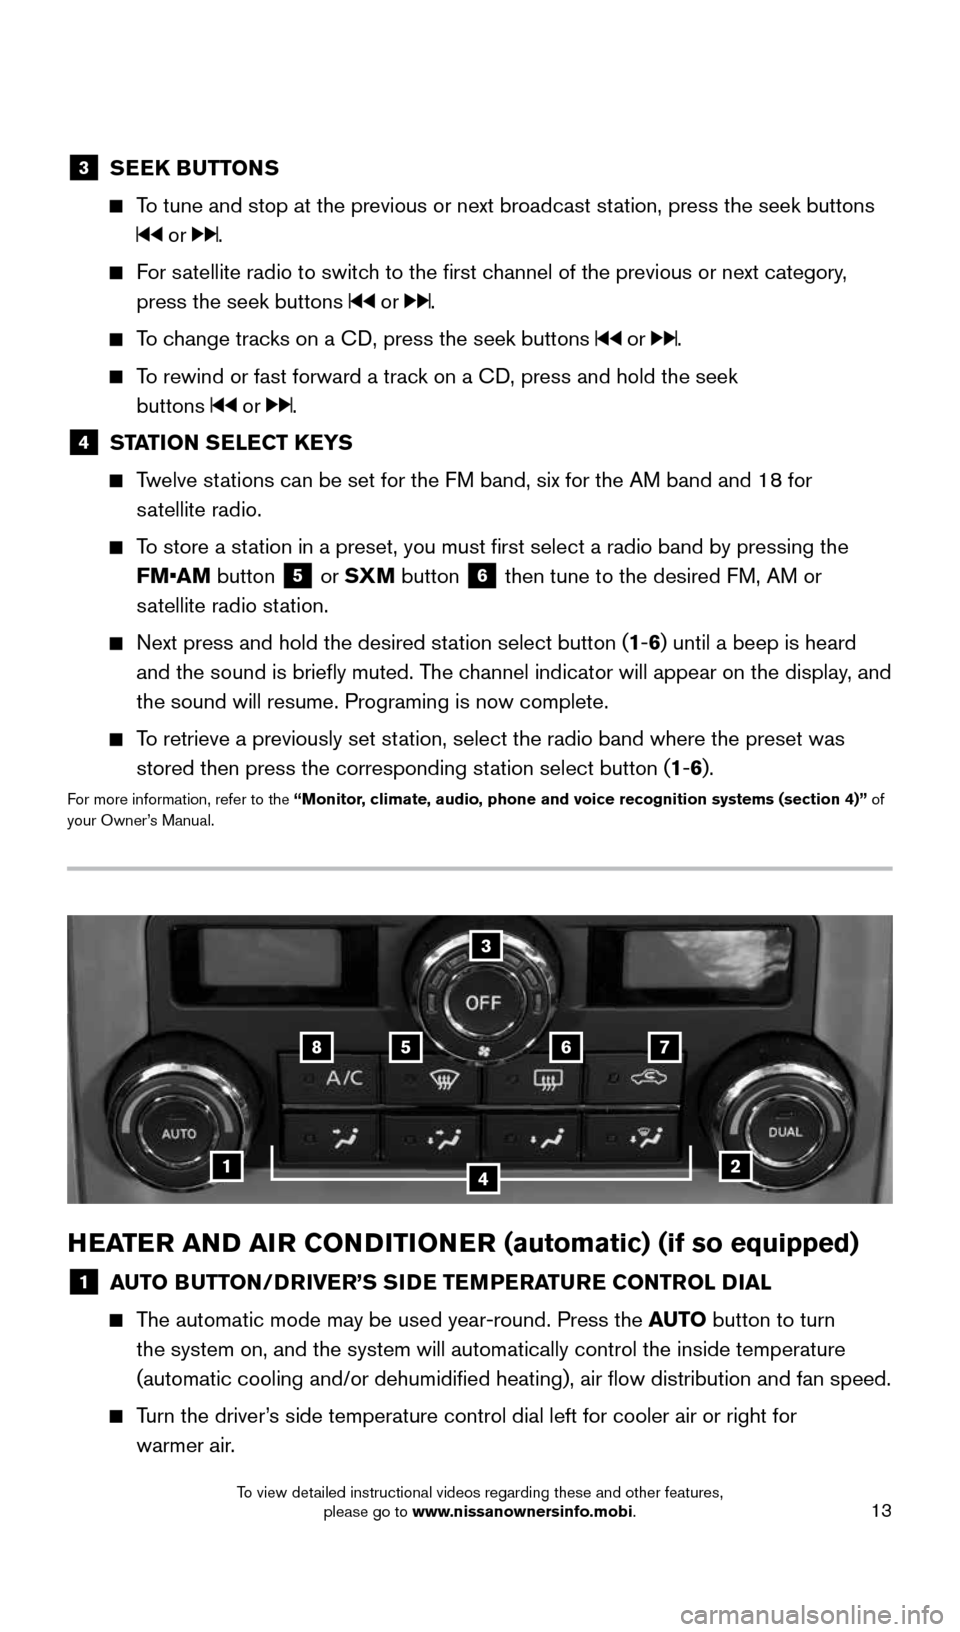
HEATER AND AIR CONDITIONER (automatic) (if so equipped)
1 AUTO BUTTON/DRIVER’S SIDE TEMPERATURE CONTROL DIAL
The automatic mode may be used year-round. Press the AUTO button to turn
the system on, and the system will automatically control the inside temp\
erature
(automatic cooling and/or dehumidified heating), air flow distribu\
tion and fan speed.
Turn the driver’s side temperature control dial left for cooler air or right for
warmer air.
3 SEEK BUTTONS
To tune and stop at the previous or next broadcast station, press the seek buttons
or .
For satellite radio to switch to the first channel of the previous or next category,
press the seek buttons
or .
To change tracks on a CD, press the seek buttons or .
To rewind or fast forward a track on a CD, press and hold the seek
buttons
or .
4 STATION SELECT KEYS
Twelve stations can be set for the FM band, six for the AM band and 18 for
satellite radio.
To store a station in a preset, you must first select a radio band by pressing the \
FM•AM button
5 or SXM button
6 then tune to the desired FM, AM or
satellite radio station.
Next press and hold the desired station select button (1-6) until a beep is heard
and the sound is briefly muted. The channel indicator will appear on the display, and
the sound will resume. Programing is now complete.
To retrieve a previously set station, select the radio band where the preset was
stored then press the corresponding station select button (1-6).
For more information, refer to the “Monitor, climate, audio, phone and voice recognition systems (section 4)” of
your Owner’s Manual.
1
5
2
6
3
7
4
8
1938136_16b_Frontier_QRG_012016.indd 131/20/16 5:06 PM
To view detailed instructional videos regarding these and other features, please go to www.nissanownersinfo.mobi.
Page 18 of 28
16
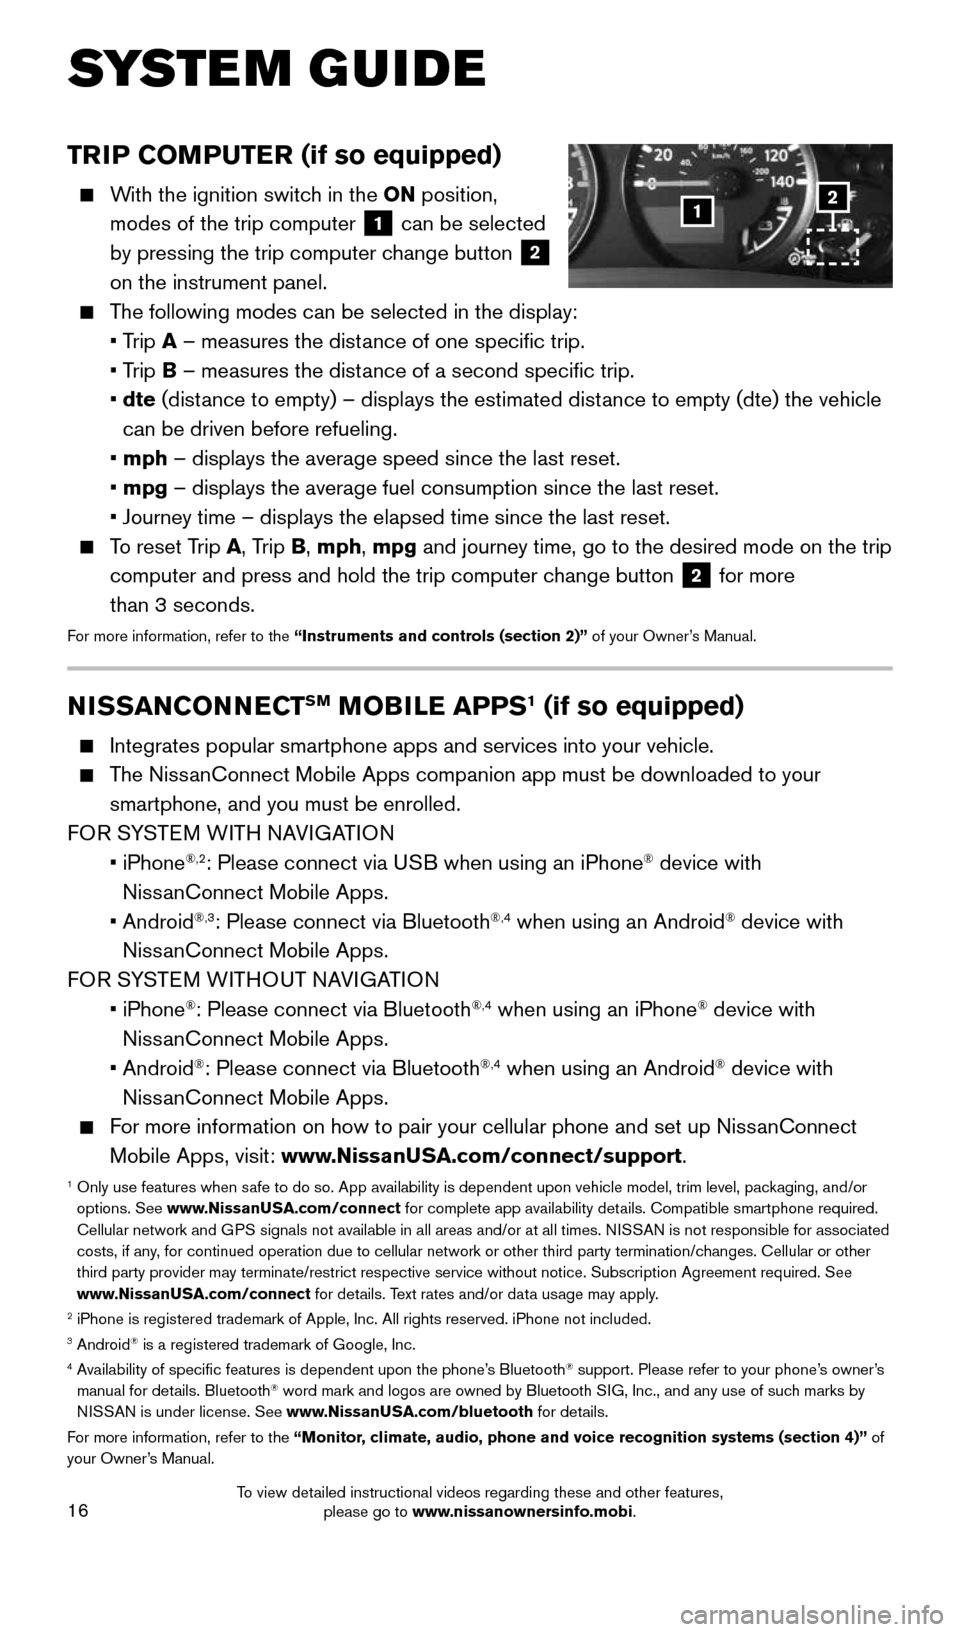
TRIP COMPUTER (if so equipped)
With the ignition switch in the ON position,
modes of the trip computer
1 can be selected
by pressing the trip computer change button 2
on the instrument panel.
The following modes can be selected in the display:
• Trip A – measures the distance of one specific trip.
• Trip B – measures the distance of a second specific trip.
• dte (distance to empty) – displays the estimated distance to empty (dte) the vehicle
can be driven before refueling.
• mph – displays the average speed since the last reset.
• mpg – displays the average fuel consumption since the last reset.
• Journey time – displays the elapsed time since the last reset.
To reset Trip A, Trip B, mph, mpg and journey time, go to the desired mode on the trip
computer and press and hold the trip computer change button
2 for more
than 3 seconds.
For more information, refer to the “Instruments and controls (section 2)” of your Owner’s Manual.
1
SYSTEM GUIDE
2
NISSANCONNECTSM MOBILE APPS1 (if so equipped)
Integrates popular smartphone apps and services into your vehicle.
The NissanConnect Mobile Apps companion app must be downloaded to your
smartphone, and you must be enrolled.
FOR SYSTEM WITH NAVIGATION
• iPhone
®,2: Please connect via USB when using an iPhone® device with
NissanConnect Mobile Apps.
• Android
®,3: Please connect via Bluetooth®,4 when using an Android® device with
NissanConnect Mobile Apps.
FOR SYSTEM WITHOUT NAVIGATION
• iPhone
®: Please connect via Bluetooth®,4 when using an iPhone® device with
NissanConnect Mobile Apps.
• Android
®: Please connect via Bluetooth®,4 when using an Android® device with
NissanConnect Mobile Apps.
For more information on how to pair your cellular phone and set up NissanConnect
Mobile Apps, visit: www.NissanUSA.com/connect/support.
1 Only use features when safe to do so. App availability is dependent upon vehicle model, trim lev\
el, packaging, and/or
options. See www.NissanUSA.com/connect for complete app availability details. Compatible smartphone required.
Cellular network and GPS signals not available in all areas and/or at all times. NISSAN is not responsible for associated
costs, if any, for continued operation due to cellular network or other third party t\
ermination/changes. Cellular or other
third party provider may terminate/restrict respective service without n\
otice. Subscription Agreement required. See
www.NissanUSA.com/connect for details. Text rates and/or data usage may apply.
2 iPhone is registered trademark of Apple, Inc. All rights reserved. iPho\
ne not included.3 Android® is a registered trademark of Google, Inc.4 Availability of specific features is dependent upon the phone’s Bluetooth® support. Please refer to your phone’s owner’s
manual for details. Bluetooth® word mark and logos are owned by Bluetooth SIG, Inc., and any use of such marks by
NISSAN is under license. See www.NissanUSA.com/bluetooth for details.
For more information, refer to the “Monitor, climate, audio, phone and voice recognition systems (section 4)” of
your Owner’s Manual.
1938136_16b_Frontier_QRG_012016.indd 161/20/16 5:06 PM
To view detailed instructional videos regarding these and other features, please go to www.nissanownersinfo.mobi.