2016 NISSAN 370Z COUPE Head light
[x] Cancel search: Head lightPage 135 of 428
3-14Pre-driving checks and adjustments
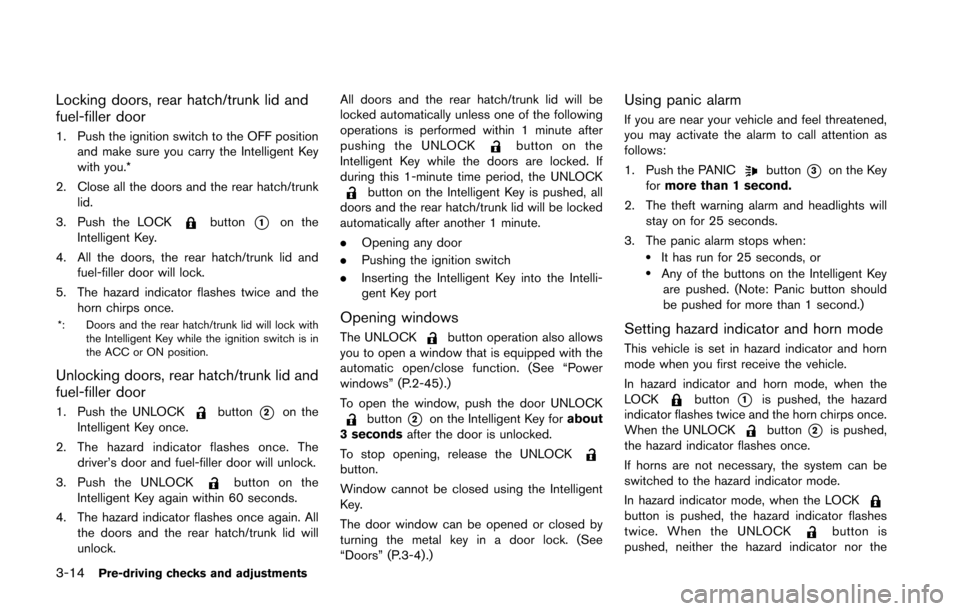
Locking doors, rear hatch/trunk lid and
fuel-filler door
1. Push the ignition switch to the OFF positionand make sure you carry the Intelligent Key
with you.*
2. Close all the doors and the rear hatch/trunk lid.
3. Push the LOCK
button*1on the
Intelligent Key.
4. All the doors, the rear hatch/trunk lid and fuel-filler door will lock.
5. The hazard indicator flashes twice and the horn chirps once.
*: Doors and the rear hatch/trunk lid will lock with the Intelligent Key while the ignition switch is in
the ACC or ON position.
Unlocking doors, rear hatch/trunk lid and
fuel-filler door
1. Push the UNLOCKbutton*2on the
Intelligent Key once.
2. The hazard indicator flashes once. The driver’s door and fuel-filler door will unlock.
3. Push the UNLOCK
button on the
Intelligent Key again within 60 seconds.
4. The hazard indicator flashes once again. All the doors and the rear hatch/trunk lid will
unlock. All doors and the rear hatch/trunk lid will be
locked automatically unless one of the following
operations is performed within 1 minute after
pushing the UNLOCK
button on the
Intelligent Key while the doors are locked. If
during this 1-minute time period, the UNLOCK
button on the Intelligent Key is pushed, all
doors and the rear hatch/trunk lid will be locked
automatically after another 1 minute.
. Opening any door
. Pushing the ignition switch
. Inserting the Intelligent Key into the Intelli-
gent Key port
Opening windows
The UNLOCKbutton operation also allows
you to open a window that is equipped with the
automatic open/close function. (See “Power
windows” (P.2-45) .)
To open the window, push the door UNLOCK
button*2on the Intelligent Key for about
3 seconds after the door is unlocked.
To stop opening, release the UNLOCK
button.
Window cannot be closed using the Intelligent
Key.
The door window can be opened or closed by
turning the metal key in a door lock. (See
“Doors” (P.3-4).)
Using panic alarm
If you are near your vehicle and feel threatened,
you may activate the alarm to call attention as
follows:
1. Push the PANIC
button*3on the Key
for more than 1 second.
2. The theft warning alarm and headlights will stay on for 25 seconds.
3. The panic alarm stops when:
.It has run for 25 seconds, or.Any of the buttons on the Intelligent Key are pushed. (Note: Panic button should
be pushed for more than 1 second.)
Setting hazard indicator and horn mode
This vehicle is set in hazard indicator and horn
mode when you first receive the vehicle.
In hazard indicator and horn mode, when the
LOCK
button*1is pushed, the hazard
indicator flashes twice and the horn chirps once.
When the UNLOCK
button*2is pushed,
the hazard indicator flashes once.
If horns are not necessary, the system can be
switched to the hazard indicator mode.
In hazard indicator mode, when the LOCK
button is pushed, the hazard indicator flashes
twice. When the UNLOCKbutton is
pushed, neither the hazard indicator nor the
Page 158 of 428
CAUTION
.Do not store the main sun visor
before storing the extension sun
visor.
. Do not pull the extension sun visor
forcedly downwards.
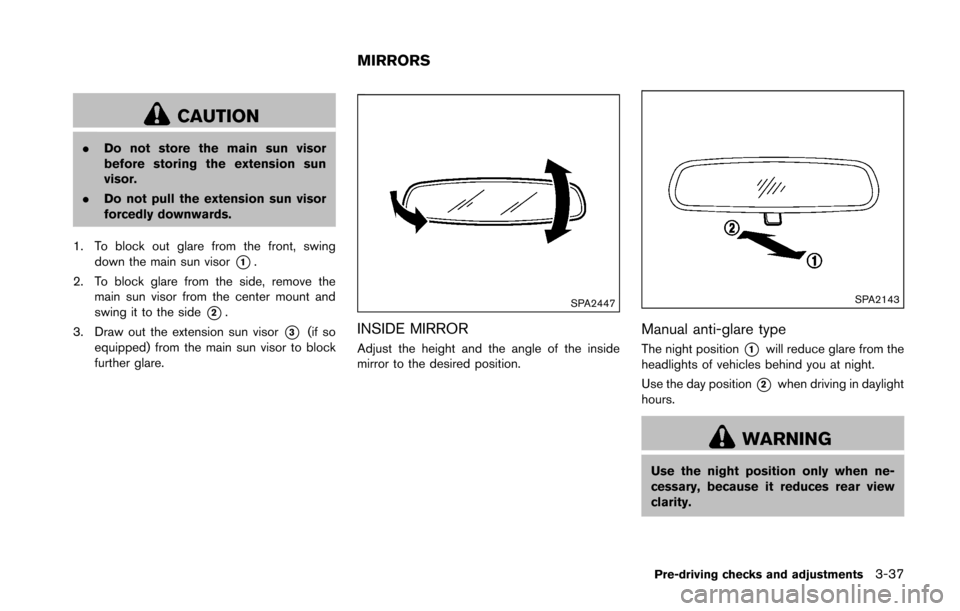
1. To block out glare from the front, swing down the main sun visor
*1.
2. To block glare from the side, remove the main sun visor from the center mount and
swing it to the side
*2.
3. Draw out the extension sun visor
*3(if so
equipped) from the main sun visor to block
further glare.
SPA2447
INSIDE MIRROR
Adjust the height and the angle of the inside
mirror to the desired position.
SPA2143
Manual anti-glare type
The night position*1will reduce glare from the
headlights of vehicles behind you at night.
Use the day position
*2when driving in daylight
hours.
WARNING
Use the night position only when ne-
cessary, because it reduces rear view
clarity.
Pre-driving checks and adjustments3-37
MIRRORS
Page 159 of 428
3-38Pre-driving checks and adjustments
SPA2450
Automatic anti-glare type
The inside mirror is designed so that it
automatically changes reflection according to
the intensity of the headlights of the following
vehicle.
The anti-glare system will be automatically
turned on when the ignition switch is pushed
to the ON position.
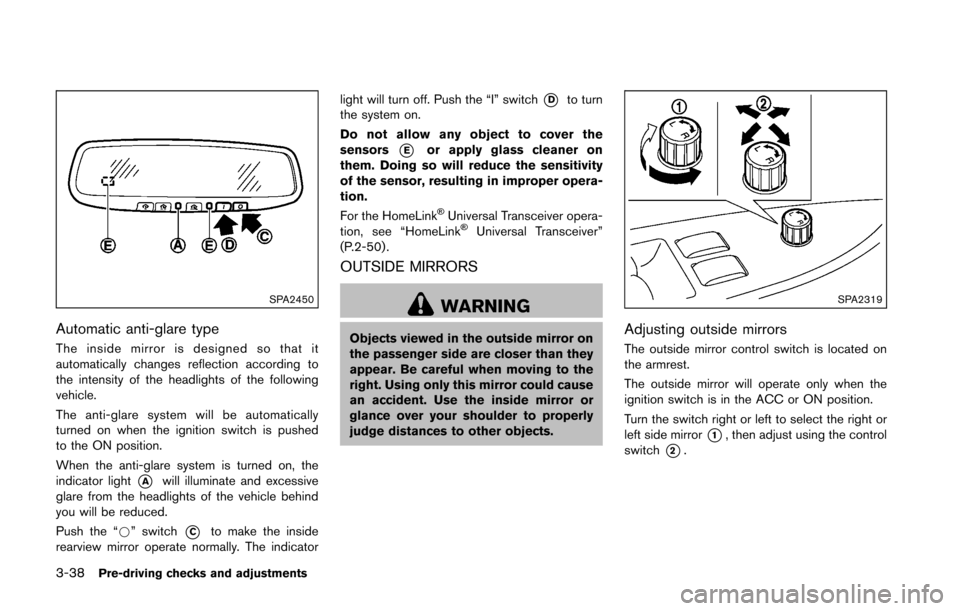
When the anti-glare system is turned on, the
indicator light
*Awill illuminate and excessive
glare from the headlights of the vehicle behind
you will be reduced.
Push the “*” switch
*Cto make the inside
rearview mirror operate normally. The indicator light will turn off. Push the “I” switch
*Dto turn
the system on.
Do not allow any object to cover the
sensors
*Eor apply glass cleaner on
them. Doing so will reduce the sensitivity
of the sensor, resulting in improper opera-
tion.
For the HomeLink
�ŠUniversal Transceiver opera-
tion, see “HomeLink�ŠUniversal Transceiver”
(P.2-50) .
OUTSIDE MIRRORS
WARNING
Objects viewed in the outside mirror on
the passenger side are closer than they
appear. Be careful when moving to the
right. Using only this mirror could cause
an accident. Use the inside mirror or
glance over your shoulder to properly
judge distances to other objects.
SPA2319
Adjusting outside mirrors
The outside mirror control switch is located on
the armrest.
The outside mirror will operate only when the
ignition switch is in the ACC or ON position.
Turn the switch right or left to select the right or
left side mirror
*1, then adjust using the control
switch
*2.
Page 168 of 428
SAA2477
HOW TO SELECT MENUS ON THE
SCREEN
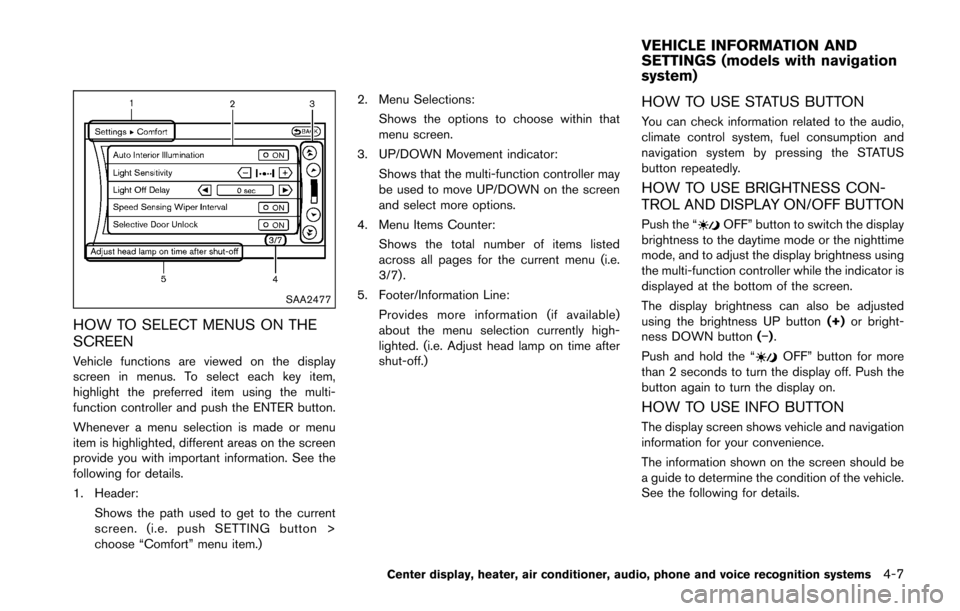
Vehicle functions are viewed on the display
screen in menus. To select each key item,
highlight the preferred item using the multi-
function controller and push the ENTER button.
Whenever a menu selection is made or menu
item is highlighted, different areas on the screen
provide you with important information. See the
following for details.
1. Header:Shows the path used to get to the current
screen. (i.e. push SETTING button >
choose “Comfort” menu item.) 2. Menu Selections:
Shows the options to choose within that
menu screen.
3. UP/DOWN Movement indicator: Shows that the multi-function controller may
be used to move UP/DOWN on the screen
and select more options.
4. Menu Items Counter: Shows the total number of items listed
across all pages for the current menu (i.e.
3/7) .
5. Footer/Information Line: Provides more information (if available)
about the menu selection currently high-
lighted. (i.e. Adjust head lamp on time after
shut-off.)
HOW TO USE STATUS BUTTON
You can check information related to the audio,
climate control system, fuel consumption and
navigation system by pressing the STATUS
button repeatedly.
HOW TO USE BRIGHTNESS CON-
TROL AND DISPLAY ON/OFF BUTTON
Push the “OFF” button to switch the display
brightness to the daytime mode or the nighttime
mode, and to adjust the display brightness using
the multi-function controller while the indicator is
displayed at the bottom of the screen.
The display brightness can also be adjusted
using the brightness UP button (+)or bright-
ness DOWN button (�í).
Push and hold the “
OFF” button for more
than 2 seconds to turn the display off. Push the
button again to turn the display on.
HOW TO USE INFO BUTTON
The display screen shows vehicle and navigation
information for your convenience.
The information shown on the screen should be
a guide to determine the condition of the vehicle.
See the following for details.
Center display, heater, air conditioner, audio, phone and voice recognition systems4-7
VEHICLE INFORMATION AND
SETTINGS (models with navigation
system)
Page 175 of 428
4-14Center display, heater, air conditioner, audio, phone and voice recognition systems
JVH0308M
Others settings
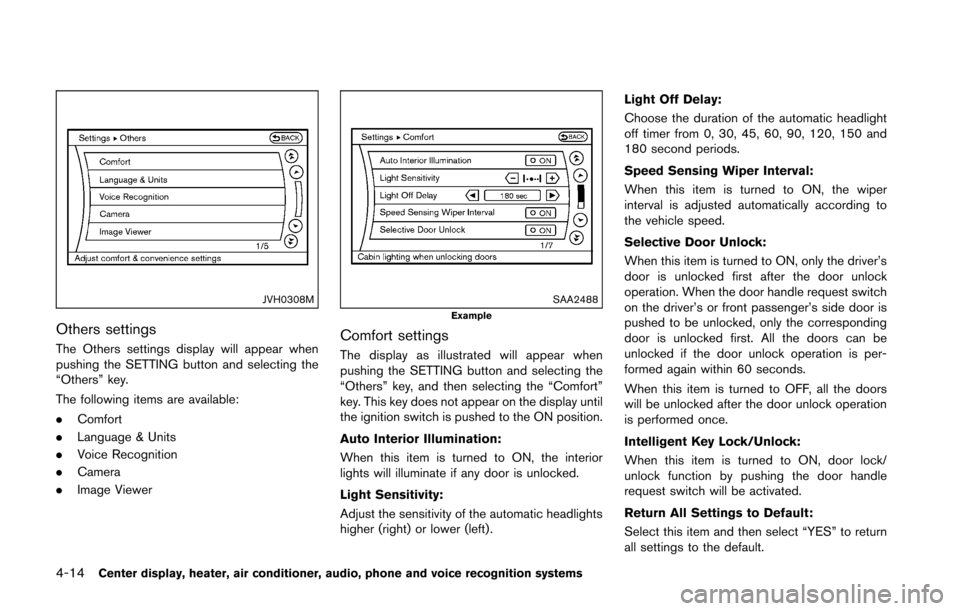
The Others settings display will appear when
pushing the SETTING button and selecting the
“Others” key.
The following items are available:
.Comfort
. Language & Units
. Voice Recognition
. Camera
. Image Viewer
SAA2488Example
Comfort settings
The display as illustrated will appear when
pushing the SETTING button and selecting the
“Others” key, and then selecting the “Comfort”
key. This key does not appear on the display until
the ignition switch is pushed to the ON position.
Auto Interior Illumination:
When this item is turned to ON, the interior
lights will illuminate if any door is unlocked.
Light Sensitivity:
Adjust the sensitivity of the automatic headlights
higher (right) or lower (left) . Light Off Delay:
Choose the duration of the automatic headlight
off timer from 0, 30, 45, 60, 90, 120, 150 and
180 second periods.
Speed Sensing Wiper Interval:
When this item is turned to ON, the wiper
interval is adjusted automatically according to
the vehicle speed.
Selective Door Unlock:
When this item is turned to ON, only the driver’s
door is unlocked first after the door unlock
operation. When the door handle request switch
on the driver’s or front passenger’s side door is
pushed to be unlocked, only the corresponding
door is unlocked first. All the doors can be
unlocked if the door unlock operation is per-
formed again within 60 seconds.
When this item is turned to OFF, all the doors
will be unlocked after the door unlock operation
is performed once.
Intelligent Key Lock/Unlock:
When this item is turned to ON, door lock/
unlock function by pushing the door handle
request switch will be activated.
Return All Settings to Default:
Select this item and then select “YES” to return
all settings to the default.
Page 295 of 428
5-10Starting and driving
SSD0826
INTELLIGENT KEY BATTERY DIS-
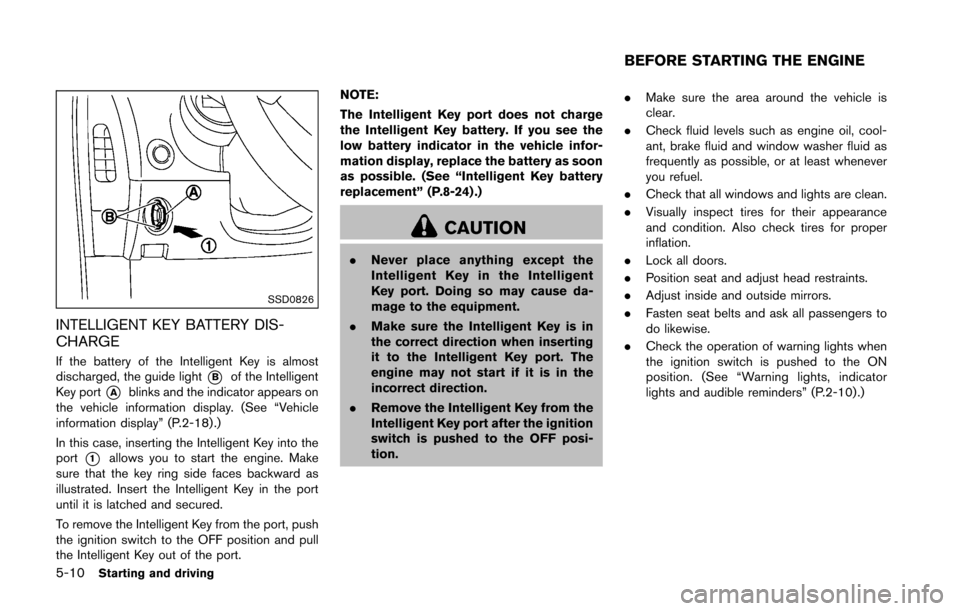
CHARGE
If the battery of the Intelligent Key is almost
discharged, the guide light
*Bof the Intelligent
Key port
*Ablinks and the indicator appears on
the vehicle information display. (See “Vehicle
information display” (P.2-18) .)
In this case, inserting the Intelligent Key into the
port
*1allows you to start the engine. Make
sure that the key ring side faces backward as
illustrated. Insert the Intelligent Key in the port
until it is latched and secured.
To remove the Intelligent Key from the port, push
the ignition switch to the OFF position and pull
the Intelligent Key out of the port. NOTE:
The Intelligent Key port does not charge
the Intelligent Key battery. If you see the
low battery indicator in the vehicle infor-
mation display, replace the battery as soon
as possible. (See “Intelligent Key battery
replacement” (P.8-24) .)
CAUTION
.
Never place anything except the
Intelligent Key in the Intelligent
Key port. Doing so may cause da-
mage to the equipment.
. Make sure the Intelligent Key is in
the correct direction when inserting
it to the Intelligent Key port. The
engine may not start if it is in the
incorrect direction.
. Remove the Intelligent Key from the
Intelligent Key port after the ignition
switch is pushed to the OFF posi-
tion. .
Make sure the area around the vehicle is
clear.
. Check fluid levels such as engine oil, cool-
ant, brake fluid and window washer fluid as
frequently as possible, or at least whenever
you refuel.
. Check that all windows and lights are clean.
. Visually inspect tires for their appearance
and condition. Also check tires for proper
inflation.
. Lock all doors.
. Position seat and adjust head restraints.
. Adjust inside and outside mirrors.
. Fasten seat belts and ask all passengers to
do likewise.
. Check the operation of warning lights when
the ignition switch is pushed to the ON
position. (See “Warning lights, indicator
lights and audible reminders” (P.2-10) .)
BEFORE STARTING THE ENGINE
Page 308 of 428
To reset at a slower cruising speed,use one
of the following methods:
. Lightly tap the brake pedal. When the
vehicle attains the desired speed, push the
COAST/SET switch and release it.
. Push and hold the COAST/SET switch.
Release the switch when the vehicle slows
down to the desired speed.
. Push, then quickly release the COAST/
SETT switch. Each time you do this, the
set speed will decrease by about 1 MPH
(1.6 km/h) .
To resume the preset speed, push and
release the ACCEL/RES switch. The vehicle
will resume the last set cruising speed when the
vehicle speed is over 25 MPH (40 km/h) .
CAUTION
During the first 1,200 miles (2,000 km) ,
follow these recommendations to ob-
tain maximum engine performance and
ensure the future reliability and econo-
my of your new vehicle.
Failure to follow these recommenda-
tions may result in shortened engine
life and reduced engine performance.
. Avoid driving for long periods at constant
speed, either fast or slow. Do not run the
engine over 4,000 rpm.
. Do not accelerate at full throttle in any gear.
. Avoid quick starts.
. Avoid hard braking as much as possible. Follow these easy-to-use Fuel Efficient Driving
Tips to help you achieve the most fuel economy
from your vehicle.
1. Use smooth accelerator and brake pedal
application.
.Avoid rapid starts and stops..Use smooth, gentle accelerator andbrake application whenever possible.
.Maintain constant speed while commut-
ing and coast whenever possible.
2. Maintain constant speed.
.Look ahead to try and anticipate and minimize stops.
.Synchronizing your speed with traffic
lights allows you to reduce your number
of stops.
.Maintaining a steady speed can minimize red light stops and improve fuel effi-
ciency.
3. Use air conditioning (A/C) at higher vehicle speeds.
.Below 40 MPH (64 km/h) , it is moreefficient to open windows to cool the
vehicle due to reduced engine load.
.Above 40 MPH (64 km/h) , it is moreefficient to use A/C to cool the vehicle
due to increased aerodynamic drag.
Starting and driving5-23
BREAK-IN SCHEDULE FUEL EFFICIENT DRIVING TIPS
Page 327 of 428
6-8In case of emergency
SCE0845
Roadster models:
Securely store the jacking tools in the storage
area.
Place the spare tire cover and trunk room carpet
back in the trunk, and then close the trunk lid.
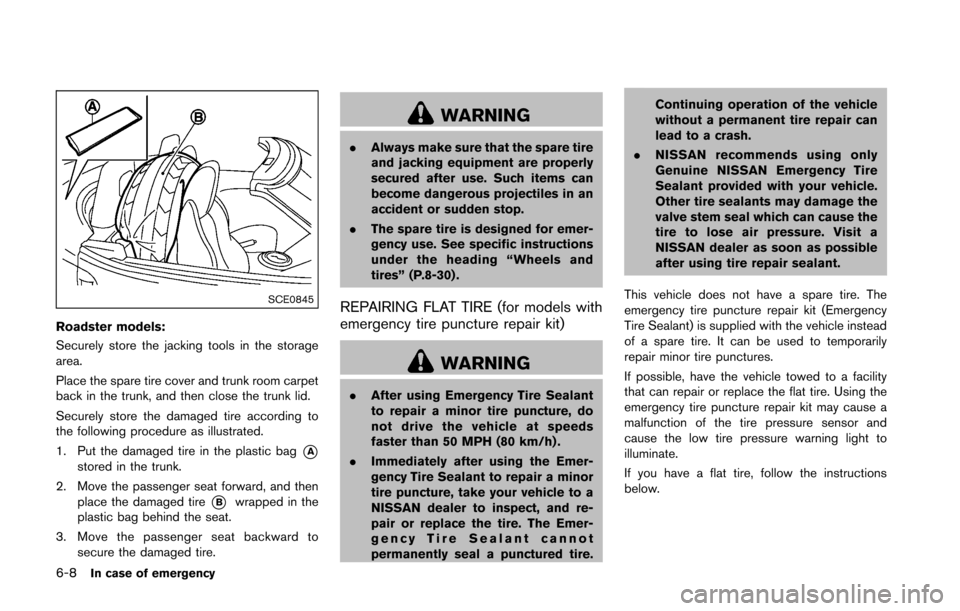
Securely store the damaged tire according to
the following procedure as illustrated.
1. Put the damaged tire in the plastic bag
*Astored in the trunk.
2. Move the passenger seat forward, and then place the damaged tire
*Bwrapped in the
plastic bag behind the seat.
3. Move the passenger seat backward to secure the damaged tire.
WARNING
.Always make sure that the spare tire
and jacking equipment are properly
secured after use. Such items can
become dangerous projectiles in an
accident or sudden stop.
. The spare tire is designed for emer-
gency use. See specific instructions
under the heading “Wheels and
tires” (P.8-30) .
REPAIRING FLAT TIRE (for models with
emergency tire puncture repair kit)
WARNING
.After using Emergency Tire Sealant
to repair a minor tire puncture, do
not drive the vehicle at speeds
faster than 50 MPH (80 km/h) .
. Immediately after using the Emer-
gency Tire Sealant to repair a minor
tire puncture, take your vehicle to a
NISSAN dealer to inspect, and re-
pair or replace the tire. The Emer-
gency Tire Sealant cannot
permanently seal a punctured tire. Continuing operation of the vehicle
without a permanent tire repair can
lead to a crash.
. NISSAN recommends using only
Genuine NISSAN Emergency Tire
Sealant provided with your vehicle.
Other tire sealants may damage the
valve stem seal which can cause the
tire to lose air pressure. Visit a
NISSAN dealer as soon as possible
after using tire repair sealant.
This vehicle does not have a spare tire. The
emergency tire puncture repair kit (Emergency
Tire Sealant) is supplied with the vehicle instead
of a spare tire. It can be used to temporarily
repair minor tire punctures.
If possible, have the vehicle towed to a facility
that can repair or replace the flat tire. Using the
emergency tire puncture repair kit may cause a
malfunction of the tire pressure sensor and
cause the low tire pressure warning light to
illuminate.
If you have a flat tire, follow the instructions
below.