2016 MITSUBISHI OUTLANDER SPORT spare tire
[x] Cancel search: spare tirePage 246 of 398
Vehicle preparation before driving 6-4 Driving safety
6
N00629000669
For a safer and more enjoyable trip, always check for the following: Before starting the vehicle, make certain that you and all passengers are seated and wearing their seat belts properly (with children in the rear seat, in appropriaterestraints), and that all the doors and lift- gate are locked. Move the driver’s seat as far backward as possible, while still keeping good visibil- ity, and good control of the steering wheel, brakes, accelerator, and controls.Check the instrument panel indicators and multi-information display for any possible problem. In the same way, the front passenger seat should also be moved as far back as possi- ble. Make sure that infants and small children are properly restrained in accordance with all laws and regulations.
Check these by selecting the defroster mode, and set the blower switch on high. Youshould be able to feel the air blowing against the windshield. Refer to “Defrosting or defogging (wind-shield, door windows)” on page 7-8, 7-13, 7-18, 7-23. Check all the tires for heavy tread wear or uneven wear patterns. Look for stones, nails, glass, or other objects stuck in the tread. Look for any tread cuts or sidewall cracks. Checkthe wheel nuts for tightness, and the tires (including spare tire) for proper pressure. Replace your tires before they are heavilyworn out. As your vehicle is equipped with a tire pres- sure monitoring system, there is a risk ofdamage to the tire inflation pressure sensors when the tire is replaced on the rim. Tire replacement should, therefore, be performedonly by an authorized Mitsubishi Motors dealer.
Have someone watch while you turn all the exterior lights on and off. Also check the turnsignal indicators and high-beam indicators on the instrument panel. Check the ground under the vehicle after parking overnight, for fuel, water, oil, or other leaks. Make sure all the fluid levels are correct. Also, if you can smell fuel, you needto find out why immediately and have it fixed.
N00629200094
Even this vehicle’s safety equipment, andyour safest driving, cannot guarantee that you can avoid an accident or injury. However, ifyou give extra attention to the following areas, you can better protect yourself and your passengers: Drive defensively. Be aware of traffic, road and weather conditions. Leave plenty of stopping distance between your vehicle and the vehicle ahead.
Vehicle preparation before driving Seat belts and seats
Defrosters Tires
Lights Fluid leaks Safe driving techniques
BK0229600US.bo
ok 4 ページ 2015年10月1日 木曜日 午後2時29分
Page 326 of 398
How to change a tire 8-6 For emergencies
8
N00836901832
Before changing a tire, first stop your vehicle in a safe, flat location. 1. Park the vehicle on level and stable ground. 2. Set the parking brake firmly.3. On vehicles equipped with manual trans- axle, stop the engine and move the gear- shift lever to the “R” (Reverse) position.On vehicles equipped with continuously variable transmission (CVT), move the selector lever to the “P” (PARK) position,and stop the engine. 4. Turn on the hazard flashers and set up a warning triangle, flashing signal light,etc., at an adequate distance from the vehicle, and have all your passengers leave the vehicle.
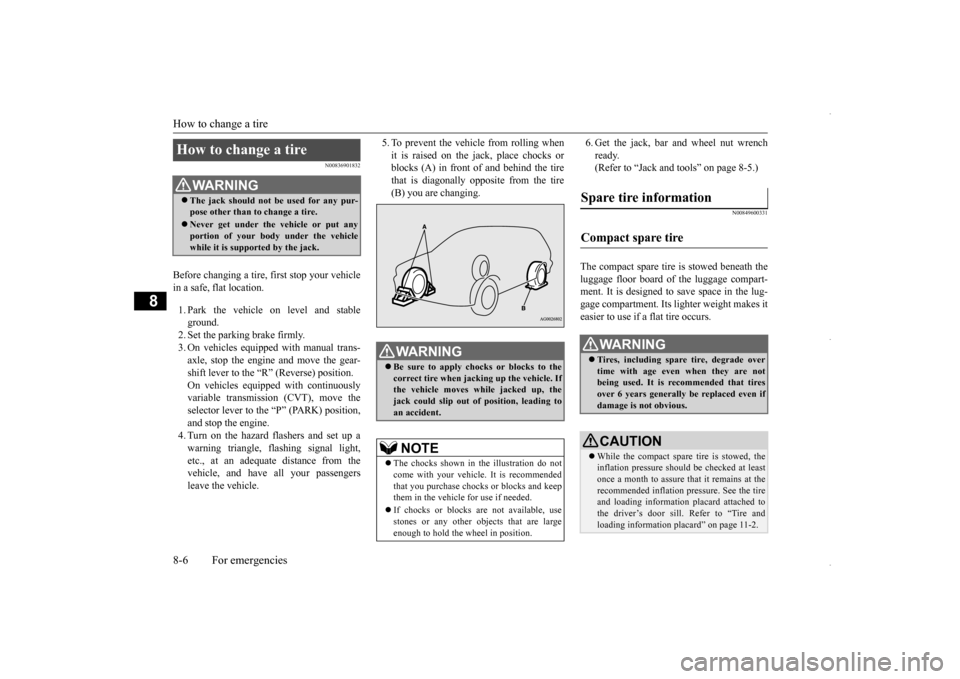
5. To prevent the vehicle from rolling when it is raised on the jack, place chocks or blocks (A) in front of and behind the tire that is diagonally opposite from the tire(B) you are changing.
6. Get the jack, bar and wheel nut wrench ready. (Refer to “Jack and tools” on page 8-5.)
N00849600331
The compact spare tire is stowed beneath the luggage floor board of the luggage compart- ment. It is designed to save space in the lug- gage compartment. Its lighter weight makes iteasier to use if a flat tire occurs.
How to change a tire
WA R N I N G The jack should not be used for any pur- pose other than to change a tire. Never get under the vehicle or put any portion of your body under the vehicle while it is supported by the jack.
WA R N I N G Be sure to apply chocks or blocks to the correct tire when jacking up the vehicle. Ifthe vehicle moves while jacked up, the jack could slip out of position, leading to an accident.NOTE
The chocks shown in the illustration do not come with your vehicle. It is recommended that you purchase chocks or blocks and keepthem in the vehicle for use if needed. If chocks or blocks are not available, use stones or any other objects that are large enough to hold the wheel in position.
Spare tire information Compact spare tire
WA R N I N G Tires, including spare tire, degrade over time with age even when they are not being used. It is recommended that tires over 6 years generally be replaced even ifdamage is not obvious.CAUTION While the compact spare tire is stowed, the inflation pressure should be checked at least once a month to assure that it remains at the recommended inflation pressure. See the tireand loading information placard attached to the driver’s door sill. Refer to “Tire and loading information placard” on page 11-2.
BK0229600US.bo
ok 6 ページ 2015年10月1日 木曜日 午後2時29分
Page 327 of 398
How to change a tire
For emergencies 8-7
8
N00849701355
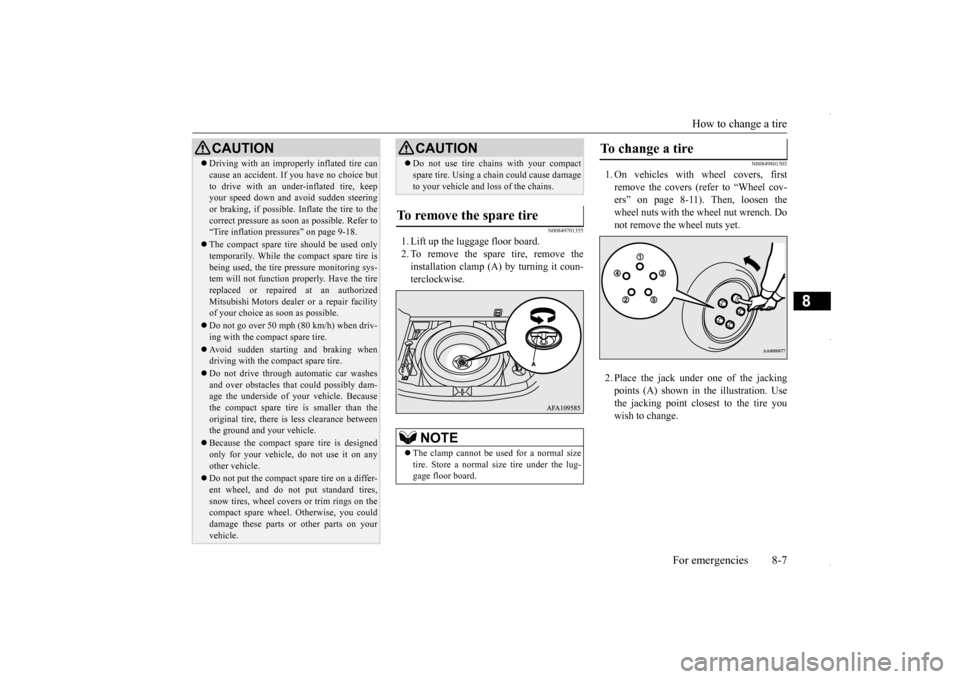
1. Lift up the luggage floor board. 2. To remove the spare tire, remove theinstallation clamp (A) by turning it coun-terclockwise.
N00849801503
1. On vehicles with wheel covers, firstremove the covers (refer to “Wheel cov-ers” on page 8-11). Then, loosen the wheel nuts with the wheel nut wrench. Do not remove the wheel nuts yet. 2. Place the jack under
one of the jacking
points (A) shown in the illustration. Use the jacking point closest to the tire youwish to change.
Driving with an improperly inflated tire can cause an accident. If you have no choice but to drive with an under-inflated tire, keep your speed down and avoid sudden steering or braking, if possible
. Inflate the tire to the
correct pressure as soon as possible. Refer to “Tire inflation pressures” on page 9-18. The compact spare tire should be used only temporarily. While the compact spare tire is being used, the tire pressure monitoring sys-tem will not function properly. Have the tire replaced or repaired at an authorized Mitsubishi Motors dealer or a repair facilityof your choice as soon as possible. Do not go over 50 mph (80 km/h) when driv- ing with the compact spare tire. Avoid sudden starting and braking when driving with the compact spare tire. Do not drive through automatic car washes and over obstacles that could possibly dam- age the underside of your vehicle. Because the compact spare tire is smaller than theoriginal tire, there is less clearance between the ground and your vehicle. Because the compact spare tire is designed only for your vehicle, do not use it on any other vehicle. Do not put the compact spare tire on a differ- ent wheel, and do not put standard tires, snow tires, wheel covers or trim rings on the compact spare wheel. Otherwise, you coulddamage these parts or other parts on your vehicle.CAUTION
Do not use tire chains with your compact spare tire. Using a chain could cause damage to your vehicle and loss of the chains.
To remove the spare tire
NOTE
The clamp cannot be us
ed for a normal size
tire. Store a normal size tire under the lug- gage floor board.CAUTION
To change a tire
BK0229600US.bo
ok 7 ページ 2015年10月1日 木曜日 午後2時29分
Page 328 of 398
How to change a tire 8-8 For emergencies
8
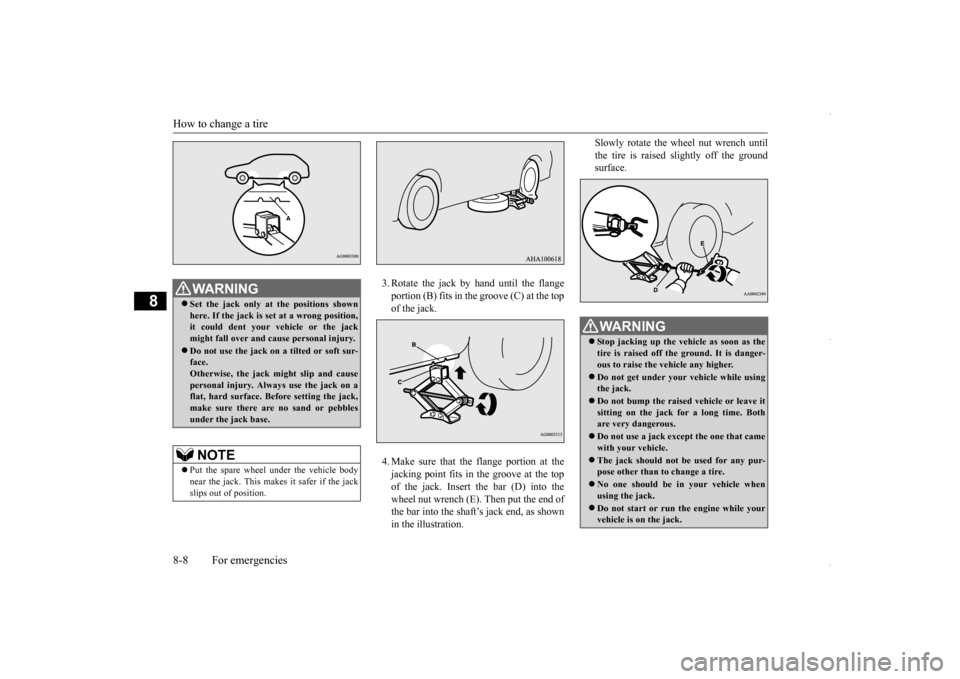
3. Rotate the jack by hand until the flange portion (B) fits in the groove (C) at the top of the jack. 4. Make sure that the flange portion at the jacking point fits in the groove at the topof the jack. Insert the bar (D) into thewheel nut wrench (E). Then put the end of the bar into the shaft’s jack end, as shown in the illustration.
Slowly rotate the wheel nut wrench until the tire is raised slightly off the ground surface.
WA R N I N G Set the jack only at the positions shown here. If the jack is set at a wrong position, it could dent your vehicle or the jackmight fall over and cause personal injury. Do not use the jack on a tilted or soft sur- face. Otherwise, the jack might slip and cause personal injury. Always use the jack on aflat, hard surface. Before setting the jack, make sure there are no sand or pebbles under the jack base.NOTE
Put the spare wheel under the vehicle body near the jack. This makes it safer if the jack slips out of position.
WA R N I N G Stop jacking up the vehicle as soon as the tire is raised off the ground. It is danger- ous to raise the vehicle any higher. Do not get under your vehicle while using the jack. Do not bump the raised vehicle or leave it sitting on the jack for a long time. Bothare very dangerous. Do not use a jack except the one that came with your vehicle. The jack should not be used for any pur- pose other than to change a tire. No one should be in your vehicle when using the jack. Do not start or run the engine while your vehicle is on the jack.
BK0229600US.bo
ok 8 ページ 2015年10月1日 木曜日 午後2時29分
Page 329 of 398
How to change a tire
For emergencies 8-9
8
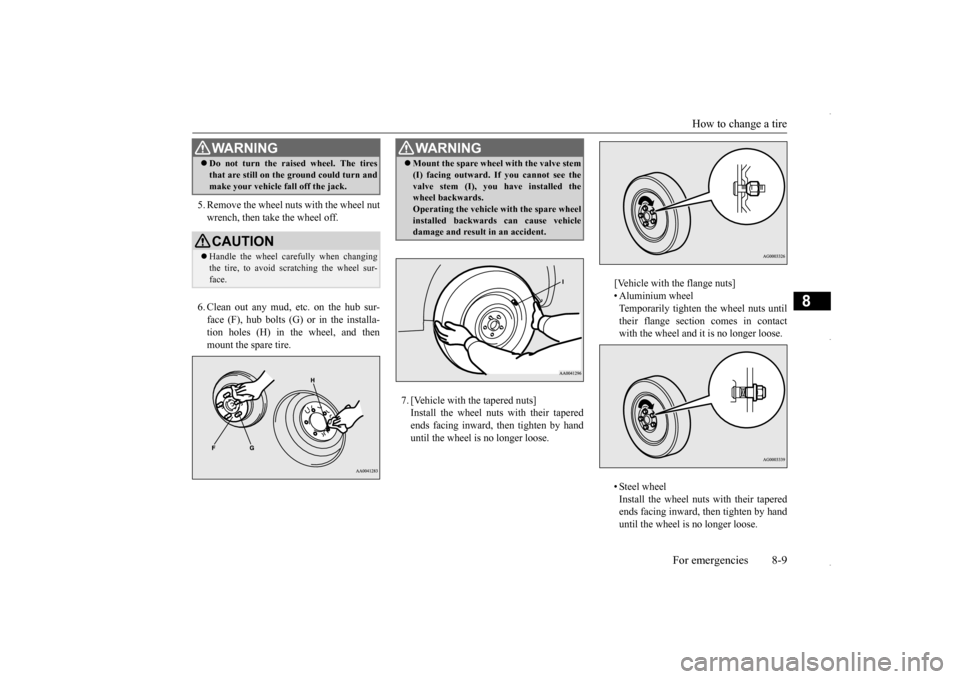
5. Remove the wheel nuts with the wheel nut wrench, then take the wheel off. 6. Clean out any mud, etc. on the hub sur- face (F), hub bolts (G) or in the installa-tion holes (H) in the wheel, and then mount the spare tire.
7. [Vehicle with the tapered nuts] Install the wheel nuts with their tapered ends facing inward, then tighten by handuntil the wheel is no longer loose.
[Vehicle with the flange nuts] • Aluminium wheel Temporarily tighten the wheel nuts untiltheir flange section comes in contact with the wheel and it is no longer loose. • Steel wheel Install the wheel nuts with their tapered ends facing inward, then tighten by hand until the wheel is no longer loose.
Do not turn the raised wheel. The tires that are still on the ground could turn and make your vehicle fall off the jack.CAUTION Handle the wheel carefully when changing the tire, to avoid scratching the wheel sur- face.WA R N I N G
WA R N I N G Mount the spare wheel with the valve stem (I) facing outward. If you cannot see the valve stem (I), you have installed the wheel backwards. Operating the vehicle with the spare wheelinstalled backwards can cause vehicle damage and result in an accident.
BK0229600US.bo
ok 9 ページ 2015年10月1日 木曜日 午後2時29分
Page 330 of 398
How to change a tire 8-10 For emergencies
8
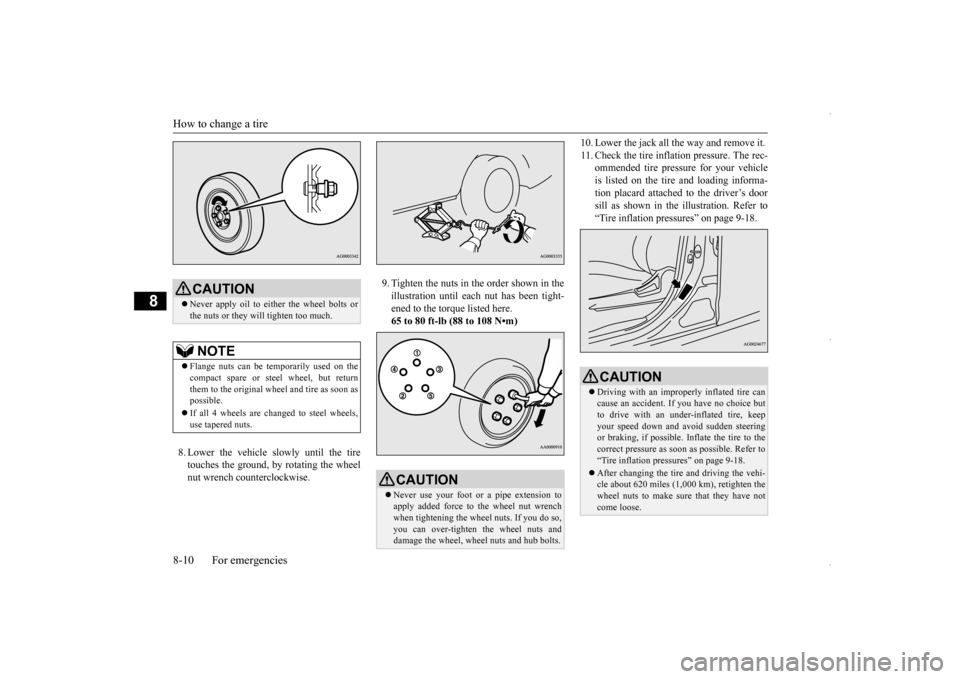
8. Lower the vehicle slowly until the tire touches the ground, by rotating the wheelnut wrench counterclockwise.
9. Tighten the nuts in the order shown in the illustration until each nut has been tight- ened to the torque listed here.65 to 80 ft-lb (88 to 108 N•m)
10. Lower the jack all the way and remove it. 11. Check the tire inflation pressure. The rec-
ommended tire pressure for your vehicle is listed on the tire and loading informa-tion placard attached to the driver’s door sill as shown in the illustration. Refer to “Tire inflation pressures” on page 9-18.
CAUTION Never apply oil to either the wheel bolts or the nuts or they will tighten too much.NOTE
Flange nuts can be temporarily used on the compact spare or steel wheel, but return them to the original wheel and tire as soon as possible. If all 4 wheels are changed to steel wheels, use tapered nuts.
CAUTION Never use your foot or a pipe extension to apply added force to the wheel nut wrenchwhen tightening the wheel nuts. If you do so, you can over-tighten the wheel nuts and damage the wheel, wheel nuts and hub bolts.
CAUTION Driving with an improperly inflated tire can cause an accident. If
you have no choice but
to drive with an under-inflated tire, keep your speed down and avoid sudden steeringor braking, if possible
. Inflate the tire to the
correct pressure as soon as possible. Refer to “Tire inflation pressures” on page 9-18. After changing the tire and driving the vehi- cle about 620 miles (1,000 km), retighten thewheel nuts to make sure that they have not come loose.
BK0229600US.bo
ok 10 ページ 2015年10月1日 木曜日 午後2時29分
Page 331 of 398
How to change a tire
For emergencies 8-11
8
N00850000162
Reverse the removing procedure when stor- ing the flat tire or spare tire, jack, bar and wheel nut wrench. Refer to “To remove the spare tire” on page8-7 and “Jack and tools” on page 8-5.
N00849400195
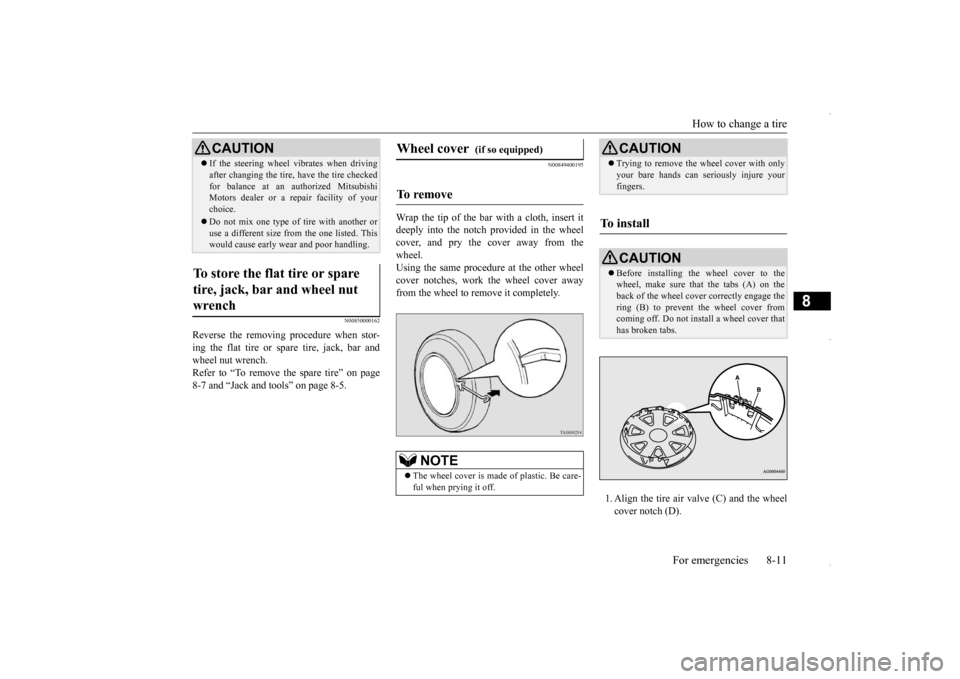
Wrap the tip of the bar with a cloth, insert itdeeply into the notch provided in the wheelcover, and pry the cover away from the wheel. Using the same procedure at the other wheelcover notches, work the wheel cover awayfrom the wheel to remove it completely.
1. Align the tire air valve (C) and the wheel cover notch (D).
If the steering wheel vibrates when driving after changing the tire, have the tire checked for balance at an authorized Mitsubishi Motors dealer or a repair facility of your choice. Do not mix one type of tire with another or use a different size from the one listed. Thiswould cause early wear and poor handling.
To store the flat tire or spare tire, jack, bar and wheel nut wrench
CAUTION
Wheel cover
(if so equipped)
To remove
NOTE
The wheel cover is made of plastic. Be care- ful when prying it off.
CAUTION Trying to remove the wheel cover with only your bare hands can seriously injure your fingers.
To install
CAUTION Before installing the wheel cover to the wheel, make sure that the tabs (A) on theback of the wheel cover correctly engage the ring (B) to prevent the wheel cover from coming off. Do not install a wheel cover thathas broken tabs.
BK0229600US.bo
ok 11 ページ 2015年10月1日 木曜日 午後2時29分
Page 350 of 398
Tires 9-14 Vehicle care and maintenance
9
N00939201592
It is important to familiarize yourself with the following terms: Cold tire pressure: • The measured pressure after the vehicle has been parked for at least three hours,or • The measured pressure when the vehicle is driven less than 1 mile (1.6 km) afterhaving been parked for three hours.
Maximum pressure:the maximum permis- sible cold tire inflat
ion pressure for this
tire. Recommended inflation pressure: the inflation pressure for optimum tire perfor-mance. Intended outboard sidewall: • The sidewall that contains a whitewall,bears white lettering or bears manufac- turer, brand, and/or model name molding that is higher or deeper than the samemolding on the other sidewall of the tire, or
• The outward facing sidewall of an asym- metrical tire that has a particular side that must always face outward when mounted on a vehicle.
Passenger car tire: a tire intended for use on passenger cars,
multipurpose passen-
ger vehicles, and trucks, that have a grossvehicle weight rating (GVWR) of 10,000 pounds or less. Light truck (LT) tire: a tire designated by its manufacturer as primarily intended foruse on lightweight trucks or multipurpose passenger vehicles. Tread: portion of a tire that comes into contact with the road. Tread rib: a tread section running circum- ferentially around a tire. Tread separation: pulling away of the tread from the tire carcass. Carcass: the tire structure, except tread and sidewall rubber which, when inflated, bears the load. Sidewall: portion of a tire between the tread and bead. Section width: the linear distance between the exteriors of the sidewalls of aninflated tire, excluding elevations due to labeling, decoration, or protective bands. Bead: the part of the tire that is made of steel wires, wrapped or reinforced by ply cords and that is shaped to fit the rim.
NOTE
Check each battery terminal for corrosion. You can stop more corrosion by washing with a solution of baking soda and water. Grease the posts and clamps after cleaning or tightening them. Check to see that the battery is securely installed and cannot be moved. Also checkeach terminal for tightness. If you will not be driv
ing your vehicle for a
long period of time, remove the battery and store it in a place where the battery fluid will not freeze. The battery only should be storedwith a full charge. Before cleaning the battery, tighten all the filler port caps to keep dirt and moisture out.
Tires
WA R N I N G Driving with tires that are worn, damaged or improperly inflated is dangerous.These type tire conditions will adversely affect vehicle performance. These type tire conditions can also cause a tread separation or blowout which may result in an accident causing seriousinjury or death.
Tires, including spare tire, degrade over time with age even when they are not being used. It is recommended that tires over 6 years generally be replaced even if damage isnot obvious.WA R N I N G
BK0229600US.bo
ok 14 ページ 2015年10月1日 木曜日 午後2時29分