2016 MITSUBISHI OUTLANDER SPORT manual transmission
[x] Cancel search: manual transmissionPage 117 of 398

Continuously variable transmission (CVT) (if so equipped)
Features and controls 5-55
5
Move the lever to this position only after the vehicle has come to a complete stop. At this position, the transmission is disen- gaged. It is the same as the neutral position ona manual transaxle and
should be used when
the vehicle is not moving for an extended length of time during driving, such as in atraffic jam.
This position is used for most city and high- way driving. The transmission will automati- cally and continuously change its gear ratio depending on road and driving conditions.
N00560701078
Whether the vehicle is stationary or inmotion, sports mode is selected by pushingthe selector lever from the “D” (DRIVE) position into the manual gate (A). To return
to “D” (DRIVE) operation, push the selector lever back into the main gate (B). In sports mode, rapid sh
ifting is possible sim-
ply by operating the selector lever or spor-tronic steering wheel paddle shifter. Unlike the manual transaxle, sports mode allows shifting with the accelerator pedaldepressed.
“R” REVERSE
CAUTION Never shift into the “P” (PARK) or “R” (REVERSE) position while the vehicle is inmotion. If the lever is shifted into the “P” (PARK) or “R” (REVERSE) position while the vehicle is in motion, the transmissionmay be damaged.
“N” NEUTRAL
WA R N I N G Never move the selector lever to the “N” (NEUTRAL) position while driving since you could accidentally slip it into the “P”(PARK) or “R” (REVERSE) position, damaging the transmission.
To prevent the vehicle from rolling when stopped on a slope, the engine should be started in the “P” (PARK) position, not in “N” (NEUTRAL) position. To prevent rolling, always keep your foot on the brake pedal when the vehicle is in “N” (NEUTRAL) position, or when shift-ing into or out of “N” (NEUTRAL) posi- tion.
“D” DRIVE
CAUTION To prevent transmission damage, never shift into the “D” (DRIVE) position from the “R” (REVERSE) position while the vehicle is inmotion.
Sports mode
WA R N I N G
NOTE
For vehicles equipped with the sportronic steering wheel paddle shifter, sports mode can be operated even when the selector leveris in the main gate (B). Also, you can return to the “D” operation in any of following ways. When returning to “D” operation, theselector lever position display will change to “D” (DRIVE) position. • Pull the + (SHIFT UP) side sportronic steering wheel paddle shifter forward (toward the driver) for over 2 seconds. • Stop the vehicle • Push the selector lever from the “D” (DRIVE) position into the manual gate (A) and push the selector lever back into themain gate (B).
BK0229600US.bo
ok 55 ページ 2015年10月1日 木曜日 午後2時29分
Page 127 of 398

Hill start assist
Features and controls 5-65
5
authorized Mitsubishi Motors dealer or a repair facility of your choice immediately.
N00550700124
The disc brakes have an alarm that makes ametallic squeal when the brake pads have worn down enough to need service. If you hear this sound, have the brake padsreplaced at an authorized Mitsubishi Motors dealer or a repair facility of your choice.
N00562600074
The hill start assist makes it easy to start off on a steep uphill slope by preventing thevehicle from moving back
wards. It keeps the
braking force for about 2 second when you move your foot from the brake pedal to theaccelerator pedal.
N00562700059
1. Stop the vehicle completely using thebrake pedal. 2. On vehicles equipped with manual trans- axle, place the gearshift lever into the 1stpositon. On vehicles equipped with a continuously variable transmission (CVT), place theselector lever into the “D” position. 3. Release the brake pedal and the hill start assist will maintain the braking force applied while stopping for approximately2 seconds.
WA R N I N G Never coast downhill with the engine OFF. Keep the engine running whenever your vehicle is in motion. If you turn off theengine while driving, the power brake booster will stop working and your brakes will not work as well. If the power assist is
lost or if either brake
hydraulic system stops working properly,take your vehicle to an authorized Mitsubishi Motors dealer or a repair facil- ity of your choice immediately.
Brake pad wear alarm
WA R N I N G Driving with worn brake pads will make it harder to stop, and can cause an accident.
Hill start assist
CAUTION Do not overly rely on the hill start assist to prevent backwards movement of the vehicle. Under certain circumstances, even when hillstart assist is activated, the vehicle may move backwards if the brake pedal is not suf- ficiently depressed, if the vehicle is heavilyloaded, or if the road is very steep or slip- pery. The hill start assist is not designed to keep the vehicle stopped in place on uphill slopes for more than 2 seconds. When facing uphill, do
not rely on using the
hill start assist to maintain a stopped positionas an alternative to depressing the brake pedal. Doing so could cause an accident.
Do not perform the following operation while the hill start assist is operating. [Except for vehicles equipped with the F. A . S . T. - k e y ] Turn the ignition switch to the “OFF” or“ACC” position. [Vehicles equipped with the F.A.S.T.-key] Put the operation mode in OFF or ACC. Thehill start assist could stop operating, which could result in an accident.
To operate
NOTE
When reversing on an uphill slope, place the gearshift lever or the selector lever into the“R” position.CAUTION
BK0229600US.bo
ok 65 ページ 2015年10月1日 木曜日 午後2時29分
Page 135 of 398

Cruise control (if so equipped) Features and controls 5-73
5
N00546300031 N00518301600
Cruise control is an automatic speed control system that keeps a set speed. It can be acti- vated at speeds from about 25 mph(40 km/h). Cruise control does not work at speeds below about 25 mph (40 km/h).To w i n g
CAUTION When towing the vehicle with only the front wheels or only the rear wheels raised off the ground, do not place the ignition switch in the “ON” position or do not put the operationmode in ON. Placing the ignition switch in the “ON” position or putting the operation mode in ON could cause the ASC to operate,resulting in an accident. Note that the correct towing method depends on the transmission type and the vehicle’sdrive configuration. For details, refer to “Towing” on page 8-12.
Cruise control (if so equipped)
CAUTION When you do not wish to drive at a set speed, turn off the cruise control for safety.
Do not use cruise control when driving con- ditions will not allow you to stay at the same speed, such as in heavy traffic or on roads that are winding, icy, snow-covered, wet, slippery, on a steep downhill slope. On vehicles equipped with manual transaxle, do not move the gearshift lever to the “N”(Neutral) position while driving at a set speed without depressing the clutch pedal. The engine will run too fast and might bedamaged.NOTE
Cruise control may not be able to keep your speed on uphills or downhills. Your speed may decrease on a steep uphill. You may use the accelerator pedal if you want to stay at your set speed. Your speed may increase to more than the set speed on a steep downhill. You have to usethe brake to control your speed. As a result, the set speed driving is deactivated.CAUTION
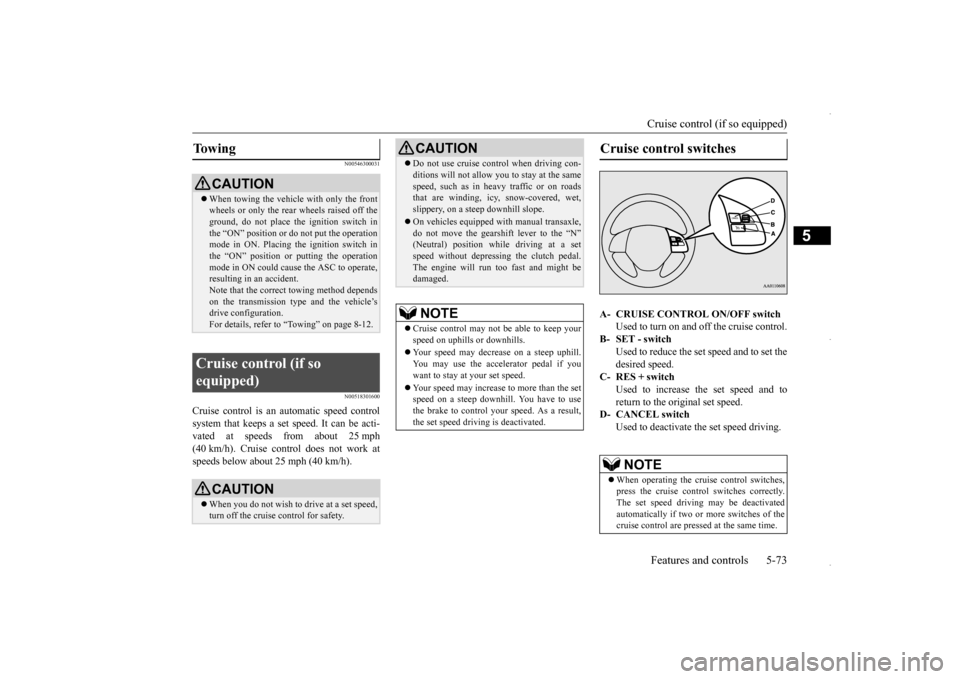
Cruise control switches A- CRUISE CONTROL ON/OFF switch
Used to turn on and off the cruise control.
B- SET - switch
Used to reduce the set speed and to set the desired speed.
C- RES + switch
Used to increase the set speed and toreturn to the original set speed.
D- CANCEL switch
Used to deactivate the set speed driving.NOTE
When operating the cruise control switches, press the cruise control switches correctly.The set speed driving may be deactivated automatically if two or more switches of the cruise control are pressed at the same time.
BK0229600US.bo
ok 73 ページ 2015年10月1日 木曜日 午後2時29分
Page 205 of 398

Bluetooth® 2.0 interface (if so equipped)
Features and controls 5-143
5
1. Stop your vehicle in a safe area, put the gearshift lever in the “N” (Neutral) posi- tion (manual transaxle), or the selector lever in the “P” (PARK) position (contin-uously variable transmission (CVT)), and pull the parking brake lever. 2. Press the SPEECH button (except for vehicles with Mitsubishi Multi-Commu- nication System) or PICK-UP button (for vehicles with Mitsubishi Multi-Commu-nication System). 3. Say “Voice training.” 4. The voice guide will say “This operationmust be performed in a quiet environment while the vehicle is stopped. See the owner’s manual for the list of requiredtraining phrases. Press and release the SPEECH button when you are ready to begin. Press the HANG-UP button to can-cel at any time.” Press the SPEECH button to start the speaker enrollment process.
5. The voice guide will prompt for phrase 1. Repeat the corresponding phrase listed in table “Enrollment commands” on page5-160. The system will register your voice and then move on to the registration of thenext command. Continue the process until all phrases have been registered.
6. When all enrollment commands have been read out, the voice guide will say “Speaker enrollment is complete.” The system will then end the speaker enroll-ment process and return to the main menu.
N00564901081
You can turn a voice model registered with the speaker enrollment function on and off whenever you want. You can also retrain the system.Use the following procedure to perform these actions. 1. Press the SPEECH button (except for vehicles with Mitsubishi Multi-Commu-nication System) or PICK-UP button (for vehicles with Mitsubishi Multi-Commu- nication System).2. Say “Voice training.”
NOTE
Speaker enrollment is not possible unless the vehicle is parked. Make sure you park the vehicle in a safe area before attemptingspeaker enrollment.
NOTE
If you do not start the speaker enrollment process within 3 minutes after pressing the SPEECH button, the speaker enrollment function will time out. The voice guide will say “Speaker enroll-ment has timed out.” The system will then beep and the voice recognition mode will be deactivated. NOTE
To repeat the most recent voice training command, press and release the SPEECH button. If you press the HANG-UP button anytime during the process, the system will beep and stop the speaker enrollment process.
NOTE
Completing the speaker enrollment process will turn on the voice model automatically. The commands “Help” and “Cancel” will not work in this mode.
Enabling and disabling the voice model and retraining
BK0229600US.book
143 ページ 2015年10月1日 木曜日 午後2時29分
Page 206 of 398

Bluetooth® 2.0 interface (if so equipped) 5-144 Features and controls
5
3. If you have completed a speaker enroll- ment process once already, the voice guide will say either “Enrollment is enabled. Would you like to disable orretrain?” or “Enrollment is disabled. Would you like to enable or retrain?” 4. When enrollment is “enabled,” the voicemodel is on; when enrollment is “dis- abled,” the voice model is off. Say the command that fits your needs. Say “Retrain” to start the speaker enroll-ment process and recreate a new voice model. (Refer to “Speaker enrollment” on page 5-142.)
N00565001311
Before you can make or receive hands-free calls or play music using the Bluetooth
® 2.0
interface function, you must pair the Blue- tooth
® device and Bluetooth
® 2.0 interface.
Up to 7 Bluetooth
® devices can be paired
with the Bluetooth
® 2.0 interface.
If multiple paired Bluetooth
® devices are
available in the vehicle, the cellular phone or music player most recently connected is auto- matically connected to the Bluetooth
® 2.0
interface. You can also change a Bluetooth
® device to
be connected. To pair a Bluetooth
® device with the Blue-
tooth
® 2.0 interface, use either one of the fol-
lowing 2 methods (Type 1 or Type 2).
1. Stop your vehicle in a safe area, put the gearshift lever in the “N” (Neutral) posi- tion (manual transaxle), or the selectorlever in the “P” (PARK) position (contin- uously variable transmission (CVT)), and pull the parking brake lever. 2. Press the SPEECH button (except for vehicles with Mitsubishi Multi-Commu- nication System) or PICK-UP button (forvehicles with Mitsubishi Multi-Commu- nication System). 3. Say “Setup.”4. Say “Pairing Options.”5. The voice guide will say “Select one of the following: pair, edit, delete, or list.” Say “Pair.”
® 2.0
interface and Bluetooth
® device
NOTE
Pairing is required only when the device is used for the first time. Once the device has been paired with the Bluetooth
® 2.0 inter-
face, all you need is
to bring the device into
the vehicle next time and the device will connect to the Bluetooth
® 2.0 interface auto-
matically (if supported by the device). The device must have Bluetooth
® turned ON to
connect.
To p a i r
Pairing procedure- Type 1
(if so
equipped)NOTE
You cannot pair any Bluetooth
® device with
the Bluetooth
® 2.0 interface unless the vehi-
cle is parked. Before pairing a Bluetooth
®
device with the Bluetooth
® 2.0 interface,
confirm that the vehicle is parked in a safe location.
BK0229600US.book
144 ページ 2015年10月1日 木曜日 午後2時29分
Page 208 of 398

Bluetooth® 2.0 interface (if so equipped) 5-146 Features and controls
5
1. Stop your vehicle in a safe area, put the gearshift lever in the “N” (Neutral) posi- tion (manual transaxle), or the selectorlever in the “P” (PARK) position (contin- uously variable transmission (CVT)), and pull the parking brake lever. 2. Press the SPEECH button (except for vehicles with Mitsubishi Multi-Commu- nication System) or PICK-UP button (forvehicles with Mitsubishi Multi-Commu- nication System). 3. Say “Pair Device.”
4. The voice guide will say “Start pairing procedure on the device. See the devicemanual for instructions.” and then willsay “The pairing code is
5. Enter in the Bluetooth
® device the 4-digit
number that has been read out in Step 4.
Pairing procedure- Type 2
(if so
equipped)NOTE
You cannot pair any Bluetooth
® device with
the Bluetooth
® 2.0 interface unless the vehi-
cle is parked. Before pairing a Bluetooth
®
device with the Bluetooth
® 2.0 interface,
confirm that the vehicle is parked in a safe location.
NOTE
The following procedure ( to ) can also be used instead of saying “Pair Device.” Replace this step 3 with the following proce- dure if you prefer. Say “Setup.” Say “Pairing Options.” The voice guide will say “Select one of the following: pair, edit, delete, or list.” Say “Pair.” voice guide will say “Maximum devicespaired” and then the system will end the pairing process. To register a new device, delete one device and then repeat the pairing process. (Refer to “Selecting a device: Deleting adevice” on page 5-147.)NOTE
Some Bluetooth
® devices require a specific
pairing code. Please refer to the device man- ual for pairing code requirements and read the next section “If your device requires a specific pairing code” on page 5-147 to setthe pairing code.
The pairing code entered here is only used for the Bluetooth
® connection certification.
Depending on the connection settings of the Bluetooth
® device, this code may have to be
entered each time you connect the Blue- tooth
® device to the Bluetooth
® 2.0 inter-
face. For the default connection settings,refer to the instructions for the device.NOTE
Depending on the Bluetooth
® device, it may
take a few minutes to pair it with the Blue- tooth
® 2.0 interface.
If the Bluetooth
® 2.0 interface cannot recog-
nize the Bluetooth
® device, the voice guide
will say “Pairing has timed out” and the pair- ing process will be cancelled. Confirm that the device you are pairing sup- ports Bluetooth
®, and try pairing it again.
NOTE
BK0229600US.book
146 ページ 2015年10月1日 木曜日 午後2時29分
Page 229 of 398

HomeLink® Wireless Control System (if so equipped)
Features and controls 5-167
5
4. Press the HomeLink
® button that was just
programmed and observe the indicatorlight. • If the indicator light continuously illumi- nates green, programming is completeand your device should operate when the HomeLink
® button is pressed and
released.• If the indicator light rapidly flashesgreen, firmly press, hold for 2 seconds and release the programmed HomeLink
®
button. Repeat the “press/hold/release” sequence a second time, and, depending on the brand of the garage door opener (or other rolling code equipped device),repeat this sequence a third time to com- plete the programming process. At this point if your device operates, program-ming is complete.
• If the device does not operate, continue with “Programming a new HomeLink
®”
steps 5 to 7 to complete the program- ming of a rolling code equipped device.
5. At the garage door opener receiver (motor-head unit) in the garage, locate the “Learn” or “Smart” button. This can usu-ally be found where the hanging antenna wire is attached to the motor-head unit (see the garage door opener manual toidentify the “Learn” button.)6. Firmly press and release the “Learn” or “Smart” button. (The name and color of the button may vary by manufacturer.)There are typically 30 seconds to initiate step 7. 7. Return to the vehicle and firmly press,hold for 2 seconds and release the pro- grammed HomeLink
® button. Repeat the
“press/hold/release” sequence a secondtime, and, depending on the brand of the garage door opener (or other rolling code equipped device), repeat this sequence athird time to complete the programming process. HomeLink
® should now activate your
rolling code equipped device.
N00584800034
Canadian radio-frequency laws require trans-mitter signals to “time-out” (or quit) after several seconds of transmission - which may not be long enough for HomeLink
® to pick
up the signal during programming. Similar tothis Canadian law, some U.S. gate operators are designed to “time-out” in the same man- ner.The indicator LED on the hand-held transmit- ter will go off when the device times out indi- cating that it has finished transmitting.If you live in Canada
or you are having diffi-
culties programming a gate operator or garage door opener by using the “Program-ming” procedures, replace “Programming a new HomeLink
®” step 3 with the following:
NOTE
Some devices may require you to replace this “Programming a new HomeLink
®” step 3
with procedures noted in the “Gate operator / Canadian programming” section. If the indi- cator light does not change to rapidly flash-ing green or continuously lit green after performing these steps, contact HomeLink
®
at www.homelink.com
NOTE
In the event that there are still programming difficulties or questions, additional Home- Link
® information and programming videos
can be found online at www.homelink.com, www.youtube.com/HomeLinkGentex, or by calling the HomeLink
® Hotline.
Gate operator/Canadian pro- gramming
BK0229600US.book
167 ページ 2015年10月1日 木曜日 午後2時29分
Page 248 of 398

Parking 6-6 Driving safety
6
On snowy roads, ice can form on the braking system, making the brakes less effective.While driving in such
conditions, pay close
attention to preceding and following vehicles and to the condition of
the road surface. From
time to time, lightly depress the brake pedal and check how effective the brakes are. It is important to take advantage of the engine braking by downshifting while driving on steep downhill roads in order to prevent the brakes from overheating.
N00629600304
When parking on a hill, set the parking brake,and turn the front wheels toward the curb on adownhill, or away from the curb on an uphill. If necessary, apply chocks to wheels.
Place the gearshift lever into the “R” (Reverse) position when parking on a down- hill slope, into the 1st position when parkingon an uphill slope. Be sure that the parking brake is firmly set when parked and that the selector lever is in the “P” (PARK) position. When parking on a hill, it is important to setthe parking brake before moving the selector lever to the “P” (PARK) position. This pre- vents loading the parking brake against thetransaxle. When this happens, it is difficult to move the selector lever out of the “P” (PARK) position. Never leave the engi
ne running while you
take a short sleep or rest. Also, never leave the engine running in a closed or poorly ven- tilated place.
Your front bumper can be damaged if you scrape it over curbs or parking stop blocks.Be careful when traveling up or down steep slopes where your bumper can scrape the road. More effort could be required to turn the steering wheel. Refer to “Electric power steering system (EPS)” on page 5-69.
When driving in cold weather When driving downhill Parking Parking on a hill
For vehicles equipped with man- ual transaxle For vehicles equipped with contin- uously variable transmission (CVT) Parking with the engine run- ning
WA R N I N G Leaving the engine running risks injury or death from accidentally moving the gear- shift lever (manual transaxle) or the selec- tor lever (CVT) or from the accumulation of toxic exhaust fumes in the passengercompartment.
Where you park
WA R N I N G Do not park your vehicle in areas where combustible materials such as dry grass or leaves can come in contact with a hotexhaust, since a fire could occur.
Do not keep the steering wheel fully turned for a long time
BK0229600US.bo
ok 6 ページ 2015年10月1日 木曜日 午後2時29分