2016 MITSUBISHI OUTLANDER tire type
[x] Cancel search: tire typePage 235 of 464
Indicator light, warning light, and information screen display list (multi information display - Type 1)
Features and controls 5-159
5
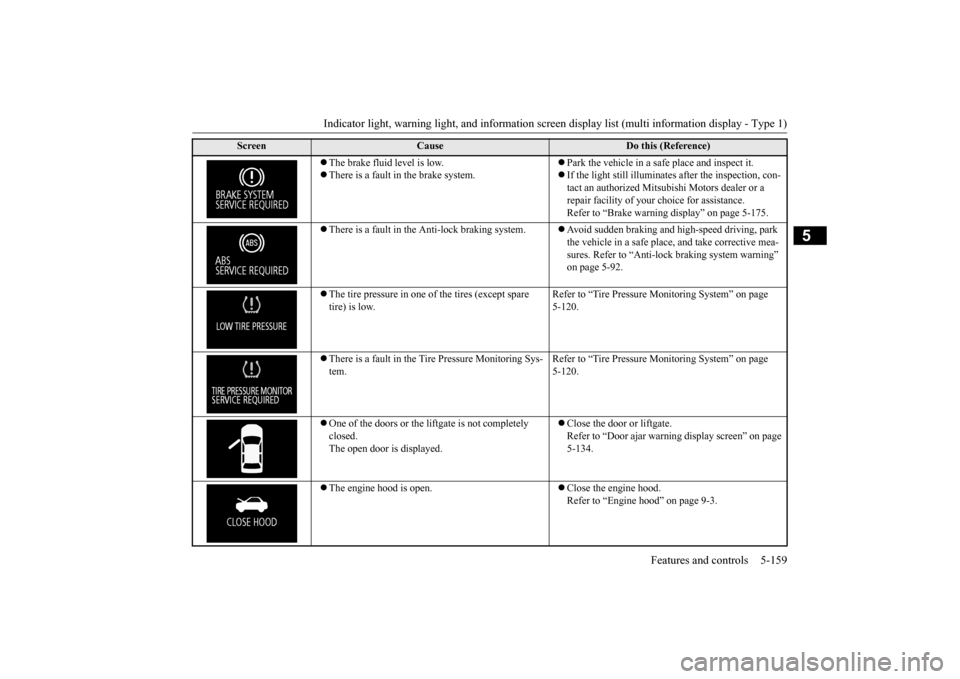
The brake fluid level is low. There is a fault in the brake system.
Park the vehicle in a sa
fe place and inspect it.
If the light still illuminates after the inspection, con- tact an authorized Mitsubishi Motors dealer or a repair facility of your
choice for assistance.
Refer to “Brake warning display” on page 5-175.
There is a fault in the Anti-lock braking system.
Avoid sudden braking and hi
gh-speed driving, park
the vehicle in a safe place, and take corrective mea- sures. Refer to “Anti-lock braking system warning” on page 5-92.
The tire pressure in one of the tires (except spare tire) is low.
Refer to “Tire Pressure
Monitoring System” on page
5-120.
There is a fault in the Tire Pressure Monitoring Sys- tem.
Refer to “Tire Pressure
Monitoring System” on page
5-120.
One of the doors or the liftgate is not completely closed. The open door is displayed.
Close the door or liftgate. Refer to “Door ajar warni
ng display screen” on page
5-134.
The engine hood is open.
Close the engine hood. Refer to “Engine hood” on page 9-3.
Screen
Cause
Do this (Reference)
BK0223400US.book 159 ページ 2015年2月13日 金曜日 午後12時15分
Page 248 of 464
Indicators 5-172 Features and controls
5
N00519900127 N00520000216
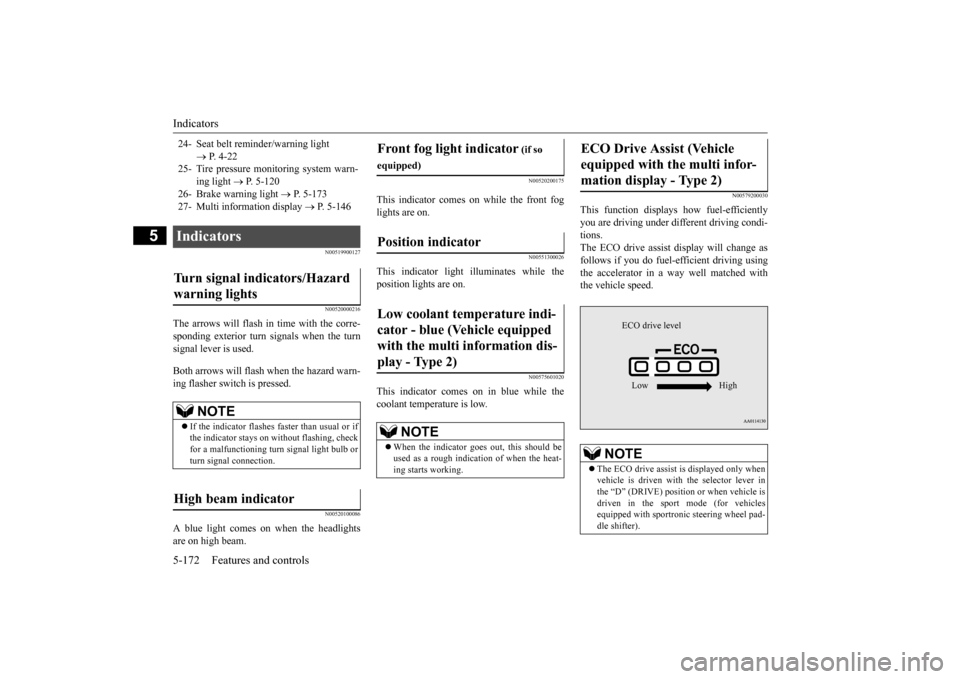
The arrows will flash in time with the corre- sponding exterior turn signals when the turnsignal lever is used. Both arrows will flash
when the hazard warn-
ing flasher swit
ch is pressed.
N00520100086
A blue light comes on when the headlights are on high beam.
N00520200175
This indicator comes on while the front foglights are on.
N00551300026
This indicator light illuminates while the position lights are on.
N00575601020
This indicator comes on in blue while thecoolant temperature is low.
N00579200030
This function displays
how fuel-efficiently
you are driving under different driving condi- tions. The ECO drive assist di
splay will change as
follows if you do fuel-efficient driving using the accelerator in a way well matched with the vehicle speed.
24- Seat belt remi
nder/warning light
P. 4-22
25- Tire pressure moni
toring system warn-
ing light
P. 5-120
26- Brake warning light
P. 5-173
27- Multi information display
P. 5-146
Indicators Turn signal indicators/Hazard warning lights
NOTE
If the indicator flashes faster than usual or if the indicator stays on wi
thout flashing, check
for a malfunctioning turn signal light bulb or turn signal connection.
High beam indicator
Front fog light indicator
(if so
equipped)Position indicator Low coolant temperature indi- cator - blue (Vehicle equipped with the multi information dis- play - Type 2)
NOTE
When the indicator goes out, this should be used as a rough indication of when the heat-ing starts working.
ECO Drive Assist (Vehicle equipped with the multi infor-mation display - Type 2)
NOTE
The ECO drive assist is displayed only when vehicle is driven with
the selector lever in
the “D” (DRIVE) positi
on or when vehicle is
driven in the sport mode (for vehicles equipped with sportroni
c steering wheel pad-
dle shifter).
ECO drive level Low High
BK0223400US.book 172 ページ 2015年2月13日 金曜日 午後12時15分
Page 314 of 464
Driving precaution 6-2 Driving safety
6
N00629300053
Utility vehicles have
higher ground clearance
and a narrower track, which enables them to perform in a wide variety of off-road situa-tions. Because of the higher ground clear- ance, these vehicles have a higher center of gravity, which makes them handle differentlythan ordinary vehicles when driving on pave- ment. They are not designed to maneuver or corner at the same speed on pavement as con-ventional 2-wheel driv
e passenger cars any
more than low-slung sports cars are designed to perform sati
sfactorily in off-road condi-
tions. Always drive safely and steer the vehicle carefully. Avoid operati
ng the vehicle in a
manner that might require sharp turns or abrupt maneuvers. As w
ith other vehicles of
this type, failure to ope
rate this vehicle cor-
rectly can result in loss of control or vehicle rollover. In a rollover crash, an unbelted person is sig-nificantly more likely to die than a person wearing a seat belt. Be
fore starting the vehi-
cle, always make cert
ain that you and all your
passengers are properly wearing their seatbelts (with children in the rear seat, in appro- priate restraints).
N00628801191
Fuel economy is depe
ndent on many factors.
Your personal driving habits can have a sig- nificant effect on your fuel consumption. Several recommendations
for achieving the
greatest fuel economy are listed below. Whenever accelerating from a stop, always accelerate
slowly and smoothly.
When parked for even a short period, do not idle the engine. Shut it off. Plan your trips to avoid unnecessary stops. Keep your tires inflated to the recom- mended pressures. When driving a 4-wheel drive vehicle on highways or dry improved roads, set thedrive mode to “4WD ECO” or “4WD AUTO” (Electronically controlled 4WD), or “AWC ECO” or “NORMAL” (S-AW C ) . For freeway driving, maintain a speed of approximately 50 mph (80 km/h) whentraffic, roadway and weather conditions safely permit.
Keep your air filter clean and your vehicle lubricated according
to the recommenda-
tions in this manual. Always keep your ve
hicle well main-
tained. A poorly maintained enginewastes fuel and costs money. Never overload your vehicle.
N00628900049
Drunk driving is one of the most frequent causes of accidents.Your driving ability ca
n be seriously impaired
even with blood alcohol levels far below the legal minimum. If you
have been drinking,
don’t drive. Ride with a designated non- drinking driver, call a cab or a friend, or use public transportation. Drinking coffee or tak-ing a cold shower will not make you sober. Similarly, prescription and nonprescription drugs affect your aler
tness, perception and
reaction time. Consul
t with your doctor or
pharmacist before dr
iving while under the
influence of any of these medications.
Driving precaution
WA R N I N G Utility vehicles have
a significantly higher
rollover rate than othe
r types of vehicles.
Avoid abrupt maneuvers and excessive speed. Always buckle up.
Fuel economy
Driving, alcohol and drugs
WA R N I N G NEVER DRINK AND DRIVE. Your perceptions ar
e less accurate, your
reflexes are slower and your judgment isimpaired.
BK0223400US.book 2 ページ 2015年2月13日 金曜日 午後12時15分
Page 326 of 464
Trailer towing 6-14 Driving safety
6
Trailer lights and equipment must comply with federal, state,
and local regulations.
Check with your loca
l recreational vehicle
dealer for the requirements in your area, and use only equipment designed for your vehi- cle. Since lighting and wiring
vary by trailer type
and brand, you should have a qualified tech- nician install a suitable connector between thevehicle and the trailer.
Improper equipment or
installation can cause da
mage to your vehi-
cle’s electrical system
and affect your vehicle
warranty. Many states and Canadi
an provinces require
special outside mirrors when towing a trailer. Even if not required,
you should install spe-
cial mirrors if you ca
nnot clearly see behind
you, or if the trailer
creates a blind spot.
Ask your trailer sales or
rental agency if any
other items are recomm
ended or required for
your towing situation.
Towing a trailer requires a certain amount of experience. Before setting out for the open road, you’ll want to get to know your trailer. Acquaint
yourself with the feel of handling and braking with the added weight of the trailer. Alwayskeep in mind that the vehicle you are driving is now a good deal longer and not nearly as responsive as your vehicl
e is without a trailer.
Before you start, check the trailer hitch, safety chains, tires
and mirror adjustment.
Be sure your vehicle’s ti
res are inflated to the
cold inflation pressure listed in the manual. You’ll find these numbe
rs on the tire and
loading information placard at the sill of thedriver’s door. Refer to “Tire inflati
on pressures” on page
9-18. Stay at least twice as far behind the vehicle ahead as you would when driving your vehi- cle without a trailer.
This can help you avoid
situations that require
heavy braking and sud-
den turns.
Trailer lights Additional trailer equipment
Operating hints
WA R N I N G If you have a rear window open and you tow a trailer with
your vehicle, carbon
monoxide gas which
you cannot see or
smell could come into your vehicle. It can cause unconsciousness or death. Refer to“Exhaust system” on page 9-24. To maximize your safe
ty when towing a
trailer: Have your exhaust system inspected for leaks, and make necessary repairs beforestarting on your trip. Keep the rear windows closed.If exhaust does come into your vehicle through a window or
another opening,
drive with your front, main heating or cooling system on an
d with the blower on
any speed. This will
bring fresh, outside
air into your vehicle. Do not use recircula- tion because it only recirculates the air inside your vehicle. Refer to “Air selectionswitch” on page 7-9.
Driver preparation
Vehicle preparation Tire Following distance
BK0223400US.book 14 ページ 2015年2月13日 金曜日 午後12時15分
Page 342 of 464
Important air condit
ioning operating tips
7-14 Comfort controls
7
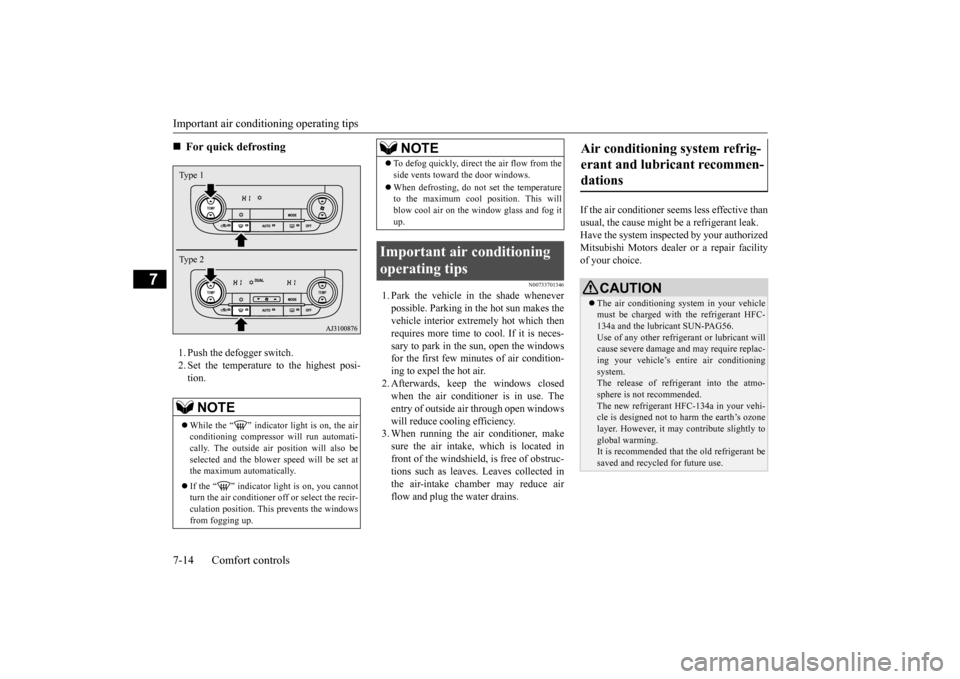
1. Push the defogger switch. 2. Set the temperature to the highest posi- tion.
N00733701346
1. Park the vehicle in the shade whenever possible. Parking in the hot sun makes thevehicle interior extremely hot which then requires more time to cool. If it is neces- sary to park in the sun, open the windowsfor the first few minutes of air condition- ing to expel the hot air. 2. Afterwards, keep the windows closedwhen the air conditioner is in use. The entry of outside air through open windows will reduce cooling efficiency.3. When running the air conditioner, make sure the air intake, which is located in front of the windshield,
is free of obstruc-
tions such as leaves. Leaves collected in the air-intake chamber may reduce air flow and plug the water drains.
If the air conditioner seem
s less effective than
usual, the cause might
be a refrigerant leak.
Have the system inspected by your authorized Mitsubishi Motors dealer
or a repair facility
of your choice.
For quick defrosting NOTE
While the “ ” indicator light is on, the air conditioning compressor
will run automati-
cally. The outside ai
r position will also be
selected and the blower
speed will be set at
the maximum au
tomatically.
If the “ ” indicator light is on, you cannot turn the air conditioner off or select the recir- culation position. This prevents the windows from fogging up.Type 1 Type 2
To defog quickly, direct the air flow from the side vents toward the door windows. When defrosting, do not set the temperature to the maximum cool position. This will blow cool air on the window glass and fog itup.
Important air conditioning operating tips
NOTE
Air conditioning system refrig- erant and lubricant recommen-dations
CAUTION The air conditioning system in your vehicle must be charged with the refrigerant HFC-134a and the lubricant SUN-PAG56. Use of any other refrige
rant or lubricant will
cause severe da
mage and may re
quire replac-
ing your vehicle’s entire air conditioning system. The release of refrigerant into the atmo-sphere is not recommended. The new refrigerant HFC-134a in your vehi- cle is designed not to harm the earth’s ozonelayer. However, it ma
y contribute slightly to
global warming. It is recommended that the old refrigerant besaved and recycled for future use.
BK0223400US.book 14 ページ 2015年2月13日 金曜日 午後12時15分
Page 344 of 464
AM/FM radio/CD player (if so equipped) 7-16 Comfort controls
7
N00715200023
If the product becomes dirty, wipe with a soft cloth. If very dirty, use a soft cloth dipped in neutral detergent diluted in water, and then wrung out. Do not use benzene, thin- ners, or other chemic
al wipes. This may
harm the surface.
N00715300053
Product names and other proper names are the trademarks or registered trade- marks of their respective owners. Furthermore, even if there is no specific denotation of trademarks or registered trademarks, these are to be observed intheir entirety. “Made for iPod”, “Made for iPhone” mean that an electronic accessory has been designed to connect specifically to iPod or iPhone, respec
tively, and has been
certified by the devel
oper to meet Apple
performance standards. iPhone, iPod, iPod clas
sic, iPod nano, and
iPod touch are trademarks of Apple Inc., registered in the U.S. and other countries.
Apple is not responsible for the operation of this device or its compliance withsafety and regulatory standards.
How to Clean
Trademarks
NOTE
iPod and iTunes licensi
ng allows individual
users to privately re
produce and play back
non- copyrighted material
as well as material
that may be legally copied and reproduced. Infringement of copyr
ight is prohibited.
For vehicles w
ith a Bluetooth
® 2.0 interface,
the types of devices
that can be connected
may vary.[For vehicles sold in U.S.A.] For details, access the Mitsubishi Motors North America website.[For vehicles sold in Canada and Mexico] For details, access the Mitsubishi Motors website. Please read and agree to the “Warn-ing about Links to the Web Sites of OtherCompanies”. The webs
ites mentioned above
may connect you to websites other than the Mitsubishi Motors website.http://www.mitsubishi-motors.com/en/prod- ucts/index.html
BK0223400US.book 16 ページ 2015年2月13日 金曜日 午後12時15分
Page 392 of 464
How to change a tire 8-10 For emergencies
8
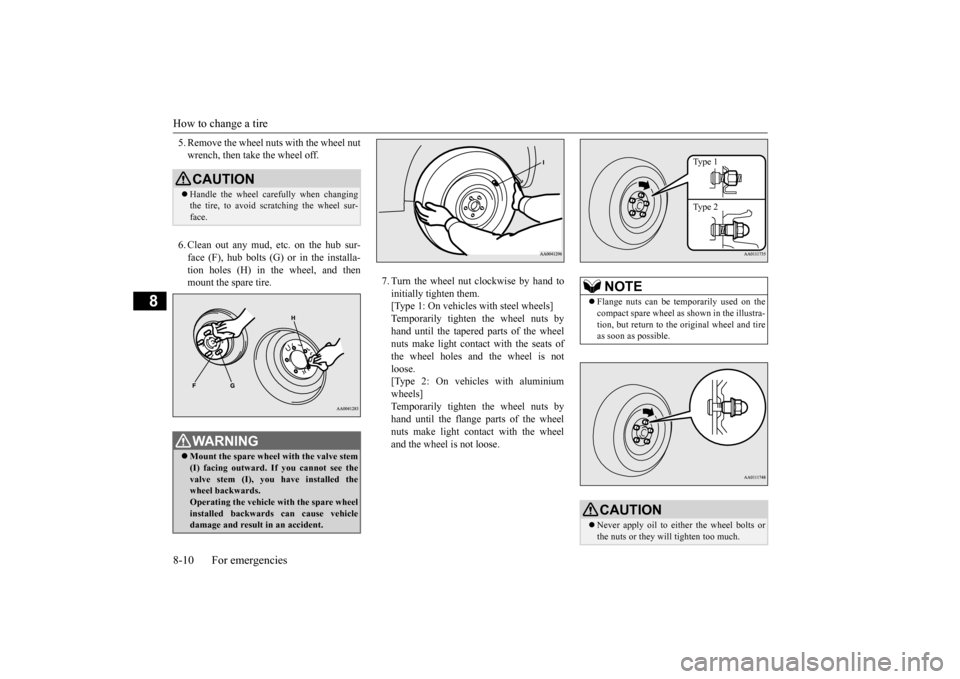
5. Remove the wheel nuts with the wheel nut wrench, then take the wheel off. 6. Clean out any mud, etc. on the hub sur- face (F), hub bolts (G)
or in the installa-
tion holes (H) in the wheel, and then mount the spare tire.
7. Turn the wheel nut clockwise by hand to initially tighten them. [Type 1: On vehicles
with steel wheels]
Temporarily tighten the wheel nuts by hand until the tapered parts of the wheel nuts make light contac
t with the seats of
the wheel holes and the wheel is not loose. [Type 2: On vehicles with aluminiumwheels] Temporarily tighten the wheel nuts by hand until the flange parts of the wheelnuts make light cont
act with the wheel
and the wheel is not loose.
CAUTION Handle the wheel carefully when changing the tire, to avoid scratching the wheel sur- face.WA R N I N G Mount the spare wheel with the valve stem (I) facing outward. If
you cannot see the
valve stem (I), you
have installed the
wheel backwards.Operating the vehicle with the spare wheel installed backwards can cause vehicle damage and result
in an ac
cident.
NOTE
Flange nuts can be te
mporarily used on the
compact spare wheel as shown in the illustra- tion, but return to the original wheel and tire as soon as possible.CAUTION Never apply oil to either the wheel bolts or the nuts or they will tighten too much.
Type 1 Type 2
BK0223400US.book 10 ページ 2015年2月13日 金曜日 午後12時15分
Page 393 of 464
How to change a tire
For emergencies 8-11
8
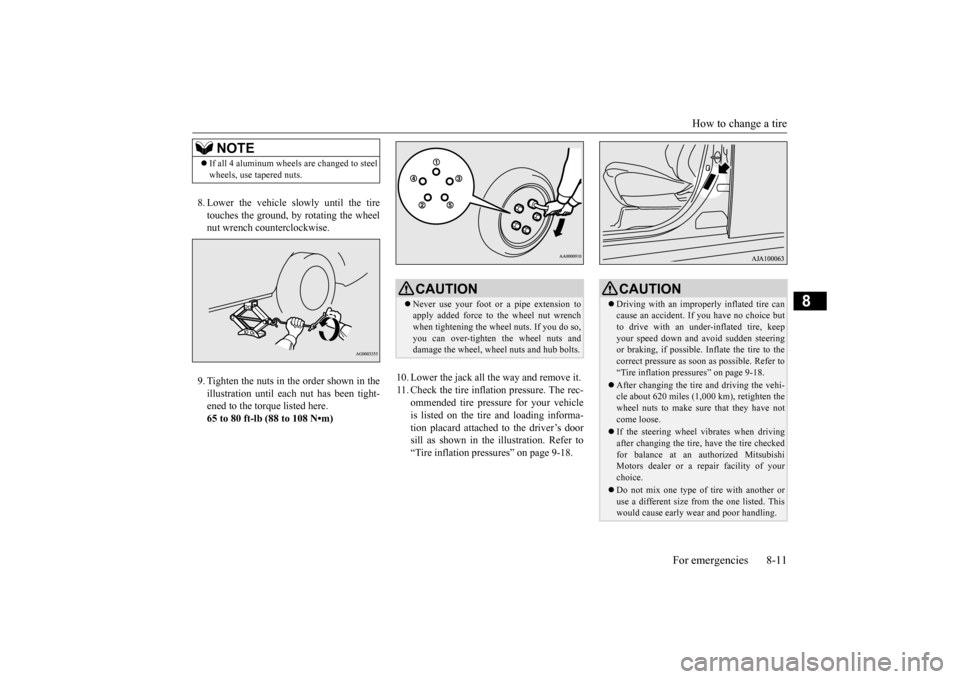
8. Lower the vehicle slowly until the tire touches the ground, by rotating the wheel nut wrench counterclockwise. 9. Tighten the nuts in the order shown in the illustration until each
nut has been tight-
ened to the torque listed here.65 to 80 ft-lb (88 to 108 N•m)
10. Lower the jack all the way and remove it. 11. Check the tire inflation pressure. The rec-
ommended tire pressure for your vehicleis listed on the tire
and loading informa-
tion placard attached to the driver’s door sill as shown in the illustration. Refer to“Tire inflation pressures” on page 9-18.
NOTE
If all 4 aluminum wheels are changed to steel wheels, use tapered nuts.
CAUTION Never use your foot or a pipe extension to apply added force to the wheel nut wrenchwhen tightening the wheel nuts. If you do so, you can over-tighten the wheel nuts and damage the wheel, wheel nuts and hub bolts.
CAUTION Driving with an imprope
rly inflated tire can
cause an accident. If
you have no choice but
to drive with an under-inflated tire, keep your speed down and avoid sudden steering or braking, if possible. Inflate the tire to thecorrect pressure as s
oon as possible. Refer to
“Tire inflation pressures” on page 9-18. After changing the tire
and driving the vehi-
cle about 620 miles (1,000 km), retighten the wheel nuts to make sure
that they have not
come loose. If the steering wheel vibrates when driving after changing the tire, have the tire checked for balance at an authorized Mitsubishi Motors dealer or a repair facility of yourchoice. Do not mix one type of tire with another or use a different size from the one listed. This would cause ea
rly wear and poor handling.
BK0223400US.book 11 ページ 2015年2月13日 金曜日 午後12時15分