2016 MITSUBISHI OUTLANDER change wheel
[x] Cancel search: change wheelPage 215 of 464
Multi Information display - Type 1
Features and controls 5-139
5
N00578600024
While driving, the momentary fuel consump- tion is shown with a bar graph. The “ ” mark in the momentary fuel gauge shows the average fuel consumption. When the momentary fuel consumption sur- passes the average fuel consumption, themomentary fuel consum
ption is displayed
with a green bar graph. Be conscious of maintaining the momentaryfuel consumption above the average fuel con- sumption, it can help you drive with the better fuel consumption.
N00568701032
This indicator will be displayed when fuel-efficient driving is achieved.
N00578700038
This function displays
how fuel-efficiently
you are driving under different driving condi- tions. The ECO drive assist di
splay will change as
follows if you do fuel-efficient driving using the accelerator in a way well matched with the vehicle speed.
N00578800026
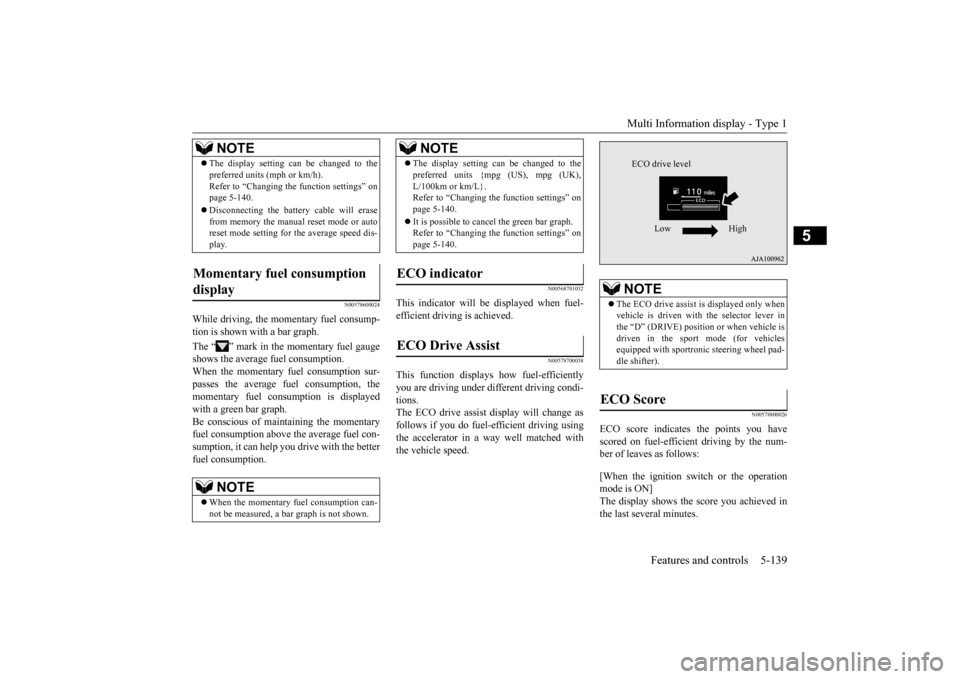
ECO score indicates the points you have scored on fuel-efficient driving by the num- ber of leaves as follows: [When the ignition switch or the operation mode is ON] The display shows the score you achieved in the last several minutes.
The display setting ca
n be changed to the
preferred units (mph or km/h).Refer to “Changing the
function settings” on
page 5-140. Disconnecting the batter
y cable wi
ll erase
from memory the manual reset mode or auto reset mode setting for
the average speed dis-
play.
Momentary fuel consumption display
NOTE
When the momentary fuel consumption can- not be measured, a ba
r graph is not shown.
NOTE
The display setting ca
n be changed to the
preferred units {mpg
(US), mpg (UK),
L/100km or km/L}.Refer to “Changing th
e function settings” on
page 5-140. It is possible to canc
el the green bar graph.
Refer to “Changing th
e function settings” on
page 5-140.
ECO indicator ECO Drive Assist
NOTE
NOTE
The ECO drive assist is displayed only when vehicle is driven with the selector lever inthe “D” (DRIVE) positi
on or when vehicle is
driven in the sport mode (for vehicles equipped with sportroni
c steering wheel pad-
dle shifter).
ECO Score
ECO drive level
Low High
BK0223400US.book 139 ページ 2015年2月13日 金曜日 午後12時15分
Page 248 of 464
Indicators 5-172 Features and controls
5
N00519900127 N00520000216
The arrows will flash in time with the corre- sponding exterior turn signals when the turnsignal lever is used. Both arrows will flash
when the hazard warn-
ing flasher swit
ch is pressed.
N00520100086
A blue light comes on when the headlights are on high beam.
N00520200175
This indicator comes on while the front foglights are on.
N00551300026
This indicator light illuminates while the position lights are on.
N00575601020
This indicator comes on in blue while thecoolant temperature is low.
N00579200030
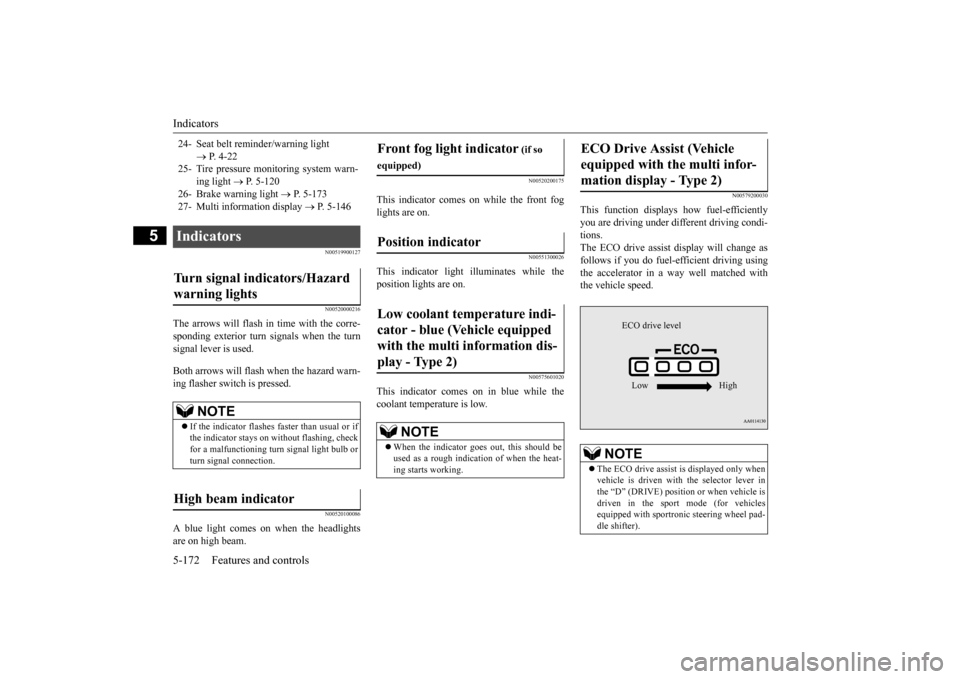
This function displays
how fuel-efficiently
you are driving under different driving condi- tions. The ECO drive assist di
splay will change as
follows if you do fuel-efficient driving using the accelerator in a way well matched with the vehicle speed.
24- Seat belt remi
nder/warning light
P. 4-22
25- Tire pressure moni
toring system warn-
ing light
P. 5-120
26- Brake warning light
P. 5-173
27- Multi information display
P. 5-146
Indicators Turn signal indicators/Hazard warning lights
NOTE
If the indicator flashes faster than usual or if the indicator stays on wi
thout flashing, check
for a malfunctioning turn signal light bulb or turn signal connection.
High beam indicator
Front fog light indicator
(if so
equipped)Position indicator Low coolant temperature indi- cator - blue (Vehicle equipped with the multi information dis- play - Type 2)
NOTE
When the indicator goes out, this should be used as a rough indication of when the heat-ing starts working.
ECO Drive Assist (Vehicle equipped with the multi infor-mation display - Type 2)
NOTE
The ECO drive assist is displayed only when vehicle is driven with
the selector lever in
the “D” (DRIVE) positi
on or when vehicle is
driven in the sport mode (for vehicles equipped with sportroni
c steering wheel pad-
dle shifter).
ECO drive level Low High
BK0223400US.book 172 ページ 2015年2月13日 金曜日 午後12時15分
Page 259 of 464
Turn signal lever
Features and controls 5-183
5
N00522601529
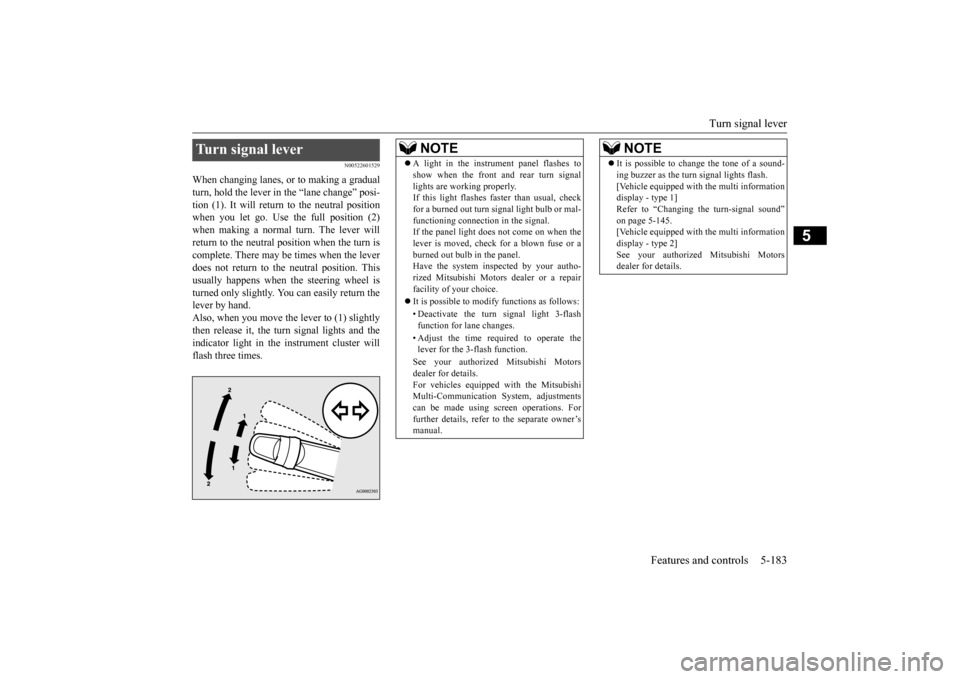
When changing lanes, or to making a gradual turn, hold the lever in the “lane change” posi- tion (1). It will return to the neutral positionwhen you let go. Use the full position (2) when making a normal turn. The lever will return to the neutral position when the turn iscomplete. There may be times when the lever does not return to th
e neutral position. This
usually happens when
the steering wheel is
turned only slightly. You
can easily return the
lever by hand.Also, when you move the lever to (1) slightly then release it, the turn signal lights and the indicator light in the instrument cluster willflash three times.Turn signal lever
NOTE
A light in the instrument panel flashes to show when the front and rear turn signallights are working properly.If this light flashes fast
er than usual, check
for a burned out turn signal light bulb or mal- functioning connecti
on in the signal.
If the panel light does not come on when the lever is moved, check
for a blown fuse or a
burned out bulb in the panel.Have the system inspected by your autho- rized Mitsubishi Motors
dealer or a repair
facility of your choice. It is possible to modify functions as follows: • Deactivate the turn signal light 3-flash function for lane changes. • Adjust the time required to operate the lever for the 3-flash function. See your authorized Mitsubishi Motors dealer for details. For vehicles equipped
with the Mitsubishi
Multi-Communication System, adjustments can be made using sc
reen operations. For
further details, refer to the separate owner’smanual.
It is possible to change the tone of a sound- ing buzzer as the turn signal lights flash.[Vehicle equipped with the multi informationdisplay - type 1] Refer to “Changing the turn-signal sound” on page 5-145.[Vehicle equipped with the multi information display - type 2] See your authorized Mitsubishi Motorsdealer for details.NOTE
BK0223400US.book 183 ページ 2015年2月13日 金曜日 午後12時15分
Page 267 of 464
Horn switch
Features and controls 5-191
5
After about 15 to 20 minutes of operation, the system will shut off automatically.To switch the defogger OFF before 15 to 20 minutes have passed, pr
ess the switch again.
The indicator light will go out and the defog-ger will turn off. If you need the defogger for more than 15 to 20 minutes, press the switch again. This willadd 15 to 20 more minutes.
N00523801195
To honk the horn, press around the “ ” markon the steering wheel.
CAUTION The rear window defogge
r is not designed to
melt snow. Remove
any snow manually
before using the rear window defogger. Use the rear window de
fogger only after the
engine has started and
is running. Be sure to
turn the defogger swit
ch off immediately
after the window is cl
ear to save on battery
power.
Do not place stickers
, tape, or other items
that are attached with
adhesive over the grid
wires on the rear window. When cleaning the insi
de rear window, use a
soft cloth and wipe lightly over the gridwires.NOTE
If your vehicle is equi
pped with door mirror
heater, mist can also be removed from the outside rearview mirrors
when the rear win-
dow defogger switch is pressed. (Refer to“Door mirror heater” on page 5-59.) On vehicles equipped wi
th the wiper deicer,
when the rear window defogger switch is pushed, the windshield becomes warm and the wipers become operable. (Refer to“Wiper deicer switch” on page 5-190.)CAUTION
It is possible to change the setting to make the rear window defogger operate automati-cally when ambient temperature becomeslow while the engine is running, even if you do not push the rear window defogger switch.It operates automati
cally only once after
turning the ignition sw
itch to the “ON” posi-
tion or putting the ope
ration mode in ON.
If you choose this setting, the door mirror heater (if so equipped)
and wiper deicer (if
so equipped) will also
operate automatically
at the same time. For further informati
on, please contact your
authorized Mitsubish
i Motors dealer.
On vehicles equipped
with Mitsubishi Multi-
Communication System
, screen operations
can be used to make the adjustment.Refer to the separate owner’s manual for details.
Horn switch
NOTE
BK0223400US.book 191 ページ 2015年2月13日 金曜日 午後12時15分
Page 283 of 464

Bluetooth® 2.0 interface (if so equipped)
Features and controls 5-207
5
You can redial the last
number called, based
on the history of dialed calls in the paired cel-lular phone. Use the following procedure to redial. 1. Press the SPEECH button (except for vehicles with Mitsubishi Multi-Commu- nication System) or PICK-UP button (forvehicles with Mitsubishi Multi-Commu- nication System). 2. Say “Redial.”
N00565700018
During a call, press the SPEECH button toenter voice recognitio
n mode, then say
“
a call you need to sim-
ulate the pressing of a phone button as a
response to an automated system, press the SPEECH button and speak “1 2 3 4 poundsend” and the 1234# will be sent via your cel- lular phone.
N00565801045
If an incoming phone call is received whilethe ignition switch or
the operation mode is in
ON or ACC, the audio sy
stem will be auto-
matically turned on and switched to the incoming call, even when the audio systemwas originally off. The voice guide a
nnouncement for the
incoming call will be output from the frontpassenger’s seat speaker. If the CD player or radio was playing when the incoming call was received, the audio sys-tem will mute the sound from the CD player or radio and output onl
y the incoming call.
To receive the call, press the PICK-UP buttonon the steering wheel control switch. When the call is over, the audio system will return to its previous state.
N00565900010
At any time during a ca
ll, you can mute the
vehicle microphone.
Pressing the SPEECH button and then saying “Mute” during a call will turn ON the mutefunction and mute the microphone. Saying “Mute off” in the same way will turn off the mute function and cancel the mute onthe microphone.
N00566600014
The Bluetooth
® 2.0 interface can switch
between hands-free m
ode (hands-free calls)
and private mode (calls
using cellular phone).
If you press the SPEECH button and say“Transfer call” duri
ng a hands-free call, you
can stop the hands-free m
ode and talk in pri-
vate mode. To return to hands-free mode, press the SPEECH button again and say “Transfer call.”
N00566000018
The Bluetooth
® 2.0 interface has 2 types of
unique phonebooks that are different from thephonebook stored in the cellular phone. They are the vehicle phonebook and the mobile phonebook.
NOTE
When the confirmation function is on, the system will check if
the name and location of
the receiver are correct. If the name is cor-rect, answer “Yes.” To change the name
or location to call,
answer “No.” The system will return to Step3.
RedialingSend function
Receiving calls
Mute function
Switching between hands-free mode and private mode
Phonebook function
BK0223400US.book 207 ページ 2015年2月13日 金曜日 午後12時15分
Page 388 of 464
How to change a tire 8-6 For emergencies
8
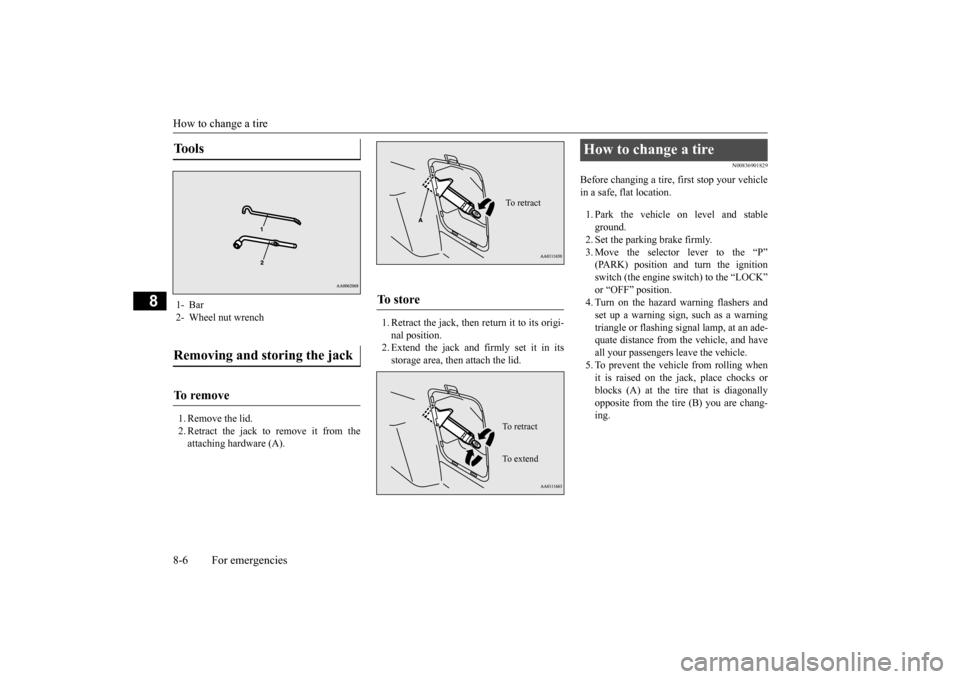
1. Remove the lid. 2. Retract the jack to remove it from theattaching hardware (A).
1. Retract the jack, then return it to its origi- nal position.2. Extend the jack and firmly set it in its storage area, then attach the lid.
N00836901829
Before changing a tire, first stop your vehiclein a safe, flat location. 1. Park the vehicle on level and stable ground.2. Set the parking brake firmly. 3. Move the selector
lever to the “P”
(PARK) position and turn the ignition switch (the engine switch) to the “LOCK” or “OFF” position.4. Turn on the hazard warning flashers and set up a warning sign, such as a warning triangle or flashing signal lamp, at an ade-quate distance from the vehicle, and have all your passengers leave the vehicle. 5. To prevent the vehicle from rolling whenit is raised on the jack, place chocks or blocks (A) at the ti
re that is diagonally
opposite from the tire (B) you are chang-ing.
Tools 1- Bar 2- Wheel nut wrenchRemoving and storing the jack To r e m o v e
To s t o r e
To retractTo r e t r a c t To e x t e n d
How to change a tire
BK0223400US.book 6 ページ 2015年2月13日 金曜日 午後12時15分
Page 389 of 464
How to change a tire
For emergencies 8-7
8
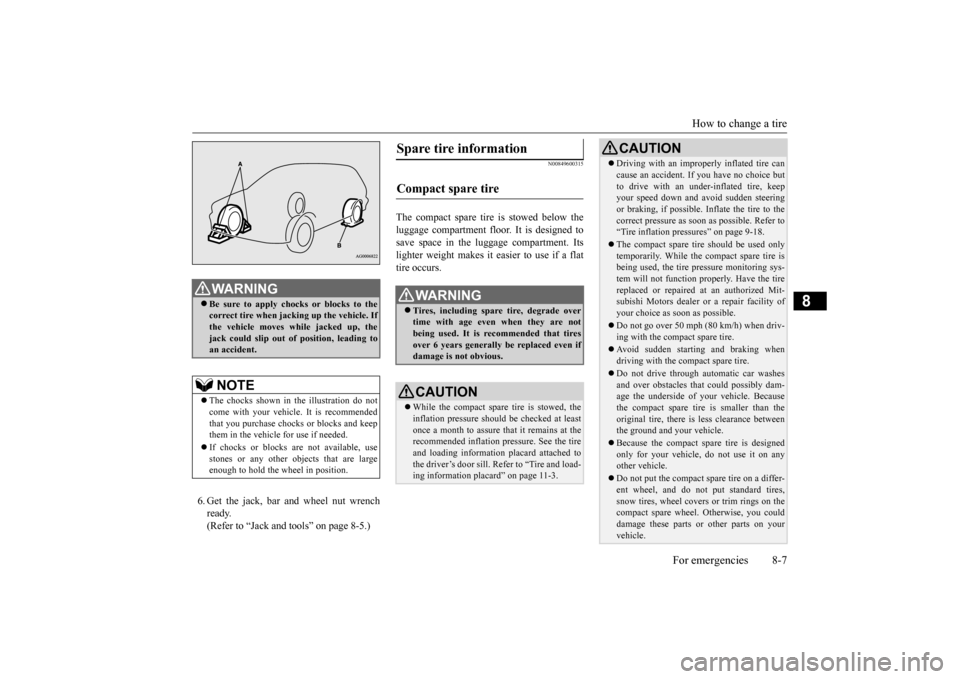
6. Get the jack, bar and wheel nut wrench ready.(Refer to “Jack and t
ools” on page 8-5.)
N00849600315
The compact spare tire is stowed below the luggage compartment fl
oor. It is designed to
save space in the luggage compartment. Itslighter weight makes it easier to use if a flat tire occurs.
WA R N I N G Be sure to apply choc
ks or blocks to the
correct tire when jacking up the vehicle. Ifthe vehicle moves while jacked up, the jack could slip out of
position, leading to
an accident.NOTE
The chocks shown in the illustration do not come with your vehicl
e. It is recommended
that you purchase chocks or blocks and keep them in the vehicle for use if needed. If chocks or blocks
are not available, use
stones or any other obj
ects that are large
enough to hold the wheel in position.
Spare tire information Compact spare tire
WA R N I N G Tires, including spar
e tire, degrade over
time with age even when they are not being used. It is recommended that tiresover 6 years generally
be replaced even if
damage is not obvious.CAUTION While the compact spare tire is stowed, the inflation pressure shoul
d be checked at least
once a month to assure that it remains at the recommended inflation pressure. See the tire and loading informati
on placard attached to
the driver’s door sill. Refer to “Tire and load-ing information placard” on page 11-3.
Driving with an imprope
rly inflated tire can
cause an accident. If
you have no choice but
to drive with an under-inflated tire, keepyour speed down and avoid sudden steering or braking, if possible. Inflate the tire to the correct pressure as s
oon as possible. Refer to
“Tire inflation pressures” on page 9-18. The compact spare tire should be used only temporarily. While the compact spare tire is being used, the tire pr
essure monitoring sys-
tem will not function pr
operly. Have the tire
replaced or repaired at an authorized Mit- subishi Motors dealer or
a repair facility of
your choice as soon as possible. Do not go over 50 mph (80 km/h) when driv- ing with the compact spare tire. Avoid sudden starting and braking when driving with the compact spare tire. Do not drive through automatic car washes and over obstacles that
could possibly dam-
age the underside of your vehicle. Because the compact spare tire is smaller than the original tire, there is less clearance betweenthe ground and your vehicle. Because the compact spare tire is designed only for your vehicle, do not use it on any other vehicle. Do not put the compact spare tire on a differ- ent wheel, and do not put standard tires, snow tires, wheel covers
or trim rings on the
compact spare wheel. Otherwise, you could damage these parts or other parts on your vehicle.CAUTION
BK0223400US.book 7 ページ 2015年2月13日 金曜日 午後12時15分
Page 390 of 464
How to change a tire 8-8 For emergencies
8
N00849701296
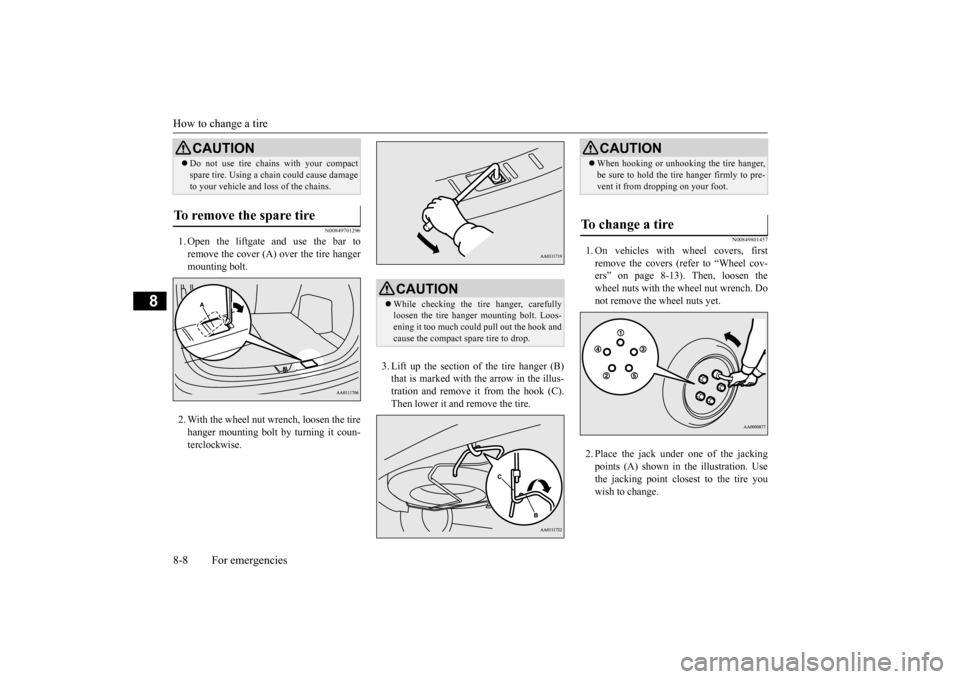
1. Open the liftgate and use the bar to remove the cover (A)
over the tire hanger
mounting bolt. 2. With the wheel nut wrench, loosen the tire hanger mounting bolt by turning it coun- terclockwise.
3. Lift up the section of the tire hanger (B) that is marked with the arrow in the illus-tration and remove it from the hook (C). Then lower it and remove the tire.
N00849801457
1. On vehicles with
wheel covers, first
remove the covers (re
fer to “Wheel cov-
ers” on page 8-13). Then, loosen thewheel nuts with the wheel nut wrench. Do not remove the wheel nuts yet. 2. Place the jack under one of the jacking points (A) shown in the illustration. Use the jacking point closest to the tire you wish to change.
Do not use tire chains with your compact spare tire. Using a ch
ain could cause damage
to your vehicle and loss of the chains.
To remove the spare tire
CAUTION
CAUTION While checking the tir
e hanger, carefully
loosen the tire hanger mounting bolt. Loos-ening it too much could pull out the hook and cause the compact spare tire to drop.
CAUTION When hooking or unhooking the tire hanger, be sure to hold the tire hanger firmly to pre-vent it from dropping on your foot.
To change a tire
BK0223400US.book 8 ページ 2015年2月13日 金曜日 午後12時15分