2016 MITSUBISHI OUTLANDER Back seats
[x] Cancel search: Back seatsPage 55 of 464
Child restraint systems
Seat and restraint systems 4-29
4
N00418801167
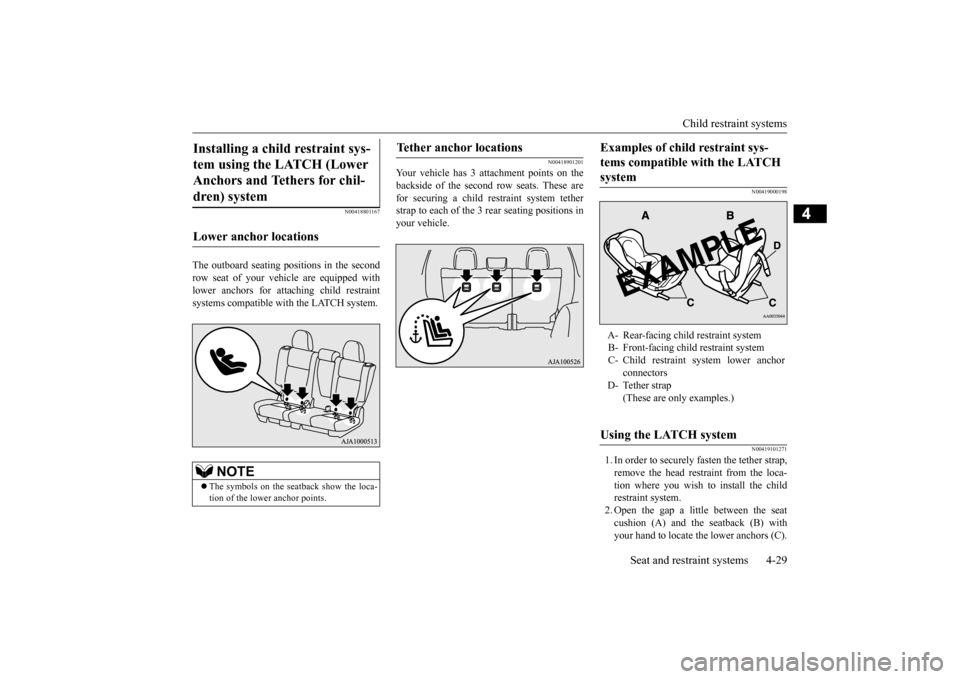
The outboard seating
positions in the second
row seat of your vehicle are equipped with lower anchors for atta
ching child restraint
systems compatible with the LATCH system.
N00418901201
Your vehicle has 3 attachment points on thebackside of the second row seats. These are for securing a child restraint system tetherstrap to each of the 3
rear seating positions in
your vehicle.
N00419000198 N00419101271
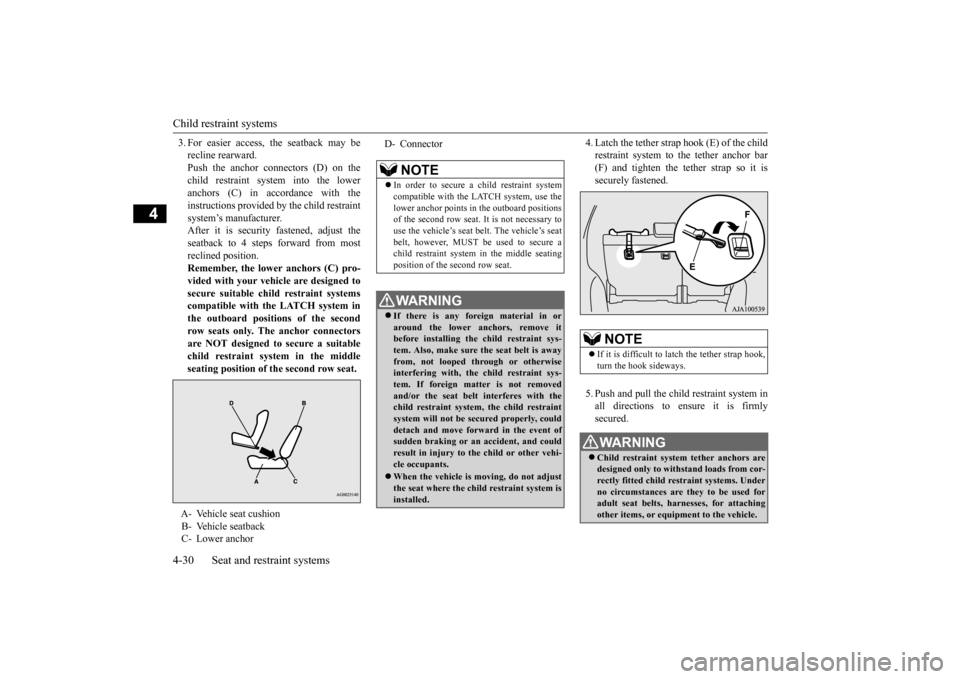
1. In order to securely fasten the tether strap, remove the head restraint from the loca- tion where you wish to install the child restraint system.2. Open the gap a little between the seat cushion (A) and the seatback (B) with your hand to locate the lower anchors (C).
Installing a child restraint sys- tem using the LATCH (Lower Anchors and Tethers for chil- dren) system Lower anchor locations
NOTE
The symbols on the seatback show the loca- tion of the lower anchor points.
Tether anchor locations
Examples of child restraint sys- tems compatible with the LATCH system A- Rear-facing child
restraint system
B- Front-facing child restraint system C- Child restraint system lower anchor
connectors
D- Tether strap
(These are only examples.)
Using the LATCH system
BK0223400US.book 29 ページ 2015年2月13日 金曜日 午後12時15分
Page 56 of 464
Child restraint systems 4-30 Seat and restraint systems
4
3. For easier access, the seatback may be recline rearward.Push the anchor connectors (D) on the child restraint system into the lower anchors (C) in accordance with theinstructions provided by
the child restraint
system’s manufacturer. After it is security fastened, adjust theseatback to 4 steps forward from most reclined position. Remember, the lower anchors (C) pro- vided with your vehi
cle are designed to
secure suitable child restraint systemscompatible with the LATCH system in the outboard positions of the second row seats only. The anchor connectorsare NOT designed to
secure a suitable
child restraint system in the middle seating position of the second row seat.
4. Latch the tether strap hook (E) of the child restraint system to the tether anchor bar(F) and tighten the tether strap so it is securely fastened. 5. Push and pull the child restraint system in all directions to ensure it is firmlysecured.
A- Vehicle seat cushion B- Vehicle seatback C- Lower anchor
D- Connector
NOTE
In order to secure a child restraint system compatible with the LATCH system, use thelower anchor points in
the outboard positions
of the second row seat.
It is not necessary to
use the vehicle’s seat
belt. The vehicle’s seat
belt, however, MUST be
used to secure a
child restraint system in the middle seating position of the second row seat.WA R N I N G If there is any foreign material in or around the lower anchors, remove it before installing the child restraint sys- tem. Also, make sure the seat belt is awayfrom, not looped through or otherwise interfering with, the child restraint sys- tem. If foreign matter is not removedand/or the seat belt interferes with the child restraint system, the child restraint system will not be secured properly, coulddetach and move forward in the event of sudden braking or an
accident, and could
result in injury to the child or other vehi-cle occupants. When the vehicle is moving, do not adjust the seat where the child restraint system isinstalled.
NOTE
If it is difficult to la
tch the tether strap hook,
turn the hook sideways.WA R N I N G Child restraint system tether anchors are designed only to with
stand loads from cor-
rectly fitted child restraint systems. Underno circumstances are they to be used for adult seat belts, harnesses, for attaching other items, or equipment to the vehicle.
BK0223400US.book 30 ページ 2015年2月13日 金曜日 午後12時15分
Page 63 of 464
Supplemental Restraint System (SRS) - airbag
Seat and restraint systems 4-37
4
The main purpose of an EDR is to record, in certain crash or near
crash-like situations,
such as an airbag deployment or hitting a road obstacle, data that
will assist in under-
standing how a vehicl
e’s systems performed.
The EDR is designed to record data related to vehicle dynamics and safety systems for a short period of time,
typically 30 seconds or
less. The EDR in this vehicle is designed to record such data as: How various systems
in your vehicle were
operating; Whether or not the driver and front pas- senger safety belts we
re buckled/fastened;
How far (if at all) the driver was depress- ing the accelerator and/or brake pedal; and, How fast the vehicle was traveling.
These data can help provide a better under- standing of the circumstances in which crashes and injuries occur.
To read data recorded by an EDR, special equipment is required, and access to the vehi- cle or the EDR is needed. In addition to thevehicle manufacturer, ot
her parties, such as
law enforcement, that have the special equip- ment, can read the information if they haveaccess to the vehicle or the EDR.
N00417900177
The driver’s seat position sensor is attachedto the seat rail and provides the airbag control unit with information on the seat’s fore-aft position. The airbag control unit controlsdeployment of the driver’s front airbag in accordance with the information it receives from this sensor.If there is a problem involving the driver’s seat position sensor, the SRS warning light in
the instrument panel will come on. Refer to “SRS warning light/dis
play” on page 4-39.
N00418001374
The passenger’s seat oc
cupant classification
sensor system is attach
ed to the front passen-
ger seat cushion and provides the airbag con-trol unit with information regarding the occupant on the front passenger seat. The air-
NOTE
EDR data are recorded by your vehicle only if a non-trivial crash si
tuation occurs; no data
are recorded by the EDR under normal driv-ing conditions and no personal data (e.g., name, gender, age, a
nd crash location) are
recorded. However, ot
her parties, such as
law enforcement, could combine the EDR data with the type of
personally identifying
data routinely acquire
d during a crash inves-
tigation.
Driver’s seat position sensor
WA R N I N G If the SRS warning light or warning dis- play comes on, have the vehicle inspected by an authorized Mitsubishi Motors dealer as soon as possible. Please observe the following instructions to ensure that the driver’s seat positionsensor can operate correctly.• Adjust the seat to the correct position,and sit well back
against the seatback.
Refer to “Front seats” on page 4-4.• Do not recline the seatback more thannecessary when driving.• Do not place metallic objects or luggageunder the front seat.
If the vehicle is involved in a severe impact, have the SRS sensors inspected by an authorized
Mitsubishi Motors dealer as
soon as possible.
Passenger’s seat occupant clas- sification sensor system
BK0223400US.book 37 ページ 2015年2月13日 金曜日 午後12時15分
Page 64 of 464
Supplemental Restraint System (SRS) - airbag 4-38 Seat and restraint systems
4
bag control unit controls deployment of the passenger’s front airbag in accordance withthe information it receives from this system. The passenger’s front airbag will not deploy in an impact when the system senses no occu-pant on the front passenger’s seat or a child in a child restraint system. In this case, the pas- senger airbag off indi
cator will come on.
Refer to “Passenger’s ai
rbag off indicator” on
page 4-38. If there is a problem involving the passen- ger’s seat occupant cl
assification sensor sys-
tem, the SRS warning light in the instrumentpanel will come on. Refer to “SRS warning light/display” on page 4-39.
N00418101346
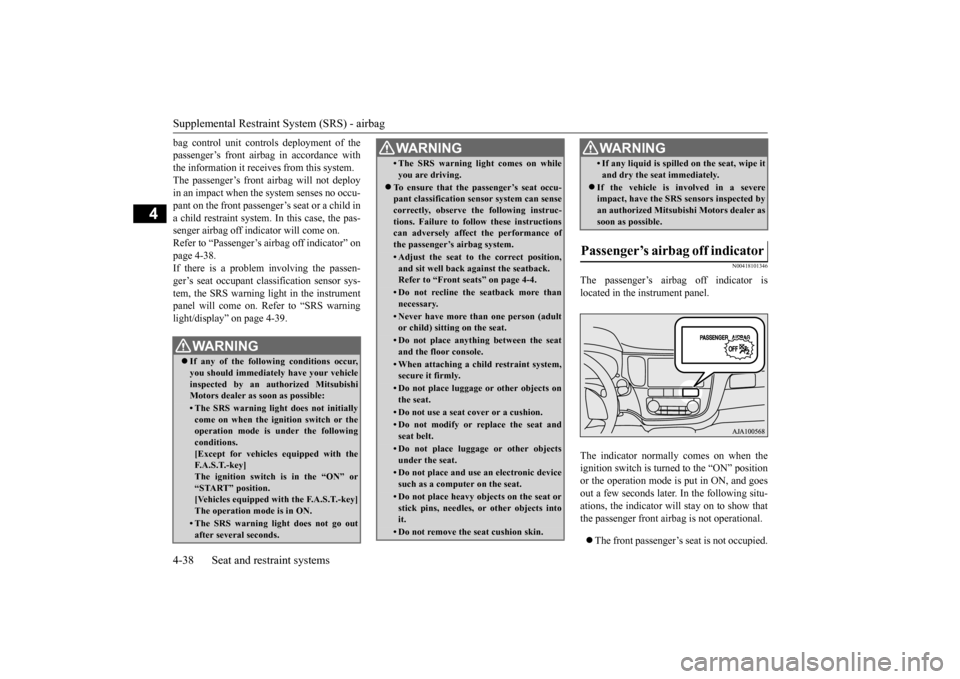
The passenger’s airbag off indicator is located in the instrument panel. The indicator normally comes on when the ignition switch is turned to the “ON” position or the operation mode is put in ON, and goes out a few seconds later.
In the following situ-
ations, the indicator will stay on to show that the passenger front airb
ag is not operational.
The front passenger’s seat is not occupied.
WA R N I N GIf any of the follow
ing conditions occur,
you should immediatel
y have your vehicle
inspected by an au
thorized Mitsubishi
Motors dealer as soon as possible:• The SRS warning light does not initiallycome on when the ignition switch or the operation mode is under the followingconditions. [Except for vehicles equipped with the F. A . S . T. - k e y ]The ignition switch is in the “ON” or “START” position. [Vehicles equipped with the F.A.S.T.-key]The operation mode is in ON.• The SRS warning light does not go outafter several seconds.
• The SRS warning li
ght comes on while
you are driving.
To ensure that the passenger’s seat occu- pant classification sensor system can sense correctly, observe the following instruc-tions. Failure to follow these instructions can adversely affect
the performance of
the passenger’s airbag system.• Adjust the seat to the correct position,and sit well back
against the seatback.
Refer to “Front seats” on page 4-4.• Do not recline the seatback more thannecessary.• Never have more th
an one person (adult
or child) sitting on the seat.• Do not place anything between the seatand the floor console.• When attaching a child restraint system,secure it firmly.• Do not place luggage or other objects onthe seat.• Do not use a seat cover or a cushion.• Do not modify or re
place the seat and
seat belt.• Do not place luggage or other objectsunder the seat.• Do not place and use
an electronic device
such as a computer on the seat.• Do not place heavy obje
cts on the seat or
stick pins, needles, or other objects intoit.• Do not remove the seat cushion skin.WA R N I N G
• If any liquid is spilled on the seat, wipe itand dry the seat immediately.
If the vehicle is involved in a severe impact, have the SRS sensors inspected by an authorized
Mitsubishi Motors dealer as
soon as possible.
Passenger’s airbag off indicator
WA R N I N G
BK0223400US.book 38 ページ 2015年2月13日 金曜日 午後12時15分
Page 72 of 464
Supplemental Restraint System (SRS) - airbag 4-46 Seat and restraint systems
4
N00408201546
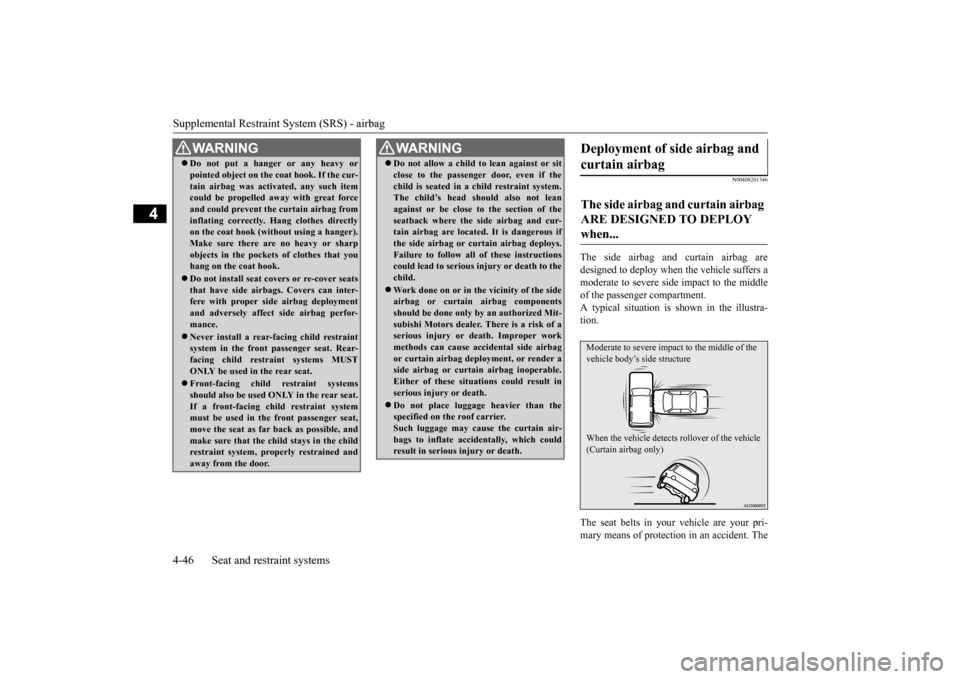
The side airbag and curtain airbag are designed to deploy when the vehicle suffers a moderate to seve
re side impact to the middle
of the passenger compartment.A typical situation is shown in the illustra- tion. The seat belts in your vehicle are your pri- mary means of protection in an accident. The
WA R N I N G Do not put a hanger or any heavy or pointed object on the coat hook. If the cur-tain airbag was activated, any such itemcould be propelled aw
ay with great force
and could prevent th
e curtain airbag from
inflating correctly. Hang clothes directlyon the coat hook (without using a hanger). Make sure there are no heavy or sharp objects in the pocket
s of clothes that you
hang on the coat hook. Do not install seat cove
rs or re-cover seats
that have side airbag
s. Covers can inter-
fere with proper si
de airbag deployment
and adversely affect
side airbag perfor-
mance. Never install a rear-facing child restraint system in the front passenger seat. Rear- facing child restraint systems MUST ONLY be used in the rear seat. Front-facing child restraint systems should also be used ON
LY in the rear seat.
If a front-facing child restraint system must be used in the front passenger seat, move the seat as far back as possible, andmake sure that the child stays in the child restraint system, properly restrained and away from the door.
Do not allow a child to lean against or sit close to the passenger door, even if thechild is seated in a child restraint system.The child’s head should also not lean against or be close to the section of the seatback where the side airbag and cur-tain airbag are located. It is dangerous if the side airbag or cu
rtain airbag deploys.
Failure to follow all of these instructionscould lead to serious in
jury or death to the
child. Work done on or in th
e vicinity of the side
airbag or curtain
airbag components
should be done only
by an authorized Mit-
subishi Motors dealer. There is a risk of a serious injury or death. Improper work methods can cause acci
dental side airbag
or curtain airbag depl
oyment, or render a
side airbag or curtai
n airbag inoperable.
Either of these situations could result inserious injury or death. Do not place luggage
heavier than the
specified on the roof carrier. Such luggage may caus
e the curtain air-
bags to inflate acci
dentally, which could
result in serious injury or death.WA R N I N G
Deployment of side airbag and curtain airbag The side airbag and curtain airbag ARE DESIGNED TO DEPLOY when... Moderate to severe impact to the middle of the vehicle body’s side structure When the vehicle detects rollover of the vehicle (Curtain airbag only)
BK0223400US.book 46 ページ 2015年2月13日 金曜日 午後12時15分
Page 306 of 464
Storage spaces 5-230 Features and controls
5
N00552301046
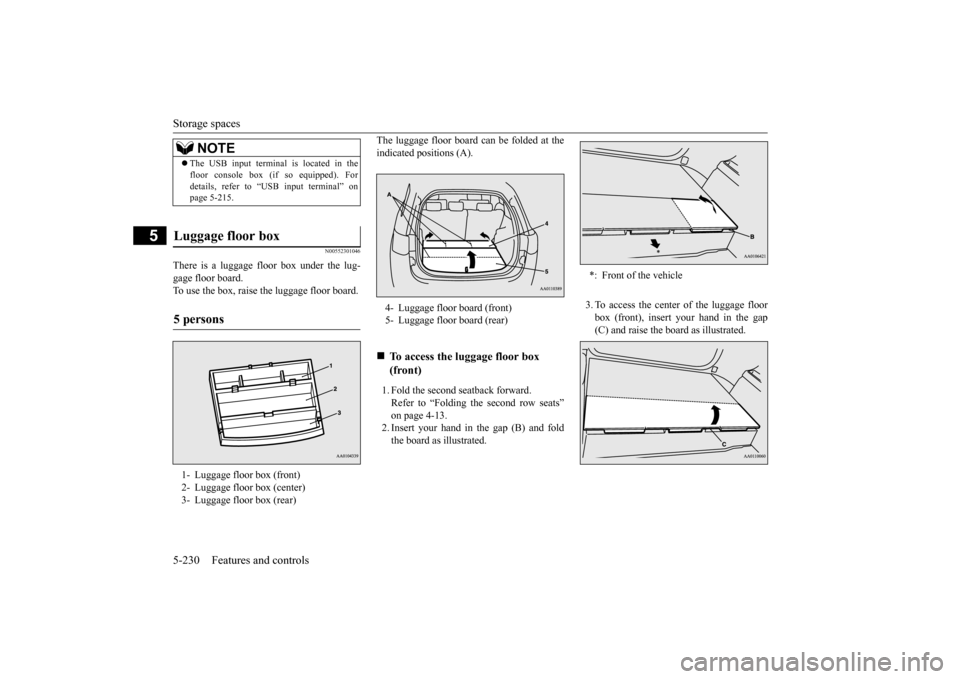
There is a luggage floor box under the lug- gage floor board. To use the box, raise the luggage floor board.
The luggage floor board can be folded at the indicated positions (A). 1. Fold the second seatback forward. Refer to “Folding the second row seats” on page 4-13. 2. Insert your hand in the gap (B) and foldthe board as illustrated.
3. To access the center of the luggage floor box (front), insert your hand in the gap (C) and raise the board as illustrated.
NOTE
The USB input terminal is located in the floor console box (if
so equipped). For
details, refer to “USB input terminal” onpage 5-215.
Luggage floor box 5 persons 1- Luggage floor box (front) 2- Luggage floor box (center) 3- Luggage floor box (rear)
4- Luggage floor board (front)5- Luggage floor board (rear)
To access the lu
ggage floor box
(front)
*: Front of the vehicle
BK0223400US.book 230 ページ 2015年2月13日 金曜日 午後12時15分
Page 310 of 464
Cargo area cover (if so equipped) 5-234 Features and controls
5
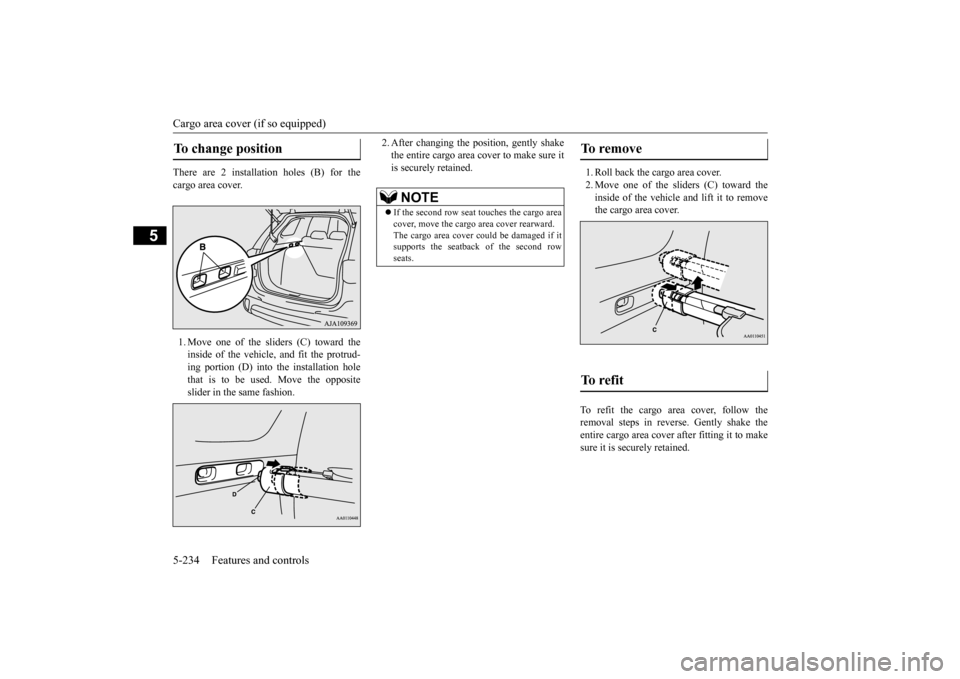
There are 2 installation holes (B) for the cargo area cover. 1. Move one of the sliders (C) toward the inside of the vehicle, and fit the protrud- ing portion (D) into the installation hole that is to be used. Move the oppositeslider in the same fashion.
2. After changing the pos
ition, gently shake
the entire cargo area cover to make sure itis securely retained.
1. Roll back the cargo area cover. 2. Move one of the sliders (C) toward the inside of the vehicle
and lift it to remove
the cargo area cover.
To refit the cargo area cover, follow the removal steps in reverse. Gently shake theentire cargo area cover after fitting it to make sure it is securely retained.
To change position
NOTE
If the second row seat touches the cargo area cover, move the cargo area cover rearward.The cargo area cover c
ould be damaged if it
supports the seatback of the second row seats.
To remove To r e f i t
BK0223400US.book 234 ページ 2015年2月13日 金曜日 午後12時15分
Page 316 of 464
Vehicle preparation before driving 6-4 Driving safety
6
N00629001709
For a safer and more enjoyable trip, always check for the following: Before starting the vehicle, make certain that you and all passengers are seated and wearing their seat
belts properly (with
children in the rear seat, in appropriate restraints), and that all the doors and the liftgate are locked. Move the driver’s seat as far backward as possible, while keep
ing good visibility,
and good control of the steering wheel,brakes, accelerator,
and controls. Check
the instrument panel
indicators and multi-
information display for any possible prob-lem. Similarly, the front
passenger seat should
also be moved as far back as possible. Make sure that infa
nts and small children
are properly restrained in accordance with all laws and regulations.
Check these by selecting the defroster mode, and set the blower swit
ch on high. You should
be able to feel the air blowing against thewindshield. Refer to “Defrosti
ng or defogging (wind-
shield, door windows)” on page 7-13 Check all the tires for heavy tread wear or uneven wear patterns. Look for stones, nails, glass, or other objects
stuck in the tread. Look
for any tread cuts or
sidewall cracks. Check
the wheel nuts for tightness, and the tires (including spare tire) for proper pressure. Replace your tires before they are heavilyworn out. As your vehicle is equi
pped with a tire pres-
sure monitoring system, there is a risk ofdamage to the tire inflation pressure sensors when the tire is replaced on the rim. Tire replacement should, only, be performed by anauthorized Mitsubishi Motors dealer. Have someone watch while you turn all the exterior lights on and off. Also check the turn
signal indicators and hi
gh-beam indicators on
the instrument panel. Check the ground under the vehicle after parking overnight, for
fuel, water, oil, or
other leaks. Make sure
all the fluid levels are
correct. Also, if you
can smell fuel, you need
to find out why imme
diately and have it
fixed.
N00629201134
Even this vehicle’s sa
fety equipment, and
your safest driving, ca
nnot guarantee that you
can avoid an accident or injury. However, ifyou give extra attention to the following areas, you can better protect yourself and your passengers: Drive defensively. Be aware of traffic, road and weather conditions. Leave plenty of stopping distance between your vehicle and the vehicle ahead. Before changing lanes, check your mir- rors, blind spots, and use your turn-signal light. While driving, watch the behavior of other drivers, bicyc
lists, and pedestrians.
Vehicle preparation before driving Seat belts and seats
Defrosters Tires Lights
Fluid leaks Safe driving techniques
BK0223400US.book 4 ページ 2015年2月13日 金曜日 午後12時15分